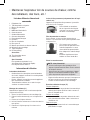
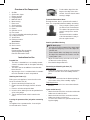
Clatronic BS 1285 Owner's manual
- Category
- Vacuum cleaners
- Type
- Owner's manual
This manual is also suitable for
Page is loading ...

DEUTSCH
Inhalt
Übersicht der Bedienelemente ............................Seite 3
Bedienungsanleitung ........................................... Seite 4
Technische Daten ................................................ Seite 9
Garantie ...............................................................Seite 9
Entsorgung...........................................................Seite 10
NEDERLANDS
Inhoud
Overzicht van de bedieningselementen...........Pagina 3
Gebruiksaanwijzing ..........................................Pagina 11
Technische gegevens ....................................... Pagina 16
Verwijdering ......................................................Pagina 16
FRANÇAIS
Sommaire
Liste des différents éléments de commande ......Page 3
Mode d’emploi .....................................................Page 17
Données techniques ............................................Page 22
Elimination ...........................................................Page 22
ESPAÑOL
Indice
Indicación de los elementos de manejo ..........Página 3
Instrucciones de servicio ..................................Página 23
Datos técnicos ..................................................Página 28
Eliminación ........................................................Página 28
ITALIANO
Indice
Elementi di comando ........................................ Pagina 3
Istruzioni per l’uso ............................................. Pagina 29
Dati tecnici .........................................................Pagina 34
Smaltimento ......................................................Pagina 34
ENGLISH
Contents
Overview of the Components ..............................Page 3
Instruction Manual ...............................................Page 35
Technical Data .................................................... Page 40
Disposal ...............................................................Page 40
JĘZYK POLSKI
Spis treści
Przegląd elementów obłsugi ............................ Strona 3
Instrukcja obsługi .............................................. Strona 41
Dane techniczne ............................................... Strona 46
Warunki gwarancji ............................................ Strona 46
Usuwanie .......................................................... Strona 47
MAGYARUL
Tartalom
A kezelőelemek áttekintése .................................Oldal 3
Használati utasítás ..............................................Oldal 48
Műszaki adatok ....................................................Oldal 53
Hulladékkezelés ...................................................Oldal 53
YKPAÏHCBKA
Зміст
Огляд елементів управління .......................сторінка 3
Інструкція з експлуатації ..............................сторінка 54
Технічні параметри ......................................сторінка 59
РУССКИЙ
Содержание
Обзор деталей прибора ......................................стр. 3
Руководство по эксплуатации ............................стр. 60
Технические данные ...........................................стр. 65
3 ..................................................
70 ........................................................
66 ........................................................
2
Page is loading ...
Page is loading ...
Page is loading ...
Page is loading ...
Page is loading ...
Page is loading ...
Page is loading ...
Page is loading ...
Page is loading ...
Page is loading ...
Page is loading ...
Page is loading ...
Page is loading ...
Page is loading ...
Page is loading ...
Page is loading ...
Page is loading ...
Page is loading ...
Page is loading ...
Page is loading ...
Page is loading ...
Page is loading ...
Page is loading ...
Page is loading ...
Page is loading ...
Page is loading ...
Page is loading ...
Page is loading ...
Page is loading ...
Page is loading ...
Page is loading ...
Page is loading ...

35
Do not use it outdoors. Keep it away from sources of
heat, direct sunlight, humidity (never dip it into any liq-
uid) and sharp edges. Do not use the appliance with
wet hands. If the appliance is humid or wet, unplug it
immediately.
• When cleaning or putting it away, switch off the ap-
pliance and always pull out the plug from the socket
(pull the plug itself, not the lead) if the appliance is not
being used and remove the attached accessories.
• Do not operate the machine without supervision. If
you leave the room you should always turn the device
off. Remove the plug from the socket.
• The device and the mains lead have to be checked
regularly for signs of damage. If damage is found the
device must not be used.
• Use only original spare parts.
• In order to ensure your children’s safety, please keep
all packaging (plastic bags, boxes, polystyrene etc.)
out of their reach.
WARNING!
Caution! Do not allow small children to play with
the foil as there is a danger of suffocation!
• Pay careful attention to the following “Special Safety
Instructions”.
Instruction Manual
Thank you for choosing our product. We hope you enjoy
using the appliance.
Symbols in these Instructions for Use
Important information for your safety is specially marked.
It is essential to comply with these instructions in order to
avoid accidents and prevent damage to the machine:
WARNING:
This warns you of dangers to your health and indicates
possible injury risks.
CAUTION:
This refers to possible hazards to the machine or other
objects.
NOTE:
This highlights tips and information.
General Safety Instructions
Read the operating instructions carefully before putting
the appliance into operation and keep the instructions in-
cluding the warranty, the receipt and, if possible, the box
with the internal packing. If you give this device to other
people, please also pass on the operating instructions.
• The appliance is designed exclusively for private use
and for the envisaged purpose. This appliance is not
t for commercial use.
Special Safety Instructions
WARNING: Danger of Electric Shock!
• The vacuum cleaner should only be used in damp rooms if
for your protection a residual-current-operated circuit breaker
is connected upstream in the electric circuit.
• If you are not sure, ask a qualied electrician for advice.
• If the water-lled device should fall over accidentally, always
remove the plug from the socket rst before uprighting it
again.
• Disconnect the plug from the socket before you clean or ser-
vice the appliance.

36
WARNING:
• Do not use the device in potentially explosive rooms.
• Never use the device to suck up explosive liquids (such as
heating oil, petrol, paint thinner, acetone) or dusts (such as
magnesium or aluminium dusts), combustible gases or un-
diluted solvents and acids - danger of explosion! Turbulence
caused by the suction air could lead to the creation of explo-
sive vapours or mixtures. These substances might attack the
parts and materials used.
• Do not try to repair the appliance on your own. Always con-
tact an authorized technician. To avoid the exposure to dan-
ger, always have a faulty cable be replaced only by the man-
ufacturer, by our customer service or by a qualied person
and with a cable of the same type.
• This appliance can be used by children aged from 8 years
and above and persons with reduced physical, sensory or
mental capabilities or lack of experience and knowledge if
they have been given supervision or instruction concerning
use of the appliance in a safe way and understand the haz-
ards involved.
• Children shall not play with the appliance.
• Cleaning and user maintenance shall not be made by
children without supervision.
• Do not suck up hot ashes or pointed or sharp objects!
• Keep hair, clothing and body parts away from the vacuum noz-
zle during use!
• Keeps the vacuum cleaner away from sources of heat such as
radiators, stoves etc.!

37
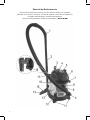
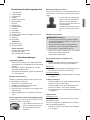
Overview of the Components
1 Air Slide
2 Suction tube, 2-part.
3 Exhaust opening
4 Carrying handle
5 I/O On/off switch
6 Motor housing
7 Power cord
8 Suction opening
9 Hose connection
11 Castors
13 Collection vessel
14 Floor nozzle
15 Lever for extending and retracting the brush
16 Locking mechanism
17 Vacuum hose
18 Parking assistance
Accessories:
10 Brush nozzle
12 Crevice nozzle
Not shown
Permanent lter (Dry vacuuming)
Sealing ring (Wet vacuuming)
Protective lter made of foam
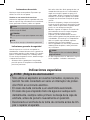
Instructions for Use
Intended Use
• The device is intended for use as a wet/dry vacuum
cleaner in accordance with its description and safety
instructions.
• The device also has an additional connection with
blower function.
• Any other type of use is considered to be in contradic-
tion of the intended use and is not permitted.
Attaching the Castors (11)
Before you use the appliance, fasten the rollers to the
foot of the collection unit (13).
1. Open the two locking mechanisms (16).
2. Remove the motor housing (6) from the collection
unit.
3. Place the collection unit upside down.
4. Insert the rollers with the pins into the provided holes
as far as they will go.
5. Turn the unit back round so that it stands on the
rollers.
Inserting the permanent filter (only when vacuuming
dry)
The appliance has a permanent lter. It can easily be
inserted and can be cleaned.
• Put the rubber edge of the dust
bag over the edge of the collec-
tion unit. It ensures that the motor
housing is airtight.
Protective filter made of foam
Beneath the motor, there is a protective lter made of
foam. This is required for both wet and dry vacuuming.
• If not yet in place, put the protec-
tive lter over the suction basket.
The rubber of the protective lter
must t securely on the suction
basket.
• You should check the condition
of the lter and that it is rmly in
place at regular intervals.
Attaching the Motor Housing
NOTE: Sealing ring
• If you do not use the permanent lter, always attach
the supplied sealing ring. Fit it over the edge of the
collection unit.
• Ensure that this rubber seal always sits correctly on
the edge of the container. If this is not the case the
suction power is lost.
• Adjust the motor housing so that the on/ off switch
sits above the suction opening.
• Close both locking mechanisms.
Connecting and detaching the hose (17)
Suction function
• Put the hose connection (9) into the suction opening
(8) on the collection unit. It must audibly click into
place.
Blowing function
• Put the hose connection into the blower opening (3)
on the motor casing. It has to audibly engage.
Detaching the hose
• Press the button on the hose connection to detach
the hose.
2-part suction hose (2)
• Attach the thicker end of the suction hose without the
holder onto the end of the hose.
• Attach the thicker end of the suction hose with the
holder onto the other suction hose.
• To release the suction hoses, pull them off while turn-
ing them slightly.

38
Nozzle Attachment
Floor nozzle (14)
The floor nozzle is equipped with rollers for easier guid-
ance.
You may use the floor nozzle to clean smooth surfaces
and dry or wet carpets.
• Use the lever (15) to set the brushes outwards or
inwards.
Best use is determined by the texture of the floor. We
recommend the following usage:
•
Use without brushes:
- To vacuum dry carpeted floors (deep pile);
- To clean wet, smooth floors.
NOTE:
• This setting is also well suited to vacuuming up
water from larger areas.
• Check the maximum ll capacity of the collection
unit. 10 litres of liquid without foaming additive!
•
Use with brushes:
- To vacuum dry, smooth floors and dry carpeted
floors (shallow pile);
- To clean (scrub) wet, smooth floors and wet car-
peted floors (shallow pile).
Crevice nozzle (12)
For vacuuming in corners and crevices, etc.
Brush nozzle (10)
For cleaning upholstery or curtains.
• To remove the nozzle attachments from the suction
hose, pull them off while turning them slightly.
• To store the nozzles, use the holders on the vacuum
above the rollers.
Air Slide (1)
Open the air slide on the hose handle in order to regulate
the airflow or to clear any particles sticking to the nozzle.
Mains Lead (7)
• Completely unwind the cable during operation.
• After use, allow the motor housing to cool down. You
may then wrap the cable around the motor housing
and may fasten it with the cable clamp.
Turning on/ off
Turn the appliance on (I) and off (O) with the On/ Off
switch (5).
Parking Position
A holder is tted on the lower part of the suction hose.
• Attach the suction hose with the holder to the parking
attachment (18) on the motor housing.
• Is the suction hose too long? Separate the two parts
of the suction hose and attach the upper part of the
suction hose to the holder on the lower part of the
suction hose.
Operation
Preparation
1. Select the desired accessory.
2. Unwind the lead completely.
3. Check if the mains voltage that you want to use
matches the information on the rating plate.
CAUTION:
Take note of the range limited by the length of the
cable!
Dry Vacuuming
1. Place the permanent lter into the collection unit.
2. Attach the motor housing.
3. Close the locking mechanisms.
4. Assemble the accessory.
5. Connect the mains plug to a properly installed
earthed socket.
6. Turn the device on.
7. Vacuum at a steady speed. There is no need to exert
pressure.
Wet Vacuuming
CAUTION:
• Do not use the appliance to vacuum foaming
cleaning agents!
• Always remove the permanent lter when vacuum-
ing liquids. Insert the sealing ring instead.
• Check that the protective lter ts properly.
• Before the cleaner is used again for dry vacuuming,
all components must be dry.
1. Disconnect the mains plug from the socket.
2. Remove the permanent lter.
3.
Fit the sealing ring over the edge of the collection unit.
4. Attach the motor housing.
5. Close the locking mechanisms.
6. Assemble the accessory.
7. Connect the mains plug to a properly installed
earthed socket.
8. Turn the device on.

39
CAUTION:
Immediately switch off the appliance in the following
situations:
• During foaming
• If liquid escapes
• When the unit is full.
• When the unit falls over.
NOTE:
• The collection unit can hold max. 10 litres of liquid
(without foaming).
• If foam should form in the collection unit, then the
maximum capacity is only 1.5 litres!
• When the vessel is full the float valve closes the
suction aperture and the motor runs at a higher
speed. Switch the device off immediately and
empty it.
Emptying the permanent filter and collection unit
1. Turn the device off with the on/off switch. Pull the plug
out of the socket.
2. Open the locking mechanisms. Remove the motor
housing.
3. Remove the permanent lter, if applicable. Shake it
out.
4. Remove the suction hose.
5. Empty the collection vessel.
6. Put the permanent lter back into the collection unit if
necessary.
7. Reassemble the hose connection and the motor
housing.
8. Close the locking mechanisms.
9. You can now use the vacuum cleaner again.
Cleaning and storage
WARNING:
• Always remove the plug before cleaning.
• Under no circumstances should you immerse the
motor housing in water in order to clean it. Other-
wise this might result in an electric shock or re.
CAUTION:
• Do not use a wire brush or any abrasive items.
• Do not use any acidic or abrasive detergents.
Collection Vessel
• Rinse out the collection vessel after use with clean
water.
• Any dirt in the vessel can be removed with a sponge
or nylon brush.
Permanent filter and protective filter made of foam
Clean the protective lter made of foam after every third
or fth emptying.
• Take off the motor housing and remove the lter.
• Quick cleaning: Tap out or brush out the lters to
loosen any residues.
• Hand wash: If soiling is more severe we recommend
a hand wash up to 40°C.
NOTE:
• Always allow the lters to dry in the open air!
• Always resume operation with dry lters!
Housing
WARNING:
Do not immerse the motor in water!
• The housing can be wiped off with a slightly damp
cloth.
• Dry off all parts after cleaning with a dry cloth.
Storage
• Clean the appliance as described and allow it to dry.
•
We recommend that you keep the appliance in the
original packaging if it will not be used for long periods.
• Always store the appliance out of the reach of chil-
dren in a dry, well ventilated place.
Troubleshooting
• Thedevicedoesnotwork.
Remedy:
Check the mains connection.
Check the position of the switch.
• Thedevicedoesnotsuckanythingup.
Possible Cause:
The collection unit is full.
Remedy:
Empty the collection unit.
Possible Cause:
The sealing ring between the motor housing and the
collection unit is missing.
Remedy:
Check the seal.
Possible Cause:
There is a foreign body in the suction hose or nozzle.
Remedy:
Check the accessories for foreign bodies.
Possible Cause:
The appliance has fallen over.

40
Remedy:
1. Switch off the appliance.
2. Wait until the motor comes to a complete stop
3. Restart operation.
• Theapplianceswitchesoffduringoperation.
Possible Cause:
The appliance is tted with a thermal cut-out which
automatically switches off the appliance in the event
of overheating.
Remedy:
Allow the appliance to cool for approx. 15 minutes
before using it again.
Noise development
The sound pressure level in the ear of an operator (LpA)
was measured according to DIN EN ISO 3744.
Sound pressure level detected: 82.0 dB(A) (no limit)
Technical Data
Model: ................................................................... BS 1285
Power supply:.................................. 220-240 V~, 50/60 Hz
Power consumption:
P
nom.
: ........................................................ 1200-1400 W
P
max.
: ..................................................................1600 W
Protection class:................................................................ II
Container volume: .....................................approx. 20 Litre
Capacity for wet vacuuming: ..................... approx. 10 Litre
Capacity with the permanent lter: .............. approx. 6 Litre
Net weight: ................................................... approx. 5.8 kg
The right to make technical and design modications in
the course of continuous product development remains
reserved.
This device has been tested according to all relevant cur-
rent CE guidelines, such as electromagnetic compatibility
and low voltage directives, and has been constructed in
accordance with the latest safety regulations
Disposal
Meaning of the “Dustbin” Symbol
Protect our environment: do not dispose of electrical
equipment in the domestic waste.
Please return any electrical equipment that you will no
longer use to the collection points provided for their
disposal.
This helps avoid the potential effects of incorrect disposal
on the environment and human health.
This will contribute to the recycling and other forms of
reutilisation of electrical and electronic equipment.
Information concerning where the equipment can be
disposed of can be obtained from your local authority.
Page is loading ...
Page is loading ...
Page is loading ...
Page is loading ...
Page is loading ...
Page is loading ...
Page is loading ...
Page is loading ...
Page is loading ...
Page is loading ...
Page is loading ...
Page is loading ...
Page is loading ...
Page is loading ...
Page is loading ...
Page is loading ...
Page is loading ...
Page is loading ...
Page is loading ...
Page is loading ...
Page is loading ...
Page is loading ...
Page is loading ...
Page is loading ...
Page is loading ...
Page is loading ...
Page is loading ...
Page is loading ...
Page is loading ...
Page is loading ...
Page is loading ...
Page is loading ...
Page is loading ...
Page is loading ...
-
 1
1
-
 2
2
-
 3
3
-
 4
4
-
 5
5
-
 6
6
-
 7
7
-
 8
8
-
 9
9
-
 10
10
-
 11
11
-
 12
12
-
 13
13
-
 14
14
-
 15
15
-
 16
16
-
 17
17
-
 18
18
-
 19
19
-
 20
20
-
 21
21
-
 22
22
-
 23
23
-
 24
24
-
 25
25
-
 26
26
-
 27
27
-
 28
28
-
 29
29
-
 30
30
-
 31
31
-
 32
32
-
 33
33
-
 34
34
-
 35
35
-
 36
36
-
 37
37
-
 38
38
-
 39
39
-
 40
40
-
 41
41
-
 42
42
-
 43
43
-
 44
44
-
 45
45
-
 46
46
-
 47
47
-
 48
48
-
 49
49
-
 50
50
-
 51
51
-
 52
52
-
 53
53
-
 54
54
-
 55
55
-
 56
56
-
 57
57
-
 58
58
-
 59
59
-
 60
60
-
 61
61
-
 62
62
-
 63
63
-
 64
64
-
 65
65
-
 66
66
-
 67
67
-
 68
68
-
 69
69
-
 70
70
-
 71
71
-
 72
72
-
 73
73
-
 74
74


Clatronic BS 1285 Owner's manual
- Category
- Vacuum cleaners
- Type
- Owner's manual
- This manual is also suitable for
Ask a question and I''ll find the answer in the document
Finding information in a document is now easier with AI
in other languages
- italiano: Clatronic BS 1285 Manuale del proprietario
- français: Clatronic BS 1285 Le manuel du propriétaire
- español: Clatronic BS 1285 El manual del propietario
- Deutsch: Clatronic BS 1285 Bedienungsanleitung
- русский: Clatronic BS 1285 Инструкция по применению
- Nederlands: Clatronic BS 1285 de handleiding
- polski: Clatronic BS 1285 Instrukcja obsługi
Related papers
-
Clatronic WK 3564 User manual
-
Clatronic WK 3445 User manual
-
BOMANN BS 1714 A CB Owner's manual
-
Clatronic aks 826 Owner's manual
-
Clatronic KH 3433 N User manual
-
CIATRONIC BS 1292 User manual
-
-
Clatronic BS 1306 N User manual
-
-
Other documents
-
BOMANN HAS 8101 CB Operating instructions
-
BOMANN AKS 713 CB Operating instructions
-
ProfiCare PC-AKS 3034 User manual
-
Parkside PNTS 1400 B1 - IAN 74286 Owner's manual
-
-
Rowenta BULLY Owner's manual
-
Parkside PNTS 1300 B2 Owner's manual
-
-
Worx WG500E User manual
-
Parkside PNTS 1300 D3 Translation Of The Original Instructions