Page is loading ...

0904-M055-O1 Rev B 03/06
Assembly Instructions for Detecto SPBT-1728,
Stainless Steel Portable Baby Scale Table
Thank you for purchasing our Detecto Stainless Steel Portable Baby Scale Table. The
following instructions will guide you through assembly of your table.
WARNING – This product is not intended for use in transporting patients!
It is to be used ONLY for weighing purposes. Failure to observe this
warning may result in serious injury to the patient and/or the operator.
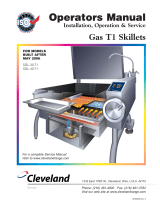
PARTS LIST
Note that the item numbers in the instructions are the same as the parts list numbers.
ITEM NO. QTY PART NUMBER DESCRIPTION
1 1 0904-D051-08 TABLE TOP
2 1 0904-D052-08 SHELF
3 4 0904-C053-0A LEG ASSEMBLY
4 2 6540-1211 CASTER, SWIVEL W/BRAKE
5 16 6007-4100 CARRIAGE HEAD BOLT
6 16 6013-0421 1/4-20 S.S. ACORN NUT
7 2 6540-1210 CASTER, SWIVEL
8 2 0046-B268-08 WARNING LABEL FOR TRANSPORT
9 4 6013-0020 NUT, 3/8”-16 ELASTIC STYLE, S.S.
TOOLS NEEDED
7/16" open end, box end, or combination wrench
End
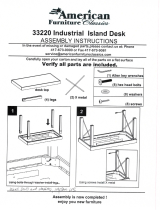
V
iew Side View
27.9”
16.9”
33.3”

203 E. Daugherty, Webb City, MO 64870
Ph: 417-673-4631 or 1-800-641-2008 Fax: 417-673-2153
Technical Support: Ph: 866-254-8261 tech@cardet.com
IMPORTANT!
Please read through instructions carefully before starting to assemble. Remove all
parts and hardware from carton. Only finger-tighten bolts and nuts until entire
assembly is completed.
ASSEMBLY
1. Remove all packing material and contents of the carton.
2. Peel the protective plastic back on each item far enough to expose the bolt holes. In order
to protect the finish of the table, it is recommended to leave the remainder of the protective
plastic on, until the table is completely assembled.
3. Referring to the Side View, place two LEG ASSEMBLY
on a flat level surface, such as
a table or bench.
4. Next place SHELF on the inside of LEG ASSEMBLY and position at the desired
height (one of the three holes).
5. Align hole in SHELF with hole in one LEG ASSEMBLY. With bolt head on outside
and nut on inside, insert CARRIAGE HEAD BOLT
through side holes and secure with
1/4-20 S.S. ACORN NUT
. Finger-tighten only! Repeat for other LEG ASSEMBLY .
6. Now place TABLE TOP
on the inside of LEG ASSEMBLY .
7. Align hole in TABLE TOP
with hole in one LEG ASSEMBLY . With bolt head on
outside and nut on inside, insert CARRIAGE HEAD BOLT
through side holes and
secure with 1/4-20 S.S. ACORN NUT
. Finger-tighten only! Repeat for other LEG
ASSEMBLY
.
8. Place remaining two LEG ASSEMBLY
on each end of SHELF and TABLE TOP .
9. Align hole in SHELF
with hole in one LEG ASSEMBLY . With bolt head on outside
and nut on inside, insert CARRIAGE HEAD BOLT
through side holes and secure with
1/4-20 S.S. ACORN NUT
. Finger-tighten only! Repeat for other LEG ASSEMBLY .
10. Align hole in TABLE TOP
with hole in one LEG ASSEMBLY . With bolt head on
outside and nut on inside, insert CARRIAGE HEAD BOLT
through side holes and
secure with 1/4-20 S.S. ACORN NUT
. Finger-tighten only! Repeat for other LEG
ASSEMBLY
.
11. Referring to the End View, rotate the table on its end.
12. With bolt head on outside and nut on inside, insert CARRIAGE HEAD BOLT
through
the four remaining holes in SHELF
and secure with 1/4-20 S.S. ACORN NUT .
Finger-tighten only!
13. With bolt head on outside and nut on inside, insert CARRIAGE HEAD BOLT through
the four remaining holes in TABLE TOP
and secure with 1/4-20 S.S. ACORN NUT .
Finger-tighten only!
14. Using the 7/16" wrench, tighten each 1/4-20 S.S. ACORN NUT
securely.
15. Remove the remainder of the protective plastic on the table before using.
/