
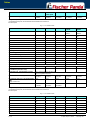
Panda_6500-10000_PMS_eng.R04 9.12.14
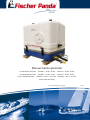
Manual marine generator
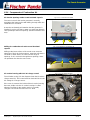
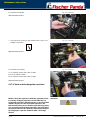
Panda 6500/7 mini PMS 230/400 V - 50 Hz - 6 kVA 120/240 V - 60 Hz - 6 kVA
Panda 8000/8 mini PMS 230/400 V - 50 Hz - 8 kVA 120/240 V - 60 Hz - 8 kVA
Panda 10000/9mini PMS 230/400 V - 50 Hz - 10,5 kVA 120/240 V - 60 Hz - 8,7 kVA
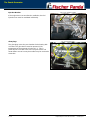
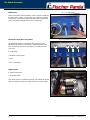
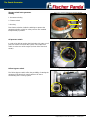
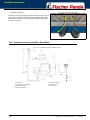
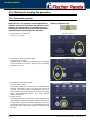
Super silent technology

FischerPandaGmbH
Otto‐Hahn‐Str.40
D‐33104Paderborn
Germany
Tel.
Fax.
Hotline
Email
Web
:
:
:
:
:
+49(0)52549202‐0
+49(0)52549202‐550
+49(0)52549202‐767
www.fischerpanda.de
Current Revision Status
Erstellt durch / created by
Fischer Panda GmbH - Leiter Technische Dokumentation
Otto-Hahn-Str. 32-34
33104 Paderborn - Germany
Tel.: +49 (0) 5254-9202-0
email: info@fischerpanda.de
web: www.fischerpanda.de
Copyright
Duplication and change of the manual is permitted only in consultation with the manufacturer!
Fischer Panda GmbH, 33104 Paderborn, reserves all rights regarding text and graphics. Details are given to the
best of our knowledge. No liability is accepted for correctness. Technical modifications for improving the product
without previous notice may be undertaken without notice. Before installation, it must be ensured that the pictures,
diagrams and related material are applicable to the genset supplied. Enquiries must be made in case of doubt.
Document
Actual: Panda_6500-10000_PMS_eng.R04_9.12.14
Replaces: Panda_6500-10000_PMS_eng.R03
Revision Page
7 mini +8 mini eingefügt
Jahresupdate R04

9.12.14 Inhalt/Contens Seite/Page 3
Inhalt / Contens
Current Revision Status2
3 General Instructions and Regulations12
3.1 Safety first! 12
3.2 Tools 16
3.3 Manufacturer declaration in accordance with the Machinery Directive 2006/42/EC 18
3.4 Customer registration and guarantee 18
3.4.1 Technical support 18
3.4.2 Caution, important information for start-up! 18
3.5 Safety Instructions - Safety First! 19
3.5.1 Safe operation 19
3.5.2 Observe safety instructions! 19
3.5.3 Personal protective clothing (PPE) 19
3.5.4 Cleanliness ensures safety 19
3.5.5 Safe handling of fuels and lubricants 20
3.5.6 Exhaust fumes and fire protection 20
3.5.7 Safety precautions against burns and battery explosions 21
3.5.8 Protect your hands and body from rotating parts! 21
3.5.9 Anti-freeze and disposal of fluids 21
3.5.10 Implementation of safety inspections and maintenance 22
3.6 Warning and instruction signs 22
3.6.1 Special instructions and hazards of generators 22
3.6.1.1 Protective conductor and potential equalisation:23
3.6.1.2 Protective conductor for Panda AC generators: 23
3.6.1.3 Switch off all loads while working on the generator 23
3.6.1.4 Potential equalisation for Panda AGT DC generators 23
3.6.1.5 Safety instructions concerning cables24
3.6.2 Recommended starter battery sizes 24
3.6.3 Important instructions for batteries - starter and/or traction batteries 24
3.6.4 General safety instructions for handling batteries 25
4 In case of Emergency First Aid / Im Notfall - Erste Hilfe27
4.1 WHEN AN ADULT STOPS BREATHING 28
5 Basics29
5.1 Intended use of the machine 29
5.1.1 Purpose of the manual and description of the definitions trained person/operator/
user 29
5.1.1.1 Trained persons 29
5.1.2 Operator 29
5.1.2.1 User 29
5.2 Panda Transport Box 30
5.2.1 Bolted Fischer Panda Transport Box 30
5.2.2 Fischer Panda Transport Box with metal tab closure 30
5.3 Transport and Loading/Unloading 30
5.3.1 Transporting the generator 30
5.3.2 Loading/unloading of the generator 30
5.4 Scope of delivery 31
5.4.1 Asynchronous Generator: 31
5.4.2 Opening the MPL sound insulation capsule 33
5.4.3 Opening the GFK sound insulation capsule 34

Seite/Page 4 Inhalt/Contens 9.12.14
Inhalt / Contens
5.5 Special maintenance notes and arrangements at long periods of stand still time or shut-
down 34
5.5.1 Reference note for the starter battery at a long-term standstill 34
5.5.2 Arrangements at a short-term standstill 35
5.5.3 Arrangements at a medium-term standstill / winter storage 35
5.5.3.1 Arrangements for conservation: 35
5.5.3.2 Arrangements for deconservation after a medium-term standstill (3 to 6
months). 36
5.5.4 Arrangements at a long-term standstill / shutdown 36
5.5.4.1 Arrangements for conservation: 36
5.5.4.2 Arrangements after a long-term standstill (shutdown) / recommissioning
(more than 6 months): 37
6 The Panda Generator39
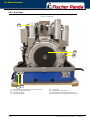
6.1 Type plate at the Generator 39
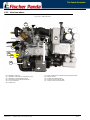
6.2 Description of the Generator 40
6.2.1 Right Side View 40
6.2.2 Left Side View 41
6.2.3 Font View 42
6.2.4 Back View 43
6.2.5 View from above 44
6.3 Details of functional units 45
6.3.1 Components of the Cooling System (Raw Water) 45
6.3.2 Components of the Cooling System (Fresh Water) 46
6.3.3 Components of Fuel System 50
6.3.4 Components of Combustion Air 52
6.3.5 Components of the Electrical System 54
6.3.6 The Operation Surveillance System 58
6.3.7 Components of the Oil Circuit 60
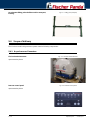
6.4 Remote Control Panel - see separate Control Panel Manual 61
6.4.1 Starting the Generator - see separate Control Panel Manual 61
6.4.2 Stopping the Generator - see separate Control Panel Manual 61
7 Installation Instructions63
7.1 Personal requirements 63
7.1.1 Hazard notes for the installation 63
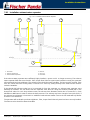
7.2 Preparing the base - Placement 64
7.2.1 Advice for optimal sound insulation 65
7.3 Generator Connections 65
7.4 Installation of the cooling system - raw water 65
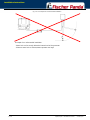
7.4.1 General Information 65
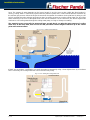
7.4.2 Installation of the through hull fitting in Yachts 65
7.4.3 Quality of the Raw Water Sucking In Line 66
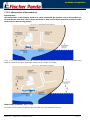
7.4.4 Generator Installation above Waterline 67
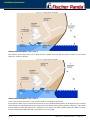
7.4.5 Generator Installation below Water-Line 68
7.4.6 Generator Housing cooled by Raw Water 69
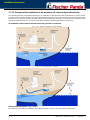
7.4.7 Indirect Cooling of the Genset Housing (by the Heat Exchanger) 70
7.5 Installation of the cooling system - fresh water 70
7.5.1 Position of the external cooling water expansion tank 70
7.5.2 Ventilating at the first filling of the Internal Cooling Water Circuit 71
7.5.3 Pressure Test for Controlling the Cooling Water Circuit 72

9.12.14 Inhalt/Contens Seite/Page 5
Inhalt / Contens
7.5.4 Scheme for Freshwater Circuit at Two Circuit Cooling System 73
7.6 Installation of the water cooled exhaust system 74
7.6.1 Installation of the standard exhaust system 74
7.7 .Installation of the waterlock 75
7.7.1 Possible cause for water in the exhaust hose 75
7.7.1.1 Possible cause: exhaust hose 75
7.7.1.2 Possible cause: cooling water hose 75
7.7.2 Installation area of the waterlock 76
7.7.3 The volume of the waterlock 76
7.7.3.1 Ideal position of the waterlock78
7.7.3.2 Example of the installation of the waterlock off-center and possible ef-
fects: 81
7.8 Exhaust / water separator 84
7.8.1 Installation exhaust water separator 86
7.9 Installation of the fuel system 88
7.9.1 General references 88
7.9.2 The Electrical Fuel Pump 89
7.9.3 Connection of the fuel lines at the tank 89
7.9.4 Position of the pre-filter with water separator 90
7.9.5 Ventilating air from the fuel system 90
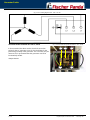
7.10 Generator DC system installation 91
7.10.1 Connection of the starter battery block 91
7.10.2 Connection of the remote control panel - see separate control panel manual 94
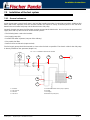
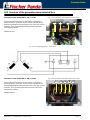
7.11 Generator AC System Installation 95
7.11.1 Installation with looped in AC-Control box 95
7.11.2 Installation AC-Box / distribution panel separate connected 96
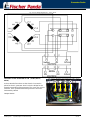
7.11.3 AC-Control Box with VCS and ASB - not all models 98
7.11.4 VCS voltage control 99
7.11.4.1 Alternative Mini VCS100
7.11.5 Installation with mini VCS mounted at the generator 101
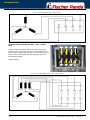
7.11.6 Jump start at high starting current (Booster) 101
7.11.7 Insulation test 102
8 Generator operation instruction103
8.1 Personal requirements 103
8.2 Hazard notes for the operation 103
8.3 General operating instruction 103
8.3.1 Operation at low temperatures 103
8.3.1.1 Pre-heating the diesel motor 104
8.3.1.2 Tips regarding starter battery 104
8.3.2 Light load operation and engine idle 104
8.3.2.1 The soot of the generator is due to the fact that: 104
8.3.2.2 To prevent the soot of the generator following steps should be obser-
ved: 104
8.3.3 Generator load for a longer period and overload 104
8.3.4 Protection conductor: 105
8.3.5 Operating control system on the Fischer Panda generator 105
8.4 Instructions for capacitors - not present at all models 105
8.5 Checks before start - see remote control panel data sheet 105
8.6 Starting the generator - see remote control panel data sheet 106

Seite/Page 6 Inhalt/Contens 9.12.14
Inhalt / Contens
8.7 Stopping the generator - see remote control panel data sheet 106
9 Maintenance Instructions107
9.1 Personal requirements 107
9.2 Hazard notes for the maintenance 107
9.3 Environmental protection 109
9.4 Maintenance interval 109
9.5 General maintenance instructions 109
9.5.1 Checks before each start 109
9.5.2 Check of Hoses and rubber parts in the sound insulated capsule 109
9.6 Oil Change Intervals 110
9.7 Checking oil-level 110
9.7.1 Refilling Oil 111
9.7.2 After the oil level check and refilling the oil 111
9.8 Replacement of engine oil and engine oil filter 112
9.8.1 After the oil change 114
9.9 Verifying the starter battery and (if necessary) the battery bank 115
9.9.1 Battery 115
9.9.1.1 Check battery and cable connections 115
9.9.1.2 Check electrolyte level 115
9.9.1.3 Check electrolyte density 116
9.10 Grease lubricated generator backend bearing 116
9.10.1 Exchange of grease lubricated bearing 117
9.10.1.1 Demounting the cooling disc (if existent) 118
9.10.1.2 Demounting the backend bearing 118
9.10.1.3 Installing the new backend bearing 119
9.11 Checking the oil level of the generator end bearing at Fischer Panda generators 122
9.11.1 Oil level check 123
9.11.2 Refilling oil 123
9.11.3 Refiller-Set 124
9.11.4 Screw plug 124
9.12 Replacement of the oil-cooled backend bearing 125
9.12.1 Exchange oil-cooled bearing 125
9.12.2 Demounting the bearing 125
9.13 Ventilating the fuel system 137
9.13.1 Replacement of the fuel filter 138
9.13.1.1 Optional fuel filter with sight glass 139
9.14 Checking the water separator in the fuel supply 140
9.14.1 Replace the air filter mat 140
9.14.2 Alternative replacement of the air filter mat with pull out holder 141
9.14.3 Alternative replacement of the air filter at housing with snap fasteners 143
9.14.4 Ventilation of the coolant circuit / freshwater 144
9.14.5 V-belt replacement for the internal cooling water pump 146
9.15 The raw water circuit 147
9.15.1 Clean raw water filter 147
9.16 Causes with frequent impeller waste 148
9.16.1 Replacement of the impeller 149
9.17 Replacing the Actuator 151

9.12.14 Inhalt/Contens Seite/Page 7
Inhalt / Contens
9.17.1 Check and discharge the capacitors 153
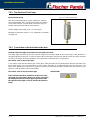
9.18 Replacing the Electric Starter 156
9.19 Replacing the DC/DC Converter 159
9.20 Replacing the DC Alternator 160
9.21 Replacing the Oil Pressure Switch 164
9.21.1 Replacing the oil pressure sensor (optional component) 165
9.22 Replacing the Operating Current Relays 166
9.23 Replacing the fuses 167
9.24 Replacing a Thermoswitch 168
9.25 Replacing the Injection Nozzles 170
9.26 Checking the Flame Glow Plug (optional unit) 173
9.26.1 Replacing the Flame Glow Plug 174
9.27 Replacing the Stop Solenoid (Energize to stop) 175
9.28 Replacing the Glow Plugs 179
10 Generator Faults181
10.1 Personal requirements 181
10.2 Hazard notes for the troubleshooting 181
10.3 Tools and Measuring Instruments 183
10.4 Troubleshooting Table and Flowchart 184
10.4.1 Generator output voltage too low 184
10.4.2 Generator voltage too high (more than 240 V - 50 Hz 184
10.4.3 Generator voltage fluctuates 184
10.4.4 Generator not able to start electric motor 184
10.4.5 Diesel motor fails to start 184
10.4.6 Starter is turning motor, but fails to start 184
10.4.7 Motor does not achieve enough speed during starting process 186
10.4.8 Motor runs unsteady 186
10.4.9 Motor speed drops 186
10.4.10 Motor runs in off position 186
10.4.11 Motor stops by itself 186
10.4.12 Sooty, black exhaust 187
10.4.13 Generator must be shut off immediately if: 187
10.4.14 Troubleshooting for the VCS-Voltage Control 187
10.4.15 Troubleshooting Flowcharts 188
10.4.15.1Details and explanations concerning the troubleshooting flowchart 190
10.5 Versions of the generator power terminal box 194
10.6 Overloading the generator 198
10.6.1 Monitoring the Generator Voltage 199
10.6.2 Automatic voltage monitoring and auto-shut down 199
10.7 Generator-Output Voltage is too low 200
10.7.1 Discharging the Capacitors 200
10.7.2 Checking the Capacitors 201
10.7.2.1 Checking the electrical connections to the capacitors 201
10.7.3 Check the Generator Voltage 201
10.7.4 Measuring the Ohm Resistance of the Generator Windings 202
10.7.5 Check the Windings for Short circuit 202

Seite/Page 8 Inhalt/Contens 9.12.14
Inhalt / Contens
10.7.6 Measuring the Inductive Resistance 203
10.8 Generator provides no voltage 203
10.8.1 Rotor Magnetism Loss and „Re-magnetising“ 203
10.9 Engine Starting Problems 204
10.9.1 Electric Fuel Solenoid Valve 204
10.9.2 Re-start with Failure Bypass Switch 204
10.9.3 Lifting solenoid for motor stop - optional 205
10.9.4 Troubleshooting Table 206
11 Tables207
11.1 Technical Data 207
11.2 Rated current 212
11.3 Cable cross section 212
11.4 Fuel 213
11.5 Engine oil 213
11.5.1 Engine oil classification 213
11.5.1.1 Operating range: 213
11.5.1.2 Quality of oil: 213
11.6 Coolant specifications 214
11.6.1 Coolant mixture ratio 214
11.7 Types of coil 215
11.7.1 HP1 - 230V / 50 Hz 215
11.7.2 HP2 - 120V / 60 Hz 215
11.7.3 HP2 - 120V / 60 Hz - Duo 216
11.7.4 HP3 - 400V / 50 Hz 216
11.7.5 HP2 - 120V / 60 Hz 216
11.7.6 DVS - 400V / 50 Hz 217
11.7.7 DVS - 120V 240V / 60 Hz 217
11.8 Resistor & inductance of the generator coil 217
11.9 Voltage values stator coil 218
11.10 Diameter of conduits 219
Generator Control Panel P6+ Manual221
Current revision status222
Hardware222
12 Safety Instructions Generator Control P6+223
12.1 Personal requirements 223
12.2 Safety instructions 223
13 General operation225
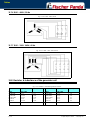
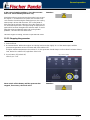
13.1 Panel Generator Control 225
13.1 Rear view 12 V-version 226
13.2 Rear view 24 V-version 227
13.3 Installation of the remote control panel 228
13.3.1 Placement. 228
13.3.2 Terminal connections 228
13.3.3 Function of the jumpers 229

9.12.14 Kapitel/Chapter 2: - Seite/Page 9
13.3.4 Configuration and adjustment 230
13.3.4.1 Configuration and setting sheet KE01 230
13.3.4.2 Configuration and setting sheet KE02231
13.3.4.3 Configuration and setting sheet KE03 232
13.3.4.4 Configuration and setting sheet KE04233
13.4 Starting preparation / Checks (daily) 234
13.4.1 Marine version 234
13.4.2 Vehicle version 234
13.5 Starting and stopping the generators 235
13.5.1 Starting the generator 235
13.5.2 Stopping the generator 236
13.6 Automatic adapter - optional 237
13.6.1 Function: 237
13.6.2 The Automatic input: 238
13.6.3 Terminal connections 239
13.7 Master-Slave adapter - optional 239
13.7.1 Fischer Panda Art. No. 21.02.02.015P, 12 V-version 239
13.7.2 Fischer Panda Art. No. 21.02.02.01P, 24 V-version 240
13.7.3 Terminal Connections: 240
13.7.4 Fuse: 240
13.7.5 Terminal connections 241
13.7.5.1 Terminal X2 (IN/OUT from view Master-Operating-Panel) 241
13.7.5.2 Terminal X3 241
13.7.6 Configuration and adjustment 242
13.7.6.1 Configuration and setting sheet KE05 242
13.7.6.2 Configuration and setting sheet KE06243
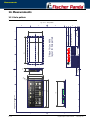
14 Measurements245
14.1 Hole pattern 245

Seite/Page 10 Kapitel/Chapter 2: 9.12.14
Leere Seite / Intentionally blank

9.12.14 Kapitel/Chapter 3: - Seite/Page 11
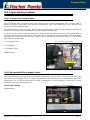
Dear Customer,
Thank you for purchasing a Fischer Panda Generator and choosing Fischer Panda as your partner for mobile power
on board. With your generator, you now have the means to produce your own power – wherever you are - and
experience even greater independence. Not only do you have a Fischer Panda generator on board, you also have
worldwide support from the Fischer Panda Team. Please take the time to read this and find how we can support you
further.
Installation Approval and Warranty
Every generator has a worldwide warranty. You can apply for this warranty through your dealer when the installation
is approved. If you have purchased an extended warranty, please ensure that it is kept in a safe place and that the
dealer has your current address. Consult your dealer about warranty options especially if you have purchased a
used generator. He will be able to advise about authorised Fischer Panda Services worldwide.
Service and Support
To ensure that your generator operates reliably, regular maintenance checks and tasks as specified in this manual
must be carried out. Fischer Panda can supply Service Kits which are ideal for regular servicing tasks. We only
supply the highest quality components which are guaranteed to be the RIGHT parts for your generator. Service
“Plus” Kits are also available and ideal for longer trips where more than one service interval may be required.
If you require assistance – please contact your Fischer Panda Dealer. Please do not attempt to undertake any repair
work yourself, as this may affect your generator warranty. Your dealer will also be able to assist in finding your
nearest Fischer Panda service station. Your nearest service station can also be found in our Global Service Network
which can be downloaded from our homepage.
Product Registration
Please take the time to register your Fischer Panda Generator on our website at
http://www.fischerpanda.de/mypanda
By registering, you will ensure that you will be kept up to date on any technical upgrades or specific information on
the operation or servicing of your generator. We can even let you know about new Fischer Panda products –
especially helpful if you are planning to upgrade or expand your installation at a later date.
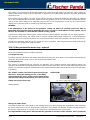
Fischer Panda Quality - Tried and Tested
DIN-certified according DIN ISO 9001
Thank you for purchasing a Fischer Panda Generator.
Your Fischer Panda Team

General Instructions and Regulations
Seite/Page 12 - Kaptitel/Chapter 3: General Instructions and Regulations 9.12.14
3. General Instructions and Regulations
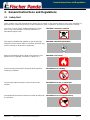
3.1 Safety first!
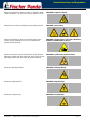
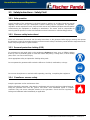
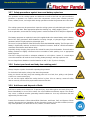
These symbols are used throughout this manual and on labels on the machine itself to warn of the possibility of
personal injury of lethal danger during certain maintenance work or operations. Read these instructions carefully.
WARNING: Hazardous materials Can cause acute or chronic health impairments or death
even in very small quantities if inhaled, swallowed, or
absorbed through the skin.
WARNING: Important information! This warning symbol draws attention to special warnings,
instructions or procedures which, if not strictly observed, may
result in damage or destruction of equipment.
WARNING: Fire hazard Warning of materials that may ignite in the presence of an
ignition source (cigarettes, hot surfaces, sparks, etc.).
PROHIBITED: No smoking In the environment described / during the work specified,
smoking is prohibited.
PROHIBITED: No fire or naked light Fire and naked light are ignition sources that must be
avoided.
PROHIBITED: Do not activate/start up The equipment shall not be activated or started up while work
is in progress.

General Instructions and Regulations
9.12.14 Kapitel/Chapter 3: General Instructions and Regulations - Seite/Page 13
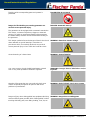
PROHIBITED: Do not touch Touching of the corresponding parts and systems is
prohibited.
DANGER: Automatic start-up Danger for life! Working at a running generator can
result in severe personal injury.
The generator can be equipped with a automatic start device.
This means, an external signal may trigger an automatic
start-up. To avoid an unexpected starting of the generator,
the starter battery must be disconnected before working at
the generator.
WARNING: Hazardous electric voltage This danger symbol refers to the danger of electric shock and
draws attention to special warnings, instructions or
procedures which, if not strictly observed, may result in
severe personal injury or loss of life due to electric shock.
WARNING: General warning General warning of a hazard area
WARNING: Danger due to inhalation and/or
ingestion
Can cause acute or chronic health impairments or death
even in very small quantities if inhaled or ingested.
WARNING: Risk of electric shock upon contactWarning of live parts that may cause electric shock upon
contact. Especially dangerous for persons with heart
problems or pacemakers.
WARNING: Danger due to rotating parts Danger of injury due to being pulled into equipment. Bruising
and torn off body parts possible. Risk of being pulled in when
touching with body part, loose-fitting clothing, scarf, tie, etc.

General Instructions and Regulations
Seite/Page 14 - Kaptitel/Chapter 3: General Instructions and Regulations 9.12.14
WARNING: Explosion hazard Warning of substances that may cause an explosion under
certain conditions, e.g. presence of heat or ignition sources.
WARNING: Hot surface Warning of hot surfaces and liquids. Burn/scalding hazard.
WARNING: Danger due to corrosive substances,
potential contamination of person
Warning of substances that cause chemical burns upon
contact. These substances can act as contaminants if
introduced into the body.
WARNING: System may be pressurised! When the system is opened, the pressure can be relieved
abruptly and expel hot gases and fluids. Risk of injury due to
parts flying about, burn hazard due to liquids and gases.
WARNING: Hearing damageWarning of hearing damages.
WARNING: Magnetic fieldWarning of magnetic field.
WARNING: OverpressureWarning of overpressure.

General Instructions and Regulations
9.12.14 Kapitel/Chapter 3: General Instructions and Regulations - Seite/Page 15
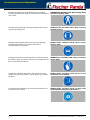
MANDATORY INSTRUCTION: Wear snugly fitting
protective clothing (PPE).
Wearing the applicable snugly fitting protective clothing
provides protection from hazards and can prevent damage to
your health.
MANDATORY INSTRUCTION: Wear hearing
protection (PPE).
Wearing hearing protection provides protection from acute
and gradual hearing loss.
MANDATORY INSTRUCTION: Wear safety
goggles (PPE).
Wearing safety goggles protects the eyes from damage.
Optical spectacles are not a replacement for the
corresponding safety goggles.
MANDATORY INSTRUCTION: Wear protective
gloves (PPE).
Wearing protective gloves provides the hands from hazards
like friction, graze, punctures or deep cuts and protects them
from contact with hot surfaces.
MANDATORY INSTRUCTION: Observe the
instructions in the manual.
Compliance with the instructions in the manual can avert
danger and prevent accidents. This will protect you and the
generator.
MANDATORY INSTRUCTION: Comply with
environmental protection requirements.
Environmental protection saves our living environment. For
you and for your children.

General Instructions and Regulations
Seite/Page 16 - Kaptitel/Chapter 3: General Instructions and Regulations 9.12.14
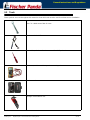
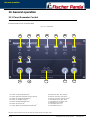
3.2 Tools
These symbols are used throughout this manual to show which tool must be used for maintenance or installation.
Spanners
W.A.F X = width across flats of X mm
Hook wrench for oil filter
Screw driver, for slotted head screws and for Phillips head screws
Multimeter, multimeter with capacitor measuring unit
Socket wrench set
Hexagon socket wrench set

General Instructions and Regulations
9.12.14 Kapitel/Chapter 3: General Instructions and Regulations - Seite/Page 17
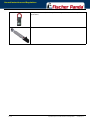
Clamp-on ammeter (DC for synchronous generators; AC for asynchronous
generators)
Torque wrench

General Instructions and Regulations
Seite/Page 18 - Kaptitel/Chapter 3: General Instructions and Regulations 9.12.14
3.3 Manufacturer declaration in accordance with the Machinery Directive
2006/42/EC
Manufacturer declaration in accordance with the Machinery Directive 2006/42/EC
The generator was designed in such a way that all assemblies correspond with the CE guidelines. If Machinery
Directive 2006/42/EC is applied, then it is forbidden to start the generator until it has been ascertained that the
system into which the generator is to be integrated also complies with the Machinery Directive 2006/42/EC. This
includes the exhaust system, cooling system and electrical installations.
The evaluation of “protection against contact“ must be carried out when installed, in conjunction with the respective
system. This also includes correct electrical connections, a safe ground wire connection, foreign body and humidity
protection, protection against moisture due to excessive condensation, as well as overheating through appropriate
and inappropriate use of the equipment in its installed state. The responsibility for implementing these measures lies
with those who undertake the installation of the generator in the final system.
3.4 Customer registration and guarantee
Use the advantages of registering your product:
• you will receive a Guarantee Certificate after approval of your installation data
• you will receive extended product information that may be relevant to safety.
• You will receive free upgrades as necessary.
Additional advantages:
Based on your complete data record, Fischer Panda technicians can provide you with fast assistance, since 90 % of
the disturbances result from defects in the periphery.
Problems due to installation errors can be recognized in advance.
3.4.1 Technical support
Technical Support via the Internet: [email protected]
3.4.2 Caution, important information for start-up!
1. The commissioning log shall be filled in immediately after initial operation and shall be confirmed by signature.
2. The commissioning log must be received by Fischer Panda GmbH at Paderborn within 4 weeks of initial
operation.
3. After receiving the commissioning log, Fischer Panda will make out the official guarantee certificate and send it to
the customer.
4. If warranty claims are made, the document with the guarantee certification must be submitted.
If the above requirements are not or only partly fulfilled, the warranty claim shall become void.

General Instructions and Regulations
9.12.14 Kapitel/Chapter 3: General Instructions and Regulations - Seite/Page 19
3.5 Safety Instructions - Safety First!
3.5.1 Safe operation
Careful handling of the equipment is the best insurance against an accident. Read the manual
diligently, and make sure you understand it before starting up the equipment. All operators,
regardless of their experience level, shall read this manual and additional pertinent manuals before
commissioning the equipment or installing an attachment. The owner shall be responsible for
ensuring that all operators receive this information and are instructed on safe handling practices.
3.5.2 Observe safety instructions!
Read and understand this manual and the safety instructions on the generator before trying to start up and operate
the generator. Learn the operating practices and ensure work safety. Familiarise yourself with the equipment and its
limits. Keep the generator in good condition.
3.5.3 Personal protective clothing (PPE)
For maintenance and repair work on the equipment, do not wear loose, torn, or ill-fitting clothing
that may catch on protruding parts or come into contact with pulleys, cooling disks, or other rotating
parts, which can cause severe injury.
Wear appropriate safety and protective clothing during work.
Do not operate the generator while under the influence of alcohol, medications, or drugs.
Do not wear head phones or ear buds while operating, servicing, or repairing the equipment.
3.5.4 Cleanliness ensures safety
Keep the generator and its environment clean.
Before cleaning the generator, shut down the equipment and secure it against accidental start-up.
Keep the generator free from dirt, grease, and waste. Store flammable liquids in suitable
containers only and ensure adequate distance to the generator. Check the lines regularly for
leakage and eliminate leaks immediately as applicable.

General Instructions and Regulations
Seite/Page 20 - Kaptitel/Chapter 3: General Instructions and Regulations 9.12.14
3.5.5 Safe handling of fuels and lubricants
Keep fuels and lubricants away from naked fire.
Before filling up the tank and/or applying lubricant, always shut down the generator and secure it
against accidental start-up.
Do not smoke and avoid naked flame and sparking near fuels and the generator. Fuel is highly
flammable and may explode under certain conditions.
Refuel in well-ventilated open spaces only. If fuel/lubricant was spilled, eliminate fluids
immediately.
Do not mix diesel fuel with petrol or alcohol. Such a mixture can cause fire and will damage the
generator.
Use only approved fuel containers and tank systems. Old bottles and canisters are not adequate.
3.5.6 Exhaust fumes and fire protection
Engine fumes can be hazardous to your health if they accumulate. Ensure that the generator
exhaust fumes are vented appropriately (leak-proof system), and that an adequate fresh air
supply is available for the generator and the operator (forced ventilation).
Check the system regularly for leakage and eliminate leaks as applicable.
Exhaust gases and parts containing such fumes are very hot; they may cause burns under certain
circumstances. Always keep flammable parts away from the generator and the exhaust system.
To prevent fire, ensure that electrical connections are not short-circuited. Check regularly that all
lines and cables are in good condition and that there is no chafing. Bare wires, open chafing
spots, frayed insulation, and loose cable connections can cause dangerous electric shocks, short-
circuit, and fire.
The generator shall be integrated in the existing fire safety system by the operating company.
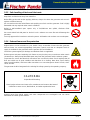
Exhaust gases from diesel motors and some components are carcinogenic and can cause
deformities and other genetic defects.
CALIFORNIA
Proposition 65 Warning
Diesel engine exhaust and some of its constituents are known to the State of
California to cause cancer, birth defects, and other reproductive harm.
Page is loading ...
Page is loading ...
Page is loading ...
Page is loading ...
Page is loading ...
Page is loading ...
Page is loading ...
Page is loading ...
Page is loading ...
Page is loading ...
Page is loading ...
Page is loading ...
Page is loading ...
Page is loading ...
Page is loading ...
Page is loading ...
Page is loading ...
Page is loading ...
Page is loading ...
Page is loading ...
Page is loading ...
Page is loading ...
Page is loading ...
Page is loading ...
Page is loading ...
Page is loading ...
Page is loading ...
Page is loading ...
Page is loading ...
Page is loading ...
Page is loading ...
Page is loading ...
Page is loading ...
Page is loading ...
Page is loading ...
Page is loading ...
Page is loading ...
Page is loading ...
Page is loading ...
Page is loading ...
Page is loading ...
Page is loading ...
Page is loading ...
Page is loading ...
Page is loading ...
Page is loading ...
Page is loading ...
Page is loading ...
Page is loading ...
Page is loading ...
Page is loading ...
Page is loading ...
Page is loading ...
Page is loading ...
Page is loading ...
Page is loading ...
Page is loading ...
Page is loading ...
Page is loading ...
Page is loading ...
Page is loading ...
Page is loading ...
Page is loading ...
Page is loading ...
Page is loading ...
Page is loading ...
Page is loading ...
Page is loading ...
Page is loading ...
Page is loading ...
Page is loading ...
Page is loading ...
Page is loading ...
Page is loading ...
Page is loading ...
Page is loading ...
Page is loading ...
Page is loading ...
Page is loading ...
Page is loading ...
Page is loading ...
Page is loading ...
Page is loading ...
Page is loading ...
Page is loading ...
Page is loading ...
Page is loading ...
Page is loading ...
Page is loading ...
Page is loading ...
Page is loading ...
Page is loading ...
Page is loading ...
Page is loading ...
Page is loading ...
Page is loading ...
Page is loading ...
Page is loading ...
Page is loading ...
Page is loading ...
Page is loading ...
Page is loading ...
Page is loading ...
Page is loading ...
Page is loading ...
Page is loading ...
Page is loading ...
Page is loading ...
Page is loading ...
Page is loading ...
Page is loading ...
Page is loading ...
Page is loading ...
Page is loading ...
Page is loading ...
Page is loading ...
Page is loading ...
Page is loading ...
Page is loading ...
Page is loading ...
Page is loading ...
Page is loading ...
Page is loading ...
Page is loading ...
Page is loading ...
Page is loading ...
Page is loading ...
Page is loading ...
Page is loading ...
Page is loading ...
Page is loading ...
Page is loading ...
Page is loading ...
Page is loading ...
Page is loading ...
Page is loading ...
Page is loading ...
Page is loading ...
Page is loading ...
Page is loading ...
Page is loading ...
Page is loading ...
Page is loading ...
Page is loading ...
Page is loading ...
Page is loading ...
Page is loading ...
Page is loading ...
Page is loading ...
Page is loading ...
Page is loading ...
Page is loading ...
Page is loading ...
Page is loading ...
Page is loading ...
Page is loading ...
Page is loading ...
Page is loading ...
Page is loading ...
Page is loading ...
Page is loading ...
Page is loading ...
Page is loading ...
Page is loading ...
Page is loading ...
Page is loading ...
Page is loading ...
Page is loading ...
Page is loading ...
Page is loading ...
Page is loading ...
Page is loading ...
Page is loading ...
Page is loading ...
Page is loading ...
Page is loading ...
Page is loading ...
Page is loading ...
Page is loading ...
Page is loading ...
Page is loading ...
Page is loading ...
Page is loading ...
Page is loading ...
Page is loading ...
Page is loading ...
Page is loading ...
Page is loading ...
Page is loading ...
Page is loading ...
Page is loading ...
Page is loading ...
Page is loading ...
Page is loading ...
Page is loading ...
Page is loading ...
Page is loading ...
Page is loading ...
Page is loading ...
Page is loading ...
Page is loading ...
Page is loading ...
Page is loading ...
Page is loading ...
Page is loading ...
Page is loading ...
Page is loading ...
Page is loading ...
Page is loading ...
Page is loading ...
Page is loading ...
Page is loading ...
Page is loading ...
Page is loading ...
Page is loading ...
Page is loading ...
Page is loading ...
Page is loading ...
Page is loading ...
Page is loading ...
Page is loading ...
Page is loading ...
Page is loading ...
Page is loading ...
Page is loading ...
Page is loading ...
-
 1
1
-
 2
2
-
 3
3
-
 4
4
-
 5
5
-
 6
6
-
 7
7
-
 8
8
-
 9
9
-
 10
10
-
 11
11
-
 12
12
-
 13
13
-
 14
14
-
 15
15
-
 16
16
-
 17
17
-
 18
18
-
 19
19
-
 20
20
-
 21
21
-
 22
22
-
 23
23
-
 24
24
-
 25
25
-
 26
26
-
 27
27
-
 28
28
-
 29
29
-
 30
30
-
 31
31
-
 32
32
-
 33
33
-
 34
34
-
 35
35
-
 36
36
-
 37
37
-
 38
38
-
 39
39
-
 40
40
-
 41
41
-
 42
42
-
 43
43
-
 44
44
-
 45
45
-
 46
46
-
 47
47
-
 48
48
-
 49
49
-
 50
50
-
 51
51
-
 52
52
-
 53
53
-
 54
54
-
 55
55
-
 56
56
-
 57
57
-
 58
58
-
 59
59
-
 60
60
-
 61
61
-
 62
62
-
 63
63
-
 64
64
-
 65
65
-
 66
66
-
 67
67
-
 68
68
-
 69
69
-
 70
70
-
 71
71
-
 72
72
-
 73
73
-
 74
74
-
 75
75
-
 76
76
-
 77
77
-
 78
78
-
 79
79
-
 80
80
-
 81
81
-
 82
82
-
 83
83
-
 84
84
-
 85
85
-
 86
86
-
 87
87
-
 88
88
-
 89
89
-
 90
90
-
 91
91
-
 92
92
-
 93
93
-
 94
94
-
 95
95
-
 96
96
-
 97
97
-
 98
98
-
 99
99
-
 100
100
-
 101
101
-
 102
102
-
 103
103
-
 104
104
-
 105
105
-
 106
106
-
 107
107
-
 108
108
-
 109
109
-
 110
110
-
 111
111
-
 112
112
-
 113
113
-
 114
114
-
 115
115
-
 116
116
-
 117
117
-
 118
118
-
 119
119
-
 120
120
-
 121
121
-
 122
122
-
 123
123
-
 124
124
-
 125
125
-
 126
126
-
 127
127
-
 128
128
-
 129
129
-
 130
130
-
 131
131
-
 132
132
-
 133
133
-
 134
134
-
 135
135
-
 136
136
-
 137
137
-
 138
138
-
 139
139
-
 140
140
-
 141
141
-
 142
142
-
 143
143
-
 144
144
-
 145
145
-
 146
146
-
 147
147
-
 148
148
-
 149
149
-
 150
150
-
 151
151
-
 152
152
-
 153
153
-
 154
154
-
 155
155
-
 156
156
-
 157
157
-
 158
158
-
 159
159
-
 160
160
-
 161
161
-
 162
162
-
 163
163
-
 164
164
-
 165
165
-
 166
166
-
 167
167
-
 168
168
-
 169
169
-
 170
170
-
 171
171
-
 172
172
-
 173
173
-
 174
174
-
 175
175
-
 176
176
-
 177
177
-
 178
178
-
 179
179
-
 180
180
-
 181
181
-
 182
182
-
 183
183
-
 184
184
-
 185
185
-
 186
186
-
 187
187
-
 188
188
-
 189
189
-
 190
190
-
 191
191
-
 192
192
-
 193
193
-
 194
194
-
 195
195
-
 196
196
-
 197
197
-
 198
198
-
 199
199
-
 200
200
-
 201
201
-
 202
202
-
 203
203
-
 204
204
-
 205
205
-
 206
206
-
 207
207
-
 208
208
-
 209
209
-
 210
210
-
 211
211
-
 212
212
-
 213
213
-
 214
214
-
 215
215
-
 216
216
-
 217
217
-
 218
218
-
 219
219
-
 220
220
-
 221
221
-
 222
222
-
 223
223
-
 224
224
-
 225
225
-
 226
226
-
 227
227
-
 228
228
-
 229
229
-
 230
230
-
 231
231
-
 232
232
-
 233
233
-
 234
234
-
 235
235
-
 236
236
-
 237
237
-
 238
238
-
 239
239
-
 240
240
-
 241
241
-
 242
242
-
 243
243
-
 244
244
-
 245
245
-
 246
246


Fischer Panda Panda 7 mini PMS Owner's manual
- Type
- Owner's manual
- This manual is also suitable for
Ask a question and I''ll find the answer in the document
Finding information in a document is now easier with AI
Related papers
-
 Fischer Panda Panda AGT 6000 User manual
-
 Fischer Panda Panda 12 Mini PMS Owner's manual
-
 Fischer Panda Panda 10000x-230V PMS Owner's manual
-
 Fischer Panda Panda 10000i PMS Owner's manual
-
 Fischer Panda Panda 15000i PMS Owner's manual
-
 Fischer Panda Panda 25i-230V PMS Owner's manual
-
 Fischer Panda Panda 45i PVK-U Owner's manual
-
 Fischer Panda Panda 12000x-230V PVMV-N Owner's manual
-
 Fischer Panda Panda 8 Mini PVMV-N Owner's manual
-
 Fischer Panda Panda 15000 PVK-UK Owner's manual


Other documents
-
N-Com n-com SPCOM00000048 Helmet Intercom System User manual
-
Aurora AGI6500DE Operating instructions
-
Heinner VGEN001 Instructions Manual
-
Platinum FUPU5660 User manual
-
 AUTOTERM AIR-2D 12V/24V Air Heaters User manual
-
 COMBO FUTA1050 User manual
-
 Remak VCS Installation And Operating Instructions Manual
-
havit HV2861 User manual
-
 ICEMASTER PANDA 6000ND User manual
-
Whisper Power M-SC6 Installation guide


