Canon IXUS 950 IS User manual

Category
Bridge cameras
Type
User manual
Preparations
Shooting
Playback/Erasing
Menus and Settings
Printing
The Components Guide
Downloading Images to
a Computer
CDI-E306-010 XX07XXX
Camera User Guide
Please Read This First
This guide explains how to prepare the camera and use its basic features.
© 2007 CANON INC. PRINTED IN JAPAN
ENGLISH
Basic
Cov-Basic-E.fm Page 1 Friday, February 23, 2007 4:50 PM
The following guides are available. Refer to them as necessary according to the
flowchart below.
Flowchart and Reference Guides
System Map
Basic Camera User
Guide (This Guide)
Read this first.
Advanced Camera
User Guide
Direct Print User
Guide
Basic Camera User
Guide (This Guide)
Software Starter Guide
ZoomBrowser EX/
ImageBrowser Software
User Guide
PDF manuals available on
the Canon website.
http://web.canon.jp/Imaging/
information-e.html
For information on included items and
items sold separately
The Components Guide
Preparations
Charging the battery
Installing the battery and memory card
Setting the date, time and language
Shooting
Playback/Erasing
Menus and Settings
Handling precautions, references to the
various shooting and playback functions
Printing
Installing the software
Downloading images to a computer
Using the software
In this guide, the Basic Camera User Guide is called the Basic Guide, and the Advanced
Camera User Guide is called the Advanced Guide. Also, "battery" refers to the battery pack.
You may not be able to achieve the full
performance of this camera with the
included memory card.
EC212-CUG-E.book Page 0 Friday, February 23, 2007 5:46 PM
1
Front View
a Wrist Strap Mount
b Microphone
c Viewfinder Window (Advanced Guide p. 18)
d AF-assist Beam (Advanced Guide p. 24)
e Red-Eye Reduction Lamp (Advanced Guide p. 36)
f Self-Timer Lamp (p. 16)
g Flash (p. 14)
h Lens
The Components Guide
In order to avoid dropping the camera, wear the wrist strap
when using the camera.
def
c
g
h
a
b
Attaching the Wrist Strap
The Components Guide
EC212-CUG-E.book Page 1 Friday, February 23, 2007 5:46 PM
2
Back View
a LCD Monitor (Advanced Guide pp. 12, 15)
b Viewfinder (Advanced Guide p. 18)
c A/V OUT (Audio/Video output) Terminal (Advanced Guide p. 104)
d Terminal Cover
e DIGITAL Terminal (p. 27)
f Tripod Socket
g DC Coupler Terminal Cover (Advanced Guide p. 134)
h Memory Card Slot/Battery Cover (p. 8)
The interface cable and AV cable cannot be connected
simultaneously.
The LCD monitor may be covered with a thin plastic film
for protection against scratches during shipment. If so,
remove the film before using the camera.
a
b
f
h
c
d
e
g
EC212-CUG-E.book Page 2 Friday, February 23, 2007 5:46 PM
3
Controls
a Speaker
b Indicators (p. 6)
c Power Lamp
d Power Button (p. 10)
e Zoom Lever (p. 14, Advanced Guide p. 80)
Shooting: (Wide Angle)/ (Telephoto)
Playback: (Index)/ (Magnify)
f Shutter Button (p. 10)
g Mode Dial (pp. 10, 11)
h (Print/Share) Button (pp. 22, 30, Advanced Guide pp. 70, 71)
i Touch Control Dial
j DISP. (Display) Button (Advanced Guide p. 12)
k FUNC./SET (Function/Set) Button (p. 20, Advanced Guide p. 22)
l MENU Button (p. 21, Advanced Guide p. 23)
m (Macro)/ (Infinity)/ Button (p. 15)
n (ISO Speed)/ (Jump)/ Button (Advanced Guide pp. 69, 83)
o (Flash)/ Button (p. 14)
p (Single Image Erase)/ (Continuous)/ (Self-timer)
/ Button (pp. 16, 19, Advanced Guide p. 37)
bd
ec
g
h
j
k
mn
p
o
a
l
f
i
The Components Guide
EC212-CUG-E.book Page 3 Friday, February 23, 2007 5:46 PM
4
Using the Touch Control Dial
Touching the Dial
A magnified image of the touch control dial displays on the LCD
monitor when you place your finger on the dial. Circling your finger on
the dial allows you to configure the functions assigned to each button.
Circling Your Finger on the Dial
You can select categories or images by circling your finger on the dial.
Circling counterclockwise works the same as the button and
circling clockwise the same as the button. (It may also work as the
/ buttons with some functions.)
Functions that cannot be configured are shown in gray.
The dial display (Touch Icons) can be turned On/Off in
the (Set up) menu (Advanced Guide p. 26).
When Touch Icons is set to [Off], the icon of the function
being touched appears in green on the LCD monitor.
Touch Icons
Sample in shooting mode
Sample of selecting manual
mode
EC212-CUG-E.book Page 4 Friday, February 23, 2007 5:46 PM
5
The following functions can be operated using the touch control dial.
Please note that some of the options for some functions cannot be
operated with it.
Operable Functions
Reference Page
Basic Advanced
Shooting
Selecting a shooting mode
(When mode dial is set to
(Manual), (SCN) or
(Movie))
p. 11
Selecting / / / / /
pp. 14,
15, 16
pp. 37, 69
Selecting options in the FUNC. menu
p. 20 p. 22
Playback
Selecting images
p. 18 pp. 80, 81,
82, 83,
102, 105
Operations for playing/editing movies
pp. 84, 86
Operations for sound memos and the
Sound Recorder
pp. 94, 95
Operations for DPOF print settings and
direct transfer settings.
pp. 107,
111
Shooting
and
Playback
Selecting options in menus
p. 21 p. 23
Selecting time zones for the world clock p. 20
Selecting options for the My Camera settings
–p. 113
The Components Guide
EC212-CUG-E.book Page 5 Friday, February 23, 2007 5:46 PM
6
Indicators
The camera indicators light or blink under the following
circumstances.
Upper Indicator
Lower Indicator
1.
Charging the Battery.
Charge the battery before use under the following circumstances.
When using the battery for the first time.
When the "Change the battery pack." message displays.
1. Insert the battery into the battery charger.
2. Plug the battery charger (CB-2LX) into a power outlet, or
attach the power cord to the battery charger (CB-2LXE) and
plug it into a power outlet.
Battery charger model names and types vary by region.
Never do the following while an indicator is blinking green.
These actions may corrupt image data.
Shake or jolt the camera
Shut off the power, or open the memory card slot/battery
cover
Green: Ready to shoot (camera beeps twice)
Blinking Green: Time Lapse (movie) recording/Image recording/
reading/erasing/transferring (when connected to
a computer/printer)
Orange: Ready to shoot (flash on)
Blinking Orange: Ready to shoot (camera shake warning)
Yellow: Macro mode/infinity mode/AF lock mode
Blinking Yellow: Focusing difficulty (camera beeps once)
Preparations
EC212-CUG-E.book Page 6 Friday, February 23, 2007 5:46 PM
7
The charge indicator will light orange while the battery is
charging. It will change to green when the charge is complete.
Charging takes approximately 2 hours 5 minutes.
2.
Installing the Battery.
1.
Slide the memory card slot/battery cover and open it (
a
,
b
).
2. Push the battery lock in the direction of the arrow (c) and
insert the battery until it locks.
To remove the battery, push the battery lock in the direction of
the arrow (c) and hold it while pulling the battery out.
To protect the battery and prolong its life, do not charge it for
longer than 24 hours continuously.
Î
See the Advanced Guide: Battery Handling (p. 130).
Charge Indicator
Align these symbols
For CB-2LX For CB-2LXE
Battery Lock
b
c
a
Preparations
EC212-CUG-E.book Page 7 Friday, February 23, 2007 5:46 PM
8
3.
Inserting the Memory Card.
1. Insert the memory card until it clicks into place.
2. Close the memory card slot/battery cover (
a, b).
To Remove the Memory Card
Use a finger to push the memory card in until you hear a click, then
release it.
Ensure that the memory card is correctly oriented before
inserting it in the camera. Inserting it backward may cause
the camera to fail to recognize the memory card or to
malfunction.
Î
See the Advanced Guide: Handling the Memory Card (p. 132).
Î
See the Advanced Guide: Formatting Memory Cards (p. 29).
You can use SD memory cards, SDHC memory cards and
MultiMediaCards with this camera. These cards are collectively
called memory cards in this guide.
Back
b
a
EC212-CUG-E.book Page 8 Friday, February 23, 2007 5:46 PM
9
First Time Settings
Setting the Date/Time
1. Press the power button (a).
2. Use the or button to select an item and the or
button to change its value (
b).
To set the daylight saving option, select the icon and use the
or button to configure the setting.
3. Confirm that the correct time is displayed and press the
FUNC./SET button (
c).
The date and time can also be set in the Set up menu (p. 21).
Setting the Display Language
1. Turn the mode dial to (playback).
2. Hold down the FUNC./SET button and press the MENU
button.
3. Use the ,
, or button to select a language and
press the FUNC./SET button.
The display language can also be set in the Set up menu (p. 21).
A rechargeable lithium battery is built into the camera
to save such settings as the date/time. This battery
charges when the main battery is in the camera. When
you purchase the camera, place the main battery in it
for approximately four hours or use AC Adapter Kit
ACK-DC30 (sold separately) to charge the lithium bat-
tery. It will charge even if the camera is turned off.
The date/time settings may be lost after approximately
three weeks if you remove the main battery. Reset the
date/time settings if this occurs.
Î
See the Advanced Guide: Setting the World Clock (p. 20).
b
c
a
Preparations
EC212-CUG-E.book Page 9 Friday, February 23, 2007 5:46 PM
10
1.
Press the power button.
The start-up sound will play and the
start-up image will display in the LCD
monitor.
Pressing the power button again turns
the power off.
To switch to the setting that mutes all
sounds (except for the warning sound),
press and hold the DISP. button while
pressing the power button.
2.
Turn the mode dial to (Auto).
3.
Aim the camera at the subject.
4.
Focus and shoot.
1. Press the shutter button halfway to
focus.
When the camera focuses, it beeps
twice and the indicator lights green
(orange when the flash fires). In
addition, a green AF frame appears in
the LCD monitor on the portion of the
image used to set the focus.
Shooting
Î
See the Advanced Guide: Using the LCD Monitor (p. 12).
Î
See the Advanced Guide: Power Saving Function (p. 19).
Î
See the Advanced Guide: Set up Menu (p. 26).
Î
See the Advanced Guide: My Camera Menu (p. 28).
Power button
DISP. button
Indicators
EC212-CUG-E.book Page 10 Friday, February 23, 2007 5:46 PM
11
2. Press the shutter button fully to
shoot.
The shutter sound will play and the
image will record. The indicator will
blink green while the image is
recorded to the memory card.
Reviewing an Image Right After Shooting
After a shot is taken, the image appears in the LCD monitor for
approximately 2 seconds.
You can continue to display images regardless of the review duration
setting with the following procedures.
Keeping the shutter button pressed after a shot.
Pressing the FUNC./SET or DISP. button while the image is dis-
played in the LCD monitor.
To stop displaying the image, press the shutter button halfway.
Selecting a Shooting Mode
1.
Turn the mode dial to the desired mode (a).
, or modes
1. Press the FUNC./SET button (b)
2. Select a shooting mode using the or button (c).
3. Press the FUNC./SET button (d).
You can also use the touch control dial to make a selection.
Î
See Indicators (p. 6).
Î
See the Advanced Guide: How to Use the IS Mode (p. 32).
Î
See the Advanced Guide for the various shooting methods
available.
Î
See the Advanced Guide: Review (p. 24).
Î
See the Advanced Guide: Checking for Focus Right After
Shooting (p. 74).
Î
See Erasing (p. 19).
a
b d
c
Shooting
EC212-CUG-E.book Page 11 Friday, February 23, 2007 5:46 PM
12
Shooting Modes
AUTO
Auto
The camera automatically selects settings.
MANUAL
Manual
Allows you to select settings yourself, such as the exposure compensation, white
balance, my colors or ISO speed.
Digital Macro
Allows you to shoot when the distance from the lens (at
maximum wide angle) to the subject is within 2 – 50 cm (0.8
in. – 1.6 ft.). The subject can be shown larger than in
standard macro mode because the camera trims the image
edges and zooms in with the digital zoom.
Color Accent
Use this option to
have only the color
specified in the LCD
monitor remain and to
transform all others to
black and white.
Color
Swap
Use this option to
transform a color
specified in the
LCD monitor into
another.
Stitch Assist
Allows you to shoot overlapping images that can later be
merged (stitched) to create one panoramic image on a
computer.
SPECIAL
SCENE
Portrait
Produces a soft effect
when photographing
people.
Night
Snapshot
Allows you to take
snapshots of
people against
twilight or night backgrounds by
reducing the effects of camera shake
even without using a tripod.
Kids&Pets
Allows you to capture
subjects that move
around, such as
children and pets,
without missing photo
opportunities.
Indoor
Prevents camera
shake and
maintains the
subject's true color
when shooting
under fluorescent or tungsten lighting.
Creative Light Effect
You can select specific shapes, such as or , to
produce fantastical images of people set against a
nightscape or illuminated by a light source
Î
See the Advanced Guide
(p. 35).
Î
See the Advanced Guide
(p. 64).
Î
See the Advanced Guide
(p. 66).
Î
See the Advanced Guide
(p. 47).
EC212-CUG-E.book Page 12 Friday, February 23, 2007 5:46 PM
13
SPECIAL
SCENE
Foliage
Shoots trees and
leaves—such as new
growth, autumn
leaves or blossoms—
in vivid colors.
Snow
Shoots without a
blue tinge and
without making
people appear
dark against a
snowy background.
Beach
Shoots without
making people
appear dark near
water or sand where
reflected sunlight is
strong.
Fireworks
Captures
fireworks in the
sky sharply and
at optimal
exposure.
Aquarium
Selects the optimal
ISO speed, white
balance and color
balance to capture
fish and other items in
an indoor aquarium.
Underwater
Appropriate for
shooting images
with Waterproof
Case WP-DC15
(sold separately).
This mode uses an optimal white
balance setting to reduce bluish tones
and record images with a natural hue.
MOVIE
Movie
Shoots a movie when you press the shutter button.
You can select from the following modes: [ Standard]; [ Fast Frame Rate]
suitable for sports or fast motion
; [ Compact] convenient for email attachments;
[ Color Accent] for recording all colors in black and white except for the
selected color; [ Color Swap] for recording a selected color as a different color;
and [ Time Lapse] for shooting one frame at a time at a set interval.
The shutter speed is slow in mode. Always use a tripod
to avoid camera shake.
In , , , , , , or mode, the ISO
speed may increase and cause noise in the image depend-
ing on the scene being shot.
In mode, shoot with the subject 1 m (3.3 ft.) or more
from the end of the lens.
To shoot underwater, install the camera in Waterproof
Case WP-DC15 (sold separately).
We recommend you use Waterproof Case WP-DC15 for
shooting at ski resorts or beaches.
Î
See the Advanced Guide (p. 42).
Shooting
EC212-CUG-E.book Page 13 Friday, February 23, 2007 5:46 PM
14
Using the Zoom
1.
Press the zoom lever toward or .
The zoom can be adjusted from 35 – 140 mm (focal length) in
35mm film equivalent terms.
Using the Flash
1.
Press the button (a) and use the or button to
switch between modes (b).
You can also use the touch control dial to make a selection.
Î
See the Advanced Guide: Red-Eye Reduction Function (p. 36).
Î
See the Advanced Guide: Setting the Slow Synchro Function (p. 36).
You are recommended to shoot with the camera attached to a tripod
or other device if the camera shake warning icon appears.
The option cannot be set in (Auto) mode.
Wide Angle: Zooms out from the subject.
Telephoto: Zooms in on the subject.
Auto
On
Off
a
b
Î
See the Advanced Guide: Functions Available in Each Shooting Mode (p. 160).
See Selecting a Shooting Mode (p. 11).
Î
EC212-CUG-E.book Page 14 Friday, February 23, 2007 5:46 PM
15
Shooting Close-Ups/Infinity Shots
1.
Press the / button (a) and use the or button
to switch between modes (b).
You can also use the touch control dial to make a selection.
To Cancel: press the / button and use the or button to
display (Normal).
Macro
Use this mode to shoot close-ups of flowers or small items.
Image Area at Minimum Focusing Distance from End of Lens to Subject
Maximum wide angle setting: 30 × 22 mm (1.2 × 0.9 in.)
Minimum focusing distance: 2 cm (0.8 in.)
Maximum telephoto setting: 110 × 82 mm (4.3 × 3.2 in.)
Minimum focusing distance: 40 cm (1.3 ft.)
Infinity
Use this mode to record subjects 3 m (9.8 ft.) or more from the end of
the lens.
Use the LCD monitor to compose close-ups in macro mode
since images composed with the viewfinder may be off-
center.
When using the internal flash in macro mode, there is a pos-
sibility that images will not be of the optimum brightness.
The option cannot be set in (Auto) mode.
a
b
Î
See the Advanced Guide: Functions Available in Each Shooting Mode (p. 160).
See Selecting a Shooting Mode (p. 11).
Î
Shooting
EC212-CUG-E.book Page 15 Friday, February 23, 2007 5:46 PM
16
Using the Self-Timer
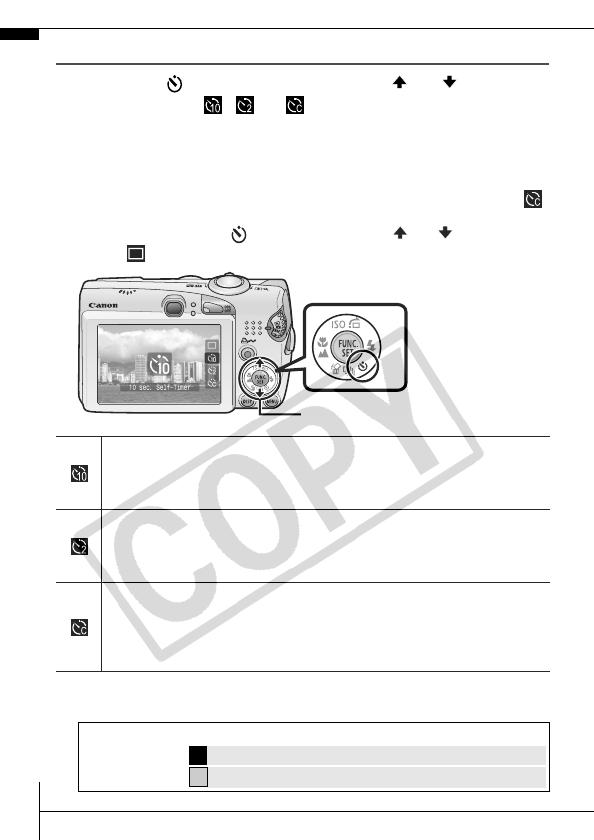
1.
Press the button (a) and use the or button
(b) to display , or .
You can also use the touch control dial to make a selection.
When the shutter button is pressed fully, the self-timer will
activate and the self-timer lamp will blink (when using red-eye
reduction, it will stay lit for the last 2 seconds).
You can change the delay time and number of shots with the
option (p. 17).
To Cancel: press the button and use the or button to
select .
*1 This may differ depending on your My Camera settings (Advanced Guide p. 113).
*2 Default setting.
*3 Default setting is 3 shots.
10 sec. Self-Timer: shoots 10 sec. after you press the shutter
button.
2 sec. before the shutter releases, the self-timer lamp and sound
speed up*
1
.
2 sec. Self-Timer:
shoots 2 sec. after you press the shutter
button.
The self-timer sound beeps quickly
*
1
when you press the shutter
button and the shutter releases 2 sec. later.
Custom Timer
:
you can change the delay time (0–10*
2
, 15, 20,
30 sec.) and number of shots (1–10)
*
3
.
When [Delay] is set to 2 or more sec., the self-timer sound beeps
quickly 2 sec. before the shutter releases. When [Shots] is set to
more than 1, the self-timer sound only beeps before the first shot.
The self-timer cannot be used in some shooting modes.
a
b
Î
See the Advanced Guide: Functions Available in Each Shooting Mode (p. 160).
See Selecting a Shooting Mode (p. 11).
Î
EC212-CUG-E.book Page 16 Friday, February 23, 2007 5:46 PM
17
Changing the Delay Time and Number of Shots ( )
1.
In the (Rec) menu, select [Self-
timer] and press the FUNC./SET
button.
2.
Use the or button to select
[Delay] or [Shots] and the or
button to change the setting and
press the FUNC./SET button.
3.
Press the MENU button.
Î
See Menus and Settings (p. 21).
If the [Shots] option is set to 2 or more shots, the following
occurs.
The exposure and white balance are locked at the set-
tings selected for the first shot.
If the flash is used, the interval between shots lengthens
because the flash must charge.
The interval between shots lengthens when the built-in
memory of the camera fills.
Shooting will automatically cease if the memory card
becomes full.
Shooting
EC212-CUG-E.book Page 17 Friday, February 23, 2007 5:46 PM
18
1.
Turn the mode dial to (playback) (a).
The last recorded image will display. Or if you have played back
images, the last image viewed will display (Resume Playback).
If the memory card has been switched, or the images on the
memory card have been edited with a computer, the newest image
on the memory card appears.
2.
Use the or button to display the image you wish to
view (b).
Use the button to move to the previous image and the
button to move to the next image. Holding the button down
advances the images more rapidly, but shows them less clearly.
Circling your fingertip to the left or right
on the touch control dial selects an
image.
Playback
Î
See the Advanced Guide for the various playback methods
available
Î
See Using the Touch Control Dial (p. 4).
a
b
Playback screen when
the touch control dial is
activated
EC212-CUG-E.book Page 18 Friday, February 23, 2007 5:46 PM
  • Page 1 1
  • Page 2 2
  • Page 3 3
  • Page 4 4
  • Page 5 5
  • Page 6 6
  • Page 7 7
  • Page 8 8
  • Page 9 9
  • Page 10 10
  • Page 11 11
  • Page 12 12
  • Page 13 13
  • Page 14 14
  • Page 15 15
  • Page 16 16
  • Page 17 17
  • Page 18 18
  • Page 19 19
  • Page 20 20
  • Page 21 21
  • Page 22 22
  • Page 23 23
  • Page 24 24
  • Page 25 25
  • Page 26 26
  • Page 27 27
  • Page 28 28
  • Page 29 29
  • Page 30 30
  • Page 31 31
  • Page 32 32
  • Page 33 33
  • Page 34 34
  • Page 35 35

Canon IXUS 950 IS User manual

Category
Bridge cameras
Type
User manual

Ask a question and I''ll find the answer in the document

Finding information in a document is now easier with AI