Page is loading ...


1
for those who appreciate quality, reliability & performance
Congratulations
Congratulations
Dear Kirby Customer,
Congratulations on the purchase of The Ultimate G series™.
You now own a superior, complete home maintenance
system designed to help make your home and furnishings
look better and last longer. Most importantly, repeated use
of your Kirby
®
Ultimate G will give you the type of clean
in-home environment you want and deserve.
This use and care manual is designed to help you get the
most out of your new Kirby Ultimate G and enjoy its
numerous benefits and features. The Kirby video will give
you step-by-step instructions on your machine’s operation.
Your local distributor is available should you have any
further questions.
Kirby, the hallmark of innovation and quality for over 85
years, sells through the in-home sales method in over 60
countries. We, at Kirby, want you to know that every
customer is important to us and that we sincerely
appreciate your business.
Please enjoy your Ultimate G to its fullest!
This manual is written for use with the Kirby Model The Ultimate G series.
For assistance, contact your local authorized distributor
The Kirby Company, 1920 West 114th Street, Cleveland, Ohio 44102, U.S.A.
Parts and Supplies (1-800-437-7170), [email protected]
Consumer Relations (1-800-494-8586), [email protected]
www.kirby.com
Kirby, Micron Magic, Split Second, Split Second 2, Scuttle, Odorific, TechDrive, Miracle Waxer, and Mini Em-Tor are registered
trademarks of The Scott Fetzer Company.
The Ultimate G series is a trademark of The Scott Fetzer Company.

2
The Kirby Company
Important Safety Instructions
Important Safety Instructions
The Ultimate G series™ Model G7D is Listed and Certified by Underwriters Laboratories Inc. and
Canadian Standards Association as a double insulated appliance. The Model 293001 and 295001
Carpet Shampoo System, Model 293101 and 295101 Floor Care System, Model 293501 Zippbrush™
and Model 293201 Turbo Accessory System™ are also Listed and Certified as Optional Accessories
for use with this Kirby
®
model. Outside North America, Kirby products are approved by national test
authorities as appropriate.
WHEN USING AN ELECTRICAL APPLIANCE, BASIC PRECAUTIONS
SHOULD ALWAYS BE FOLLOWED.
BE FAMILIAR WITH ALL THE IMPORTANT SAFETY INSTRUCTIONS
BEFORE USING YOUR KIRBY.
WARNING - To reduce the risk of fire, electric shock or injury:
• Donotleaveapplianceunattendedwhenrunningorpluggedin.Unplugfromoutletwhen
not in use and before servicing.
• Donotuseoutdoors.UseonlyondrysurfacesorwiththeKirbyCarpetShampooSystem.
• Donotallowtobeusedasatoy.Closeattentionisnecessarywhenusedbyornearchildren.
Do not let children use the cleaner unattended.
• Useonlyasdescribedinthismanual.Useonlymanufacturer’srecommendedattachments.
• Donotusewithdamagedcordorplug.Ifapplianceisnotworkingasitshould,hasbeen
dropped, damaged, left outdoors or dropped into water, return it to a factory authorized
distributor or service center.
• Donotpullorcarrybycord,usecordasahandle,closedoorsoncord,orpullcordaround
sharp edges or corners. Do not run appliance over cord. Keep cord away from heated surfaces.
• Donotunplugbypullingoncord.Tounplug,grasptheplug,notthecord.
• Donothandleplugorappliancewithwethands.
• Donotputanyobjectintoopenings.Donotusewithanyopeningblocked;keepopenings
free of dust, lint, hair and anything that may reduce airflow.
• Keephair,looseclothing,fingersandallpartsofbodyawayfromopeningsandmovingparts.
• Donotpickupanythingthatisburning,smolderingorsmoking,suchascigarettes,matches,
glowing particles or hot ashes.
• Donotpickupcombustiblematerials.
• Donotusewithoutdustbagand/orfiltersinplace.
• TurnKirbyOFFbeforeunpluggingthecord.
• Useextracarewhencleaningonstairs.
• Donotusetopickupflammableorcombustibleliquids,suchasgasolineoruseinconfined
areas where flammable or combustible vapors are present.
• WhenusingtheCarpetShampooSystem,donotuseflammableorcombustibleliquidsto
clean carpet or floor.
• WhenusingtheFloorCareSystem,useonlygenuineKirbycleaningproductsorcommercially
available floor cleaners or waxes intended for machine operation.
• Unplugthecordfromthewalloutletandletthemotorcometoacompletestopbefore
attempting any cleaning, service or changing accessories.
• ThisapplianceisprovidedwithDoubleInsulation.Itmustbeservicedbyafactoryauthorized
distributor or service center using genuine Kirby parts to maintain safety and to protect your
warranty. See page 51.
• KeepallKirbychemicalsoutofthereachofchildren.Thesechemicalsmaycauseirritation
or discomfort if swallowed or placed in the eyes.
• DonotuseflammableorcombustiblefluidinthePortableSprayer.
• DonotusepesticidesorchemicalproductsinthePortableSprayerthatmayaffectordamage
the human respiratory system, eyes or skin.
• Toavoidirritationordamagetoeyesorears,keepthemassagecupandallotheraccessories
a safe distance away.
• Alwaysusesafetyglasseswhenturbosanding.
SAVE THESE INSTRUCTIONS
FOR HOUSEHOLD USE ONLY

3
for those who appreciate quality, reliability & performance
Table of Contents
Table of Contents
Important Safety Instructions 2
About this Manual 4
Kirby
®
Micron Magic
®
HEPA Filtration 5
Part 1 — Getting Started 6
Moving Your Ultimate G/HandleTiltLatch/Toe-TouchControl
™
7
PowerNozzleHeightAdjustment/TechDrive
®
Power Assist 8
Installing/ChangingDisposableFilterBags 9
BagSupportStrap/MiniEm-Tor
®
10
TheBeltLifter 10
Part 2 — Upright & Portable Cleaner 12
The Upright Cleaner 13
The Upright as a Straight Suction Cleaner 14
The Portable Cleaner 15
Part 3—Canister Cleaner & Attachments 17
ConvertingtoaCanisterCleaner/InstallingtheAttachmentHose 18
ExtensionTubes/SurfaceNozzle 19
DusterBrush/UpholsteryNozzle 20
CreviceTool/Wall&CeilingBrush 20
MassageCup/SuctionControlGrip 21
Using Your Ultimate GasaBlower 21
The Portable Sprayer 24
The Portable Shampooer 26
Part 4 — Optional Accessories 29
The Carpet Shampoo System 30
The Miracle Waxer
®
36
TheFloorCareSystem-FloorBuffer 38
The Floor Care System - Carpet Fluffer 40
The Turbo Accessory System
™
41
The Zippbrush
™
43
Part 5 — Operating/Maintenance Tips 45
ChangingthePowerNozzleBelt 46
AdjustingtheBrushRollHeight 48
LightBulbReplacement 49
Miscellaneous Parts Replacement 50
QuestionsandAnswers/Troubleshooting 51
Other Fine Kirby Cleaning Products 56
Index 58
Expanded Illustration of Ultimate G and Filtration System - Inside back cover.
IfyouhaveanyquestionsregardingyourpurchaseortheoperationofyourKirbyHomeCare
System, please contact your local authorized distributorship:
___________________________________________________
___________________________________________________
___________________________________________________
OR
You may contact The Kirby Company’s Consumer Relations Department by:
e-mail [email protected]
telephone 1-800-494-8586
fax 216-529-6146
mail Consumer Relations
1920 West 114th Street
Cleveland, Ohio 44102
Our business hours are 8:00 a.m. to 5:00 p.m. Eastern Time, U.S.A. Monday through Friday.

4
The Kirby Company
About This Manual
About This Manual
Using this Owner's Manual
This Owner’s Manual was designed to be easy to read and follow. It has been organized
in sections based on the various ways you may use your new Kirby
®
Ultimate G. Within
each section, simple step-by-step illustrations will help you easily visualize the steps required
to properly operate your new Ultimate G and its many attachments and optional accessories.
Please note: The rear cover of this Owner’s Manual includes a fold-out illustration that points
out the location of various parts of your new Ultimate G. Simply fold this flap out and refer
to the illustrations and corresponding (#) as you read this manual.
In addition to the Table of Contents on page 3, you will also find an Index on page 58 that
will refer you to the information you require.
We at Kirby sincerely hope this Owner’s Manual will help you obtain years of satisfactory
world-class performance from The Ultimate G series
™
by Kirby.

5
for those who appreciate quality, reliability & performance
Youboughtthebest;youexpectthebest.That’swhyKirbydevelopedtheMicronMagic
HEPA(HighEfficiencyParticleArrest)FiltrationSystemfeaturingthelatestincleanair
technology without sacrificing Kirby’s tremendous airflow.
* Captures and retains 99.97% of household dust, pollen, dust mites and other particles
down to 0.3 microns.
* Captures and retains 99.5% of other particles down to 0.1 microns.
So, what does this mean?
Improved Indoor Air Quality!
These improvements are a part of the Kirby Company’s pursuit to respond to our customers’
needs.TheKirbyMicronMagicHEPAFiltrationSystemdemonstratesthequalityyouexpect
and the performance you deserve.
ReordergenuineKirbyMicronMagicHEPAfilterbagsfromyourlocalauthorized
Kirby Distributor.
Kirby
®
For those who appreciate Quality, Reliability and Performance
™

6
The Kirby Company
Getting Started
Getting Started
PART ONE
This section outlines general information you will need as
you begin using your new Kirby
®
Ultimate G. It includes
information on:
Moving and Carrying Your Ultimate G
Using the Handle Tilt Latch
The Toe-Touch Control
™
Proper Power Nozzle Height
Using TechDrive
®
Power Assist
Installing/Changing Disposable Filter Bags
Emptying the Mini Em-Tor
®
Understanding the Belt Lifter
Please read this section (as well as all other sections) carefully
before using your new Ultimate G.

7
for those who appreciate quality, reliability & performance
Getting Started
Getting Started
Moving/Carrying Your Ultimate G/Handle Tilt Latch
and Toe-Touch Control
™
MOVING YOUR ULTIMATE G
Your Ultimate G is equipped with TechDrive
®
Power Assist.
In order to push your Ultimate G with the motor OFF,
TechDrive Pedal
o
11 must be turned OFF (disengaged).
Turn TechDrive OFF by pushing down on the gray “N” side
(marked“N”forNeutral)oftheTechDrivePowerAssistN/D
Pedal. (See page 8 for additional information.)
CARRYING YOUR ULTIMATE G
NOTE: The Carrying Grip
o
18 is designed for convenience in
carrying your Ultimate G. ❏
HANDLETILTLATCH
TheHandleTiltLatch
o
10 serves two purposes:
To allow you to lift the front of the Ultimate G over door
thresholds or throw rugs. To do so, move the Tilt Latch
Levertowardsthebag.Bydoingthis,thehandlewillonly
lower part way to the 45° position. This allows you to push
down on the locked handle and lift the front of the Ultimate G.
➤
To allow you to store your Ultimate G in a vertical
position or carry it.
To do this, lower the handle to a horizontal position
near the floor. While pushing the handle down, move the Tilt
Latch Lever away from the bag to lock the handle down. You
can now stand the Ultimate G up onto its bumper and lean it
against a wall for storage.
This vertical position may also be useful in carrying the
Ultimate G. To lift the Ultimate G, use the Carrying
Grip
o
18 . ❏
THETOE-TOUCHCONTROL
The Toe-Touch Control
o
8 ,
o
9 , located over the front wheel,
raises and lowers the front of your Ultimate G.
StepdownontheToe-TouchControlBottomPedal
o
9 to
raise the front (see page 13). ➤
1
2
CAUTION:
NeverunlocktheHandleTiltLatchwithoutholdingontothehandle.
The handle is spring-loaded and could fly up when unlatched.
!

8
The Kirby Company
Getting Started
Getting Started
Power Nozzle Height Adjustment and TechDrive
®
Power Assist
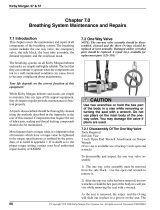
Then, each time you press on the Toe-Touch Control
™
Upper
Pedal
o
8 , you will lower the front one notch.
The number of bars showing above the Toe-Touch Control
provide an indication of height. ❏
POWERNOZZLEHEIGHTADJUSTMENT
When using the Power Nozzle
o
25 , it is important to adjust
the height properly. Start by pressing the Toe-Touch Control
BottomPedal
o
9 all the way down, raising the front of your
Ultimate G all the way up.
Then, with your Ultimate G ON, press the Toe-Touch Control
Upper Pedal
o
8 , one notch at a time, until you hear a change in
the tone of the motor. This means your Ultimate G has sealed to
the carpet. Press the Toe-Touch Control Upper Pedal one more
time and your Power Nozzle will be at the proper operating height.
NOTE: When finished vacuuming, press the Toe-Touch Control
BottomPedalallthewaydowntomoveyourUltimate G. ❏
TECHDRIVE
Your new Ultimate G is equipped with TechDrive Power
Assist. This innovative power assist feature eliminates most of
the effort required to move your Ultimate G back and forth. ❏
TURNINGTECHDRIVEON(DRIVE)
To engage TechDrive and put the Ultimate G in the Power
Assist mode, push down the yellow “D” side (marked “D” for
Drive)oftheTechDriveN/DPedal
o
12 located just below the
Power Switch.
o
13
You may use your Ultimate G without TechDrive Power Assist
if desired. Simply put TechDrive in Neutral. ❏
IMPORTANT:
To avoid possible damage to soft tiles or marking of waxed and
finished non-carpeted floors, disengage the TechDrive.
!
TURNINGTECHDRIVEOFF(NEUTRAL)
To move your Ultimate G with the motor OFF or to vacuum
without Power Assist, TechDrive must be put in Neutral.
To place TechDrive in Neutral, push down the gray “N” side
(marked“N”forNeutral)oftheTechDrivePowerAssistN/D
Pedal
o
11 . ❏

9
for those who appreciate quality, reliability & performance
CAUTION:
BeforechangingtheDisposableFilterBag,unplugthepowercord
from the wall outlet and be sure that the motor and fan have stopped.
!
Getting Started
Getting Started
Installing/Changing Disposable Filter Bags
INSTALLING/CHANGINGDISPOSABLE
FILTERBAGS
ADisposableFilterBagmustbeinstalledbeforeyoubegin
vacuuming.
ToinstallanewDisposableFilterBag,unziptheOuter
PermanentBag
o
1andpullouttheDisposableFilterBag
along with the Top Adaptor
o
5 . ➤
Whennecessary,removetheusedDisposableFilterBag.
NOTE:AlwaysreplacetheDisposableFilterBagwhen
dirt reaches the “FULL” line on the bag. Failure to do
so will affect performance.
FromtherearoftheDisposableBag,graspthecardboardface-
plate.HoldingtheTopAdaptorsteady,rotatethecardboard
faceplate to the left (counter-clockwise). When the lock tabs
on the Top Adaptor align with the slots in the cardboard face-
plate, gently pull the bag off. ➤
ToinstallanewDisposableFilterBag,graspthecard-
board faceplate from the rear of the Disposable Filter
bag. Align the slots in the cardboard faceplate on the
DisposableFilterBagwiththelocktabsontheTop
Adaptor. Then push the Top Adaptor into the bag opening.
HoldingtheTopAdaptorsteady,rotatethecardboardfaceplate
totheright(clockwise)tosecuretheDisposableFilterBag.
NOTE: To avoid air leaks, make sure the cardboard faceplate is
securely positioned up against the flat portion of the Top
Adaptor. ➤
1
2
3

10
The Kirby Company
CAUTION:
Do not pick up heavy objects, such as coins, screws, rocks or similar
objects. This may damage the fan.
!
Getting Started
Getting Started
Bag Support Strap/Mini Em-Tor
®
and Belt Lifter
BAGSUPPORTSTRAP
ChecktomakesuretheBagSupportStrap
o
4 is con-
nected to the Top Adaptor
o
5.TheBagSupportStrap
provides the support required for proper operation of
theDisposableFilterBag.
If it is not connected, thread the strap through the small hole
of the Top Adaptor. Then place the hole in the strap over the
stud on the Top Adaptor.
Finally, insert the adaptor and new filter bag into the Outer
PermanentBag
o
1 and close the zipper completely for
maximum performance.
NOTE: In order for the Filtration System to perform effectively,
use only Kirby
®
Micron Magic
®
HEPAFiltrationBags.Ifthe
outside bag is torn or damaged, please replace immediately. ❏
EMPTYINGTHEMINIEM-TOR
The Mini Em-Tor
o
6 is designed to collect large, heavy particles
which can be emptied by removing the Mini Em-Tor.
To remove, grasp the Mini Em-Tor in the handhold
provided and rotate it away from the body of the
Ultimate G as far as it will go, then lift it off.
ThetopofthebagisreleasedfromthehandlebypressingtheBag
ReleaseButton
o
16 . After removing the Mini Em-Tor and the
entireBagAssembly,positionthefrontopeningoftheMini
Em-Tor over a newspaper and shake it to remove the particles. ➤
ToreplacetheMiniEm-Tor,re-attachtheentireBag
AssemblybyinsertingtheBagLatchTab
o
2 at the top of
thebagintotheslotundertheBagReleaseButton
o
16 .
Finally, line up the raised indicator arrow of the Mini Em-Tor
with the indicator arrow on the Air Exhaust Port
o
19 . Rotate the
Mini Em-Tor towards the Ultimate G and lock it in place.
NOTE: The Mini Em-Tor must be securely locked in place
or the Ultimate G will not operate. ❏
USINGTHEBELTLIFTER
TheBeltLifter
o
20 on your Ultimate G is used for two purposes:
l) ToengageordisengagetheBrushRoll.WhentheBrushRoll
is disengaged, the Ultimate G can be used as a straight suction
cleaner(page14),and;
2) To allow removal of the Power Nozzle when converting
your Ultimate G for use with various attachments and
optional accessories.
To avoid damaging the belt, turn the Ultimate G OFF before
usingtheBeltLifter.➤
4
1
2

11
for those who appreciate quality, reliability & performance
USINGTHEBELTLIFTER(cont)
TousetheBeltLifter,youmustfirstraisetheHeadlight
Hood
o
21 . ➤
FlipouttheL-shapedhandleontheBeltLifter
o
20 . Use
ittoturntheBeltLifterfullytotheleft(counter-clock-
wise) until it stops and the red arrows line up. This
stretches the belt and lifts it off the motor shaft. Return the
L-shapedhandleontheBeltLiftertoitsclosedposition.
If you are using your Ultimate G as a straight suction cleaner,
simplylowertheHeadlightHood.TheBrushRollisnow
disengaged and will not rotate when the power switch is
turned ON. ➤
The belt will be stretched to the top of the nozzle as shown.
Tore-engagethebeltsotheBrushRollrotates,simply
raisetheHeadlightHoodandusetheL-shapedhandleto
turntheBeltLifterfullytotheright(clockwise)untilthe
greenarrowslineup.ThenlowertheHeadlightHood.
TheBrushRollwillnowrotatewhenthePowerSwitchis
turned ON.
NOTE: The belt should not be stretched when stored for an
extended period. Make sure the green arrows line up for
storage. ❏
Your Ultimate GisequippedwithaBrushRoll
Performance Indicator Light
o
7 , located on the top
right side of the Power Nozzle. The purpose of this
lightistoshowiftheBrushRollisrotatingproperly.
IftheBrushRollIndicatorLightflashesintermittentlyor
doesnotcomeonwhenusingthePowerNozzle,theBrush
RollBeltmaynotbeworkingproperly.EithertheBeltisnot
engaged or may need to be replaced.
ToreplacetheBrushRollBelt,alsocalledthePowerNozzle
Belt,seePage46.
Getting Started
Getting Started
The Belt Lifter (continued)
1
2
3
4
5

Upright&PortableCleaner
Upright&PortableCleaner
PART TWO
Your Kirby
®
Ultimate G is an extremely versatile home
maintenance system. In this section, we will discuss
the following:
Using your Ultimate G as an
Upright Cleaner
Using your Upright as a Straight
Suction Cleaner
Cleaning Hard-Surface Floors
Using your Ultimate G as a
Portable Cleaner
Cleaning Mattresses and Carpeted Stairs
This section provides the information you need to use your
Ultimate G for a wide variety of jobs.
12
The Kirby Company

Upright&PortableCleaner
Upright&PortableCleaner
The Upright Cleaner
13
for those who appreciate quality, reliability & performance
THEUPRIGHTCLEANER
Beforeyoubeginvacuuming,it’simportanttohavethePower
Nozzle
o
25 adjusted to the proper height setting. This gives you
the most efficient cleaning action. Lowering the Power Nozzle
too far prevents proper cleaning and shortens belt life.
The proper height setting can be achieved by doing
the following: ➤
BeforeyouturntheUltimate G ON, raise the Power
Nozzle by stepping on the Toe Touch Control
TM
BottomPedal
o
9 all the way down (see page 8 for
additional details). ➤
Turn the Ultimate G ON by pressing the Power Switch
o
13 . ➤
Press the Toe-Touch Control
Upper Pedal
o
8 , one
notch at a time, until you hear a change in the tone of
the motor. This means your Ultimate G has sealed to
the carpet. Press the Toe-Touch Control Upper Pedal one
more time and your Power Nozzle will be at the proper
operating height. ➤
1
2
3

14
The Kirby Company
Upright&PortableCleaner
Upright&PortableCleaner
The Upright Cleaner/Straight Suction Upright Cleaner
If power assist is desired, engage TechDrive
®
by push-
ing down the yellow “D” side (marked “D” for Drive) of
theTechDrivePowerAssistN/DPedal
o
12 located just
below the Power Switch
o
13 . ➤
To turn your Ultimate G OFF, press the Toe-Touch
Control
™
BottomPedal
o
9 all the way down until noz-
zle is fully raised.
Disengage TechDrive by stepping on the gray “N” side
(marked“N”forNeutral)oftheTechDrivePowerAssistN/D
Pedal
o
11 .
Turn the Ultimate G OFF by pressing the Power Switch
o
13
and then unplugging. ❏
STRAIGHTSUCTIONCLEANER
Straight Suction Cleaning allows you to vacuum hard floors,
throwrugsanddelicatecarpetswithoutuseoftheBrushRoll.
NOTE: When using Straight Suction Cleaning without the
HardFloorPad,eitheroncarpetsorbarefloors,lowerthe
nozzle as close as possible to the floor without scraping it.
With the Ultimate GturnedOFF,raisetheHeadlight
Hood
o
21 . ➤
FlipouttheL-shapedhandleontheBeltLifter
o
20 .
UseittoturntheBeltLifterallthewaytotheleft
(counter-clockwise) until the red arrows line up (see
page10).ReturntheL-shapedhandleontheBeltLifterto
its closed position.
ThenlowertheHeadlightHood.
TheBrushRollisnowdisengagedandyourUltimate G will
operate as a Straight Suction Cleaner. ❏
5
4
1
2

15
for those who appreciate quality, reliability & performance
Upright&PortableCleaner
Upright&PortableCleaner
The Hard Floor Pad and The Portable Cleaner
THEHARDFLOORPAD
ByattachingtheoptionalHardFloorPadtoyourUltimate
G, you may dust bare floors. While the Ultimate G is turned
OFF, raise the Power Nozzle
o
25 as far as it will go by press-
ing the Toe-Touch Control
™
BottomPedal
o
9 . Attach the
HardFloorPadontothenozzleopeningusingthespring
clips on the plate. Then lower the Power Nozzle by pressing
the Toe-Touch Control Upper Pedal
o
8 one notch at a time
until the bristles touch the floor.
NOTE:TheHardFloorPadshouldonlybeusedwhenthe
Ultimate G is in the Straight Suction Cleaner mode. When
usingtheHardFloorPad,lowerthenozzleuntilthebristles
touch the bare floor. ❏
PORTABLECLEANERSET-UP
BesidesbeingaremarkableUprightCleaner,theUltimate G
can easily be converted into a portable cleaner for mattresses
and carpeted stairs.
To convert your Ultimate G to a Portable Cleaner,
make sure the Ultimate G is turned OFF, unplugged,
and the TechDrive
®
is disengaged.
ThenreleasetheOuterPermanentBagTopfromtheBag
Support
o
16bypressingtheBagReleaseButton
o
16 and sliding
the bag top off. ➤
Remove the cord from the handle. With the Upright
Handle
o
17intheverticalposition,pushtheHandle
ReleaseButton
o
14 , located at the base of the handle,
andpullthehandlestraightupandoutoftheslot.(Bag
not shown for clarity.) ➤
InsertthePortableHandle
o
15 into the slot where the
UprightHandlewasconnected.PushthePortable
Handleintotheslotuntilitsnapsintoplace.➤
1
2
3
CAUTION:
BeforeinstallingtheHardFloorPad,turnunitOFF,unplugthepowercord
from the wall outlet and be sure the motor and nozzle brush have stopped.
!

16
The Kirby Company
Upright&PortableCleaner
Upright&PortableCleaner
The Portable Cleaner
PORTABLECLEANERSET-UP(cont)
BendtheFiltrationBagAssembly
o
1 in half and insert
theBagLatchTab
o
2 into the slot on the Portable
Handleuntilitsnapsintoplace.
You are now ready for portable power cleaning. ❏
NOTE:
Do not use portable mode on upholstered furniture.
CARPETED STAIRS
Place your Ultimate G on one of the carpeted steps, while
supporting the rear of the Ultimate G.
RollthecleanerbackandforthsothattheBrushRoll
agitates the carpeting and loosens the dirt. ❏
MATTRESS CLEANING
Cleaning mattress surfaces is done the same as carpeted
stairs. To begin, set the Ultimate GHandPortableonthe
mattress.WiththeBrushRollengaged,turntheUltimate G
ON and lower the power nozzle to its lowest setting. Engage
TechDrive
®
and begin to vacuum. ❏
DELICATE MATTRESS CLEANING
Cleaning soft or delicate mattress surfaces is done the same as
regular mattress surfaces, except that you may want to disen-
gagetheBrushRoll.(Ifyourmattresshastuftedbuttonson
thesurface,theBrushRollcouldpullthemloose.)
Forstraightsuctioncleaning,raisetheHeadlightHood
o
21
andflipouttheL-shapedhandleontheBeltLifter
o
20 . Use it
toturntheBeltLifterallthewaytotheleft(counter-clock-
wise)untiltheredarrowslineup.ThiswillstoptheBrush
Roll from turning.
ReturntheL-shapedhandleontheBeltLiftertoitsclosed
positionandlowertheHeadlightHood.UsetheToe-Touch
Control
™
to adjust the Power Nozzle to its lowest setting. ❏
4
CAUTION:
To reduce risk of injury in the portable mode, keep hair and loose clothing
away from the
Ultimate G
while in operation.
Also make sure TechDrive is in the neutral position whan vacuuming stairs.
!

17
for those who appreciate quality, reliability & performance
CanisterCleaner&Attachments
CanisterCleaner&Attachments
PART THREE
Your Kirby
®
Ultimate G comes with a wide variety of
attachments for added versatility. In this section, we will dis-
cuss the following:
Removing the Power Nozzle to Convert
to a Canister Cleaner
Using Extension Tubes
Using the Surface Nozzle, Duster Brush,
Upholstery Nozzle, Crevice Tool, Wall &
Ceiling Brush and the Massage Cup
Using the Suction Control Grip
Using your Ultimate G as a Blower Unit
Using the Portable Sprayer and the
Portable Shampooer
This section will add even greater value to your Ultimate G
by providing information you need to use attachments for a
wide variety of jobs.

18
The Kirby Company
LocktheAttachmentHoseConnectorinplaceby
turning the Accessory Lock
o
22 all the way to the
right (clockwise). (Accessory Lock will clamp the
AttachmentHosetotheUltimate G.)
WiththeAttachmentHoseinplace,theUltimate G will
automatically adjust to high speed for hose operation.
NOTE: If the Ultimate G will not run when the Power
Switch is ON, see page 51. ❏
CONVERTINGTOACANISTERCLEANER/
INSTALLINGTHEATTACHMENTHOSE
When using different cleaning attachments, the Attachment
Hoseisconnectedtothefrontofthecleanerinplaceofthe
Power Nozzle
o
25 .
NOTE:WhenconnectingtheAttachmentHose,youmay
choosebetweentheUprightHandle
o
17 or the Portable
Handle
o
15 .ToinstallthePortableHandle,seepage15.
ToinstalltheAttachmentHose,youmustfirstconvert
to a Canister by removing the Power Nozzle. To do so,
press the Toe-Touch Control
™
BottomPedal
o
9 all the
way down until nozzle is fully raised. Disengage
TechDrive
®
by stepping on the gray “N” side (marked “N” for
Neutral)oftheTechDrivePowerAssistN/DPedal
o
11 . Turn the
Ultimate G OFF by pressing the Power Switch
o
13 and then
unplugging. ➤
RaisetheHeadlightHood
o
21 and flip out the L-shaped
handleontheBeltLifter
o
20.UseittoturntheBelt
Lifter all the way to the left (counter-clockwise) until
the red arrows line up.
Unlock the Power Nozzle by turning the Accessory Lock
o
22 all the way to the left (counter-clockwise). The Power
Nozzle should tip forward when it is released. Lift the
nozzle away from the Ultimate G and off. ➤
AttheconnectorendoftheAttachmentHose,youwill
noticetwohook-shapedlugs.Hookthelugsoverthe
endsoftheAttachingBar
o
24 , then push the opening of
the hose up against the Ultimate G.
1
2
4
5
3
CAUTION:
In normal operation, friction between the belt and the metal motor
shaft may cause the metal motor shaft to become hot to the touch.
!
CanisterCleaner&Attachments
CanisterCleaner&Attachments
Converting to a Canister Cleaner/Installing the Attachment Hose

19
for those who appreciate quality, reliability & performance
INSTALLINGATTACHMENTSONTHE
ATTACHMENTHOSE
To attach tools to the hose, push lightly while twisting the
smaller end of the hose into the tool. ❏
ATTACHINGTHESUCTIONRELIEF
UPHOLSTERYPANEL
To attach the suction relief faceplate for drapes and delicate
upholstery, insert the lip on the front edge of the upholstery
tool under the two tabs on the front of the suction relief
faceplate as shown.
Push down the rear of the upholstery tool as shown to snap
the suction relief faceplate into place.
To remove the suction relief faceplate, reverse the
above procedure. ❏
EXTENSIONTUBES
One or two Extension Tubes can be attached to the end of
the hose to extend your reach and efficiently use various
attachments. ❏
SURFACE NOZZLE
The Surface Nozzle may be used on bare floors or for sur-
face cleaning carpets and under low furniture.
Rubber wheels on the nozzle allow it to glide silently on the
surface of hard floors without scratching and vacuum with
maximum power. ❏
CanisterCleaner&Attachments
CanisterCleaner&Attachments
Installing/Using the Attachments
/