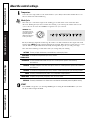
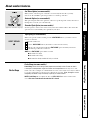
GE WPRE6280 is an advanced washing machine with a range of features designed to make laundry day easier and more efficient. Its Color Logic system guides you through selecting the right settings for different types of fabrics, ensuring optimal cleaning results. Choose from various wash cycles tailored to specific needs, including Cottons, Easy Care/Perma Press, Handwash, Delicate, Casuals, Super, Quick Rinse, and Prewash. The Wash/Spin Speeds dial offers customizable agitation and spin speeds, from delicate to normal, accommodating various fabrics.
GE WPRE6280 is an advanced washing machine with a range of features designed to make laundry day easier and more efficient. Its Color Logic system guides you through selecting the right settings for different types of fabrics, ensuring optimal cleaning results. Choose from various wash cycles tailored to specific needs, including Cottons, Easy Care/Perma Press, Handwash, Delicate, Casuals, Super, Quick Rinse, and Prewash. The Wash/Spin Speeds dial offers customizable agitation and spin speeds, from delicate to normal, accommodating various fabrics.


-
 1
1
-
 2
2
-
 3
3
-
 4
4
-
 5
5
-
 6
6
-
 7
7
-
 8
8
-
 9
9
-
 10
10
-
 11
11
-
 12
12
-
 13
13
-
 14
14
-
 15
15
-
 16
16
-
 17
17
-
 18
18


GE WPRE6280 is an advanced washing machine with a range of features designed to make laundry day easier and more efficient. Its Color Logic system guides you through selecting the right settings for different types of fabrics, ensuring optimal cleaning results. Choose from various wash cycles tailored to specific needs, including Cottons, Easy Care/Perma Press, Handwash, Delicate, Casuals, Super, Quick Rinse, and Prewash. The Wash/Spin Speeds dial offers customizable agitation and spin speeds, from delicate to normal, accommodating various fabrics.
Ask a question and I''ll find the answer in the document
Finding information in a document is now easier with AI
Related papers
Other documents
-
Maytag HAV2460AWW User manual
-
Amana NAV-1 Owner's manual
-
-
KitchenAid KAWS700J User manual
-
-
-
Whirlpool 6LSR7244EQ0 User manual
-
-
Admiral AAV7000AWW Owner's manual
-