Amprobe SOLAR-100 Solar Power Meter User manual
- Category
- Measuring, testing & control
- Type
- User manual
Amprobe SOLAR-100 Solar Power Meter is designed to measure solar energy and radiation for various applications, including:
- Assessing the effectiveness of solar films
- Measuring solar radiation intensity
- Evaluating light intensity through car windows
- Determining optimal incident angles for solar panels
- Measuring sun transmission through transparent and film glass Its key features include:
- Easy operation with no adjustments required
- Clear and intuitive display
- Max/Min function for capturing extreme values
- Data hold function for convenient readings
- Auto-ranging capability for accurate measurements across a wide range of light intensities

Users Manual
• Mode d’emploi
• Bedienungshandbuch
• Manual d’Uso
• Manual de uso
SOLAR-100
Solar Power Meter

SOLAR-100
Solar Power Meter
Users Manual
July 2009, Rev.1
©2009 Amprobe Test Tools.
All rights reserved. Printed in China
English

Limited Warranty and Limitation of Liability
Your Amprobe product will be free from defects in material
and workmanship for 1 year from the date of purchase. This
warranty does not cover fuses, disposable batteries or damage
from accident, neglect, misuse, alteration, contamination, or
abnormal conditions of operation or handling. Resellers are not
authorized to extend any other warranty on Amprobe’s behalf.
To obtain service during the warranty period, return the product
with proof of purchase to an authorized Amprobe Test Tools
Service Center or to an Amprobe dealer or distributor. See Repair
Section for details. THIS WARRANTY IS YOUR ONLY REMEDY.
ALL OTHER WARRANTIES - WHETHER EXPRESS, IMPLIED OR
STAUTORY - INCLUDING IMPLIED WARRANTIES OF FITNESS FOR
A PARTICULAR PURPOSE OR MERCHANTABILITY, ARE HEREBY
DISCLAIMED. MANUFACTURER SHALL NOT BE LIABLE FOR ANY
SPECIAL, INDIRECT, INCIDENTAL OR CONSEQUENTIAL DAMAGES
OR LOSSES, ARISING FROM ANY CAUSE OR THEORY. Since some
states or countries do not allow the exclusion or limitation of an
implied warranty or of incidental or consequential damages, this
limitation of liability may not apply to you.
Repair
All test tools returned for warranty or non-warranty repair or
for calibration should be accompanied by the following: your
name, company’s name, address, telephone number, and proof of
purchase. Additionally, please include a brief description of the
problem or the service requested and include the test leads with
the meter. Non-warranty repair or replacement charges should be
remitted in the form of a check, a money order, credit card with
expiration date, or a purchase order made payable to Amprobe®
Test Tools.
In-Warranty Repairs and Replacement – All Countries
Please read the warranty statement and check your battery before
requesting repair. During the warranty period any defective test
tool can be returned to your Amprobe® Test Tools distributor
for an exchange for the same or like product. Please check the
“Where to Buy” section on www.amprobe.com for a list of
distributors near you. Additionally, in the United States and
Canada In-Warranty repair and replacement units can also be sent
to a Amprobe® Test Tools Service Center (see address below).

Non-Warranty Repairs and Replacement – US and Canada
Non-warranty repairs in the United States and Canada should be
sent to a Amprobe® Test Tools Service Center. Call Amprobe® Test
Tools or inquire at your point of purchase for current repair and
replacement rates.
In USA In Canada
Amprobe Test Tools Amprobe Test Tools
Everett, WA 98203 Mississauga, ON L4Z 1X9
Tel: 877-AMPROBE (267-7623) Tel: 905-890-7600
Non-Warranty Repairs and Replacement – Europe
European non-warranty units can be replaced by your Amprobe®
Test Tools distributor for a nominalv charge. Please check the
“Where to Buy” section on www.amprobe.com for a list of
distributors near you.
European Correspondence Address*
Amprobe® Test Tools Europe
In den Engematten 14
79286 Glottertal, Germany
Tel.: +49 (0) 7684 8009 - 0
*(Correspondence only – no repair or replacement available from
this address. European customers please contact your distributor.)

3
5
6
7
1
2
3
4
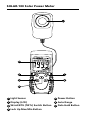
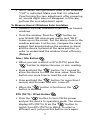
SOLAR-100 Solar Power Meter
Light Sensor
Display (LCD)
W/m2/BTU (ft2*h) Switch Button
Lock Up Max/Min Button
Power Button
Auto Range
Data Hold Button
1
2
4 7
3
5
6

3
CONTENTS
SYMBOLS ...........................................................................2
Warning and Precautions .............................................2
UNPACKING AND INSPECTION ........................................3
INTRODUCTION .................................................................3
OPERATION ........................................................................4
SPECIFICATION ..................................................................7
MAINTENANCE AND REPAIR ............................................8
BATTERY REPLACEMENT ..................................................8

4
5
SYMBOLS
Caution! Refer to the explanation in this Manual
Conforms to relevant Australian standards
Complies with European Directives
Do not dispose of this clamp meter as unsorted
municipal waste. Contact a qualified recycler for
disposal.
Warning and Precautions
For your own safety and to avoid damaging the
instrument follow the procedures described in this
instruction manual and read carefully all notes preceded
by this symbol
When taking measurements:
• Avoid doing that in humid or wet places or using
in rooms where explosive gas, combustible gas,
steam or excessive dust is present.
• Avoid doing that if you notice anomalous
conditions such as breakages, deformations,
fractures, leakages of battery liquid, blind display
etc.
• Operating environment: for indoor use, expose to
pollution level II.
• Do not put this device in direct sunlight or where
it is hot and/or damp.
Remember to turn OFF the power after use. For
long storage, remove the battery to prevent the
battery from leaking to cause damage to the parts
inside.
• This is a precision device. During use or storage,
do not go beyond its spec. to prevent any possible
damage or danger

4
5
UNPACKING AND INSPECTION
Your shipping carton should include:
1 SOLAR-100 Solar Power Meter
1 9 volt battery
1 User manual
If any of the items are damaged or missing, return
the complete package to the place of purchase for an
exchange.
INTRODUCTION
The SOLAR-100 measures the solar energy and radiation,
the typical application for this model are:
• Transmission measurement is most suitable for
measuring the effectiveness of the solar film.
• Solar radiation measurement.
• Car windows light intensity measurement.
• Optimal incident angle for the solar panel.
• Measurement of the sun’s transmission through
transparent and film glass.
• Convenient, no need to adjust, data displayed
clearly.

6
7
OPERATION
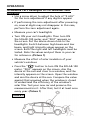
To Measure Car’s Headlights or Car Windows Solar
Insulation
• Use a screw driver to adjust the hole of “0 ADJ”
for the zero adjustment if any digits is appear
• If performing the zero adjustment after powering
on, several digits may not disappear. In this case,
perform the zero adjustment again.
• Measure your car’s headlights
• Turn ON your car’s headlights. Then turn ON
the SOLAR-100 meter, and “00.0” appears on
the screen. Put the device down close to the
headlights. Switch between high beam and low
beam, and light intensity values appear on the
screen. Both the right and left headlights must be
tested. Note the values and put them in your car
for reference. (Picture 1)
• Measure the effect of solar insulation of your
vehicle’s windows
• Press the “
” button to turn ON the SOLAR-100
meter, “00.0” appears on the screen. Aim the
device at the sun and close to a window, and the
intensity appears on the screen. Open the window
and aim the device at the sun. Compare the value
against that acquired when the window is closed
to understand the efficiency of the window’s
solar film. Test your new car and preserve the
measurements in it. After that, test it at least once
every year. (Picture 1)
Picture 1.

6
7
• NOTE: When the light sensor cover is not attached
“CAP” is indicated. Make sure that it is attached.
If performing the zero adjustment after powering
on, several digits may not disappear. In this case,
perform the zero adjustment again.
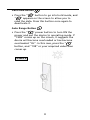
To Measure House’s Windows Solar Insulation
• Measure the solar insulation effect of your house’s
windows
• Close the window. Press the “
” button on
your SOLAR-100 solar power meter, and “00.0”
comes up on the screen. Put the device close to the
window and aim it at the sun. Compare the value
against that acquired when the window is closed
and the device is placed at the same position, in
order to understand the window’s heat efficiency.
(Picture 2)
Max / Min Button
• When you test in W/m2 or BTU (ft2*h) press the
“
” button to display the max. or min. reading.
• Press and hold the “
” button for 1 second to
allow the device to read the max. value. Press the
button one more time to read the min value.
• Press and hold the “
” button for more than 1
second, and the max. and min. come off.
• When the “
” button is functional, the “ ”
button is disabled.
BTU (ft2*h) / W/m2 Button
• Press the “ ” button to turn ON the power
and put the device to operating mode. The screen
displays BTU (ft2*h). Press the “
” button to
switch from BTU (ft2*h) to W/m2. To select a
different unit, just press this button once again.

8
9
Data Hold Button
• Press the “ ” button to go into hold mode, and
“
” appears on the screen to allow you to
read the data. Press this button once again to
deactivate it.
Auto Range Button
• Press the “ ” power button to turn ON the
power and put the device to operating mode. If
“1999” comes up on the screen, it suggests the
device will become overloaded or has become
overloaded “OL”. In this case, press the “
”
button, and “199” or your acquired value then
comes up.
Picture 2.

8
9
SPECIFICATION
Battery Life : Approx. 100 hr
Accuracy : Typically within ± 10W/m2 [±3 BTU / (ft2*h)]
or ±5%, whichever is greater in sunlight; Additional
temperature induced error ±0.38W/m2 / °C [±0.12 BTU /
(ft2*h)/ °C] from 25°C
Operating temp. & RH : 5°C ~ 40°C, below 80%RH
Storage temp. & RH : -10°C ~ 60°C, below 70%RH
Display : 3-1/2 digits LCD with maximum reading 1999
Sampling Time : Approx. 0.25 second
Resolution : 0.1W/m2 ; 0.1 BTU /(ft2*h)
Accuracy : < ±3/year
Over-input : Display shows ”OL”
Range : 1999W/m 2 ; 634 BTU /(ft 2 * h).
Dimensions : 132(L) x 60(W) x 38 (H)mm
Weight : Approx. 150g.
EMC : This instrument is EMC-compliant and has
undergone compatibility tests according to EN61326-1:
2006
- EMC: Conforms to EN61326-1.
This product complies with requirements of the
following European Community Directives: 89/ 336/
EEC (Electromagnetic Compatibility) and 73/ 23/ EEC
(Low Voltage) as amended by 93/ 68/ EEC (CE Marking).
However, electrical noise or intense electromagnetic
fields in the vicinity of the equipment may disturb the
measurement circuit. Measuring instruments will also
respond to unwanted signals that may be present within
the measurement circuit. Users should exercise care
and take appropriate precautions to avoid misleading
results when making measurements in the presence of
electronic interference.

10
MAINTENANCE AND REPAIR
If there appears to be a malfunction during the
operation of the meter, the following steps should be
performed in order to isolate the cause of the problem.
1. Check the battery. Replace the battery
immediately when the “” symbol appears on
the LCD.
2. Review the operating instructions for possible
mistakes in operating procedure.
Except for the replacement of the battery, repair of the
meter should be performed only by a Factory Authorized
Service Center or by other qualified instrument service
personnel. The front panel and case can be cleaned with
a mild solution of detergent and water. Apply sparingly
with a soft cloth and allow to dry completely before
using. Do not use aromatic hydrocarbons or chlorinated
solvents for cleaning.
BATTERY REPLACEMENT
When the symbol “” is displayed, batteries need
replacement.
Unscrew the battery cover and remove the battery. Insert
a new battery of the same type (9V NEDA1604, JIS006P,
IEC6F22) observing the proper polarity, re-screw the
battery cover and reposition the protective holster.
• Type (9V NEDA1604, JIS006P, IEC6F22) observing
the proper polarity

-
 1
1
-
 2
2
-
 3
3
-
 4
4
-
 5
5
-
 6
6
-
 7
7
-
 8
8
-
 9
9
-
 10
10
-
 11
11
-
 12
12
-
 13
13
-
 14
14


Amprobe SOLAR-100 Solar Power Meter User manual
- Category
- Measuring, testing & control
- Type
- User manual
Amprobe SOLAR-100 Solar Power Meter is designed to measure solar energy and radiation for various applications, including:
- Assessing the effectiveness of solar films
- Measuring solar radiation intensity
- Evaluating light intensity through car windows
- Determining optimal incident angles for solar panels
- Measuring sun transmission through transparent and film glass Its key features include:
- Easy operation with no adjustments required
- Clear and intuitive display
- Max/Min function for capturing extreme values
- Data hold function for convenient readings
- Auto-ranging capability for accurate measurements across a wide range of light intensities
Ask a question and I''ll find the answer in the document
Finding information in a document is now easier with AI
Related papers
-
Amprobe FLASH-80 Industrial Mini Flashlight User manual
-
-
-
Amprobe FLASH-175 User manual
-
-
-
-
Amprobe AM-270 Industrial Multimeter User manual
-
-


