Page is loading ...

v. 091709
T100D
Endurance
®
T100D Treadmill
User Manual
v. T100D-030513
PLEASE CAREFULLY READ THIS ENTIRE MANUAL BEFORE
OPERATING
YOUR NEW TREADMILL!
Z100 / Z300
Z500
Z700
T100
OWNER’S MANUAL

I. REFERENCE DRAWINGS..............................
II. BEFORE YOU BEGIN.....................................
III. IMPORTANT SAFETY INSTRUCTIONS.........
IV. SAFETY GUIDELINES....................................
V. ASSEMBLY INSTRUCTIONS..........................
VI. ASSEMBLY STEPS........................................
VII. SETTING UP YOUR TREADMILL...................
VIII. OPERATING YOUR TREADMILL...................
IX. OPERATING THE CONSOLE.........................
X. PROGRAM FEATURES..................................
XI. TARGET HEART RATE ..................................
XII. CHEST STRAP OPERATION .........................
XIII. HEART RATE CONTROL OPERATION..........
XIV. GENERAL MAINTENANCE.............................
XV. TROUBLESHOOTING GUIDE........................
XVI. SETTING/SERVICE GUIDE............................
XVII. PARTS LIST....................................................
XVIII. EXPLODED VIEW DIAGRAM..........................
3
4
5
6 - 9
10 - 11
12 - 17
18
19
20 - 22
23 - 29
30 - 31
32
33
34 - 35
36
37 - 38
39 - 42
43
Table of Contents
2

Note: Due to continuing product improvements, specications and designs
are subject to change without notice.
Even though we have prepared this manual with extreme care, neither
the publisher nor the author can accept responsibility for any errors in,
or omission from, the information given.
Reference Drawings
3

Thank you for purchasing the Endurance T100 Treadmill.
To maximize your use of the equipment please study this Owner’s Manual thoroughly.
UNPACKING THE EQUIPMENT
The T100 is carefully tested and inspected before shipment. We have shipped the unit in
several pieces that require assembly. Ask for assistance during the assembly process.
CAUTION
Remove the Right and Left Uprights, Console and packing material carefully.
Hold the treadmill on each side and lift it out from the box carefully.
Position the treadmill on a at level surface.
Read the Owner’s Manual carefully before attempting to assemble the treadmill.
Endurance Equipment continually seeks ways to improve the performance, specications and product manuals in order to ensure that
only superior products are released from our factories. Please take the time to carefully read through this manual thoroughly.
Instructions contained in this document are not intended to cover all details or variations possible with Endurance Equipment, or to
cover every contingency that may be met in conjunction with installation, operation, maintenance or troubleshooting of the equipment.
Even though we have prepared this manual with extreme care, neither the publisher nor the author can accept responsibility for any
errors in, or omission from, the information given. Should additional information be required, or should situations arise that are not
covered by this manual, the matter should be directed to your local Endurance Equipment representative, or the Service Department
at Endurance Equipment in Forest Park, Illinois.
Any Questions?
Call (800) 556-3113
Before you Begin
4

Before beginning any tness program, you should obtain a complete physical examination
from your physician.
Il est conseille de subir un examen medical complet avant d’entreprendre tout programme d’exercise. Si vous
avez des etourdissements ou des faiblesses, arretez les exercices immediatement.
When using exercise equipment, you should always take basic precautions,
including the following:
Read all instructions before using the T100. These instructions are written to
ensure your safety and to protect the unit.
Do not allow children on or near the equipment.
Use the equipment only for its intended purpose as described in this guide.
Do not use accessory attachments that are not recommended by the manufacturer.
Such attachments might cause injuries.
Wear proper exercise clothing and shoes for your workout, no loose clothing.
Use care when getting on or off the unit.
Do not overexert yourself or work to exhaustion.
If you feel any pain or abnormal symptoms, stop your workout immediately and
consult your physician.
Never operate the unit after it has been dropped or damaged.
Return the equipment to a service center for examination and repair.
Never drop or insert objects into any opening in the equipment.
Always check the unit before each use.
Make sure that all fasteners are secure and in good working condition.
Do not use the equipment outdoors or near water.
PERSONAL SAFETY DURING ASSEMBLY
It is strongly recommended that a qualied dealer assemble the equipment.
Assistance is required.
Before beginning assembly, please take the time to read the instructions thoroughly.
Read each step in the assembly instructions and follow the steps in sequence.
Do not skip ahead. If you skip ahead, you may learn later that you have to
disassemble components and that you may have damaged the equipment.
Assemble and operate the T100 on a solid, level surface.
Locate the unit a few feet from the walls or furniture to provide easy access.
The T100 is designed for your enjoyment. By following these precautions and using common
sense, you will have many safe and pleasurable hours of healthful exercise with your
Endurance
T100.
After assembly, you should check all functions to ensure correct operation. If you experience
problems, rst recheck the assembly instructions to locate any possible errors made during
assembly. If you are unable to correct the problem, call the dealer from whom you purchased
the machine or call 1-800-556-3113 for the dealer nearest you.
Important Safety Instructions
5

Successful cardio training programs have one prominent feature in common...safety.
Cardio training has some inherent dangers, as do all physical activities.
The chance of injury can be greatly reduced or completely removed by using correct
running techniques, proper breathing, maintaining equipment in good working
condition, and by wearing the appropriate clothing.
It is highly recommended that you consult your physician before beginning
any exercise program. This is especially important for individuals over the
age of 35, or persons with pre-existing health problems.
Always warm up before starting a workout. Try to do a total body warm up
before you start. It is especially important to warm up the specic muscle
groups you are going to be using. This can be as simple as performing a
warm up set of high repetitions and light weight for each exercise.
Always wear appropriate clothing and shoes when exercising.
Wearing comfortable athletic shoes with good support and loose tting,
breathable clothing will reduce the risk of injury.
Maintaining equipment in proper operating condition is of utmost
importance for a safe cardio training program.
Read and study all warning labels on this machine. It is absolutely
necessary that you familiarize yourself and all others with the proper
operation of this machine prior to use.
Keep hands, limbs, loose clothing and long hair well out of the way of all
moving parts.
Inspect the machine daily for loose or worn parts. If a problem is found do
not allow the machine to be used until all parts are tightened or worn or
defective parts are repaired or replaced.
To reduce the risk of burns, re, electric shock, or injury to persons, install
the treadmill on a at level surface with access to a 120VAC, 15Amp,
grounded outlet.
Do not use an extension cord unless it is 14awg or larger, with only one
outlet on the end. the treadmill should be the only appliance in the electrical
circuit. do not attempt to disable the grounded plug by using improper
adapters, or in any way modify the cord set. a serious shock or re hazard
may result along with computer malfunctions.
Safety Guidelines
6

ELECTRICAL SAFETY
WARNING!
NEVER use a RCD - Residual Current Device (U.S. ver.= GFCI) - wall outlet with this treadmill. As with
any appliance with a large motor, the RCD/GFCI will trip often. Route the power mains cord away from
any moving part of the treadmill including the elevation mechanism and transport wheels.
NEVER remove any cover without rst disconnecting AC power. If voltage varies by ten percent (10%)
or more, the performance of your treadmill may be affected. Such conditions are not covered under
your warranty. If you suspect the voltage is low, contact your local power company or a licensed
electrician for proper testing.
NEVER expose this treadmill to rain or moisture. This product is NOT designed for use outdoors, near
a pool or spa, or in any other high humidity environment. The temperature specication is 40 degrees
c, and humidity is 95%, non-condensing (no water drops forming on surfaces).
Circuit Breakers: Some circuit breakers used in homes are not rated for high inrush currents that can
occur when a treadmill is rst turned on or even during normal use. If your treadmill is tripping the circuit
breaker (even though it is the proper current rating and the treadmill is the only appliance on the circuit)
but the circuit breaker on the treadmill itself does not trip, you will need to replace the breaker with a
high inrush type. This is not a warranty defect. This is a condition we as a manufacture have no ability
to control. This part is available through most electrical supply stores
GROUNDING INSTRUCTION
This product must be grounded. If the treadmill’s electrical system should malfunction or breakdown
grounding provides a path of least resistance for electric current, reducing the risk of electric shock.
This product is equipped with a cord having an equipment-grounding plug. The plug must be plugged
into an appropriate outlet that is properly installed and grounded in accordance with all local codes and
ordinances.
DANGER - Improper connection of the equipment-grounding conductor can result in a risk of
electric shock. Check with a qualied electrician or serviceman if you are in doubt as to whether
the product is properly grounded. Do not modify the plug provided with the product if it will not
t the outlet; have a proper outlet installed by a qualied electrician.
This product is for use on a nominal 120-volt circuit, and has a grounding plug that looks like the plug
illustrated below. A temporary adapter that looks like the adapter illustrated below may be used to
connect this plug to a 2-pole receptacle as shown below if a properly grounded outlet is not available.
The temporary adapter should be used only until a properly grounded outlet, (shown below) can be
installed by a qualied electrician. The green colored rigid ear-lug, or the like, extending from the
adapter, must be connected to a permanent ground such as a properly grounded outlet box cover.
Whenever the adapter is used, it must be held in place by a metal screw.
Safety Guidelines
7
-3-
WARNING!
NEVER use a RCD - Residual Current Device (U.S. ver.= GFCI) - wall outlet with this treadmill.
As with any appliance with a large motor, the RCD/GFCI will trip often. Route the power mains
cord away from any moving part of the treadmill including the elevation mechanism and
transport wheels.
NEVER remove any cover without first disconnecting AC power. If voltage varies by ten percent (10%)
or more, the performance of your treadmill may be affected. Such conditions are not covered
under your warranty. If you suspect the voltage is low, contact your local power company or a
licensed electrician for proper testing.
NEVER expose this treadmill to rain or moisture. This product is NOT designed for use outdoors,
near a pool or spa, or in any other high humidity environment. The temperature specification is 40
degrees c, and humidity is 95%, non-condensing (no water drops forming on surfaces).
Circuit Breakers: Some circuit breakers used in homes are not rated for high inrush currents that
can occur when a treadmill is first turned on or even during normal use. If your treadmill is tripping the
circuit breaker (even though it is the proper current rating and the treadmill is the only appliance on
the circuit) but the circuit breaker on the treadmill itself does not trip, you will need to replace the
breaker with a high inrush type. This is not a warranty defect. This is a condition we as a
manufacture have no ability to control. This part is available through most electrical supply stores.
This product must be grounded. If the treadmill’s electrical system should malfunction or
breakdown grounding provides a path of least resistance for electric current, reducing the risk of
electric shock. This product is equipped with a cord having an equipment-grounding plug. The plug
must be plugged into an appropriate outlet that is properly installed and grounded in accordance
with all local codes and ordinances.
DANGER - Improper connection of the equipment-grounding conductor can result in a risk
of electric shock. Check with a qualified electrician or serviceman if you are in doubt as to
whether the product is properly grounded. Do not modify the plug provided with the
product if it will not fit the outlet; have a proper outlet installed by a qualified electrician.
This product is for use on a nominal 120-volt circuit, and has a grounding plug that looks like the
plug illustrated below. A temporary adapter that looks like the adapter illustrated below may be
used to connect this plug to a 2-pole receptacle as shown below if a properly grounded outlet is
not available. The temporary adapter should be used only until a properly grounded outlet, (shown
below) can be installed by a qualified electrician. The green colored rigid ear-lug, or the like,
extending from the adapter, must be connected to a permanent ground such as a properly
grounded outlet box cover. Whenever the adapter is used, it must be held in place by a metal
screw.
Important Electrical Information
Grounding Instructions

This exercise equipment is designed and built for optimum safety for home use.
However, certain precautions always apply whenever you operate any exercise
equipment.
Be sure to read the entire manual before assembly and operation of this machine.
Also, please note the following safety precautions.
MECHANICAL SAFETY
Inspect the equipment prior to exercising to ensure that all nuts and bolts are
fully tightened before each use.
Replace any defective components immediately and/or keep the equipment out
of use until repair.
Do not use attachments not recommended by the manufacturer.
Never drop or insert an object into any opening.
Only one person may use the treadmill at a time.
Never activate the treadmill when someone is standing on the belt.
APPROPRIATE ATTIRE
Always wear appropriate clothing.
Do not wear loose clothing that might catch on any part of this treadmill.
Always wear non-slippery shoes while working with the treadmill.
Do not wear shoes with heels or leather soles.
Check the soles of your shoes and remove any dirt and embedded stones.
CHILDREN AND PETS
Most exercise equipment is not recommended for small children.
Children should not use the equipment unless they are under strict adult supervision.
To ensure safety, keep young children off the treadmill at all times.
Exercise equipment has many moving parts.
In the interest of safety, keep others (especially children and pets) at a safe distance
while you exercise.
FCC WARNING - POSSIBLE RADIO/TELEVISION INTERFERENCE
NOTE: This equipment has been tested and found to comply with Part 15 of the FCC rules. These limits are designed to
provide reasonable protection against harmful interference in a residential installation. Any changes or modications not
expressly approved by the party responsible for the compliance could void the user’s authority to operate the equipment.
This equipment generates, uses and can radiate radio frequency energy and, if not installed and used in accordance
with the instructions, may cause harmful interference to radio communications. However, there is no guarantee that the
interference will not occur in a particular installation.
If this equipment does cause harmful radio interference to radio or television reception, which can be determined by
turning the equipment off and on, you are encouraged to try to correct the interference by one or more of the following
measures:
Class R (Residential): Private or non-commercial use
• Reorient or relocate the receiving antenna
• Increase space between the equipment
• Plug the equipment into two electrical outlet located on separate circuits
• Consult an exercise equipment dealer or an experienced radio/TV technician for help
Safety Guidelines
8

Safety Guidelines
9
IMPORTANT OPERATION INSTRUCTIONS
● NEVER operate this treadmill without reading and completely understanding the
results of any operational change you request from the computer.
● Understand that changes in speed and incline do not occur immediately. Set your
desired speed on the computer console and release the adjustment key. The
computer will obey the command gradually.
● NEVER use your treadmill during an electrical storm. Surges may occur in your
household power supply that could damage treadmill components.
● Use caution while participating in other activities while walking on your treadmill;
such as watching television, reading, etc. These distractions may cause you to lose
balance or stray from walking in the center of the belt; which may result in serious
injury.
● NEVER mount or dismount the treadmill while the belt is moving. treadmills start
with at a very low speed and it is unnecessary to straddle the belt during start up.
Simply standing on the belt during slow acceleration is proper after you have
learned to operate the unit.Always hold on to a handrail or hand bar while making
control changes (incline, speed, etc.).
Do not use excessive pressure on console control keys. They are precision set to
function properly with little nger pressure. Pushing harder is not going to make the
unit go faster or slower. If you feel the buttons are not functioning properly with
normal pressure contact your dealer.
SAFETY TETHER CORD
A safety tether cord is provided with this unit. It is a simple magnetic design that should be
used at all times. It is for your safety should you fall or move too far back on the tread-belt.
Pulling this safety tether cord will stop tread-belt movement.
To Use:
1. Place the magnet into position on the console control head. Your treadmill will not start
and operate without this.
2. Fasten the plastic clip onto your clothing securely to assure good holding power.
Note: The magnet has strong enough power to minimize accidental, unexpected
stopping. The clip should be attached securely to make certain it does not come off. Be
familiar with its function and limitations. The treadmill will stop, depending on speed, with a
one to two step coast anytime the magnet is pulled off the console. Use the red Stop / Pause
switch in normal operation.

Assembly Instructions
10
Professional installers are highly recommended!
However, if you acquire the appropriate tools, obtain assistance, and follow the
assembly steps sequentially, the process will take time, but is fairly easy.
ASSEMBLY TIPS
Read all “NOTES” on each page before beginning each step.
While you may be able to assemble the T100 using the illustrations only, important safety
notes and other tips are included in the text.
Some pieces may have extra holes that you will not use. Use only those holes indicated in
the instructions and illustrations.
NOTE: To nd out the length of a particular bolt, measure its shank (the long, narrow part
beneath the head).
Refer to the following diagram:
Do not fully tighten bolts until instructed to do so.
NOTE: After assembly, you should check all functions to ensure correct operation. If you
experience problems, rst recheck the assembly instructions to locate any possible errors
made during assembly. If you are unable to correct the problem, call the dealer from whom
you purchased the machine or call 1-800-556-3113 for the dealer nearest you.

Hardware Pack Check List
11
-5-
Assembly Pack Check List
Step2
Step3
Step1
#117 - 3/8" x16.5 x2.0T x4H
Split Washer (6 pcs)
#144 - 3/8”-16 x 3”
Button Head Socket Bolt (6 pcs)
#134 - M5 x 12mm
Phillips Head Screw (4 pcs)
#116 -ψ3/8" x 35 x 2T
Flat Washer (6 pcs)
#134 - M5 x 12mm
Phillips Head Screw (4 pcs)
#117 - 3/8" x16.5 x2.0T x4H
Split Washer (6 pcs)
#125 -ψ3/8" x25 x2T
Flat Washer (6 pcs)
#145 – 3/8”-16 x3/4”
Button Head Socket Bolt (6 pcs)
#146 – M8 x1.25x12mm
Socket Head Cap Bolt (6 pcs)

Be careful to assemble all components
in the sequence they are presented.
A. Attach Right Upright (#34) to Frame Base using:
One Retaining Plate (#98)
Three 3/8”-16 x 3” Button Head Socket Bolts (#144)
Three 3/8” Lock Washers (#117)
Three 3/8” Flat Washers (#116)
Note: The right upright (34) is with preinstalled lower computer cable A. To install
uprights on the frame base, special care must be taken not to pinch the cable
between the upright and frame base.
B. Attach Left Upright (#33) to Frame Base using:
One Retaining Plate (#98)
Three 3/8”-16 x 3” Button Head Socket Bolts (#144)
Three 3/8” Lock Washers (#117)
Three 3/8” Flat Washers (#116)
C. Attach Motor Base Caps (#26 ) to Frame Base using
Four M5x12mm Phillips Head Screws (#134)
Step 1
12

Above shows STEP 1 assembled and completed.
Step 1
13

Be careful to assemble all components
in the sequence they are presented.
A. Connect Upper Computer Cable B (#41), Hand Pulse Assembly C & D (#37
& #38), Touch Pad/Backlit Cable E(#43) and Groud Wire F (#35) to the board on
on back of the console (#28)
B. Attach Console Assembly (#28) to Console Support (#5) using:
Four M5x12mm Phillips Head Screws (#134)
Step 2
14

Above shows STEP 2 assembled and completed.
Step 2
15

Be careful to assemble all components
in the sequence they are presented.
A. Attached the console to Mounting Brackets (#3 & #4) using:
Six M8x12mm Socket Head Cap Screws (#146)
B. Connect Upper Computer Cable F (#41) to Lower Computer Cable A (#42)
C. Attach the Mounting Brackets (#3 & #4) to the Uprights using:
Six 3/8”-16 x 3/4” Button Head Socket Bolts (#145)
Six 3/8” Lock Washer (#117)
Six 3/8” Flat Washer (#125)
Step 3
16

Above shows STEP 3 assembled and completed.
Step 3
17

PLACEMENT IN YOUR HOME
To make exercise a desirable daily activity for you, the treadmill should be placed in a
comfortable and attractive setting. This treadmill is designed to use minimal oor space and
to t nicely in your home.
Do not place or operate the treadmill outdoors.
Do not place the treadmill near water or in a high moisture content environment.
Make sure the power cord is not in the path of heavy trafc.
It is highly recommended to place a dedicated treadmill mat beneath your treadmill.
A dedicated mat provides superior stability and rmness for a proper workout.
Locate the treadmill at least 4 feet from walls or furniture.
Occasionally, after extended use, you will nd a ne black dust below your treadmill. This
is normal wear and DOES NOT mean there is anything wrong with your treadmill. This dust
can be easily removed with a vacuum cleaner. If you wish to prevent this dust from getting
on your oor or carpet, place a dedicated treadmill mat beneath your treadmill.
LEVELING THE BASE
It is important that you place the treadmill on a rm level surface. If the ground is uneven, you
may level the treadmill with levelers located under the deck. Make sure the back of the deck
is not higher than the front. If adjustments are to be made, check to see if the leverage feet,
as shown below, touch the ground rmly. If there is a gap, turn the leverage foot
counterclockwise to eliminate the gap.
Make sure the running deck is level to the ground. If the deck is positioned so that you are
running downhill, it will cause premature damage to the electronic system
Setting up your Treadmill
18

TURN POWER ON
The On/Off switch for the treadmill is located next to the power supply cord receptacle on the
front of the treadmill. Insert the power supply cord into the receptacle and ip the switch to
the “ON” position.
MOVING THE TREADMILL
This treadmill is easy to move around safely.
To move the treadmill:
1. Turn the power switch off.
2. Unplug the power cord.
3. Lift the rear of the treadmill to a comfortable angle.
4. Simply roll the treadmill on its front two wheels to the desired location.
5. Gently lower the rear of the treadmill to ground level.
STORE YOUR TREADMILL
Please follow these safety precautions, especially if you have children at home.
We suggest to take the following precautions when storing your treadmill.
1. When you nish your workout, turn the power switch to the off position.
2. Remove the plug from the outlet.
3. Remove the safety key.
It is imperative that the safety key is removed and kept away from children.
Operating your Treadmill
19

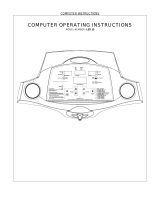
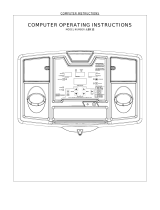
Getting familiar with the control panel
■ Console
Getting Started:
Power the treadmill on by plugging it into an appropriate wall outlet, then turn on the power
switch located at the front of the treadmill below the motor hood. Ensure that the safety key
is installed, as the treadmill will not power on without it.
When the power is turned on, all the lights on the display will light for a short time. Then the
Time and Distance windows will display Odometer readings for a short time. The Time win-
dow will show how many hours the treadmill has been in use and the Distance window will
show how many Kilometers (or Miles if the treadmill is set to English readings; see
maintenance for changing settings) the treadmill has gone. A message will be displayed
showing the current software version. The treadmill will then enter idle mode, which is the
starting point for operation.
Operating the Console
20
Getting familiar with the control panel
Console
Getting Started:
Power the treadmill on by plugging it into an appropriate wall outlet, then turn on the power switch
located at the front of the treadmill below the motor hood. Ensure that the safety key is installed,
as the treadmill will not power on without it.
When the power is turned on, all the lights on the display will light for a short time. Then the Time
and Distance windows will display Odometer readings for a short time. The Time window will show
how many hours the treadmill has been in use and the Distance window will show how many
Kilometers (or Miles if the treadmill is set to English readings; see maintenance for changing
settings) the treadmill has gone. A message will be displayed showing the current software version.
The treadmill will then enter idle mode, which is the starting point for operation.
Operation of Your Treadmill
/