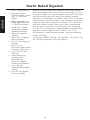
KitchenAid Mixer W10236413B User manual
- Category
- Pasta & ravioli makers
- Type
- User manual
This manual is also suitable for

This accessory has been
approved for use with all
KitchenAid
®
household
stand mixers.
L’utilisation de cet accessoire
a été approuvée pour
tous les batteurs sur socle
ménagers de KitchenAid
®
.
Este accesorio se ha
aprobado para usarse con
todas las batidoras de
uso doméstico con base
KitchenAid
®
.
PASTA PRESS
INSTRUCTIONS AND RECIPES
PRESSE-PÂTE
INSTRUCTIONS ET RECETTES
PRENSA PARA PASTA
INSTRUCCIONES Y RECETAS
KPEXTA
W10236413B
U.S.A.: 1-800-541-6390
Canada: 1-800-807-6777

Proof of Purchase
Always keep a copy of the sales receipt
showing the date of purchase of your Stand
Mixer Accessory. Proof of purchase will
assure you of in-warranty service.
Please complete the following for your
personal records:
Model Number __________________________________________________________________
Date Purchased __________________________________________________________________
Store Name and Location __________________________________________________________
Preuve d’achat
Comprobante de compra
Veuillez conserver une copie du coupon de
caisse indiquant la date d’achat de votre
Accessoires Du Batteur Sur Socle. La preuve
d’achat vous assure du service après-vente
sous garantie.
Veuillez remplir ce qui suit pour votre
dossier personnel :
Número del modelo __________________________________________________________
Fecha de compra ____________________________________________________________
Nombre de la tienda y dirección ________________________________________________
Numéro de modèle __________________________________________________________
Date d’achat ________________________________________________________________
Nom du magasin et emplacement ______________________________________________
Siempre conserve una copia del recibo de
ventas que especifique la fecha de compra de
sus aditamentos para la batidora con base.
El comprobante de compra le asegurará el
servicio técnico bajo garantía.
Complete lo siguiente para su
registro personal:

1
ENGLISH
Table of Contents
INTRODUCTION
Proof of Purchase ................................................................................. Inside Front Cover
Stand Mixer Accessory Safety ..........................................................................................2
Important Safeguards .....................................................................................................2
FEATURES AND OPERATION
To Assemble Pasta Press Accessory ..................................................................................3
Pasta Plates .....................................................................................................................5
To Attach Pasta Press Accessory ......................................................................................6
To Use Pasta Press Accessory ...........................................................................................6
To Change the Pasta Plates .............................................................................................7
To Loosen the Pasta Ring ................................................................................................7
Care and Cleaning ..........................................................................................................8
Pasta Making Tips ...........................................................................................................9
Cooking Pasta ...............................................................................................................10
RECIPES
Basic Egg Noodle Pasta .................................................................................................10
Light Wheat Pasta .........................................................................................................11
Whole Wheat Pasta ......................................................................................................11
Spinach Pasta ...............................................................................................................11
Deluxe Macaroni and Cheese ........................................................................................12
Classic Minestrone ........................................................................................................13
Pasta with Roasted Fresh Vegetable Sauce ....................................................................14
Asparagus, Tomato and Fusilli Salad .............................................................................15
Bolognese Pasta Sauce ..................................................................................................16
Seafood Cream Sauce ...................................................................................................17
Rustic Baked Rigatoni ....................................................................................................18
Chinese Peanut Noodles ................................................................................................19
WARRANTY AND SERVICE INFORMATION
KitchenAid
®
Stand Mixer Accessory Warranty ..............................................................20
Hassle-Free Replacement Warranty – 50 United States and District of Columbia ..........21
Hassle-Free Replacement Warranty – Canada ...............................................................21
How to Arrange for Warranty Service in Puerto Rico ....................................................21
How to Arrange for Service after the Warranty Expires – All Locations .........................22
How to Arrange for Service Outside these Locations ....................................................22
How to Order Accessories and Replacement Parts ........................................................22

2
ENGLISH
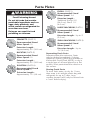
IMPORTANT SAFEGUARDS
Stand Mixer Accessory Safety
When using electrical appliances, basic safety precautions should always be followed
including the following:
1. Read all instructions.
2. To avoid risk of electrical shock, do not put mixer in water or other liquid.
3. Close supervision is necessary when any appliance is used by or near children.
4. Unplug the mixer from outlet when not in use, before putting on or taking off
parts, and before cleaning.
5. Avoid contacting moving parts. Keep fingers out of feed and discharge openings.
6. Do not feed dough by hand. Always use the combo tool to push food.
7. Do not operate the mixer with a damaged cord or plug or after the mixer
malfunctions, or is dropped or damaged in any manner. Return the mixer to the
nearest Authorized Service Center for examination, repair or electrical or mechanical
adjustment.
8. The use of accessories not recommended or sold by KitchenAid may cause fire,
electric shock or injury.
9. Do not use the mixer outdoors.
10. Do not let the cord hang over the edge of table or counter.
11. Do not let cord contact hot surface, including the stove.
12. This product is designed for household use only.
13. Also see Important Safeguards included in the mixer Instructions and Recipes
booklet.
SAVE THESE INSTRUCTIONS
Your safety and the safety of others are very important.
We have provided many important safety messages in this manual and on your
appliance. Always read and obey all safety messages.
This is the safety alert symbol.
This symbol alerts you to potential hazards that can kill or hurt you
and others.
All safety messages will follow the safety alert symbol and either
the word “DANGER” or “WARNING.” These words mean:
You can be killed or seriously injured
if you don’t immediately follow
instructions.
You can be killed or seriously injured
if you don’t follow instructions.
All safety messages will tell you what the potential hazard is, tell you how to
reduce the chance of injury, and tell you what can happen if the instructions are
not followed.
DANGER
WARNING

3
ENGLISH
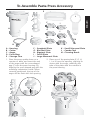
1. Place the press upside down on a
counter or table, and insert the end
of the auger with the cross-shaped
peg (C) into the press housing (A),
aligning the cross-shaped peg with the
matching indentation inside. When
correctly positioned, the top of the
auger will be flush with the opening.
To Assemble Pasta Press Accessory
2. Place one of the pasta plates (F, G, H,
I, J or K) over the opening, aligning its
center with the auger, matching the
tabs of the plate with the notches in
the press housing.
SMALL MACARONI
LARGE
MACARONI
FUSILLI
SPAGHETTI
BUCATINI
RIGATONI
A - Housing
B - Cutter
C - Auger
D - Pasta Ring
E - Storage Case
F - Spaghetti Plate
G - Bucatini Plate
H - Rigatoni Plate
I - Fusilli Plate
J - Large Macaroni Plate
K - Small Macaroni Plate
L - Combo Tool
M
- Cleaning Brush
C
D
E
F
G
H
I
L
J
K
A
B
RIGATONI
M

4
ENGLISH
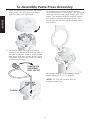
3. Place the pasta ring (D) over the plate
and gently turn by hand until finger
tight but not over tightened.
4. Insert the cutter (B) into the socket,
aligning the flange with the left side of
the slot as shown. Push in until locked
into place and turn cutter to the right.
The pasta press is now ready to attach
to the stand mixer.
To Assemble Pasta Press Accessory
A multipurpose combo tool (L) with a
hook and wrench is provided. The flat end
may be used to help push dough into the
press. The wrench may be used to loosen
the pasta ring from the press body. The
hook may be used to pry the auger out of
the casing.
A storage case (E) is provided to store
pasta plates (F, G, H, I, J and K).
NOTE: Do not use combo tool to
tighten pasta ring.
RIGATONI
RIGATONI
FLANGE
TURN AFTER
INSERTING
INTO SOCKET

5
ENGLISH
SPAGHETTI (PLATE F)
Recommended Stand
Mixer Speed: 10
Extrusion Length -
Approximately 9½" (24.0 cm).
BUCATINI (PLATE G)
Recommended Stand
Mixer Speed: 10
Extrusion Length -
Approximately 9½" (24.0 cm).
RIGATONI (PLATE H)
Recommended Stand
Mixer Speed: 6
Extrusion Length -
Approximately 1½" (4.0 cm).
FUSILLI (PLATE I)
Recommended Stand
Mixer Speed: 2-4
Extrusion Length -
Traditional (Long): 9½"
(24.0 cm); Short: 1½"
(4.0 cm).
LARGE MACARONI (PLATE J)
Recommended Stand
Mixer Speed: 6
Extrusion Length - Up to 2"
(5.0 cm).
SMALL MACARONI (PLATE K)
Recommended Stand
Mixer Speed: 6
Extrusion Length - Up to
1½" (4.0 cm).
Separating Fresh Pasta
Separate pasta after extrusion. Pasta
may be cooked immediately. If drying
instead of cooking, place long noodles on
KitchenAid
®
Drying Rack (KPDR), or dry in
a single layer on a towel placed on a flat
surface. Short pasta should be dried on a
flat surface.
Storing Fresh Pasta
To store fresh pasta, air dry for 1 hour,
then wrap in an airtight plastic bag and
refrigerate for up to 5 days. Long
noodles (except fusilli) may be formed into
a “nest” before drying.
Pasta Plates
SPAGHETTI
BUCATINI
RIGATONI
SMALL MACARONI
FUSILLI
WARNING
Food Poisoning Hazard
Do not let foods that contain
perishable ingredients such as
eggs, dairy products, and
meats remain unrefrigerated for
more than one hour.
Doing so can result in food
poisoning or sickness.
LARGE
MACARONI

6
ENGLISH
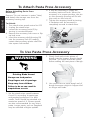
Before Attaching Pasta Press
Accessory
Remove “Do not immerse in water” label,
and detach the storage case from the
accessory housing top.
To Attach:
1. Turn stand mixer speed control to OFF.
2. Unplug the stand mixer.
3. Loosen the accessory knob (P) by
turning it counterclockwise.
4. Remove the accessory hub cover or flip
up hub cover.
5. Insert the accessory shaft housing (N)
into the accessory hub (O) making
certain that accessory power shaft fits
into square hub socket.
6. It may be necessary to rotate the
accessory back and forth. When the
accessory is in proper position, the pin
on the accessory housing will fit into
the notch on the hub rim.
7. Tighten the accessory knob by turning
it clockwise until the accessory is
completely secured to stand mixer.
P
O
N
To Attach Pasta Press Accessory
To Use Pasta Press Accessory
2. Slowly feed walnut-size pieces of
dough into the hopper; dough should
self-feed. The auger should be visible
before adding the next piece of dough.
3. Use combo tool to push dough only if
dough becomes caught in hopper and
no longer self feeds.
1. Set the stand mixer speed between
6 and 10, according to pasta type
and personal preference. For best
results, Fusilli should be extruded at a
maximum speed of 6. Slower speeds
are also recommended for very short
pasta. Longer pasta, such as Spaghetti
may be extruded at higher speeds.
Rotating Blade Hazard
Always use food pusher.
Keep fingers out of openings.
Keep away from children.
Failure to do so can result in
amputations or cuts.
WARNING

7
ENGLISH
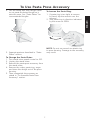
To Loosen the Pasta Ring:
1. If pasta ring is too tight to remove
by hand, slip the wrench over the
grooves.
2. Turn pasta ring in direction indicated
by the arrow to OPEN.
NOTE: Do not use wrench to attach ring
to press housing. Damage to the accessory
may result.
To Use Pasta Press Accessory
4. Use the swing-arm wire dough cutter
to cut pasta at desired length as it
exits the press. See “Pasta Plates” for
recommended lengths.
5. Separate pasta as described in “Pasta
Plates“ section.
To Change the Pasta Plates:
1. Turn stand mixer speed control to OFF.
2. Unplug the stand mixer.
3. Remove the pasta press accessory from
the stand mixer.
4. Remove the cutter, pasta ring, auger
and clean the dough out of the press
housing.
5. Then reassemble the accessory as
stated in “To Assemble Pasta Press
Accessory“ section.
O
P
E
N
C
L
O
S
E
O
P
E
N
C
L
O
S
E

8
ENGLISH
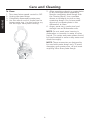
Care and Cleaning
To Clean:
1. Turn stand mixer speed control to OFF.
2. Unplug the stand mixer.
3. Completely disassemble pasta press.
4. Use the wrench end of combo tool to
loosen pasta ring. Use the hook to pry
out the auger from press housing.
5. Allow remaining dough on pasta plates
to dry overnight before separating.
Remove completely dried dough with
the Cleaning Brush. Use a wooden
skewer or toothpick to pick out any
remaining dough. Do not use metal
objects or put pasta plates in the
dishwasher to clean.
6. Auger, pasta ring, combo tool and
storage case are dishwasher safe.
NOTE: Do not wash press housing in
dishwasher or immerse in water or other
liquids. The cutter and pasta plates should
be hand washed in warm sudsy water and
dried thoroughly.
NOTE: These accessories are designed to
be used with pasta dough only. To avoid
damaging your pasta press, do not insert
anything other than pasta dough.

9
ENGLISH
NOTE: Mixer must rest at least 1 hour
after extruding 2 consecutive pasta
dough recipes.
Dough
• Learning to make homemade pasta
is simply a matter of practice. If you
have not made pasta, you may have to
prepare several batches of dough before
you feel comfortable. We recommend
experimenting with the Basic Egg
Noodle Pasta Recipe.
• The ratio of liquid to flour is small,
making the pasta dough firm and
leathery, but still pliable. It is extremely
important to have the correct proportion
of ingredients for proper dough
consistency, as dough that is too moist
or too dry will be difficult to work
with. To help you achieve consistent
results, the pasta recipes in this booklet
specify sifted flour. To sift flour, follow
this procedure: Place dry ingredient
measuring cup on a large piece of waxed
paper and hold sifter directly above and
close to cup. Scoop flour into sifter and
sift until flour exceeds top of cup. Using
the flat edge of a spatula, remove excess
flour from measuring cup.
• Occasionally, there may be unmixed
pieces of dough in the bowl after initial
mixing with the flat beater. These pieces
will be sufficiently incorporated by
stand mixer kneading followed by hand
kneading which firms and smoothes the
texture of the dough.
• Many factors, such as humidity, brand
of flour used, and size of eggs, can
affect dough consistency. To compensate
for humid conditions, start the initial
mixing process with only the sifted
flour and eggs. Check the dough for
proper consistency by pinching a small
amount of dough together after mixing
with the flat beater. The dough should
stay together without sticking to your
fingers. It may be necessary to add a
small amount of water or flour to reach
correct dough consistency.
• If the prepared dough is too moist or
sticky to extrude, simply dust with flour
or pat some flour into the dough before
placing in the extruder.
Using Your Pasta Press and
KitchenAid
®
Stand Mixer
• Long noodles and macaroni tend to curl
in different directions as they extrude
through the plate. The first 10"
(25.0 cm) of curled noodles may be
pulled off and returned to the hopper
to be extruded again. Pasta will extrude
slowly at first, then faster as more
dough is extruded.
• Separate pasta immediately after extrusion.
Lay a group of noodles on a towel placed
on a flat surface and pull apart from drier
ends of strands. Dry in a single layer. Long
strands of pasta may be placed on a
KitchenAid
®
Drying Rack (KPDR).
• Homemade pasta behaves differently
than store-purchased pasta. Because
long noodles bend as they dry and
are more fragile, they require gentle
handling before cooking.
Storing Your Pasta
• Store dried pasta in an airtight glass or
plastic container almost indefinitely in a
cool, dark place. However, do not store
dried whole-wheat pasta for more than
1 month, as it may turn rancid.
• To store fresh pasta, air dry for 1 hour,
then wrap in an airtight plastic bag and
refrigerate for up to 5 days. To freeze,
double wrap the pasta and keep frozen
for up to 4 months. To use frozen
fresh pasta, do not thaw – it should go
directly from freezer into boiling water.
Pasta Making Tips
WARNING
Food Poisoning Hazard
Do not let foods that contain
perishable ingredients such as
eggs, dairy products, and
meats remain unrefrigerated for
more than one hour.
Doing so can result in food
poisoning or sickness.

10
ENGLISH
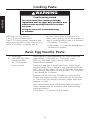
Add 2 tsp (10 mL) salt and
1 tbs (15 mL) oil (optional) to
6 qt (5.7 L) boiling water. Gradually add
pasta and continue to cook at a boil until
pasta is “al dente” or slightly firm to
the bite. Pasta floats to the top of the
water while cooking, so stir occasionally to
keep it cooking evenly. Drain in a colander.
• Dry pasta – 7 minutes
• Fresh pasta – 2–5 minutes depending on
thickness of noodles
Cooking Pasta
4 large eggs
3½ cups (830 mL) sifted
all-purpose flour
1 tbs (15 mL) water
1 tsp (2 mL) salt
Break eggs into a glass measuring cup. Check to see that
eggs measure
7
/8 cup (207 mL). If less than
7
/8 cup
(207 mL), add water, 1 tsp (2 mL) at a time, until
measurement is reached.
Place flour and salt in stand mixer bowl. Attach bowl
and flat beater. Turn to Speed 2 and gradually add eggs
and 1 tbs (15 ML) water. Mix for 30 seconds. Stop mixer
and exchange flat beater for dough hook. Turn to Speed
2 and knead for 2 minutes.
Remove mixture from bowl and place on clean surface.
Dough may appear crumbly. Hand knead for 30 seconds
to 1 minute or until dough is smooth, pliable and holds
together in a ball.
Form walnut-sized pieces and extrude pasta into desired
shape. Separate and dry as desired, then follow cooking
instructions above.
Yield: About 1 ¼ pounds (579 g) dough
Basic Egg Noodle Pasta
WARNING
Food Poisoning Hazard
Do not let foods that contain perishable
ingredients such as eggs, dairy products, and
meats remain unrefrigerated for more than
one hour.
Doing so can result in food poisoning
or sickness.

11
ENGLISH
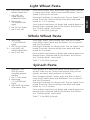
Spinach Pasta
1 package 10 oz
(285 g) frozen
chopped spinach,
thawed
1 tbs (15 mL) water
4 large eggs
(
7
/8 cup [208 mL]
eggs)
4 cups (945 mL) sifted
all-purpose flour
Place spinach in a towel and wring out all water until
spinach feels very dry. Finely chop spinach using a food
grinder accessory, food processor or blender.
Place chopped spinach, water, eggs, and flour in stand
mixer bowl. Attach bowl and flat beater. Turn to Speed 2
and mix 30 seconds.
Exchange flat beater for dough hook. Turn to Speed 2 and
knead 2 minutes. Remove dough from bowl and hand
knead for 1 to 2 minutes.
Form walnut-sized pieces of dough and extrude pasta into
desired shape. Separate and dry as desired, then follow
the “Cooking Pasta“ instructions.
Yield: 1
1
/2 lbs (680 g) dough.
Light Wheat Pasta
2
1
/2 cups (590 mL) sifted
whole wheat flour
1 cup (235 mL)
sifted bread or
unbleached flour
4 large eggs
(
7
/8 cup [208 mL]
eggs)
2 tbs (30 mL) water
1
/2 tsp (2 mL) salt
Place whole wheat flour, bread flour, eggs, water, and salt
in stand mixer bowl. Attach bowl and flat beater. Turn to
Speed 2 and mix 30 seconds.
Exchange flat beater for dough hook. Turn to Speed 2 and
knead 2 minutes. Remove dough from bowl and hand
knead for 1 to 2 minutes.
Form walnut-sized pieces of dough and extrude pasta into
desired shape. Separate and dry as desired, then follow
the “Cooking Pasta“ instructions.
Yield: 1
1
/4 lbs (565 g) dough.
Whole Wheat Pasta
4 large eggs
(
7
/8 cup [208 mL]
eggs)
2 tbs (30 mL) water
3
1
/2 cups (830 mL)
whole wheat flour
1
/2 tsp (2 mL) salt
Place eggs, water, whole wheat flour, and salt in stand
mixer bowl. Attach bowl and flat beater. Turn to Speed 2
and mix 30 seconds.
Exchange flat beater for dough hook. Turn to Speed 2 and
knead 2 minutes. Remove dough from bowl and hand
knead for 2 minutes.
Form walnut-sized pieces of dough and extrude pasta into
desired shape. Separate and dry as desired, then follow
the “Cooking Pasta“ instructions.
Yield: 1
1
/4 lbs (565 g) dough.

12
ENGLISH
Deluxe Macaroni and Cheese
3 tbs (45 mL) butter
2 tbs (30 mL) finely
minced onion
2 tbs (30 mL) flour
3 cups (780 mL) milk
4 oz (120 mL) extra
sharp Cheddar
cheese, shredded
4 oz (120 mL) Fontina
cheese, shredded
1 tsp (5 mL)
Worcestershire sauce
¼ tsp (1 mL)
garlic salt
1
/8 tsp (0.5 mL) pepper
1
/8 tsp (0.5 mL) paprika
1 recipe basic egg
noodle pasta
extruded into
short-cut large
macaroni, cooked
and drained
Melt butter in a large saucepan over medium heat. Add
onion and cook, stirring occasionally, for 4 to 5 minutes
or until translucent. Add flour and cook an additional
minute. Whisk in milk, and continue cooking over medium
heat until mixture comes to a boil and thickens slightly.
Reduce to low heat and stir in Cheddar and Fontina
cheeses, mixing until melted and well incorporated. Add
Worcestershire sauce, garlic salt, pepper, and paprika,
stirring well to combine. Remove from heat and set aside.
Place cheese mixture and cooked macaroni in large bowl,
mixing well to combine. Transfer mixture to a greased 9" x
13" x 2" (23 cm x 33 cm x 5 cm) baking pan. Cover tightly
with foil and bake at 350°F (180°C) for 25 to 30 minutes.
Remove foil and bake an additional 10 minutes to brown
and crisp top. Serve immediately.
Yield: 10 servings.
Per Serving: About 214 cal., 11 g protein, 16 g carb,
12 g total fat, 56 mg cholesterol, 258 mg sodium.

13
ENGLISH
Classic Minestrone
3 tbs (45 mL) olive oil
2 stalks celery, trimmed
and cut into ¼"
(0.65 cm) slices
3 carrots, peeled
and cut into ¼"
(0.65 cm) slices
2 small zucchini,
trimmed and
cut into ¼"
(0.65 cm) slices
1 small onion, chopped
1 shallot, finely
chopped
1 package (32 oz)
(946 mL) chicken
broth
2 cans (14.5 oz
[429 mL] each) petite
diced tomatoes with
juice
1 tsp (5 mL) dried
oregano
1 tsp (5 mL) dried basil
¼ tsp (1 mL) pepper
½ recipe basic egg
noodle pasta
extruded into
short-cut small
macaroni, uncooked
1 can (15.8 oz
[467 mL]) white
beans, rinsed and
drained
Heat olive oil in large pot over medium high heat. Add
celery, carrots, zucchini, onion, and shallot. Cook and stir
for 4 to 5 minutes, or until vegetables are softened.
Add chicken broth, tomatoes, oregano, basil, and pepper.
Increase heat to high and bring mixture to a boil. Add
pasta, and continue to boil until pasta has reached al
dente stage, about 4 to 5 minutes. Reduce heat to low
and stir in beans. Simmer an additional 5 minutes or until
beans are heated through. Serve immediately.
Yield: 10 servings.
Per Serving: About 97 cal., 4 g protein, 16 g carb, 2 g fat,
9 mg cholesterol, 466 mg sodium.

14
ENGLISH
Pasta with Roasted Fresh Vegetable Sauce
4 tbs (60 mL) olive oil,
divided
1 small zucchini,
trimmed and cut into
¼" (0.65 cm) slices
1 small yellow squash,
trimmed and cut into
¼" (0.65 cm) slices
1 small onion, chopped
3 cloves garlic, minced
1 package (8 oz)
(235 mL) sliced
button or baby Bella
mushrooms
8 large ripe Roma
tomatoes, peeled and
seeded if desired,
and cut into ½"
(1.25 cm) slices
1 tsp (5 mL) salt
1
/8 tsp (0.5 mL) pepper
½ cup (120 mL) chicken
or vegetable broth (if
desired)
½ recipe basic egg
noodle pasta
extruded into
short-cut large
macaroni, cooked
and drained
2 tbs (30 mL) coarsely
chopped basil leaves
2 tbs (30 mL) coarsely
chopped flat leaf
Italian parsley
½ cup (235 mL)
Parmesan cheese
Coat bottom and sides of a large glass or ceramic baking
pan with 1 tbs (15 mL) olive oil. Place zucchini, yellow
squash, onion, garlic, mushrooms, tomatoes, salt, and
pepper in baking pan. Drizzle with remaining oil and
mix well. Bake at 425°F (220°C) for 1 hour, stirring
mixture every 20 minutes, until vegetables are tender and
caramelized.
Remove from oven and add broth, if desired, to loosen
browned bits from bottom of pan and add additional
moisture. Let stand 10 minutes. Add hot cooked pasta,
basil, parsley, and Parmesan cheese. Mix well to combine
and serve immediately.
Yield: 8 servings.
Per Serving: About 149 cal., 6 g protein, 12 g carb, 9 g
fat, 17 mg cholesterol, 476 mg sodium.

15
ENGLISH
Asparagus, Tomato and Fusilli Salad
1 lb (455 g) asparagus,
trimmed and cut into
1" (2.5 cm) pieces
1 medium yellow bell
pepper, seeded and
diced
1 package (1 pint)
(550 mL) grape
tomatoes, halved
2 green onions,
trimmed and thinly
sliced
4 ounces (120 mL)
smoked provolone
cheese, diced
¼ cup (60 mL) chopped
parsley
½ cup (120 mL) olive oil
2 tbs (30 mL) balsamic
vinegar
3 tbs (45 mL) red wine
vinegar
2 cloves garlic, finely
minced
½ tsp (2 mL) salt
1
/8 tsp (0.5 mL) pepper
½ recipe basic egg
noodle pasta
extruded into
short-cut fusilli,
cooked, rinsed and
cooled
Bring medium saucepan with 2 cups (475 ml) water to
boil over high heat. Add asparagus, cover, and continue
to boil for 2 to 3 minutes, or until tender crisp. Remove
asparagus from pan and immediately submerse in cold
water. Rinse well and place in large bowl. Add yellow
pepper, tomatoes, green onions, provolone cheese, and
parsley. Mix well and set aside.
In small bowl, whisk together oil, vinegars, garlic, salt, and
pepper. Pour mixture over vegetables and let stand
15 minutes. Add cooked pasta and mix well to combine.
Cover and refrigerate one hour or until well chilled.
Serve cold.
Yield: 8 servings.
Per Serving: About 226 cal., 6 g protein, 11 g carb, 18 g
fat, 21 mg cholesterol, 297 mg sodium.

16
ENGLISH
Bolognese Pasta Sauce
Serve with Spaghetti
or Bucatini Pasta
1 lb (455 g) lean
ground beef
1 lb (455 g) ground
pork
2 carrots, peeled and
finely chopped
2 stalks celery, finely
chopped
1 medium onion, finely
chopped
4 cloves garlic, minced
½ cup (120 mL) dry red
wine
2 cans (28 oz
[828 mL] each)
crushed tomatoes
2 cans (6 oz
[177 mL] each)
tomato paste
1 can (14 ½ oz
[428 mL]) chicken or
beef broth
2 tsp (10 mL) dried
basil
2 tsp (10 mL) dried
oregano
2 fresh bay leaves
½ tsp (2 mL) crushed
red pepper flakes
2 tsp (10 mL) sugar
Salt and pepper to
taste
In large pot or Dutch oven over medium-high heat, cook
and crumble ground beef and pork, about 5 minutes. Add
carrots, celery, onion, and garlic to pot and continue to
cook and finely crumble mixture until meat is thoroughly
cooked, about 8 to 9 minutes. Remove from heat and
drain all excess fat. Return pot to medium heat and
add red wine. Cook and stir 3 minutes. Add remaining
ingredients, reduce heat and simmer for 1 hour, stirring
occasionally. Remove bay leaves and serve over hot pasta.
Yield: 10 servings.
Per Serving: About 268 cal., 21 g protein, 22 g carb, 11 g
fat, 57 mg cholesterol, 820 mg sodium.

17
ENGLISH
Seafood Cream Sauce
Serve with Large
Macaroni or Fusilli
Pasta
8 oz (235 mL) shrimp,
peeled and deveined
8 oz (235 mL) bay
scallops
2 tbs (30 mL) butter
1 small shallot, finely
chopped
¼ cup (60 mL) dry white
wine
1 cup (235 mL) half
and half
1 cup (235 mL) grated
Parmesan cheese
¼ tsp (1 mL) salt
1
/8 tsp (0.5 mL) pepper
Dash nutmeg
Place shrimp and scallops between layers of paper towels
to remove excess moisture; set aside. Melt butter in large
skillet over medium heat. Add shallot and sauté for 2 to
3 minutes, stirring occasionally. Add shrimp and scallops
to skillet and cook, stirring occasionally, for 3 to
4 minutes, or just until seafood turns opaque. Stir in
white wine and simmer mixture 1 to 2 minutes. Add half
and half, Parmesan cheese, salt, pepper, and nutmeg.
Continue to cook, stirring occasionally, until mixture just
begins to simmer and cheese is melted. Do not boil.
Sauce will be thin. Remove from heat immediately and
toss with hot pasta.
Yield: 6 servings.
Per Serving: About 248 cal., 22 g protein, 5 g carb,
14 g fat, 109 mg cholesterol, 608 mg sodium.

18
ENGLISH
Rustic Baked Rigatoni
1 tbs (15 mL) olive oil
2 boneless skinless
chicken breasts, sliced
into ¼" (0.65 cm)
pieces
2 Italian sausage links,
sliced diagonally into
¼" (0.65 cm) pieces
1 small onion, sliced
1 small green pepper,
seeded and sliced
2 large cloves garlic,
minced
1 tsp (5 mL) chopped
fresh rosemary
1
/8 tsp (0.5 mL) cayenne
pepper
1 can (14.5 oz
[428 mL]) petite diced
tomatoes with juice
¾ cup (175 mL) half
and half
½ recipe basic egg
noodle pasta
extruded into
short-cut rigatoni,
cooked and drained
½ cup (120 mL)
shredded Mozzarella
cheese
¼ cup (60 mL) grated
Romano cheese
Heat oil in large skillet over medium heat. Add chicken
and sausage links and cook, stirring occasionally, for 5 to
6 minutes. Add onion, green pepper, and garlic. Continue
cooking and stirring until meat is completely cooked
through and vegetables are tender, about 6 to 7 minutes.
Add rosemary, cayenne pepper, and tomatoes. Stir well to
combine and bring mixture to a simmer. Stir in half and
half and remove mixture from heat. Add cooked pasta
and stir well to combine. Transfer mixture to a greased
2½ -qt (2.3 L) baking dish. Sprinkle with mozzarella and
Romano cheeses. Bake at 350°F (180°C) for 15 to
20 minutes, or until heated through. Serve immediately.
Yield: 8 servings.
Per Serving: About 369 cal., 24 g protein, 15 g carb, 24 g
fat, 94 mg cholesterol, 587 mg sodium.
Page is loading ...
Page is loading ...
Page is loading ...
Page is loading ...
Page is loading ...
-
 1
1
-
 2
2
-
 3
3
-
 4
4
-
 5
5
-
 6
6
-
 7
7
-
 8
8
-
 9
9
-
 10
10
-
 11
11
-
 12
12
-
 13
13
-
 14
14
-
 15
15
-
 16
16
-
 17
17
-
 18
18
-
 19
19
-
 20
20
-
 21
21
-
 22
22
-
 23
23
-
 24
24
-
 25
25


KitchenAid Mixer W10236413B User manual
- Category
- Pasta & ravioli makers
- Type
- User manual
- This manual is also suitable for
Ask a question and I''ll find the answer in the document
Finding information in a document is now easier with AI
Related papers
-
KitchenAid KSMCT1OB User guide
-
-
-
-
-
-
-
-
-
Other documents
-
Rival S12-GN User manual
-
-
Cosori Upgraded Personal Blender User guide
-
Lenoxx PR3565 Instructions Manual
-
Bellini BTPA700 User guide
-
Ronco Pasta Maker Owner's manual
-
Emeril Lagasse PM-01 User guide
-
Farberware FPM100 Owner's manual
-
Philips HR2357 User manual
-
Cuisinart 46260 User manual