
MICROWAVE OVEN
HORNO DE MICROONDAS
FOUR A MICRO-ONDES
INSTRUCTION MANUAL
MANUAL DE INSTRUCCIONES
MANUEL D’INSTRUCTIONS
MODEL / MODELO / MODÈLE: MOTR13D3S
BEF
ORE USE, PLEASE READ AND FOLLOW ALL SAFETY RULES AND OPERATING INSTRUCTIONS.
Av
anti has a policy of continuous improvement on its products and reserves the right to change materials and specifications
without notice.
Avanti Products LLC
P.O. Box 520604 - Miami, Florida 33152
www.avantiproducts.com

2
TABLE OF CONTENTS
Help Us Help You
3
Parts and Features
4
Important Safety Instructions
5
Installation Instructions
6
Before Using Your Microwave Oven
6
Installation of Your Microwave Oven
6
Safety Precautions
6 – 7
Electrical Connection
8
Operating Your Microwave Oven
8
Control Panel 9
Operation Procedure 9 - 14
Care and Maintenance
15 – 16
Problems with Your Microwave Oven?
17
Troubleshooting Guide
17
Service for Your Microwave Oven
18
Avanti Microwave Oven Warranty
19
Instrucciones en Español
20 – 35
Instructions en Français
36 - 54
Registration Information and Registration Card
Last Page

3
HELP US HELP YOU…
Re
ad this guide carefully.
It
is intended to help you operate and maintain your
new microwave oven properly.
Kee
p it handy to answer your questions.
If you don't understand something or you need more
assistance, please call:
Av
anti Customer Service
800-220-5570
Kee
p proof of original purchase date (such as your
sales slip) with this guide to establish the warranty
period.
Wr
ite down the model and serial numbers.
You'
ll find them on a label located on the rear wall of
the microwave oven.
Pl
ease write these numbers here:
_______
_____________________________
Date of Purchase
____________________________________
Model Number
_______
_____________________________
Serial Number
Use these numbers in any correspondence or service
calls concerning your microwave oven.
If you received a damaged microwave oven,
immediately contact the dealer (or builder) that sold
you the microwave oven.
Sa
ve time and money. Before you call for service,
check the Troubleshooting Guide. It lists causes of
minor operating problems that you can correct
yourself.
IF
YOU NEED SERVICE
We
're proud of our service and want you to be pleased. If
for some reason you are not happy with the service you
receive, here are some steps to follow for further
assistance.
FIRST, contact the people who serviced your microwave
oven. Explain why you are not pleased. In most cases, this
will solve the problem.
NE
XT, if you are still not pleased, write all
the details, including your telephone
number, and send it to:
Customer Service
Avanti Products
10880 NW 30 Street
Miami, FL 33172 USA

4
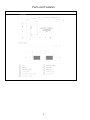
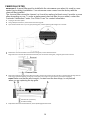
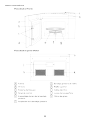
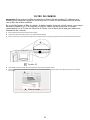
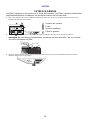
Parts and Features

5
IMPORTANT SAFETY INSTRUCTIONS
When using electrical appliances basic safety precautions should be followed, including the
following:
WARNING
To reduce the risk of burns, electrical shock, fire,
injury to persons, or exposure to excessive
microwave energy when using your appliance,
follow these basic precautions:
• Read all instructions before using the appliance.
• Read and follow the specific “PRECAUTIONS TO AVOID POSSIBLE EXPOSURE TO
EXCESSIVE MICROWAVE ENERGY” found on page 6.
• This appliance must be grounded. Connect only to properly grounded outlet.
SEE GROUNDING INSTRUCTIONS found on page 8.
• Install or locate the appliance only in accordance with the provided installation instructions.
• When cleaning surfaces of door and oven that comes together on the closing door, use only mild,
nonabrasive soaps, or detergents applied with a sponge or soft cloth.
• Liquids, such as water, coffee, or tea are able to be overheated beyond the boiling point without
appearing to be boiling. Visible bubbling or boiling when the container is removed from the
microwave oven is not always present. THIS COULD RESULT IN VERY HOT LIQUIDS
SUDDENLY BOILING OVER WHEN THE CONTAINER IS DISTURBED OR A UTENSIL IS
INSERTED INTO THE LIQUID.
• Some products such as whole eggs and sealed containers-(for example, closed glass jars) may
explode and should not be heated in microwave oven.
• Use this microwave oven only for its intended use as described in this manual.
• Do not use corrosive chemicals or vapors in this appliance. This type of oven is specifically
designed to heat, cook, or dry food. It is not designed for industrial or laboratory use.
• As with any appliance, close supervision is necessary when used by children.
• Do not operate this microwave oven if it has a damaged cord or plug, if it is not working properly, or
if it has been damaged or dropped.
• To reduce the risk of fire in the oven cavity:
• Do not overcook food. Carefully attend microwave oven if paper, plastic, or combustible
materials are placed inside the oven to facilitate cooking.
• Remove wire twist-ties from bags before placing bag in oven.
• If materials inside the oven should ignite, keep oven door closed, turn oven off at the wall
switch, or shut off power at the fuse or circuit breaker panel.
• Do not use the cavity for storage purposes. Do not leave paper products, cooking utensils, or
food in the cavity when not in use.
• Only qualified service personnel should service this appliance. Contact the nearest authorized
service facility for examination, repair or adjustment.
• Do not cover or block any openings on this appliance.
• Do not use this microwave oven to heat corrosive chemicals (for example, sulfides and chlorides).
Vapors from such corrosive chemicals may interact with the contact and springs of the safety
interlock switches thereby rendering them inoperable.
• Do not immerse cord or plug in water.
• Keep cord away from heated surfaces.
• Do not let cord hang over edge of table or counter.
• Never clean appliance parts with flammable fluids. The fumes can create a fire hazard or
explosion.
• Do not store or use gasoline or any other flammable vapors and liquids in the vicinity of this or any
other appliance. The fumes can create a fire hazard or explosion.
• Do not store this appliance outdoors. Do not use this product near water – for example near a
kitchen sink, in a wet basement, near a swimming pool, or similar locations
-SAVE THESE INSTRUCTIONS-

6
INSTALLATION INSTRUCTIONS
BEFORE USING YOUR MICROWAVE OVEN
• Remove the exterior and interior packing.
• Check
to be sure you have all of the following parts:
• Glass Tray Installation Hardware Kit
• Turntable Roller Assembly (Roller or Roller Ring) (Detailed Breakdown In Installation
• Instruction Manual / Installation Manual Manual)
• Inspect the oven after unpacking for any visual damage such as:
• Misaligned Door
• Damaged Door
• Dents or Holes in Door Window and Screen
• Dents in Cavity
If
any of the above is visible, DO NOT use the oven.
INSTALLATION OF YOUR MICROWAVE OVEN
SEE FULL INSTALLATION INSTRUCTIONS IN INSTALLATION MANUAL
• Do not block air vents. If they are blocked during operation, the oven may overheat and eventually cause
oven failure.
• Poor television reception and radio interference may result if the oven is located close to a TV, radio, antenna,
or antenna wire. Position the oven as far from them as possible.
• Clean the interior surface with lukewarm water using a soft cloth.
• Keep the oven away from hot air, steam or splashing liquids when choosing a place to locate it, otherwise, the
unit’s operation may be adversely affected, causing it to break down.
• Direct sunlight may affect the acrylic coating and heat sources may increase electrical consumption.
• Plug the appliance into an exclusive properly installed-grounded wall outlet. Do not under any circumstances
cut or remove the third (ground) prong from the power cord. Any questions concerning power and or
grounding should be directed toward a certified electrician or an authorized Avanti Products service center.
• DO NOT place anything on the top of the oven.
• DO NOT remove the turn-table drive shaft.
SAFETY PRECAUTIONS
PRECAUTIONS TO AVOID POSSIBLE EXPOSURE TO
EXCESSIVE MICROWAVE ENERGY
(a) Do not attempt to operate this oven with the door-open since open-door operation can result in harmful
exposure to microwave energy. It is important not to defeat or tamper with the safety interlocks.
(b)
Do not place any object between the oven front face and the door or allow soil or cleaner residue to
accumulate on sealing surfaces.
(c) Do not operate the oven if it is damaged. It is particularly important that the oven door close properly and that
there is no damage to the : (1) Door ( bent ), (2) Hinges and latches ( broken or loosened ), (3) Door seals
and sealing surfaces.
(d) The oven should not be adjusted or repaired by anyone except properly qualified service personnel.

7
GENERAL USE
• DO NOT attempt to tamper with or make any adjustments or repairs to door, control panel or any other part
of the oven. Do NOT remove outer panel from oven. Repairs should only be done by qualified service
personnel.
• DO NOT operate the oven empty. The microwave energy will reflect continuously throughout the oven if no
food or water is present to absorb energy.
• If a fire occurs in the oven, touch the START/STOP pad and LEAVE THE DOOR CLOSED. Disconnect the
power cord, or shut off power at the fuse or circuit breaker panel.
• DO NOT attempt to dry clothes, newspapers or other materials in oven. They may catch on fire.
• DO NOT use recycled paper products, as they may contain impurities, which may cause sparks and/or fires
when used.
• DO NOT hit or strike control panel. Damage to controls may occur.
UTENSILS
• METAL CONTAINERS or dishes with metallic rims should not be used. Arcing may occur.
• METAL TWIST-TIES may not be used in the microwave oven.
• DO NOT use SEALED JARS or NARROW NECK bottles for cooking or reheating. They may shatter.
• DO NOT use CONVENTIONAL THERMOMETERS in the microwave oven. They may cause arcing. Use
only those labeled “Microwave Safe” and follow all directions. Check the food in several places.
• Remove PLASTIC STORE WRAPS before cooking or defrosting in the oven.
RECOMMENDED
• Microwave browning dish – Use to brown exterior of small items such as steaks, chops, or pancakes.
Follow the directions provided with your browning dish.
• Microwaveable plastic wrap – Use to retain steam. Leave a small opening for some steam to escape and
avoid placing it directly on the food.
• Paper towels and napkins – Use for short-term heating and covering; these absorb excess moisture and
prevent splattering. Do not use recycled paper towels, which may contain metal and could ignite.
FOOD
• Paper towels and napkins – Use for short-term heating and covering; these absorb excess moisture and
prevent splattering. Do not use recycled paper towels, which may contain metal and could ignite.
• Never use your microwave oven for HOME CANNING. The oven is not designed to permit proper canning.
Improperly canned food may spoil and be dangerous to consume.
• COOKING TIMES are approximate. Factors that may affect cooking are starting temperature, altitude,
volume, size and shape of food and utensils used. As you become familiar with the oven, you will be able
to adjust for these factors.
• It is better to UNDERCOOK RATHER THAN OVERCOOK foods. If food is undercooked, it can always be
returned to the oven for further cooking. If food is overcooked, nothing can be done. Always start with
minimum cooking times.
• SMALL QUANTITIES of food or foods with LOW MOISTURE content can burn, dry out or catch on fire if
cooked too long.
• DO NOT boil eggs in their shell. Pressure may build up and the eggs will explode.
• Potatoes, apples, egg yolks, whole acorn squash and sausage are examples of food with NONPOROUS
SKINS. These must be pierced before cooking to prevent bursting.
• POPCORN must be popped in a microwave corn popper. Microwave popped corn produces a lower yield
than conventional popping. DO NOT use oven for popcorn unless popped in a microwave approved
popcorn utensil or unless it’s commercially packaged and recommended especially for microwave ovens.
DO NOT use oil unless specified by the manufacturer.
• DO NOT attempt to deep fat fry in your oven.
• HEATED LIQUIDS can ERUPT if not mixed with air. DO NOT heat liquids in your microwave oven without
first stirring.

8
ELECTRICAL CONNECTION
GROUNDING INSTRUCTIONS
Th
is appliance must be grounded. In the event of an electrical short circuit, grounding reduces the risk of electrical
shock by providing an escape wire for the electric current. This appliance is equipped with a cord having a grounding
wire with a grounding plug. The plug must be inserted into an outlet that is properly installed and grounded.
The po
wer cord of this appliance is equipped with a three-prong plug which mates with standard three prong wall outlets
to minimize the possibility of electrical shock.
Do no
t under any circumstances cut or remove the third ground prong from the power cord supplied.
Do not
use the extension cord. If the power supply cord is too short, have a qualified electrician or serviceman to install
an outlet near the appliance.
This appliance requires a standard 115/120 Volts A.C. ~/60Hz electrical outlet with three-prong ground.
The c
ord should be secured behind the appliance and not left exposed or dangling to prevent accidental injury.
OPERATING YOUR MICROWAVE OVEN
Although your oven is provided with safety features, it is important to observe the following:
• It is important not to defeat or tamper with safety interlocks.
• Do not place any object between the oven front face and the door or allow residue to accumulate on sealing
surfaces. Wipe the sealing area frequently with a mild detergent, rinse and wipe dry. Never use abrasive
powders or pads.
• When opened, the door must not be subjected to strain, for example, a child hanging on an opened door or any
load which could cause the oven to fall forward and cause injury and damage the door. Do not operate the oven
if it is damaged, until it has been repaired by a qualified service person. It is particularly important that the oven
closes properly and that there is no damage to the:
• Door (bent)
• Hinges and latches (broken or loosened)
• Door seals and sealing surfaces
• The oven should not be adjusted or repaired by anyone except properly qualified service personnel.
Warning
Improper use of the grounded plug can result in the risk of electrical shock. Consult a qualified
electrician or service person if the grounding instructions are not completely understood, or if doubt
exists as to whether the appliance is properly grounded.

9
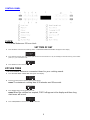
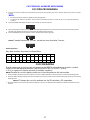
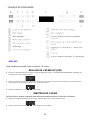
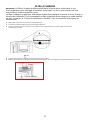
CONTROL PANEL
CLOCK
Your model features a 12-hour clock.
SET TIME OF DAY
1.
Press CLOCK to enter the Clock Setting mode. “12:00 PRESS CLOCK ENTER
TIME” will appear in the display.
2.
Press CLOCK, and then press the number pads to enter the correct time-of- day. For example, if the time is 10:12, press number
pads “1, 0, 1, 2” to enter the time.
3.
Press START to confirm the time.
KITCHEN TIMER
The microwave features a convenient timer for your cooking needs.
1.
Press KITCHEN TIMER. “ENTER TIME” will appear in the display.
2.
Press the number pads to input the desired cooking time.
NOTE:
The maximum cooking time is 99 minutes and 99 seconds.
3.
Press START to begin counting down the time.
NOTE:
When the set time has expired, “END” will appear in the display and three long
alert tones will sound.
4.
Press STOP/CANCEL to exit the Kitchen Timer function.

10
FEATURES
VENT FAN
The Vent Fan feature allows you to exhaust heat and steam from the cooking
surface
below.
•
Press VENT HI-LO-OFF to turn On/Off the fan, and to regulate the fan speed.
NOTE:
The fan speed cannot be adjusted if the control panel is locked.
•
When the control is pressed the first time, “High” appears in the display.
High Speed - Press once
Low Speed - Press twice
Off - Press three times
SURFACE LIGHTING
The surface light feature illuminates the cooking surface below the microwave oven. Press
LIGHT to toggle among High, Low and Off.
CHILD CONTROL PANEL LOCK
The Child Lock feature allows you to lock the microwave control panel for easy cleaning
or to avoid unintentionally changing the settings or turning on the microwave oven.
To Lock/Unlock the control panel:
•
To Lock:
Press STOP/CANCEL for 3 seconds. The Lock icon
will illuminate and
“LOCKED” will appear in the display to
indicate the lock has been activated.
•
To Unlock:
Press STOP/CANCEL for 3 seconds. The Lock icon will disappear
and “UNLOCK” will appear in the display to
indicate the lock has been deactivated.
STATUS RECALL
The Status Recall feature allows you to check the Time and Power settings during
microwave cooking.
•
Press POWER LEVEL to display the set power level.
•
Press CLOCK to display the time.

11
IMPORTANT:
Never operate the microwave without food in the oven cavity; this can damage
the magnetron tube or glass turntable. You may wish to leave a cup filled with water inside
the oven when it is not in use to avoid damage if the oven is unintentionally turned on.
COOKWARE
IMPORTANT:
Tightly closed containers could explode. Closed containers should be
opened and plastic pouches should be pierced before cooking.
MICROWAVE-SAFE
•
Browning dish (Sold separately. Follow manufacturer recommendations.)
•
Ceramic glass, Glass
•
China, Earthenware (Follow manufacturer recommendations.)
•
Melamine (Follow manufacturer recommendations.)
•
Paper towels, Paper Plates, Napkins (Use non-recycled paper.)
•
Plastic wraps, Bags, Covers, Dinnerware, Containers (Follow manufacturer recommendations.)
•
Pottery and Clay (Follow manufacturer recommendations.)
•
Silicone bakeware (Follow manufacturer recommendations.)
•
Wax paper
NOT MICROWAVE-SAFE
•
Metal cookware and bakeware
•
Straw or Wicker
•
Gold, silver or pewter
•
Non-approved meat thermometers, skewers
•
Twist ties
•
Foil liners, such as sandwich wrappers
•
Staples
•
Objects with gold or silver trim or with metallic glaze
•
Wood
To Test Cookware/Dinnerware:
Place dish in microwave oven with 1 cup (250 mL) of water beside it. Program
1 minute of cook time at 100%. If dish becomes hot and the water stays cool, do not use the
dish in the microwave oven.

12
MICROWAVE COOKING
TIMED COOKING
1.
Press the number pads to set the cooking time. For example, to cook for 10 minutes, press “1,0,0,0” in turn.
NOTE:
•
The maximum cooking time is 99 minutes and 99 seconds.
•
100% power is the default. If you wish to cook at 100% power, skip steps 2 and 3, and go directly to Step 4.
2.
Press POWER LEVEL to activate Power mode.
3.
Press the number pads or press POWER LEVEL repeatedly to select the desired power level. See “Power Levels” chart later in this
section.
4.
Press START to begin cooking. The time will count down.
NOTE:
When cooking is finished, an alert tone sounds 3 times and “End” appears in the
display.
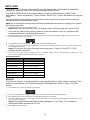
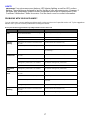
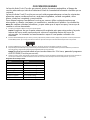
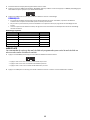
Power Levels
Ten power levels are available.
Level
10
9
8
7
6
5
4
3
2
1
0
Power
100%
90%
80%
70%
60%
50%
40%
30%
20%
10%
0%
Display
PL- HI
PL- 90
PL-80 PL-70 PL-60 PL-50 PL-40 PL-30 PL-20 PL-10 PL-0
CONVENIENCE COOKING
You can begin cooking at 100% power by touching a single control. For convenience
cooking, use either the START/+ 30 SEC control or the number touch pad.
NOTE:
During Convenience cooking, the microwave power level can be viewed, but not
adjusted.
•
Press START/+ 30 SEC to begin cooking at 100% microwave power for
30 seconds.
•
Press START/+ 30 SEC, during microwave cooking, to increase the cooking time
in 30-second increments.
NOTE:
The maximum cooking time is 99 minutes and 99 seconds.
•
Press a number pad (1 to 9) to start cooking with 100% microwave power for 1 to
9 minutes.

13
AUTO COOK
The AUTO COOK function automatically sets the appropriate cooking time calculated by
sensing the moisture level of the food or beverage being cooked.
The AUTO COOK function is programmed to cook the following items: Potato, Fresh
Vegetables, Frozen Vegetables, Frozen Dinner, White Rice, Frozen Breakfast and
Ground
Meat.
For best results when cooking, use microwave-safe containers and cover the containers
with vented lids or vented plastic wrap.
NOTE:
Do not use tight-sealing covers that would keep the steam from escaping, and cause
the food to overcook.
1.
Place the covered container in the microwave oven.
NOTE:
Make sure the outside of the microwave-safe container and the inside of the
oven are dry before placing the container in the microwave oven. Any moisture will
turn into steam which can mislead the sensors.
2.
Press AUTO COOK once, “Potato” will appear on the display. Continue to press AUTO COOK to toggle among the choices until
the desired item appears
in the display.
3.
Press START to confirm , enter the number of potatoes to be cooked and begin cooking.
4.
Once Start is pressed, the process begins. When the sensing process is completed, alert tones will sound and the calculated cook
time will begin to count down.
NOTE:
Do not open the door during the sensing process. If you do, the AUTO COOK
program will be cancelled.
5.
Use the Timed or Convenience Cooking function to complete cooking food to desired degree of doneness, if the
food is undercooked when the AUTO COOK time has elapsed.
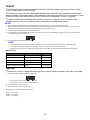
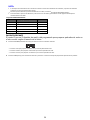
AUTO COOK Programs
Item Quantity
Potato
1 to 4 potatoes
Fresh Vegetables
1 to 3 cups (140 to 420 g)
Frozen Vegetables
1 to 3 cups (140 to 420 g)
Frozen Dinner
10 to 20 oz. (283 to 567 g)
White Rice
1 to 2 cups (185 to 370 g)
Frozen Breakfast
8 to 12 oz. (227 to 340 g)
Ground Meat
9 to 19 oz. (255 to 539 g)
DEFROST
The Defrost function is programmed to automatically defrost select items by weight. The
Defrost control allows you to select among the following items: Meat,
Poultry, Fish and
Bread.
1.
Press DEFROST once. “Meat” will appear on the display.
2.
Continue to press DEFROST to toggle among the choices until the desired item appears in the display.
3.
Press START to confirm your item selection. “Enter Weight” will appear in the display.
4.
Press the number pads to enter the weight of the item to be defrosted. For example, if the food weight is 1.2 lbs, press “1” and
then “2” to enter the weight.
NOTE:
The weight of the food item should be between 0.1 to 6.0 lbs. The maximum
weight that will be accepted is 6.0 Lbs.
5.
Press START to begin defrosting.

14
REHEAT
The Reheat function is programmed to reheat the following items: Beverage, Dinner Plate,
Pizza, Soup/Sauce and Casserole.
The Reheat function sets the appropriate heating time automatically. Depending on the item
being reheated, the heating time is calculated by either the amount of food or beverage (Timed
Cooking) or by sensing the moisture level of the food or beverage (Sensor Cooking).
For best results when reheating items that use Sensor Cooking, use microwave- safe
containers and cover the containers with vented lids or vented plastic wrap.
NOTE:
•
Do not use tight-sealing covers that would keep the steam from escaping,
and cause the food to overcook.
•
Make sure the outside of the microwave-safe container and the inside of the
oven are dry before placing the container in the
microwave oven. Any moisture will turn into steam which can mislead the sensors.
1.
Place the food or beverage item in the microwave oven.
2.
Press REHEAT once, “BEVERAGE” will appear on the display. Continue to press REHEAT to toggle among the choices until the
desired item appears in the display.
3.
Press START to confirm and begin reheating.
NOTE:
•
If the heating time for your item is calculated by sensing moisture, the
Sensing process begins once Start is pressed.
•
Do not open the door during the Sensing process. If you do, the Reheat
program will be cancelled.
•
When the Sensing process is completed, alert tones will sound and the
calculated reheat time will begin to count down.
Reheat Programs
Item Timed or Sensor Cooking Quantity
Beverage (uncovered)
Timed
1 to 3 cups
Dinner Plate (covered)
Sensor
1 plate
Pizza (uncovered)
Sensor
1 to 4 slices
Soup/Sauce (covered)
Timed
1 to 3 cups
Casserole/Lasagna (covered)
Timed
10.5 oz. (298 g)
POPCORN
The popcorn control is programmed to pop microwave popcorn based on the size of the bag.
1.
Press POPCORN to toggle between the bag sizes.
•
Press 1 time: To pop a 3.2 ounce bag of popcorn.
•
Press 2 times: To pop a 1.75 ounce bag of popcorn.
2.
Press START to confirm selection .
3. Press the number pad to enter quantity.
For the popcorn function there are three options:
Press 1: 3.3 Oz bag
Press 2: 3.0 Oz bag
Press 3: 1.75 Oz bag

15
CLEANING
IMPORTANT:
•
Before cleaning, make sure all controls are off and the microwave oven is
cool. Always follow label instructions on cleaning
products.
•
To avoid damage to the microwave oven caused by arcing due to soil
buildup, keep the oven cavity, top grille and the area
where the door touches the oven frame clean.
1.
Using a warm water and mild soap solution and a soft cloth or sponge, clean the oven cavity, frame and oven exterior.
2.
Rinse with clean warm water and dry with a soft cloth.
NOTE:
•
Do not use scouring powder or rough scouring pads on the microwave.
•
The glass turntable may be washed and dried in the dishwasher.
•
For stainless steel models, a stainless steel cleaner may be used on the exterior.
GREASE FILTER(S)
Grease filters are located on the underside of microwave oven. The grease filters should be
removed and cleaned often; generally at least once every month.
1.
Remove the grease filter. Grasp the metal ring, slide the filter toward the back, and then gently pull the filter downward. Repeat for
the second filter.
2.
Soak the grease filters in hot water with a mild detergent added. Rinse well and shake to dry.
NOTE:
Do not use ammonia or wash in a dishwasher. The aluminum on the filter will
corrode and darken.
3.
Reinstall the grease filter. Insert the back edge of the filter into the opening, and then gently push the filter up into place. Repeat
for the second filter.
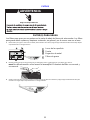
Electrical Shock Hazard
Disconnect power before cleaning.
Failure to do so can result in death or electrical shock.
MICROWAVE OVEN CARE

16
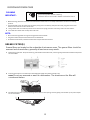
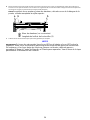
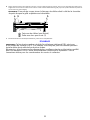
CHARCOAL FILTER
IMPORTANT:
A charcoal filter must be installed in the microwave oven when it is used in a non-
vented (recirculating) installation. Your microwave oven comes from the factory with the
charcoal filter installed.
The charcoal filter cannot be cleaned, so it must be replaced at least every 6 months or more
often depending on use. To order a replacement charcoal filter for your model, contact the
Customer Satisfaction Center. See “Back Cover” for contact information.
1.
Unplug or disconnect power.
2.
Using a Phillips screwdriver, remove screws from the top grille.
3.
Open the microwave door so you can grasp the top grille, and then pull the grille straight out to remove.
4.
Remove the used charcoal filter from the back of the grille, and then discard the filter.
5.
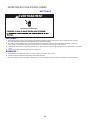
Align the holes in the new charcoal filter with the five posts on the back of the grille, and gently press down to attach.
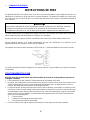
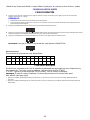
A
Charcoal Filter
6.
Align the top edge of the grille so that when the grille is pushed into place the screw hole tabs on the the grille will align with the
holes in the microwave cabinet. Gently push on the grille until it snaps into place and the screw holes are aligned.
NOTE:
Make sure that the wire harness, located near the door hinge, is not pinched
when you are replacing the top grille.
a b b
A
Wire Harness (not shown)
B
Screw Hole Tab (2)
7.
Replace the two screws removed earlier, and completely tighten the screws.

17
LIGHTS
IMPORTANT:
Your microwave oven features LED interior lighting as well as LED surface
lighting. These lights are designed to last for the life of your microwave oven. However, if
the lights stop illuminating, please contact a qualified technician for replacement or the
Customer Satisfaction Center for service. See the back cover for contact information.
PROBLEMS WITH YOUR APPLIANCE?
You can solve many common appliance problems easily, saving you the cost of a possible service call. Try the suggestions
below to see if you can solve the problem before calling the servicer.
First try the solutions suggested here to possibly avoid the cost of a service call.
PROBLEM POSSIBLE CAUSE(S) SOLUTION
Oven will not
start
Microwave oven power cord is not plugged
into an electrical outlet.
Plug into a grounded 3 prong outlet.
Door is open.
Close the door and try again.
Wrong operation is set.
Check instruction.
Arcing or
sparking
Materials to be avoided in microwave oven
are used.
Use microwave-safe cookware
only.
The oven is operated when empty.
Do not operate with oven empty.
Spilled food remains in the oven cavity.
Clean oven cavity with a damp cloth and dry thoroughly.
See “Cleaning.”
Unevenly
cooked foods
Materials to be avoided in microwave oven
are used.
Use microwave-safe cookware
only.
Food is not defrosted completely.
Completely defrost food.
Cooking time, power level is not suitable.
Use correct cooking time,
power level.
Food is not turned or stirred.
Turn or stir food.
Overcooked
foods
Cooking time, power level is not suitable.
Use correct cooking time,
power level.
Undercooked
foods
Materials to be avoided in microwave oven
are used.
Use microwave-safe cookware
only.
Food is not defrosted completely.
Completely defrost food.
Oven ventilation ports are restricted.
Check to see that oven ventilation ports are not
restricted.
Cooking time, power level is not suitable.
Use correct cooking time,
power level.
Improper
defrosting
Materials to be avoided in microwave oven
are used
Use microwave-safe cookware
only.
Cooking time, power level is not suitable.
Use correct cooking time,
power level.

18
SERVICE FOR YOUR APPLIANCE
We are proud of our customer service organization and the network of professional service technicians that provide service
on your Avanti appliances. With the purchase of your Avanti appliance, you can be confident that if you ever need additional
information or assistance, the Avanti Products Customer Service team will be here for you. Just call us toll-free.
AV
ANTI PRODUCTS CUSTOMER SERVICES
Pr
oduct Information
800-323-5029
Whatever your questions are about our products,
help is available.
Part Orders
800-220-5570
You may order parts and accessories that will be
delivered directly to your home by personal check,
money order, Master Card, or Visa.
In-Home Repair Service
800-220-5570
An Avanti Products authorized service center will
provide expert repair service, scheduled at a time
that is convenient for you. Our trained servicers
know your appliance inside and out.

19
YOUR AVANTI PRODUCTS
WARRANTY
Staple your sales receipt here. Proof of original
purchase date is needed to obtain service under
warranty.
WHAT IS COVERED – LIMITED ONE-YEAR WARRANTY
Avanti Products warrants that the product is free from defects in materials and/or workmanship for a period of twelve
(12) months from the date of purchase by the original owner. The foregoing timeline begins to run upon the date of
purchase, and shall not be stalled, tolled, extended, or suspended for any reason whatsoever unless described in
detail in the warranty document. For one year from the date of purchase by the original owner, Avanti products will,
at its option, repair or replace any part of the product which proves to be defective in material or workmanship under
normal use. Avanti Products will provide you with a reasonably similar product that is either new or factory
refurbished. During this period Avanti Products will provide all parts and labor necessary to correct such defects free
of charge, so long as the product has been installed and operated in accordance with the written instructions in this
manual. In rental or commercial use, the warranty period is 90 days. All Avanti appliances of 4.2 cubic feet capacity
or less must be brought/sent to the appliance service center for repair.
LIMITED TWO YEAR WARRANTY
During the second year of use, Avanti Products will furnish, as needed a replacement part at no charge in exchange
for any original part, which fails due to a defect in material or workmanship. All labor and transportation charges are
the responsibility of the consumer.
LIMITED SEVEN YEAR WARRANTY
For an additional 6-year period beyond the first year of the general coverage of this warranty, Avanti Products will
replace a magnetron tube, which fails due to a defect in material or workmanship. All labor and transportation
charges are the responsibility of the consumer.
WARRANTY EXCLUSIONS / WHAT IS NOT COVERED:
The warranty coverage described herein excludes all defects or damage that are not the direct fault of Avanti
Products, including without limitation, one or more of the following:
•
A failure to comply with any applicable state, local, city, or county electrical, plumbing and/or building codes,
regulations, or laws, including failure to install the product in strict conformity with local fire and building codes and
regulations.
• Any external, elemental and/or environmental forces and factors, including without limitation, rain, wind, sand,
floods, fires, mud slides, freezing temperatures, excessive moisture or extended exposure to humidity, lightning,
power surges, structural failures surrounding the appliance, and acts of God.
•
Content losses of food or other content due to
spoilage.
• Incidental or consequential damages
• Parts and labor costs for the following will not be
considered as warranty:
• Light bulbs and/or plastic housing.
• Plastic cabinet liners.
• Shipping and handling costs associated with the
replacement of the unit.
• Repairs performed by unauthorized servicers.
• Service calls that are related to external problems,
such as abuse, misuse, inadequate electrical power,
accidents, fire, floods, or any other acts of God.
• Failure of the product if it is used for other than it
intended purpose.
• The warranty does not apply outside the Continental
USA.
• Surcharges including but not limited to, any after
hour, weekend, or holiday service calls, tolls, ferry trip
charges, or mileage expense for service calls to
remote areas.
In no event shall Avanti Products have any liability or responsibility whatsoever for damage to surrounding property,
including cabinetry, floors, ceilings, and other structures and/or objects around the product. Also excluded from this
warranty are scratches, nicks, minor dents, and other cosmetic damages on external surfaces and exposed parts;
Products on which the serial numbers have been altered, defaced or removed; service visits for customer education,
or visits where there is nothing wrong with the product; correction of installation problems (you are solely responsible
for any structure and setting for the product, including all electrical, plumbing and/or other connecting facilities, for
proper foundation/flooring, and for any alterations including without limitation cabinetry, walls, floors, shelving etc., as
well as the resetting of breakers or fuses.
OUT OF WARRANTY PRODUCT
Avanti Products is under no obligation, at law or otherwise, to provide you with any concessions, including repairs,
pro-rates, or product replacement, once this warranty has expired.

20
INSTRUCCIONES EN ESPAÑOL
PRECAUCION
PARA REDUCIR EL RIESGO DE INCENDIO,
DESCARGA ELECTRICA, O DAÑO CUANDO
ESTE USANDO SU HORNO MICROONDAS,
SIGA ESTAS INDICACIONES.
• LEA TODAS LAS INSTRUCCIONES ANTES DE USAR SU HORNO MICROONDAS.
• ALGUNOS PRODUCTOS TALES COMO HUEVOS ENTEROS Y ENVASES SELLADOS
(POR EJEMPLO, FRASCOS DE VIDRIO) PUEDEN EXPLOTAR, POR LO QUE NO DEBEN
SER CALENTADOS EN SU HORNO MICROONDAS.
• USE SU HORNO MICROONDAS SOLAMENTE PARA LO QUE SE INDICA EN ESTE
MANUAL.
• NO USE SUSTANCIAS QUIMICAS CORROSIVAS O GASES EN ESTE HORNO. ESTE
TIPO DE HORNO MICROONDAS ESTA DISEÑADO ESPECIFICAMENTE PARA
CALENTAR, COCINAR, Y DESHIDRATAR ALIMENTOS, NO ESTA DISEÑADO PARA USO
INDUSTRIAL O DE LABORATORIO.
• COMO CON TODO ELECTRODOMESTICO, ES NECESARIA LA SUPERVISION DE UNA
PERSONA ADULTA CUANDO SEA OPERADO POR NIÑOS.
• NO USE SU HORNO MICROONDAS SI TIENE EL CORDON O EL ENCHUFE DAÑADOS,
SI NO ESTA FUNCIONANDO APROPIADAMENTE, O SI ESTE SUFRIO UN GOLPE O UNA
CAIDA.
• PARA REDUCIR EL RIESGO DE CHISPAS O FUEGO EN EL INTERIOR DEL HORNO
MICROONDAS:
• NO RECOCINE ALIMENTOS. ESTE PENDIENTE DE SU HORNO MICROONDAS
CUANDO COCINE ALIMENTOS QUE VENGAN CON ALGUN TIPO DE ENVOLTURA
COMO: PAPEL, PLASTICO, O MATERIAL QUE PUEDA SERVIR COMO
COMBUSTIBLE, PODRIA INICIAR UN INCENDIO.
• RETIRE EL ALAMBRE METALICO QUE SE UTILIZA PARA CERRAR LAS BOLSAS
ANTES DE COLOCAR EL ALIMENTO DENTRO DEL HORNO.
• SI ALGUNO DE LOS MATERIALES QUE ESTAN DENTRO DEL HORNO SE
INCENDIAN, MANTENGA LA PUERTA DEL HORNO MICROONDAS BIEN CERRADA,
DESCONECTELO O APAGUE LA LLAVE GENERAL DE ELECTRICIDAD.
• NO ALMACENE OBJETOS, NI DEJE PAPELES, UTENSILIOS DE COCINA, O
ALIMENTOS DENTRO DE SU HORNO MICROONDAS.
• SOLO PERSONAL DE SERVICIO AUTORIZADO PUEDE BRINDAR SERVICIO TECNICO A
SU HORNO MICROONDAS. COMUNIQUESE CON EL SERVICIO TECNICO AUTORIZADO
MAS CERCANO PARA EXAMINAR, O REPARAR SU HORNO MICROONDAS.
• NO CUBRA NI OBSTRUYA NINGUN TIPO DE VENTILACION DE SU HORNO.
• NO USE SU HORNO MICROONDAS PARA CALENTAR SUSTANCIAS QUIMICAS
CORROSIVAS (POR EJEMPLO, SULFUROS Y CLORUROS), EL GAS DE DICHOS
QUIMICOS PUEDE INTERACTUAR CON LOS CONTACTOS Y RESORTES DE LA LLAVE
DE SEGURIDAD, DEJANDOLA INOPERABLE.
• NO SUMERJA EL CORDON NI EL ENCHUFE DENTRO DEL AGUA.
• MANTENGA SU HORNO MICROONDAS ALEJADO DE SUPERFICIES CALIENTES.
• NO DEJE EL CORDON COLGANDO EN EL BORDE DE MESAS O MOSTRADORES.
• NO LIMPIE SU HORNO MICROONDAS CON LIQUIDOS INFLAMABLES. LOS GASES QUE
ESTOS EMITEN PUEDEN OCASIONAR UNA EXPLOCION Y/O INCENDIO.
• NO ALMACENAR NI USAR GASOLINA, NINGUN TIPO DE GAS O LIQUIDO INFLAMABLE
CERCA DE SU HORNO MICROONDAS O DE OTROS ELECTRODOMESTICOS, YA QUE
PUEDEN PRODUCIR UN INCENDIO Y DESENCADENAR UNA EXPLOSION.
GUARDE LAS INSTRUCCIONES CERCA DE SU ALCANCE.
Page is loading ...
Page is loading ...
Page is loading ...
Page is loading ...
Page is loading ...
Page is loading ...
Page is loading ...
Page is loading ...
Page is loading ...
Page is loading ...
Page is loading ...
Page is loading ...
Page is loading ...
Page is loading ...
Page is loading ...
Page is loading ...
Page is loading ...
Page is loading ...
Page is loading ...
Page is loading ...
Page is loading ...
Page is loading ...
Page is loading ...
Page is loading ...
Page is loading ...
Page is loading ...
Page is loading ...
Page is loading ...
Page is loading ...
Page is loading ...
Page is loading ...
Page is loading ...
Page is loading ...
Page is loading ...
Page is loading ...
Page is loading ...
-
 1
1
-
 2
2
-
 3
3
-
 4
4
-
 5
5
-
 6
6
-
 7
7
-
 8
8
-
 9
9
-
 10
10
-
 11
11
-
 12
12
-
 13
13
-
 14
14
-
 15
15
-
 16
16
-
 17
17
-
 18
18
-
 19
19
-
 20
20
-
 21
21
-
 22
22
-
 23
23
-
 24
24
-
 25
25
-
 26
26
-
 27
27
-
 28
28
-
 29
29
-
 30
30
-
 31
31
-
 32
32
-
 33
33
-
 34
34
-
 35
35
-
 36
36
-
 37
37
-
 38
38
-
 39
39
-
 40
40
-
 41
41
-
 42
42
-
 43
43
-
 44
44
-
 45
45
-
 46
46
-
 47
47
-
 48
48
-
 49
49
-
 50
50
-
 51
51
-
 52
52
-
 53
53
-
 54
54
-
 55
55
-
 56
56


Ask a question and I''ll find the answer in the document
Finding information in a document is now easier with AI
in other languages
- français: Avanti MOTR13D3S Manuel utilisateur
- español: Avanti MOTR13D3S Manual de usuario
Related papers
Other documents
-
Kenmore 80354 Owner's manual
-
-
Kenmore 790.8035 Owner's manual
-
Haier HMV1472BHS Owner's manual
-
LG MV-2042KQV Owner's manual
-
-
-
Thermador Microwave Oven MT27B User manual
-
-