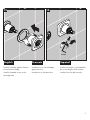
Axor 34116001 Citterio M Installation guide
- Category
- Sanitary ware
- Type
- Installation guide
This manual is also suitable for
Page is loading ...

2
Technical Information
Recommended water pressure 15 - 75 PSI
Max. water pressure 145 PSI
Recommended hot water temp. 120° - 140° F*
Max. hot water temp 176°F*
Flow rate 1.2 GPM
*Please know and follow all applicable local plumbing
codes when setting the temperature on the water heater.
Données techniques
Pression d’eau recommandée 15 - 75 PSI
Pression d’eau maximum 145 PSI
Température recommandée 120° - 140° F*
d'eau chaude
Température maximum d'eau chaude 176°F*
Capacité nominale 1.2 GPM
English
Français
Installation Considerations
• For best results, Hansgrohe recommends that
this unit be installed by a licensed, professional
plumber.
• Please read over these instructions thoroughly be-
fore beginning installation. Make sure that you
have all tools and supplies needed to complete
the installation.
• This faucet requires rough 13622181 (not
included). The rough must be installed and the
finished wall completed and made watertight
before installation of the trim kit.
This trim is not compatible with old-
style rough 34111181.
• If rough 34111181 is already installed,
please contact Hansgrohe Technical
Service regarding the additional parts
and special instructions necessary to
install this trim kit.
• Keep this booklet and the receipt (or other proof
of date and place of purchase) for this product in
a safe place. The receipt is required should it be
necessary to request warranty parts.
* Vous devez connaître et respecter tous les codes de plom-
berie locaux applicables pour le réglage de la température
du chauffe-eau.
À prendre en considération pour
l’installation
• Pour de meilleurs résultats, Hansgrohe recomman-
de que ce produit soit installé par un plombier
professionnel licencié.
• Veuillez lire attentivement ces instructions avant
de procéder à l’installation. Assurez-vous de dis-
poser de tous les outils et du matériel nécessaires
pour l’installation.
• Cette pièce doit être utilisée avec la pièce de
surface 13622181 (pas d'inclus). La pièce de
surface doit être installée et la surface du mur fini
doit être terminée et étanche.
Cette pièce ne peut pas être utilisée
avec la pièce intérieure obsolète
34111181.
• Si la pièce intérieure 3411181 a été
déjà installée, s’il vous plaît con-
tactez Hansgrohe Technical Service
pour les parties et les instructions
supplémentaires.
• Conservez ce livret et le reçu (ou une autre
preuve sur laquelle figurent la date et l’endroit
de l’achat) pour ce produit dans un endroit sûr.
Le reçu est requis si vous commandez des pièces
sous garantie.
Page is loading ...
Page is loading ...

5
English
Français Español
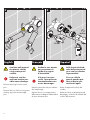
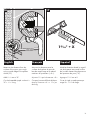
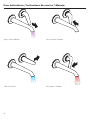
Turn the water off
at the main before
proceeding.
Remove the caps.
Cut the plaster shields so that they
extend ¹⁄₁₆" outside the surface of
the finished wall.
Avant de commencer,
fermez l’eau à la
valve principale.
Retirez les capuchons.
Coupez les protecteurs de façon
à ce qu’une partie de ¹⁄₁₆ po soit
à l’extérieur de la surface du mur
fini.
Cierre el paso del
agua en la entrada
del suministro antes
de comenzar.
Retire las tapas.
Corte los protectores de yeso de
modo que sobresalgan ¹⁄₁₆" de la
superficie de la pared terminada.
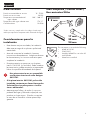
Installation / Installation / Instalación
1
2
1
2

6
English
Français Español
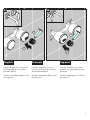
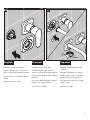
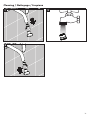
Seal the wall around
the plaster shields
using waterproof
sealant.
Failure to seal the
wall can lead to pos-
sible water damage.
Remove the plug from the spout
port.
Remove the nut, flush housing, and
sealing ring from the cartridge
port.
Scellez le mur autour
des protecteurs à
l’aide d’un agent
d’étanchéité.
Si le mur n’est pas
scellé, l’eau pourrait
éventuellement caus-
er des dommages.
Retirez le bouchon du port de bec
de remplissage.
Retirez l’écrou, le compartiment
affleurant et la bague d’étanchéité
du port de cartouche.
Selle la pared alred-
edor del protector de
yeso con un sellador
impermeable.
Si no se sella la
pared, pueden pro-
ducirse daños por
acción del agua.
Retire el tapón del orificio del
surtidor.
Retire la tuerca, el alojamiento de
descarga y el anillo de sellado del
orificio del cartucho.
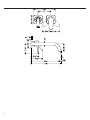
4
17 mm
30 mm
3
1
2

7
English
Français Español
Lightly lubricate the o-ring on the
cartridge adapter using white
plumbers grease.
Install the cartridge adapter in the
cartridge port.
Lubrifiez légèrement les joints
toriques en utilisant de la graisse
de plomberie blanche.
Installez l’adaptateur dans le port
de cartouche.
Lubrique levemente los retenes
anulares con grasa blanca para
plomería.
Instale el adaptador en el orificio
del cartucho.
5a 5b
1
2
1
2

8
English
Français Español
Lightly lubricate the threads on the
nut using white plumbers grease.
Install the cartridge.
Install the nut.
Temporarily install the handle.
Lubrifiez légèrement les filets sur
l’écrou en utilisant de la graisse de
plomberie blanche.
Installez la cartouche.
Installez l’écrou.
Installez la poignée temporairement.
Lubrique levemente las roscas de
la tuerca con grasa blanca para
plomería.
Instale el cartucho.
Instale la tuerca del cartucho.
Instale la manija temporalmente.
24 mm
10 Nm
6
7
1
2
3

9
English
Français Español
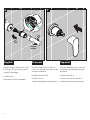
Measure the distance between the
wall and the edge of the handle.
If the distance measures 1¾" -
2⅛", select sleeve A.
If the distance measures 2⅛" -
2½" select sleeve B.
If the distance measures 2½" -
2⅞", select sleeve C.
Mesurez la distance entre le mur
et le rebord de la poignée.
Si la distance mesure de 1¾ po à
2⅛ po, sélectionnez la gaine A.
Si la distance mesure de 2⅛ po à
2½ po, sélectionnez la gaine B.
Si la distance mesure de 2½ po à
2⅞ po, sélectionnez la gaine C.
Mida la distancia entre la pared y
el borde de la manija.
Si la distancia es de 1¾" - 2⅛",
seleccione el manguito A.
Si la distancia es de 2⅛" - 2½",
seleccione el manguito B.
Si la distancia es de 2½" - 2⅞",
seleccione el manguito C.
A
B
C
1¼"
⅞"
½"
1¾" - 2⅛"
2⅛" - 2½"
2½" - 2⅞"
8

10
English
Français Español
Connect the handle escutcheon to
the selected sleeve.
Remove the handle.
Raccordez l'écusson à la gaine
sélectionnée.
Retirez la poignée.
Conecte el embellecedor en el
manguito seleccionado.
Retire la manija.
10 11

11
English
Français Español
Install the washer and the sleeve/
escutcheon assembly.
Install the handle screw on the
cartridge stem.
Installez le joint, l'assemblage
gaine/écusson.
Installez la vis de cartouche.
Instale el manguito y el embellece-
dor y el manguito de la manija.
Instale el tornillo del cartucho.
12
4 mm
13

12
English
Français Español
Install the flange.
Install the handle.
Tighten the handle screw.
Installez la bride.
Installez la poignée.
Serrez la vis de la poignée.
Instale la brida.
Instale la manija.
Apriete el tornillo de la manija.
4 mm
14
15

13
English
Français Español
Measure the distance from the
surface of the spout port rough
to the outside edge of the plaster
shield ("X").
Add
1⁵⁄₁₆" mm to "X".
Cut the threaded nipple so that it is
"X" +
1⁵⁄₁₆" long.
Mesurez la distance entre la
surface de la pièce du port de
bec de remplissage et le rebord
extérieur du protecteur (« X »).
Ajoutez 1⁵⁄₁₆ po à la mesure « X ».
Coupez le raccord fileté de façon
à ce qu’il mesure « X » + 1⁵⁄₁₆ po
de long.
Mida la distancia desde la superfi-
cie de la parte interna del orificio
del surtidor hasta el borde externo
del protector de yeso (“X”).
Agregue 1⁵⁄₁₆" mm a X.
Corte el niple roscado para que
tenga X + 1⁵⁄₁₆" de largo.
1⁵⁄₁₆" + X
1716

14
English
Français Español
Wrap the threads on the nipple
with plumbers tape.
Install the nipple.
Tighten the nipple.
Enveloppez les filets sur le raccord
fileté avec du ruban de plomberie.
Installez le raccord fileté.
Serrez le raccord fileté.
Envuelva las roscas del niple con
cinta de plombería.
Instale el niple.
Apriete el niple.
1⁵⁄₁₆" + X
18
8 mm
19

15
English
Français Español
Install the spout escutcheon.
Lightly lubricate the o-ring on the
spout using white plumbers grease.
Push the spout into place over the
nipple.
Tighten the spout screw.
Installez l'écusson du bec.
Lubrifiez légèrement le joint to-
rique sur le bec de remplissage en
utilisant de la graisse de plomberie
blanche.
Poussez le bec de remplissage en
place sur le raccord fileté.
Serrez la vis du bec.
Installez el embellecedor del
surtidor.
Lubrique levemente los retenes
anulares del surtidor utilizando
grasa blanca para plomería.
Coloque el surtidor en su lugar
sobre el niple.
Apriete el surtidor.
20 21
1
2
3
2 mm

16
English
Français Español
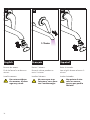
Remove the aerator.
Flush the faucet for at least two
minutes.
Install the aerator.
Do not overtighten
the aerator, or dam-
age may result.
Retirez l’aérateur.
Rincez le robinet pendant au
moins 2 minutes.
Installez l’aérateur.
Ne serrez pas trop
l’aérateur, vous pour-
riez l’endommager.
Retire el aireador.
Lave el grifo durante al menos 2
minutos.
Instale el aireador.
No apriete el aire-
ador en exceso,
puesto que podría
dañarlo.
> 2 min
22 2423
Page is loading ...
Page is loading ...

19
Cleaning / Nettoyage / Limpieza
1 2
3

20
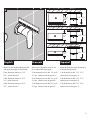
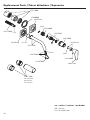
Replacement Parts / Pièces détachées / Repuestos
98959xx0
98960xx0
92875000
98933000
95973001
98863xx0
22x2
34097xx0
96338000
95633000
C
B
A
98987000
33x1,5
26x2
97971000
97600000
98935xx0
14x1
31971000
not included
pas d'inclus
no incluidos
95634000
11x2
xx = colors / couleurs / acabados
00 = chrome
82 = brushed nickel

21
Modern bathroom faucets, kitchen faucets and shower products are made from different materials to comply with the needs
of the market with regard to design and functionality. To avoid damage to the product, it is necessary to take proper care of
it.
For best results:
• Prevent the buildup of mineral scale and /or soap residue by cleaning your Hansgrohe product(s) when needed.
• Select a cleaning agent specifically intended for the type of product.
• Do not use these types of cleaners as they will cause damage to your Hansgrohe product:
Any cleaning agent containing hydrochloric acid, formic acid, lye, or acetic acid.
Abrasive cleaning powders, pads, or brushes.
Steam cleaners.
“No rinse” cleaning agents.
• Always follow the instructions provided by the manufacturer of the cleaning agent.
• Do not mix cleaning agents, unless directed by the manufacturer.
• Do not spray cleaners directly onto the product as drops could enter openings and gaps and cause damage. When
using spray cleaners, spray the cleaner onto a soft cloth or sponge.
• Always rinse your Hansgrohe product thoroughly with clear water and polish dry with a soft cloth after cleaning.
Important
• Residue from soaps, shampoos, hair dye, and other toiletries and cosmetics can cause damage. Rinse the product with
clean water after each use.
• Residue from basin/tub/tile cleaner can cause damage to faucets and fittings. Immediately rinse any overspray from
the Hansgrohe product.
• Do not store any cleaning agents under your Hansgrohe product, such as in a vanity unit, as the fumes may damage
the product.
• Damage to the product caused by improper care or the use of improper cleaning agents is not
covered by the warranty.
• If a component of the product is damaged, replace it, as there is risk of injury.
Cleaning Recommendation for Hansgrohe Products
Conseil de nettoyage pour les produits Hansgrohe
Les robinets pour les salles de bains et les cuisines modernes ainsi que les produits récents pour les douches se composent
de matériaux différents afin de satisfaire aux besoins du marché en termes de conception et de fonctionnalité. Afin d'éviter
d'endommager le produit, il est nécessaire d'en prendre soin.
Pour de meilleurs résultats :
• Empêchez l'accumulation de tarte et/ou de résidu de savon en nettoyant votre produit Hansgrohe lorsque c'est néces-
saire.
• Sélectionnez un produit de nettoyage spécifiquement prévu pour ce type de produit.
• N'utilisez pas ces types de nettoyants car ils peuvent endommager votre produit Hansgrohe :
Tout produit de nettoyage contenant de l’acide chlorhydrique, de l’acide formique, de la potasse ou de l’acide
acétique.
Les poudres de nettoyage, les tampons ou les brosses abrasives.
Les nettoyeurs à vapeur.
Les produits de nettoyage « sans rinçage ».
• Ne mélangez pas les produits de nettoyage, à moins que cela soit indiqué par le fabricant.
Page is loading ...

23
Limited Consumer Warranty
This product has been manufactured and tested to the highest quality standards by Hansgrohe, Inc. (“Hansgrohe”).
This warranty is limited to Hansgrohe products that are purchased by a consumer in the United States or Canada after
March 1, 1996, and installed in either in the United States or in Canada.
WHO IS COVERED BY THE WARRANTY
This warranty extends to the original purchaser only. This warranty is non-transferable.
WHAT IS COVERED BY THE WARRANTY
The warranty covers only your Hansgrohe manufactured product. Hansgrohe warrants this product against defects in
material or workmanship as follows:
Hansgrohe will replace at no charge for parts only or, at its option, replace any product or part of the product that proves
defective because of improper workmanship and/or material, under normal installation, use, service and maintenance. If
Hansgrohe is unable to provide a replacement and repair is not practical or cannot be made in timely fashion, Hansgrohe
may elect to refund the purchase price in exchange for the return of the product.
LENGTH OF WARRANTY
Replacement or repaired parts of products will be covered for the term of this warranty, as stated in the following two
sentences. If you are a consumer who purchased the product for use primarily for personal, family or household purposes,
this warranty extends for as long as you own the product and the home in which the product is originally installed. If you
purchased the product for use primarily for any other purpose, including, without limitation, a commercial purpose, this
warranty extends only (i) for 1 year, with respect to Hansgrohe & Commercial products, and (ii) for 5 years, with respect to
Axor products.
THIS WARRANTY DOES NOT COVER, AND HANSGROHE WILL NOT PAY FOR:
A. Conditions, malfunctions or damage not resulting from defects in material or workmanship.
B. Conditions, malfunctions or damage resulting from (1) normal wear and tear, improper installation, improper
maintenance, misuse, abuse, negligence, accident or alteration; (2) the use of abrasive or caustic cleaning agents or “no-
rinse” cleaning products, or the use of the product in any manner contrary to the product instructions; or (3) conditions in
the home such as excessive water pressure or corrosion.
C.Labor and other expenses for disconnection, deinstallation, or return of the product for warranty service
(including but not limited to proper packaging and shipping costs), or for installation or reinstallation of the product.
D. Accessories, connected materials and products, or related products not manufactured by Hansgrohe.
E. Any Hansgrohe or Axor product sold for display purposes.
F. Rubbed Bronze finish is subject to a 3-year limited warranty. Chrome and all PVD finishes are covered by the limited
lifetime warranty.
G. Hansgrohe Water Filtration System is subject to a 1-year limited warranty. Warranty does not include replacement
filters.
TO OBTAIN WARRANTY PARTS OR INFORMATION
Contact your Hansgrohe retailer, or contact Technical Service at:
Hansgrohe, Inc.
1492 Bluegrass Lakes Parkway
Alpharetta, GA 30004
Toll-free 800-334-0455
In requesting warranty service, you will need to provide:
1. The sales receipt or other evidence of the date and place of purchase.
2. A description of the problem.
3. Delivery of the product or the defective part, postage prepaid and carefully packed and insured, to:
Hansgrohe, Inc.
1492 Bluegrass Lakes Parkway
Alpharetta, GA 30004
Toll-free 800-334-0455
When warranty service is completed, any repaired or replacement product or part will be returned to you postage prepaid.

24
EXCLUSIONS AND LIMITATIONS
REPAIR OR REPLACEMENT (OR, IN LIMITED CIRCUMSTANCES, REFUND OF THE PURCHASE PRICE) AS
PROVIDED UNDER THIS WARRANTY IS THE EXCLUSIVE REMEDY OF THE PURCHASER. HANSGROHE
NEITHER ASSUMES NOR AUTHORIZES ANY PERSON TO CREATE FOR IT ANY OTHER OBLIGATION OR
LIABILITY IN CONNECTION WITH THIS PRODUCT. HANSGROHE SHALL NOT BE LIABLE TO PURCHASER
OR ANY OTHER PERSON FOR ANY INCIDENTAL, SPECIAL OR CONSEQUENTIAL DAMAGES, ARISING OUT
OF BREACH OF THIS WARRANTY OR ANY IMPLIED WARRANTY (INCLUDING BUT NOT LIMITED TO ANY
IMPLIED WARRANTY OF MERCHANTABILITY).
Some States do not allow the exclusion or limitation of incidental or consequential damages, so the above limitation or
exclusion may not apply to you. This warranty gives you specific legal rights, and you may also have other rights that vary
from state to state.
TO THE EXTENT PERMITTED BY LAW, ANY IMPLIED WARRANTIES OF MERCHANTABILITY AND FITNESS
FOR A PARTICULAR PURPOSE, ARE LIMITED TO THE DURATION OF THE EXPRESS WARRANTY.
Some states do not allow limitations on how long an implied warranty may last, so the above limitations may not apply to
you. You may be required by law to give us a reasonable opportunity to correct or cure any failure to comply before you
can bring any action in court against us under the Magnuson-Moss Warranty Act.
PRODUCT INSTRUCTIONS AND QUESTIONS
Upon purchase or prior to installation, please carefully inspect your Hansgrohe product for any damage or visible defect.
Prior to installing, always carefully study the enclosed instructions on the proper installation and the care and maintenance of
this product. If you have questions at any time about the use, installation or performance of your Hansgrohe product, or this
warranty, please write us or call us toll-free at 800-334-0455.
Hansgrohe, Inc. • 1490 Bluegrass Lakes Parkway • Alpharetta, GA 30004
Tel. 770-360-9880 • Fax 770-889-1783
www.hansgrohe-usa.com
US - Installation Instructions • Part No. 90450328 • Revised 7/2016
-
 1
1
-
 2
2
-
 3
3
-
 4
4
-
 5
5
-
 6
6
-
 7
7
-
 8
8
-
 9
9
-
 10
10
-
 11
11
-
 12
12
-
 13
13
-
 14
14
-
 15
15
-
 16
16
-
 17
17
-
 18
18
-
 19
19
-
 20
20
-
 21
21
-
 22
22
-
 23
23
-
 24
24


Axor 34116001 Citterio M Installation guide
- Category
- Sanitary ware
- Type
- Installation guide
- This manual is also suitable for
Ask a question and I''ll find the answer in the document
Finding information in a document is now easier with AI
in other languages
Related papers
-
Axor 39020001 Citterio Assembly Instruction
-
-
-
-
-
-
-
Axor 38020001 Uno Installation guide
-
-
Other documents
-
Hansgrohe 04775000 Installation guide
-
-
-
-
-
-
-
-
-