Page is loading ...

®
IC 1500R ARGOgen
WWW.INFINITI.COM.AU

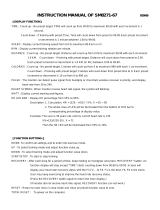
EXPLODE PICTURE 1
C
D
I1-L
I1-R
E-2
E-3
E-1
E-1
E-2
E-3
F
F-1
F-2
E-4
E-3
E-5
E-4
E-3
E-3
B
B-1
B-2
B-3
A
A-1
B-4
H-1
H-2
J-6
N

EXPLODE PICTURE 2
C
C-1
C-2
C-3
D
D-1
D-2 D-3
F-2
F-3
F
F-1
E-4
E-5
E-3
E-4
E-3
E-1
E-1
E-2
E-3
H
H-1
H-2
H-3
H-4
D-2
H-5
H-7
H-8
E-3
H-10
H-9
H-6
J
J-1
J-2J-3
J-4
J-5
J-6
J-7
J-8
J-9
J-10
J-8
K
L
L-1
L-3
L-2 L-4
L-5
L-6
MM-1
M-2 M-3 M-4 M-5
M-6
M-7
M-8
L-7
M-9
M-10
B
B-1
B-2
B-3
A
B-6
B-4
B-5
I-L
I-R
I1-L
I2-L
I1-L
I2-L
I-4
I-5
I-6
I-7
I-9
I-8
I-11
I-14
I-12
I-13
I-3L
I-10
I-3R
I-15
I-16
I-17
N
I-15
I-18
I-19
J-11
3

4
PART LIST
ITEM NO. DESCRIPTION
SPECIFICATIONS
QUANTITY UNIT
A
CONSOLE
PE-SM66160021102 1 SET
A-1
SCREW PD-SWM10510-1002
4 PCS
A-2
SCREW PD-SDM20308-1041 4
PCS
A-3
ADJUSTABLE CONSOLE BOARD
PR-P-PW2252-1000
1
PCS
B HANDLE BAR POST
MT-PR2-FW02-7005
1
SET
B-1 CABLE UPPER
PE-C22-0500-1000
1
PCS
B-2 HANDPULSE WIRE UPPER
PE-F04-0500-1002
1
PCS
B-3 SCREW
PD-SRM20816-1041 12 PCS
B-4 CURVED WAHSER
PD-WA220819-1041 4 PCS
B-5 FRONT HANDBLE END CAP
PL-P-PB1553-1002
2
PCS
B-6 SCREW
PD-SYM20308-1041
3
PCS
B-7 SCREW
PD-SOM20670-1041
1
PCS
B-8 ADJUSTABLE LEFT SIDE BRACE
PH-P-PB3889-1000
1
PCS
B-9 GENERAL ADJUSTABLE SET
PL-SDS418B6-1002
1
PCS
B-10 SLIPPROOF MAT
PH-P-PB3937-1000
2
PCS
B-11 ADJUSTABLE RIGHT SIDE BRACE
PH-P-PB3970-1000
1
PCS
B-12 SPRING WAHSER
PD-WS210600-1041
1
PCS
B-13 FLAT WAHSER
PD-WN110613-1041
1
PCS
B-14 NYLON NUT
PD-NNM10600-1041
1
PCS
B-15 END CAP
PL-SDS418B5-1002
2
PCS
C
FRONT STABLIZIER
AA-A-PA1239-9000 1 SET
C-1
FRONT STABLIZIER END CAP
PL-P-PB1663-1002 1 PCS
C-2
FRONT STABLIZIER END CAP
PL-P-PB1664-1002 1 PCS
C-3
SCREW
PD-SXI20624-1041 1 PCS
D
REAR STABLIZIER
AA-A-PA1238-9001 1 PCS
D-1
REAR STABLIZIER END CAP
PL-P-PB1665-1002 2 PCS
D-2
LEVELING
PD-SHI11230-1102 2 PCS
D-3
NUT
PD-NHI21200-1041 2 PCS
E-1
ALLEN BOLT
PD-SMM10855-1041 4 PCS
E-2
CROWN NUT
PD-NCM20800-1041 4 PCS
E-3
FLAT WASHER
PD-WN220816-1041 25 PCS
E-4
SCREW
PD-SPM20845-1041 8 PCS
E-5
SCREW
PD-SRM20816-1041 8 PCS

5
F
BACK PAD
PS-P-PB2304-1002 1 PCS
F-1
SADDLE
PS-P-PB2108-1002 1 PCS
F-2
SEAT FRAME
MTLS1000FW147005 1 PCS
F-3
END CAP
PL-P-PA-126-1002 4 PCS
G
SEAT HANDLE BAR
MT-201-FW07-7005 1 PCS
G-1
END CAP
PL-P-PB1553-1002 2 PCS
G-2
SEAR HAND PULSE WIRE
PE-B14-0600-1002 1 PCS
G-3 END CAP ML-P-PB2264-1006 1 PCS
G-4
SCREW
PD-SWM20510-1041 4 PCS
H
FRAME
MT-PR2-FW01-
7005
1 PCS
H-1
CABLE LOWER
PE-C21-0760-1000 1 PCS
H-2
HANDPULSE WIRE LOWER
PE-P-PB3160-1000 1 PCS
H-3
SENSOR BOX
PE-P-PB3715-1000 1 PCS
H-4
SCREW
PD-SDM20410-1041 1 PCS
H-5
SEAT SLIDER
MT-PR2-FW13-7300 1 PCS
H-6
SEAT SLIDER COVER LEFT
ML-SRPT3-A6-1006 1 PCS
H-7
SEAT SLIDER COVER RIGHT
ML-SRPT3-A7-1006 1 PCS
H-8
SCREW
PD-SPM10855-1041 3 PCS
H-9
SCREW
PD-SRM20820-1041 2 PCS
H-10
HAND PULSE WIRE IN SLIDER
PE-P-PB-775-1002 1 PCS
I-L
CHAIN COVER LEFT
ML-C-RPT301-8000 1 PCS
I-R
CHAIN COVER RIGHT
ML-C-RPT311-8000 1 PCS
I-1
PEDAL
PS-P-PB1392-1002 1 SET
I-2L
L CRANK
PH-P-PB2142-1041 1 PCS
I-2R
RIGHT CRANK
PH-P-PB2143-1041 1 PCS
I-3L
REAR CHAIN COVER LEFT
ML-C-RPT371-1200 1 PCS
I-3R
REAR CHAIN COVER TIGHT
ML-C-RPT381-1200 1 PCS
I-4
SCREW
PD-SEM10820-7601 2 PCS
I-5
C-RING
PD-KCO11700-1002 1 PCS
I-6
FLAT WASHER
PD-WN121725-1002 1 PCS
I-7
WAVE WASHER
PD-WD061725-1002 1 PCS
I-8
BEARING
PH-BA2-6203-1200 2 PCS
I-9
RUBBER WAHSER
PD-P-PB3562-1002 2 PCS
I-10
BELT
PH-LJ6M1016-1000 1 PCS
I-11
PULLEY
PL-PJ6B2601-1002 1 PCS
I-12
AXLE
PR-P-PW-308-1000 1 PCS

6
I-13
SCREW
PD-SHM20812-
1102
3 PCS
I-14
BUSHING
PH-P-PB3630-1000 1 PCS
I-15
SCREW
PD-SZI20624-1041 12 PCS
I-16
SCREW
PD-SBM20450-1041 12 PCS
I-17
DC CABLE
PE-P-PB-527-1000 1 PCS
I-18
BUFFERING END CAP
PL-P-PB2178-1002 2 PCS
I-19
SCREW
PD-SWM10535-1002 4 PCS
J
SLIDER
MT-PR2-FW04-7005 1 PCS
J-1
SLIDER END CAP
PL-P-PB3158-10S5 1 PCS
J-2
SLIDER END CAP
PL-P-PB2596-10S5 1 PCS
J-3
SLIDING FIXER
PH-P-PB3735-1000 1 PCS
J-4
SCREW
PD-SHM20609-1002 2 PCS
J-5
SLIDER SHAFT HOLDING
PL-P-PB1997-1000 1 PCS
J-6
SHAFT
PH-P-PB3592-1000 1 PCS
J-7
SLIDER SHAFT ASSEMBLY
MTUF755RFW167300 1 PCS
J-8
BUSHING
PH-P-PB3520-1000 2 PCS
J-9
SHAFT SER FIXER
PH-P-PB3795-1000 1 PCS
J-10
SCREW
PD-SHM20620-
1002
2 PCS
J-11
SCREW
PD-SOM10616-1002 2 PCS
K
MAGNETIC ASSEMBLY
AA-A-PA2801-9000 1 SET
L
IDLER
MT-C31AFW06-7000 1 PCS
L-1
NYLON NUT
PD-NNM20800-1041 2 PCS
L-2
DUCHING
PH-P-PA-185-1000 1 PCS
L-3
IDLER WHEEL
PH-P-PB3924-1000 1 PCS
L-4
SCREW
PD-SHM10820-1141 1 PCS
L-5
SPRING
PH-P-PB3657-1000 1 PCS
L-6
FLAT WAHSER PD-WN220816-1041 1
PCS
L-7
FLAT WASHER PD-WN120816-1041 1
PCS
M
FLYWHEEL
PH-FAD28032C1002 1 PCS
M-1
NUT
PD-NKI21200-1041 2 PCS
M-2
NUT
PD-NNI21224-1041 4 PCS
M-3
BUSHING
PH-P-PB3688-1000 1 PCS
M-4
BEARING
PH-BA2-6300-1000 1 PCS
M-5
ONE WAY BEARING
PH-P-PB1115-1000 1 PCS
M-6
BEARING
PH-BA2-6003-
1000
2 PCS
M-7
FLYWHEEL AXLE
PH-P-PB3687-1002 1 PCS

M-8
FLAT WASHER
PD-WN113034-1002 1 PCS
M-9
PULLEY
PH-P-PB-605-1000 1 PCS
M-10
BEARING
PH-BA2-6000-1000 1 PCS
N
ADAPTOR
PE-P-PB2613-1200 1 PCS
Assembly Steps
C
D
I1-L
I1-R
E-2
E-3
E-1
E-1
E-2
E-3
Step 1
1) Securely fasten the Front Stabilizer Assembly (C) to the Base Assembly using 2-Carriage Bolts (E-1),
2–Flat Washers (E-3), and 2-Acorn Nuts (E-2). Note: The transport wheels should be facing outward.
Step 2
2) Securely fasten the Front Stabilizer Assembly (D) to the Base Assembly using 2-Carriage Bolts (E-1),
2–Flat Washers (E-3), and 2-Acorn Nuts (E-2).
7

Step 3
1) Assemble the Left & Right Pedal (I-1R+L) to the Left Crank Arm on the Base Assembly. Thread the
pedal onto the crank arm and securely tighten in place using the pedal wrench. Note: A counterclockwise
rotation will tighten the pedal to the crank arm and a clockwise rotation will loosen the pedal.
F
F-1
F-2
E-4
E-3
E-5
E-4
E-3
E-3
J-6
Step 4
1) Cut the packaging cable ties and lock the Adjustable Seat Back Frame (F-2) into an upright position
using the Adjustment Knob.
2) Mount the Seat Pad (F-1) to the Seat Slider (H-5) using 4-Truss Head Bolts (E-4) and 4-Flat Washer
(E-3).
Step 5
1) Attach the Seat Back Pad (F) to the Adjustable Seat Back Frame (F-2) using 4-Truss Head Socket
Bolts (E-4) and 4-Flat Washers (E-3).
Step 6
1) Attach the Handlebar Assembly (G) to rear mounting plate of Seat Slider (H-5) using 4-Truss Head
Socket Bolts (E-5) and 4-Flat Washers (E-3).
8

Step 7
1) Fixed the seat stopper accordibg to above
B
B-1
B-2
B-3
A
B-4
H-1
H-2
N
A-1
Step 8
1) Remove the preinstalled hardware from the mast mounting area of the Base Assembly.
2) Connect the Upper Heart Rate Cable (B-2) to the Lower Heart Rate Cable (H-2)
3) Connect the Upper Data Cable Assembly (B-1) to the Lower Data Cable Assembly (H-1).
4) Tuck the excess cable lengths into frame tubing and slide the Handlebar Mast (B) down on to the Base
Assembly. Align the mounting holes and secure the mast in place by using the previously installed;
4-Truss Head Socket Bolts (B-3) and 4-Curved Washers (B-4).
Step 9
1) Secure the H-Shaped Handlebar (B) to the front cradle mounting of the Handlebar Mast (C) using the
Mounting Clamp (#I-5), 2-Allen Bolts (I-2), 2-Spring Washers (I-3) , and 2-Flat Washers (I-4).
2) Assembly the computer ( A) and cable
Plug-In Adapters convert AC voltage / current to low DC voltage outputs that are used to power the electronic
components of the product.
◎ AC Adapters vary per product model. Voltage ratings and output orientation are designed to work with the specific
electronic components used on each product model. Make sure to only use the specified AC Adapter (part listed) in
the manual and never substitute with another type adapter.
◎ The Adapter can be shorted if it is improperly grounded while plugging it into a wall outlet. If the
AC adapter feels hot upon plugging it into the wall or product, stop usage immediately. Shorted adapters will need to
9

be replaced.
◎ The receptacle (shroud) location will vary per product model. Arrange placement of the unit so the AC adapter can
easily reach the receptacle and an outlet plug.
SM6622 Instruction Manual
1. Power on, LCD will display segment for 2 seconds with long beep sound. (drawing1), and display wheel
diameter (drawing2) then enter calendar setting mode.
drawing 1 drawing 2
2. Press ENTER、UP、DOEN buttons to set year / month / day / clock (drawing3) ; screen will enter standby
mode. (drawing4)
10
drawing 3 drawing 4
3. Manual is glittering in the sleep mode, (drawing 4),you may turn UP and DOWN to select training mode
MANUAL / PROGRAM / USER PROGRAM / H.R.C. / WATT (drawing 5 ~8)and press ENTER/MODE for
confirmation. The monitor will enter MANUAL mode for training without selection.
drawing 5 drawing 6
drawing 7 drawing 8
4. Training in PROGRAM mode :
4-1 In the PROGRAM mode, you may turn UP/DOWN button to select program
P01,P02,P03..~P12, the selected program will be show on screen for 2 seconds then display

program profile accordingly. (drawing 9)。
drawing 9
4-2 LOAD 1 (preset value) is glittering after training program selected, you may turn UP/DOWN
button to select level from 1 to 16 and ENTER/MODE button for confirmation. (drawing 10)
Load level can be adjusted during training.
5. Training in MANUAL mode
5-1 In the MANUAL mode, you may turn UP/DOWN button to select load level from 1 to 16, the
preset level is 1. (drawing 11)。
darwing 10 drawing 11
5-2 After load level selected, you may preset function values for TIME, DISTANCE, CALORIES,
and PULSE by turning UP/DOWN button and press ENTER confirmation. (drawing 12~15)
5-3 Pressing START button to start training.
drawing 12 drawing 13
drawing 14 drawing 15
6. Training in USER PROGRAM:
6-1 After USER PROGRAM selected, you may set prefer program profile by turning UP, DOWN and
ENTER button for each flashing column. There are 20 segments for setting, if you want to quit during
setting, you may hold on ENTER button for 2 seconds to quit, the previous setting profile will be saved
for unfinished segment.
7. Training in H.R.C. mode:
AGE 25 is flashing after enter H.R.C. mode, you may set your age by turning UP/DOWN/ENTER button.
11

The monitor will calculate preset heart rate value automatically according to your age setting. Screen
will show heart rate percentage 55%, 75%, 90% and TARGET. You may select heart rate percentage by
UP/DOWN/ENTER button for training. (drawing 17)
drawing 16 drawing 17
8. Training in WATT mode :
The preset watt value 120 is flashing on screen in WATT setting mode, select UP/DOWN/ENTER to set
target value from 10 to 350. Pressing START button to start training.
Note :
1. Stop training or no signal over 4 minutes, the screen will off and display room temperature,
clock, and calendar after hold on ENTER for 2 seconds. (drawing 18)
2. When computer displays abnormally, please plug-out the adapter and plug-in again.
drwing 18
9. Training in BODY FAT mode:
10-1 In STOP mode, press the BODY FAT button to start body fat measurment.
10-2 The selected user (U1~U9) will blinking for 2 seconds. Then start measuring.
10-3 During measuring, user have to hold both hands on the handgrip. And the LCD will display “--” “--“ for 8
econds until computer finish measuring.
10-4 LCD will display BODY FAT advice symbol, BODY FAT percentage, BMR, BMI for 30 seconds.
<REFERENCE>
B.M.I. (Body mass index) integrated
B.M.I
SCALE
LOW LOW/MED MEDIUM MED/HIGH
RANGE <20 20-24 24.1-26.5 >26.5
BODY FAT:
SYMBOL —
+
▲ ◆
FAT%
SEX
LOW LOW/MED MEDIUM MED/HIGH
MALE <13% 13%-25.9% 26%-30% >30%
FEMALE <23% 23%-35.9% 36%-40% >40%
12

13
Button Functions :
BODY FAT : To measure user’s body fat status.
RESET : Return to main function mode in STOP mode and clean all preset function
values at zero.
RECOVERY : To test heart rate recovery status.
START/STOP : To start or stop training
MODE : To set function value for TIME, DIST, CAL, WATT.
UP : To select training mode and adjust function value up.
DOWN : To select training mode and adjust function value down.
Function :
TIME : Count up - No preset target, Time will count up from 00:00 to maximum 99:59 with each
increment is 1 second.
Count down - If training with preset Time, Time will cound down from preset to 00:00.Each preset
Increment or decrement is 1 minute between 1:00 to 99:00.
SPEED : Display current training speed from 0.0 to maximum 99.9 km or ml.
RPM : Display current training rotation per minute.
DISTANCE : Count up - No preset target, Distance will count up from 0.00 to maximum 99.90 with each
Increment 0.1 KM
Count down - If training with preset target, Distance will cound down from preset to 0.00.
Each preset increment or decrement is 0.1 KM (or ML) between 0.00 to 99.90.
CALORIES : Count up - No preset target, Calories will count up from 0 to maximum 990 with each 1 cal
increment.
Count down - If training with preset target, Calories will count down from preset time to 0.
Each preset increment or decrement is 10 cal from 0 to 990 cal.
PULSE : To display your current heart beat figures as soon as the pulse sensor has been touched.
The monitor will detect your heart best through handgrip sensors once you hold on both hands.
WATT : Display current training watt figures.
RECOVERY : After exercising for a period of time, keep holding on handgrips and press “RECOVERY”
button. All function display will stop except “TIME” starts counting down from 00:60 to 00:00.
Screen will display your heart rate recovery status with the F1,F2….to F6. F1 is the best,
F6 is the worst. User may keep exercising to improve the heart rate recovery status.
(Press the RECOVERY button again to return the main display.)
TEMPERATURE : Screen will display room temperature in sleep mode.
CALENDAR : Screen will display year/month/day in sleep mode.
CLOCK : Screen will display time in sleep mode.
Note:
1. When there is no signal been transferred into the computer for 4 minutes, the LCD display will shut off
automatically, and all previous training datas will be stored. You may press any button to have the
computer restart working.
2. The monitor can store 4 user's (U1-U4) presetting function datas. When the monitor is power on, the
LCD will display the previous (before power off) user's identification. If previous user is U1 or U2, or U3,
or U4, the previous presetting function datas of Time, Distance, Calories, Watt (if training in manual), or
Pulse values will display out.
3. The monitor has the same result as abovementioned point 2 if you press and hold on RESET button for 4
seconds.
4. If the LCD display is improper, please remove the battery and reinstall again.
5. The monitor can be power on with AC adaptor input
/