Page is loading ...

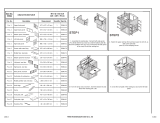
Assembling Instruction / Parts list
Item No.
55966
natura Chicken Coop
Pos. No.
Description
Measurement Quantity Item No.
Pos. 1
Front panel of house
1015 × 440 × 25 mm 1 55966-10
Pos. 2
Back panel of house
1085 × 381 × 13 mm 1 55966-20
Pos. 3
Left side panel of house
45 × 891 × 570 mm 1 55966-50
Pos. 4
Roof of house
1160 × 65 × 645 mm 1 6235-11
Pos. 5
Right side panel of house
45 × 891 × 570 mm 1 55966-51
Pos. 6
Drawer with plastic inlay
1011 × 35 × 560 mm 1 55966-70
Pos. 7
Front panel of nesting box
30 × 398 × 329 mm 1 55966-40
Pos. 8
Back panel of nesting box
30 × 398 × 329 mm 1 55966-41
Pos. 9
Side panel of nesting box
30 × 270 × 475 mm 1 55966-42
Pos. 10
Floor of nesting box
384 × 13 × 472 mm 1 55966-43
Pos. 11
Roof of nesting box
432 × 20 × 560 mm 1 55966-44
Pos. 12
Ramp
756 × 22 × 195 mm 1 55966-60
Pos. 13
Perch
25 × 25 × 533 mm 1 55966-30
Pos. 14
Plastic foot for natura hutches
4 6235-90
A
Countersunk screw
3.5 × 60 mm 5
B
Countersunk screw
3.5 × 30 mm 10
C
Carriage bolt with nut
M6 × 60 mm 5
D
Carriage bolt with nut
M6 × 65 mm 5
Check strap, right
28 cm 2
1. Insert the floor of nesting box.
2. Attach the roof and check strap.
1. Attache the ramp on the left side.
2. Finish.
Small parts
61.25 × 36 × 25 in. /
156 × 92 × 64 cm
55966-80
1. Connect the front panel with the side panels.
2. Screw together back wall and side panels.
1. Install the roof as well as the check strap.
2. Insert the pan and the perch.
1. Screw the panels of nesting box.
1. Attach the nesting box to the house.
180613
TRIXIE Heimtierbedarf GmbH & Co. KG
87980
/


