Sailor SA-6250 N User manual
- Category
- Security cameras
- Type
- User manual

Copyright: Stilus SA, Balerna - Switzerland
SAILOR is a registered trademark of Stilus SA - Switzerland
Kabelloses sicherheitssystem (2.4GHz) /
3 Kanäle: s/w Monitor 14 cm (5.5”) und Videokamera mit
eingebautem Mikrophon und Batteriefach
Système de télésurveillance (2.4GHz) /
3 canaux: moniteur b/n 14 cm (5.5”), vidéocaméra avec
microphone et compartiment pour batteries incorporés
Sistema di sorveglianza senza cavi (2.4GHz) /
3 canali: monitor b/n 14 cm (5.5”), videocamera con microfono
e vano batteria incorporati
Wireless (2.4GHz) b/w audio/video monitor
3 channels: monitor b/w 14 cm (5.5”), videocamera with buil.t-
in microphone and battery box
GEBRAUCHSANLEITUNG
Bitte lesen Sie diese sorgfältig durch
und heben Sie sie für späteres auf.
MANUEL D’UTILISATION
Nous vous prions de lire attentivement ce manuel
et de le conserver comme future référence.
MANUALE D’USO
Vi preghiamo di leggere attentamente questo manuale
e di conservarlo come futuro riferimento.
USER’S MANUAL
Please carefully read this instruction book and keep it
for future reference.
Video Security Systems
SAILORSAILOR
SAILORSAILOR
SAILOR
®
SA-6250 NSA-6250 N
SA-6250 NSA-6250 N
SA-6250 N

Video Security Systems
SAILORSAILOR
SAILORSAILOR
SAILOR
®
SA-6250 NSA-6250 N
SA-6250 NSA-6250 N
SA-6250 N
INHALT
SICHERHEITSMASSNAHMEN VOR DER
INBETRIEBNAHME .......................................... 3
INHALT DER VERPACKUNG............................. 4
BESCHREIBUNG DES KABELLOSEN
AUDIO/VIDEO ÜBERWACHUNGSSYSTEMS .......... 5
KAMERA .................................................. 5
MONITOR................................................. 6
INBETRIEBNAHME .......................................... 8
BESTMOGLICHE ............................................. 9
WEITERE FUNKTIONEN ..................................11
AUTOMATISCHE KANALABFOLGE .......... 11
MONITOR MIT AUDIO/
VIDEOFUNKTION .................................... 12
PROBLEME UND LÖSUNGEN .........................13
TECHNISCHE DATEN......................................14
SOMMAIRE
MESURES DE SECURITE AVANT LA MISE EN
FONCTION ................................................... 17
CONTENU DE L'EMBALLAGE .........................18
DESCRIPTION DU SYSTEME DE SURVEILLANCE
AUDIO/VIDEO SANS CÂBLE..............................19
CAMERA SANS CÂBLE............................ 19
MONITEUR ............................................. 20
MISE EN FONCTION...................................... 22
ORIENTATION DES ........................................ 23
FONCTIONS SUPPLEMENTAIRES.....................25
FONCTION DE SEQUENCE
AUTOMATIQUE ...................................... 25
MONITEUR AVEC FONCTION
AUDIO/VIDEO..........................................26
PROBLEMES ET SOLUTIONS .......................... 27
SPECIFICATIONS ........................................... 28
INDICE
MISURE DI SICUREZZA PRIMA DELLA MESSA IN
FUNZIONE .................................................... 31
CONTENUTO DELL’IMBALLAGGIO .................32
DESCRIZIONE DEL SISTEMA DI SORVEGLIANZA
AUDIO/VIDEO SENZA CAVI .............................. 33
VIDEOCAMERA SENZA CAVI................... 33
MONITOR............................................... 34
MESSA IN FUNZIONE .................................... 36
ORIENTAMENTO DELLE ANTENNE
PER UNA RESA OTTIMALE ............................ 37
FUNZIONI SUPPLEMENTARI ........................... 39
FUNZIONE DI SEQUENZA
AUTOMATICA ........................................ 39
MONITOR A FUNZIONE AUDIO/VIDEO ......... 40
PROBLEMI E SOLUZIONI................................ 41
SPECIFICHE ...................................................42
CONTENTS
IMPORTANT SAFETY PRECAUTIONS BEFORE
STARTING..................................................... 45
EQUIPMENT IN THIS PACKAGE ..................... 46
TO KNOW YOUR WIRELESS
AUDIO/VIDEO MONITOR .............................. 47
WIRELESS CAMERA ................................ 47
MONITOR............................................... 48
INSTALLING YOUR WIRELESS AUDIO/
VIDEO MONITOR ...........................................50
ORIENTING ANTENNAS
FOR OPTIMAL PERFORMANCE...................... 51
WHAT ELSE CAN THE WIRELESS AUDIO/VIDEO
MONITOR DO FOR YOU? ..............................53
AUTO-SEQUENCE FUNCTION.................. 53
MONITOR TO A/V FUNCTION ................. 54
TROUBLESHOOTING ......................................55
SPECIFICATIONS ........................................... 56

ENGLISH
45
Video Security Systems
SAILORSAILOR
SAILORSAILOR
SAILOR
®
SA-6250 NSA-6250 N
SA-6250 NSA-6250 N
SA-6250 N
Important Safety Precautions Before Starting
Congratulation on purchasing this 2.4 GHz Wireless audio/video monitor. Before
operating your wireless audio/video monitor, please read all these safety and
operating instructions completely and then retain for future reference.
• To prevent dangers, never put the camera in a crib or playpen.
• Do not place the camera on any surface or mount it on any wall where the
camera or its DC adapter cord are within reach of children.
• Keep the camera and monitor out of reach of children.
• Never use the camera or monitor near water. For example, do not use near a
bathtub, washbowl, laundry tub, kitchen sink, in a wet basement, etc.
• Disconnect the DC adapters from wall outlets during long periods of non-use.
• Position the camera, monitor and DC adapters to allow adequate ventilation.
• Keep the camera out of direct sunlight.
• To prevent overheating, keep the camera, monitor and DC adapters away from
heat sources such as radiators, heat registers, stoves or other appliances
(including amplifiers) which produce heat.
• Use only the DC adapters provided. Use of any others may damage the camera
and/or monitor.
• Plug into an electrical outlet with standard household power.
• Changes or modifications not approved by manufacturer could void user's
authority to operate the equipment.
• Do remember that you are using public airwaves when you use the wireless
audio/video monitor and that sound and video may be broadcasted to other 2.4
GHz receiving devices. Conversations, even from rooms near the camera, may be
broadcast. To protect the privacy of your home, always turn the camera off when
not in use.

ANMERKUNGEN
15
ENGLISH
46
Video Security Systems
SAILORSAILOR
SAILORSAILOR
SAILOR
®
SA-6250 NSA-6250 N
SA-6250 NSA-6250 N
SA-6250 N
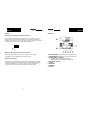
Contents of the set
The following items should be included in the box.
Please check that you have them all before installation.
• A camera with built-in transmitter and battery box
• A B/W monitor with built-in receiver
• A 10V DC adapter for camera only
• A 13.5V DC adapter for monitor only
• A movable battery box for monitor (batteries not supplied)
• Wall mount bracket
OPTION: extra camera SA-625 N
Warning:
* Two DC adapters are included with the wireless audio/video monitor. The
DC adapters can not be interchange. Use the adapter labelled OUTPUT:
10V DC with the camera. Use the adapter labelled OUTPUT: 13.5V DC with
the monitor.
* The movable battery box not only have you easily to place the monitor
on a flat surface but also is a battery case which can supply power by 10
pcs of AA type alkaline battery (Batteries not supplied).

DEUTSCH
14
Video Security Systems
SAILORSAILOR
SAILORSAILOR
SAILOR
®
SA-6250 NSA-6250 N
SA-6250 NSA-6250 N
SA-6250 N
Technische Daten
Empfänger (Monitor)
Videosystem PAL - schwarz/weiss
Frequenz Empfangsgerät 2,4 GHz ~ 2,4835 GHz
Maximaler Übertragungsweg Ca. 150 m
Empfänger-Antenne gerichtet
Empfänger-Empfindlichkeit - 29 ~ 85 Dbm
Audio:
max. Ausgang 800mW
Ausgangsschwelle 10% 500mW
Auflösung:
Vertikal 250 Zeilen
Horizontal 300 Zeilen
Max. Beleuchtung 100 cd/m2
Stromaufnahme 1200 mA
Stromversorgung DC 13,5V
Abmessungen (mm) (L)171 x (H)140 x (W)210
Nettogewicht 1320 g
Sender (Kamera)
Videosystem PAL
Sender-Frequenz 2,4 GHz ~ 2,4835 GHz
Maximaler Übertragungsweg ca. 150 m
Sender-Antenne gerichtet
Sender-Empfindlichkeit 10 dBm CE
CNOS-Einheit 1/3"
Anzahl effektive Pixel 510 - 582
Auflösung (TV-Zeilen) 330 (h)
Belichtungsdauer 1/60 - 1/10000 Sek.
Blende automatisch
Montage nur für Innenräume
Max. Aufnahmedistanz im Dunkeln 1 - 2 m
Mikrofon-Empfindlichkeit 2 - 3 m
Min. Beleuchtung wenger als: 1 Lux
Anzahl Kanäle 3
Stromaufnahme 150 mA
Stromversorgung DC 10V
Abmessungen (mm) (L)260x (H)114x (W)50
Gewicht net 450 g
ENGLISH
47
Video Security Systems
SAILORSAILOR
SAILORSAILOR
SAILOR
®
SA-6250 NSA-6250 N
SA-6250 NSA-6250 N
SA-6250 N
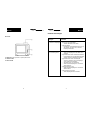
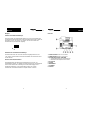
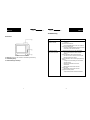
To know your wireless audio/video monitor
Wireless Camera
Wireless colour monitoring system parts
Parts of the camera
1. Camera lens
2. Power LED
3. Antenna
4. Night vision LED
5. DC jack
6. Power ON/OFF switch
7. Channel switch
8. Battery door

DEUTSCH
13
Video Security Systems
SAILORSAILOR
SAILORSAILOR
SAILOR
®
SA-6250 NSA-6250 N
SA-6250 NSA-6250 N
SA-6250 N
Probleme und Lösungen
Störungen Kontrollen
Keine Stromversorgung
von Sender und Empfänger
• Ist das Stromkabel herausgezogen?
• Monitor ist nicht eingeschaltet
.
Schalter ON/OFF auf "ON" stellen
• Falschers Netzteil
.
Das Netzteil mit dem Etikett OUTPUT: 10V mit
dem Sender, und das von 13,5V mit dem
Empfänger verwenden.
Kein Ton oder Bild.
Töne oder Bilder gestört
• Kanalschalter sind nicht gleich eingestellt
.
Sender und Empfänger auf den selben Kanal
einstellen
• Signalinterferenzen durch einen Mikrowellenherd
.
Herd ausstellen oder aus der Übertragungslinie
zwischen Sender und Empfänger entfernen
• Signalinterferenzen durch eine Störquelle
.
Sowohl am Sender, als auch am Empfänger
einen anderen Kanal einstellen.
.
Störquelle suchen und ausschalten.
.
Sender und/oder Empfänger an eine andere
Stelle installieren.
• Übertragungsweg zu lang
.
Sender und/oder Empfänger an eine andere
Stelle anordnen.
• Falsche Position der Antenne
.
Sende-/Empfangsantenne ausrichten.
ENGLISH
48
Video Security Systems
SAILORSAILOR
SAILORSAILOR
SAILOR
®
SA-6250 NSA-6250 N
SA-6250 NSA-6250 N
SA-6250 N
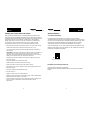
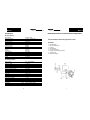
1. Antenna: Orienting antenna for optimal performance
2. Volume control
3. Power control
Monitor
Front view

DEUTSCH
12
Video Security Systems
SAILORSAILOR
SAILORSAILOR
SAILOR
®
SA-6250 NSA-6250 N
SA-6250 NSA-6250 N
SA-6250 N
Beispiele:
Funktion automatische Kanalabfolge:
Wenn zwei Sender und die betreffenden Kanäle auf CH1 und CH3 eingestellt sind,
und die beiden Kanäle nacheinander in Abfolge angezeigt werden sollen, müssen Sie
die Schalter von CH1 und CH3 auf "ON" stellen. CH1 und CH3 werden dann
hintereinander für je drei Sekunden angezeigt.
Abschalten der automatischen Kanalabfolge:
Der Schalter des Kanals, der nicht mehr automatisch angezeigt werden soll, auf
"OFF" stellen. Auf diese Weise ist der Kanal außer Betrieb und erscheint nicht mehr
auf dem Monitor.
Monitor mit Audio/Videofunktion
Die Empfängereinheit des drahtlosen Sicherheitssystems ist mit Audio- und
Videoausgängen versehen, um die Bilder und Töne des Monitors an ein Fernsehgerät
oder an einen Videorecorder zu übertragen. Die Audio/Videoausgänge an ein
Fernsehgerät anschließen, um ein größeres Bild zu haben, bzw. an einen
Videorecorder, um die Bilder aufnehmen und später ansehen zu können.
1
ON
23
m
ENGLISH
49
Video Security Systems
SAILORSAILOR
SAILORSAILOR
SAILOR
®
SA-6250 NSA-6250 N
SA-6250 NSA-6250 N
SA-6250 N
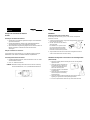
1. AUDIO OUTPUT: Monitor to A/V function
2. VIDEO OUTPUT: Monitor to A/V function
3. Channel setting switch / FUNCTION
* Channel setting switch: For channel selection
* FUNCTION: Auto-Sequence function switch
4. DC 13.5V IN
5. V-HOLD
6. BRIGHTNESS
7. CONTRAST
8. Antenna
Rear View

DEUTSCH
11
Video Security Systems
SAILORSAILOR
SAILORSAILOR
SAILOR
®
SA-6250 NSA-6250 N
SA-6250 NSA-6250 N
SA-6250 N
Weitere Funktionen
Automatische Kanalabfolge
Mit diesem drahtlosen Videosystem kann der Nutzer zu seiner Sicherheit
verschiedene Räume der Wohnung (oder des Büros) überwachen. Mit dieser Anlage
können bis zu drei Kameras über drei verschiedene Kanäle eingesetzt werden. Diese
Kanäle können nacheinander abgerufen und angezeigt werden. Des Weiteren
stehen drei Dip-Schalter für die verschiedenen Betriebsarten zur Verfügung.
Wenn der Kanalschalter auf "ON" steht, werden die gewünschten Kanäle auf dem
Bildschirm wieder gegeben. Wenn der Schalter auf "OFF" gestellt wird, werden die
Kanäle nicht auf dem Monitor angezeigt.
1
ON
23
m
(Schema Kanal-Dip-Switch)
ENGLISH
50
Video Security Systems
SAILORSAILOR
SAILORSAILOR
SAILOR
®
SA-6250 NSA-6250 N
SA-6250 NSA-6250 N
SA-6250 N
Installing your wireless audio/video monitor
When you start to install the camera, it is recommended to test reception of the
Audio/Video Monitor be tested before installing. Have one adult hold the camera at
the selected set up area while another adult moves the monitor to different locations
throughout the house to check reception. If interferences or other problems
develop, please refer to the section of this User's Guide titled "Troubleshooting".
You may need to select a different location in the room to install the camera.
The following steps show you how to set up the wireless audio/video monitor:
• Setting the channel position of camera and monitor. You need to make sure the
camera and monitor are set to the same channel [Channel 1, 2 or 3].
• You can set camera and monitor channels by lightly pushing the dip-switch to
"ON" position.
For Example: If you want to set both the camera and monitor on [Channel 1] for
operation, then you need to push [Channel 1] dip-switches of camera and
monitor to "ON" position and another dip-switch should be on "OFF" position,
beside you will install more than one camera at the same time.
• Plug the jack on the 10V DC adapter cord into the DC adapter socket on the
back of the camera
• Plug the DC adapter into a standard wall outlet
• Adjust the angle of the camera for best view of image
• Position the antenna so that it points to the monitor antenna
• Plug the jack on the 13.5V DC adapter cord into the DC adapter socket on the
back of the monitor
• Plug the DC adapter into a standard wall outlet
• Turn the monitor on
• Adjust the volume control to a comfortable level
• Adjust the video image using the V-Hold (vertical hold), Contrast and Brightness
adjustment control on the back of the monitor
• Locate and orient the antennas on both, camera and monitor, according to the
section of this User's manual titled "Orienting antennas for optional
performance".
Zeitschaltung der Kanalsequenzfunktionen
Jeder Kanal wird drei Sekunden lang angezeigt.
Diese Zeitspanne ist werkseitig eingestellt und kann vom Kunden nicht geändert
werden.

DEUTSCH
10
Video Security Systems
SAILORSAILOR
SAILORSAILOR
SAILOR
®
SA-6250 NSA-6250 N
SA-6250 NSA-6250 N
SA-6250 N
ENGLISH
51
Video Security Systems
SAILORSAILOR
SAILORSAILOR
SAILOR
®
SA-6250 NSA-6250 N
SA-6250 NSA-6250 N
SA-6250 N
Einlegen oder Auswechseln der Batterien
WICHTIG!
Bei Einlegen oder Wechsel der Batterien:
1. Niemals alte und neue Batterien gemeinsam einlegen. Immer alle Batterien
gemeinsam auswechseln.
2. Niemals Standardbatterien, alkalische oder wiederaufladbare Batterien
gemeinsam einlegen. Immer nur einen Batterietyp verwenden.
3. Sollte die Einheit für längere Zeit eingelagert oder nicht benutzt werden, die
Batterien entnehmen. Andernfalls könnte die Kamera Schaden
davontragen.
Einlegen von Batterien in die Kamera
In die Kamera sind zur Stromversorgung 4 “AA“ Batterien eingelegt. Für längere
Betriebszeiten ist der Gebrauch von alkalischen Batterien empfehlenswert.
Zum Einlegen/Auswechseln der Batterie:
1. Den Batteriefachdeckel entfernen; hierzu den Verschluss in den mit “OPEN“
markierten Bereich schieben.
2. Die 4 “AA“ Batterien entnehmen.
HINWEIS: Die Batterien einlegen, dabei darauf achten, dass ihre Ausrichtung
mit den Polaritätsweichen (+ und -) im Batteriefach übereinstimmt.
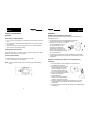
2. Drill 1/8” pilot holes over the centre of
each pencil mark.
For installation on a dry wall or sheet-
rock, use the wall anchors provided.
Gently tap the anchors into the pilot
holes with a hammer until they are flush.
Installation
Installing mounting bracket (camera stand)
The following tools are necessary: a pencil, a drill, drill bits, a Philips head
screwdriver, a hammer.
1. Choose the mounting position. Using the mounting bracket as a guide, mark
the screw holes with a pencil.
3. Align the bracket over the holes or wall anchors and tighten the screws in
order to secure the bracket to the wall or ceiling.
Installation and alignment of the camera on the mounting bracket
(camera stand)
1. Remove the camera platform and ball joint from the mounting bracket
adjustment collar.
2. Secure the camera to its platform on
the adjustment collar. Tighten the
screw to the threaded insert at the
base of the camera by hand.
3. For battery operation, insert batteries
as shown below.
4. Secure the camera, camera platform
and the ball joint to the mounting
bracket until tight.
5. Adjust the camera by rotating the ball joint and/or collar slot while
tightening to align the lens in the required sight direction.
6. If the unit is provided with a black lens cap, this should be removed.

DEUTSCH
9
Video Security Systems
SAILORSAILOR
SAILORSAILOR
SAILOR
®
SA-6250 NSA-6250 N
SA-6250 NSA-6250 N
SA-6250 N
ENGLISH
52
Video Security Systems
SAILORSAILOR
SAILORSAILOR
SAILOR
®
SA-6250 NSA-6250 N
SA-6250 NSA-6250 N
SA-6250 N
2. Referenzlöcher von etwa 1/8" in der Mitte
eines jeden Bleistiftzeichens bohren.
Zur Montage an Trocken- oder
Steinmauern die mitgelieferten
Wandverankerungen benutzen. Die
Verankerungen vorsichtig mit einem
Hammer in die Referenzlöcher einführen,
damit sie leicht eintreten.
Installation
Installation der Montagehalterung (Kamerafuß)
Erforderliche Werkzeuge: Bleistift, Bohrer, Bohrerspitzen, Schraubenzieher mit
Philips Klinge, Hammer
1. Der Installationsort wählen. Die Montagehalterung als Hilfe zum
Einzeichnen der Bohrpunkte mit dem Bleistift benutzen.
3. Die Halterung an den Bohrungen oder den Wandverankerungen ausrichten
und die Schrauben anziehen, um einen sicheren Halt an Wand oder Decke zu
gewährleisten.
Installation und Ausrichtung der Kamera an der Montagehalterung
(Kamerafuß)
1. Die Kameraplattform und das Kugelgelenk aus dem Stellring der
Montagehalterung entnehmen.
2. Die Kamera an der Plattform auf dem
Stellring befestigen. Von Hand die
Schraube in Übereinstimmung mit
dem Gewindeeinleger anziehen, der
sich auf dem Kameraboden befindet.
3. Für einen korrekten Batteriebetrieb die
Batterien wie nachfolgend
beschrieben einlegen.
4. Kamera, Plattform und Kugelgelenk
solange auf der Montagehalterung
regulieren, bis alle richtig fest sitzen.
5. Die Kamera einstellen. Das Kugelgelenk und/oder den Ring - Slot beim
Anziehen drehen, bis das Objektiv in der gewünschten Sichtrichtung
ausgerichtet ist.
6. Wird die Einheit mit einer schwarzen Schutzkappe für das Objektiv geliefert,
diese entfernen.
Inserting or replacing batteries
IMPORTANT!
When inserting or replacing batteries:
1. Do not mix old and new batteries. All the batteries should be replaced at the same
time.
2. Do not mix alkaline, standard and rechargeable batteries: only one type of battery
should be used.
3. When storing the units or during long periods of non-use, remove the batteries.
Failure to do this may damage the camera.
Inserting batteries into the camera
The camera needs 4 size “AA” batteries in order to operate on battery power. Alkaline
batteries are recommended for longer operation.
To insert or replace batteries:
1. Remove the battery door by pushing the lock marked “OPEN”.
2. Insert (or remove) the 4 “AA” size batteries.
NOTE: Insert the batteries into their compartment following the polarity markings
(+ and -).

DEUTSCH
8
Video Security Systems
SAILORSAILOR
SAILORSAILOR
SAILOR
®
SA-6250 NSA-6250 N
SA-6250 NSA-6250 N
SA-6250 N
ENGLISH
53
Video Security Systems
SAILORSAILOR
SAILORSAILOR
SAILOR
®
SA-6250 NSA-6250 N
SA-6250 NSA-6250 N
SA-6250 N
What else can the wireless audio/video monitor do for you?
Auto-sequence function
With the wireless audio/video monitor, users can monitor a serie of rooms for
maximum supervision of the home (or office). The wireless audio/video monitor can
use up to three cameras on three different channels, while the monitor can receive
signals on up to three different channels and display them in sequence. The wireless
audio/video monitor includes three channel dip-switches for various operating
modes.
When channels dip-switches are on "ON" position, channel will be dislplayed on the
monitor. If channel dip-switches are on “off” position channels won’t be displayed
on the monitor.
Auto-sequence function interval time
The channel displays at three seconds intervals.
This interval time is preset by the factory and cannot be adjusted by the user.
1
ON
23
m
(Channel Dip-switch diagram)
Inbetriebnahme
Wenn Sie den Sender an die Wand befestigen möchten, sollten sie vor der
endgültigen Montage des Wandarms Übertragungs- und Empfangstests vornehmen.
un den empfang zu testen sollte eine erwachsene Person die Kamera in der
gewünschten Position halten und eine zweite Person sollte den Empfänger an
verschiedenen Stellen im Haus. Sollten Sie Interferenzen oder andere Störungen
feststellen, sehen Sie in den Gebrauchsanween im Kapitel "Probleme und Lösungen”
nach. Ggf. muss die Kamera an eine andere Stelle des Raums angeordnet werden.
Folgenden Vorgänge sind für die Inbetriebnahme des kabellosen Systems von Sailor
erforderlich:
• Stellen Sie sicher, dass Sender und Empfänger auf denselben Kanal eingestellt
sind (1, 2 oder 3).
• Zum Einstellen des Kanals von Sender und Empfänger einfach den schalter ON/
OFF auf "ON" stellen.
Zum Beispiel: sollen sowohl der Sender, als auch der Empfänger auf Kanal 1
eingestellt werden, sind beide Schalter auf "ON" zu stellen. Wenn mehrere
Kameras installiert werden sollen, den Schalter auf "OFF" stellen.
• Der Stecker des 10V-Netzteils in die entsprechende Buchse an der Rückseite des
Senders stecken.
• Das Netzteil an eine normale Wandsteckdose anschließen.
• Der Blickwinkel der Kamera so einstellen, dass der Raum optimal überwacht wird.
• Die Antenne auf die Antenne des Monitors richten.
• Der Stecker des 13,5V-Netzteils in die entsprechende Buchse an der Rückseite des
Empfängers stecken.
• Das Netzteil an eine normale Wandsteckdose anschließen.
• Der Empfänger einschalten.
• Lautstärke regulieren.
• Das übertragene Bild mit der V-HOLD-Taste und den Kontrast- und
Helligkeitsreglern einstellen.
• Die Antennen am Sender und am Empfänger gemäß der Angaben im Kapitel
"Bestmögliche Ausrichtung der Antennen" regulieren.

DEUTSCH
7
Video Security Systems
SAILORSAILOR
SAILORSAILOR
SAILOR
®
SA-6250 NSA-6250 N
SA-6250 NSA-6250 N
SA-6250 N
ENGLISH
54
Video Security Systems
SAILORSAILOR
SAILORSAILOR
SAILOR
®
SA-6250 NSA-6250 N
SA-6250 NSA-6250 N
SA-6250 N
Example:
When you want to use the auto-sequence function:
If you have two cameras and their channels are set on [CH 1] and [CH 3], and you
wish to monitor the two channels in sequence, you must slide the channel dip-
switchs of [CH 1] and [CH 3] to the "ON" position. Then [CH 1] and [CH 3] will start
to display on the monitor in sequence at three seconds intervals.
When you want to stop the auto-sequence function:
Slide the dip-switch of the channel, you want to stop, on "OFF" position,
consequently it won’t be displayed on the monitor anymore.
Monitor to A/V function
The monitor unit of wireless audio/video monitor has audio/video outputs which
can be used to transfer picture and sound from the monitor screen to a TV screen.
Connect the outputs to the A/V input on a TV set for a large screen display, or
connect the outputs to a VCR to record transmissions for later viewing!
1
ON
23
m
1. AUDIOAUSGANG: Tonaufzeichnung mit einem Videorecorder
2. VIDEOAUSGANG: Bildaufzeichnung mit einem Videorecorder
3. Kanalumschalter / FUNKTION
* Kanalumschalter: zum Auswählen des Kanals
* FUNKTION: Schalter für automatischen Kanalwechsel
4. Strombuchse 13,5V DC
5. V-HOLD
6. HELLIGKEIT
7. KONTRAST
8. Antenne
Rückansicht

DEUTSCH
6
Video Security Systems
SAILORSAILOR
SAILORSAILOR
SAILOR
®
SA-6250 NSA-6250 N
SA-6250 NSA-6250 N
SA-6250 N
ENGLISH
55
Video Security Systems
SAILORSAILOR
SAILORSAILOR
SAILOR
®
SA-6250 NSA-6250 N
SA-6250 NSA-6250 N
SA-6250 N
Troubleshooting
Symptoms Check points
No power is supplied to the
camera or monitor.
• Is the power cord disconnected?
.
Connect it
• Monitor is not turned on
.
Push the POWER switch to the "ON" position
• Wrong DC adapter used
.
Use the DC adapter labelled OUTPUT: 10V with
the camera, 13.5V with the monitor
No sound or picture.
Noisy sound or picture.
• Channel switches are not on the same setting
.
Set the camera and the monitor to same
channel
• Signal interference due to microwave oven
.
Turn off the oven or remove it from the path
between camera and monitor
• Signal interference due to other signal producing
devices
.
Change the channel setting on both camera
and the monitor
.
Identify and eliminate the source of
interference
.
Relocate the camera and/or monitor
• Out of range
.
Relocate the camera and/or monitor
• Improper antenna position
.
Adjust camera/monitor antenna orientation
1. Antenne: Ausrichtung der Antenne zur Verbesserung der Leistung
2. Lautstärkeregelung
3. Funktionsanzeige mit Lampe
Monitor
Vorderansicht

DEUTSCH
5
Video Security Systems
SAILORSAILOR
SAILORSAILOR
SAILOR
®
SA-6250 NSA-6250 N
SA-6250 NSA-6250 N
SA-6250 N
Beschreibung kabellosen Audio/Video Überwachungssystems
Kabellose Kamera
ENGLISH
56
Video Security Systems
SAILORSAILOR
SAILORSAILOR
SAILOR
®
SA-6250 NSA-6250 N
SA-6250 NSA-6250 N
SA-6250 N
Specifications
Receiver (Monitor)
Video system PAL black/white
Receiver frequency 2,4 GHz ~ 2,4835 GHz
Maximum range ca. 150 m
Receiver antenna directional
Receiver sensitivity - 29 ~ 85 Dbm
Audio:
Maximum output 800mW
Thd output 10% 500mW
Resolution:
Vertical: 250 lines
Horizontal: 300 lines
Luminance max. 100 cd/m2
Current consumption 1200 mA
Power supply DC 13,5V
Dimensions (mm) (L)171 x (H)140 x (W)210
Weight net 1320 g
Transmitter (Camera)
Video System PAL BLACK/WHITE
Transmitter frequency 2,4 GHz ~ 2,4835 GHz
Maximum range Ca. 150 m
Transmitter antenna directional
Transmitter sensitivity 10 dBm CE
Optical size 1/3"
Number of effective pixels 510 x 582
Resolution (TV line) 330 (h)
Auto exposure 1/60 - 1/10000 Sek.
Back light compensation automatical
Installation indoor only
Max. distance night-time 1 - 2 m
Min. luminance less than 1 Lux
Microphone sensitivity 2 - 3 m
Number of channels 3
consumption 150 mA
Current consumption DC 10V
Dimensions (mm) (L)260 x (H)114 x (W)50
Weight net 450 g
Teile des kabellosen Überwachungssystems in Farbe
Kamerateile
1. Kameraobjektiv
2. LED Stromversorgung
3. Antenne
4. LED Nachtsicht
5. DC Anschlussbuchse
6. Schalter Stromversorgung ON/OFF
7. Schalter Kanal
8. Batteriefachklappe

DEUTSCH
4
Video Security Systems
SAILORSAILOR
SAILORSAILOR
SAILOR
®
SA-6250 NSA-6250 N
SA-6250 NSA-6250 N
SA-6250 N
Inhalt der Verpackung
In der Packung sind folgende Teile enthalten. Vor der Installation sollten Sie
kontrollieren, dass alle Teile vorhanden sind.
• Kamera mit eingebautem Sender und bateriefach
• S/W-Monitor mit eingebautem Empfänger
• 10V-Netzteil für die Kamera
• 13,5V-Netzteil für den Monitor
• Abnehmbares Batteriefach für den Monitor (Batterien nicht geliefert)
• Wandarm für Wandmontage
OPTION: Zusatzkamera SA-625N
Achtung:
* Das kabellose System umfasst zwei Netzteile, die nicht untereinander
austauschbar sind. Das Netzteil mit dem Etikett OUTPUT: 10V DC für die
Kamera und das Netzteil mit dem Etikett OUTPUT: 13,5V DC für den
Monitor verwenden.
* Durch das abnehmbare Batteriefach kann der Monitor leicht auf einer
ebenen Fläche aufgestellt werden. Das Fach kann 10 Batterien zur
Stromversorgung aufnehmen (Batterien nicht geliefert).
NOTES
57

DEUTSCH
3
Video Security Systems
SAILORSAILOR
SAILORSAILOR
SAILOR
®
SA-6250 NSA-6250 N
SA-6250 NSA-6250 N
SA-6250 N
Sicherheitsmaßnahmen vor der Inbetriebnahme
Wir beglückwünschen Sie zu Ihrem drahtlosen Audio/Video- Sicherheitssystem. Vor
der Inbetriebnahme lesen Sie bitte sorgfältig die Gebrauchsanleitungen durch und
heben Sie diese für späteres Nachschlagen auf.
• Um Gefahren vorzubeugen, die Kamera niemals in Kinderbetten oder
Spielbereichen von Kindern anbringen.
• Kamera und Netzteil nie in Reichweite von Kindern aufstellen.
• Kamera und Monitor niemals in der Nähe von Wasser aufstellen (z.B.
Badewannen, Waschkesseln, Waschtischen und Spülbecken, in feuchten
Kellerräumen usw.).
• Wenn die Anlage längere Zeit nicht benutzt wird, alle Stecker der Netzteile
herausziehen.
• Kamera, Monitor und Netzteile so aufstellen, dass eine angemessene Lüftung
gewährleistet ist.
• Die Kamera nicht direktem Sonnenlicht aussetzen.
• Um Überhitzung zu vermeiden, Kamera, Monitor und Netzteile nicht in der Nähe
von Wärmequellen aufstellen, z.B. Heizkörper, Öfen oder andere Geräte
(einschließlich Lautsprecher) die Wärme erzeugen.
• Nur die mitgelieferten Netzteile verwenden. Andere Netzteile können die Kamera
und/oder den Monitor beschädigen.
• Die Anlage an eine Steckdose mit Standardspannung anschließen.
• Bei vorgenommenen Änderungen, die nicht von hersteller genehmigt sind,
erlischt der Garantieanspruch.
• Es ist zu berücksichtigen, dass das kabellose Sicherheitssystem mit Radiowellen
arbeitet, und dass die übertragenen Töne und Bilder von anderen 2,4 GHz-
Empfängern aufgefangen werden könnten. Um Ihre Privatsphäre zu schützen,
schalten Sie deshalb die Anlage ab, wenn sie nicht verwendet wird.
NOTES
58
-
 1
1
-
 2
2
-
 3
3
-
 4
4
-
 5
5
-
 6
6
-
 7
7
-
 8
8
-
 9
9
-
 10
10
-
 11
11
-
 12
12
-
 13
13
-
 14
14
-
 15
15
-
 16
16


Sailor SA-6250 N User manual
- Category
- Security cameras
- Type
- User manual
Ask a question and I''ll find the answer in the document
Finding information in a document is now easier with AI
in other languages
- Deutsch: Sailor SA-6250 N Benutzerhandbuch
Related papers
Other documents
-
Hama 00107229 Owner's manual
-
Tranwo Technology Corp O6LGIGAAIR-30T User manual
-
Jasco 45246 User manual
-
Lorex SG6110X Quick Setup Manual
-
X10 XC10A User manual
-
X10 Wireless Technology VK48A User manual
-
-
-
Radio Shack 49-2534 User manual
-
Angelcare AC423-D User manual