Page is loading ...

Recommended Installation by a Professional Plumbing Contractor
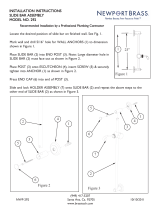
Locate the desired position of slide bar on finished wall. See Fig. 1.
Mark wall and drill 5/16” hole for WALL ANCHORS (2) using WALL BRACKET (1) for hole pat-
tern template.
Due to vibration in shipment, tightening of SETSCREW (7), shown in Fig. 2, may be required
before proceeding to next step.
Check holder orientation prior to installation - o-ring to be full engaged in holder as shown.
Match taper of holder to hose. See Figure 2a.
Place ESCUTCHEON/O-RING (6) onto SLIDE BAR assembly (4) and push forward to expose the
base of end post as shown in Figure 3.
Place SLIDE BAR assembly (4) onto mounted WALL BRACKETS (1) and secure into place with
SETSCREWS (5), three on each end, as shown in Fig. 3.
Slide ESCUTCHEON/O-RING (6) back over end post and flush with finished wall.
Install SUPPLY ELBOW (8) onto exposed 1/2 NPT NIPPLE (9).
Attach one end of HOSE (10) to SUPPLY ELBOW (8) and the other to HAND SHOWER (11).
Place HAND SHOWER (11) onto SLIDE BAR (4) shown in Figure 4 & 5.
35 1/2”
Figure 1
INSTALLATION INSTRUCTIONS
SLIDE BAR ASSEMBLY
MODEL NO. 280E, 280F, and 280S
Figure 2
7
Figure 2a
Full o-ring
engagement
!
!
Figure 4
9
8
10
!
Figure 3
4
6
5
3
7
2
5
1
10
4
11
Figure 5
(949) 417-5207
NWP-280E
EN-3686 REV. A
Santa Ana, Ca. 92705 01/23/19
www.brasstech.com
/


