
USE & CARE
GUIDE
MANUAL DE USO
Y CUIDADO
GUIDE
D’UTILISATION
ET D’ENTRETIEN
Model/Modelo/Modele
T24UR925DS
T24UR915DS
T24UR905DP
Double Drawer Refrigerator
Refrigerador de doble cajón
Réfrigérateur à double tiroir

Page |2
Table of Contents
Welcome to Your THERMADOR
Under-Counter Appliance
Important Safety Instructions ………….…4
- Definition
- Before you switch ON the appliance
- Technical safety
- Important information when using the
appliance
- Children in the household
- General regulations
Information concerning disposal …….….5
- Disposal of packaging
- Disposal of your old appliance
Installing the appliance ……………………5
- Transporting
- Installation location
Ventilation ……………………………………5
Getting to know your appliance ………….6
Getting started with your appliance ……..7
- Touch control
- Setting the temperature ………………..8
- Switching the appliance on
Refrigerator Drawers ………………………8
Toe-Kick ………………………...…………..10
Cleaning the appliance ……………………10
- Cleaning behind the Toe-kick
Odors …………………………………………11
Light (LED) ………………………………….11
Tips for saving energy ……………………11
Operating noises …………………………..11
- Normal noises
- Preventing noises
Troubleshooting ……………………………12
BSH Home Appliances Corporation
1901 Main Street, Irvine, CA.
Questions?
1-800-735-4328
www.thermador.com
We look forward to hearing from you!

Page |3
Welcome
To Your Thermador® Under-counter Appliance
Thank you and congratulations on your recent THERMADOR purchase! Whether you are a dedicated
chef or simply a connoisseur of the art of cooking, owning a THERMADOR kitchen is the ultimate
expression of personal style, good taste, and an appreciation for the complete culinary experience.
Our award-winning products have been empowering culinary enthusiasts for more than eleven
decades.
Before you begin using your new THERMADOR product, please take a moment to review the Use
and Care Guide. You will find the answers to all of your questions as well as some very important
safety information. Pay special attention to the Important Safety Instructions located at the beginning
of the manual.
Our products are handcrafted with the highest quality authentic materials to ensure reliable service. In
the unlikely event that you have a service question, please have your model and serial numbers of
your product available when calling for technical service. You can find this information in the name
plate of the appliance located inside the cabinet, at the right side of the bottom compartment.
We realize that you have made a considerable investment in your kitchen and thank you again for
choosing THERMADOR. Please feel free to share your kitchen photos and remodeling stories with
us. Follow us on Twitter or post your kitchen photos to Facebook. We would love to hear from
you!

Page |4
Important Safety Instructions
READ AND SAVE THESE INSTRUCTIONS!
Definition
WARNING:
This indicates that death or serious injury may
result due to non-observance of this warning.
CAUTION:
This indicates that minor or moderately
severe injury may result due to non-
observance of this warning.
NOTE:
This is used to draw the user’s attention to
something in particular.
WARNING: To reduce the risk of
fire, electric
shock, or injury when using your appliance, follow these
basic precautions:
Before you switch ON the appliance
Please read the operating and installation instructions
carefully. They contain important information on how to
install, use and maintain the appliance. Retain all
documents for subsequent use or for the next owner.
Technical safety
If the power cord of this appliance is damaged, it
must be replaced by an authorized servicer.
Improper installation and repairs may put the user at
considerable risk. Repairs must be performed by an
authorized servicer, to minimize the risk of ignition due
to incorrect parts or improper service.
Only original parts supplied by the manufacturer
should be used. Only original parts satisfy safety
requirements.
The appliance comes with a UL registered 3-wire
power cord. Never sever or remove the third
(ground) conductor from the power cord.
The appliance requires a 3-pole socket. The socket
should be connected by an electrician only. Where
there is a 2-pole standard wall socket, it is the
responsibility of the customer to have this socket
replaced with a correctly grounded 3-pole wall
socket. Do not use any adapter plugs. Do not use
an extension cord.
Important information when using the appliance
Never use electrical appliances inside the
appliance (e.g. heater, electric ice maker, etc.).
Risk of explosion!
Never use a steam cleaner to defrost or clean the
appliance! The steam may penetrate electrical
parts and cause a short–circuit. Risk of electric
shock!
Do not use pointed and sharp–edged implements
to remove frost or layers of ice. You could
damage sensitive internal components, including
the refrigerant tubes. Leaking refrigerant may
ignite or cause eye injuries.
Do not use mechanical devices or other means to
accelerate the defrosting process other than
those recommended by the manufacturer.
Do not store products which contain flammable
propellants (e.g. spray cans) or explosive
substances in the appliance. Risk of explosion!
Do not stand on or lean heavily against the base
of appliance, door, shelves etc.
Switch the appliance off prior to cleaning.
Bottles which contain a high percentage of
alcohol must be sealed and stored in an upright
position.
Keep plastic parts and the refrigerator seal free of
oil and grease. Otherwise, parts and the
refrigerator seal will become porous.
Never cover or block the ventilation openings for
the appliance.
Children in the household
Keep children away from packaging and its
parts. Danger of suffocation from folding
cartons and cling wrap!
Do not allow children to play with the
appliance!
Children should not be allowed to use the
appliance unless supervised by an adult.
General regulations
The appliance is designed exclusively for the storage
of food and beverage.
This appliance is intended for use in the home and
the home environment.
The refrigeration circuit has been checked for leaks.
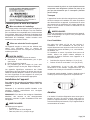
State of California Proposition 65 Warnings
This product may contain a chemical known to the State
of California, which can cause cancer or reproductive
harm. Therefore, the packaging of your product may bear
the following label as required by California:

Page |5
Information concerning disposal
Disposal of packaging
The packaging protects your appliance
from damage
during transit. All utilized materials are
environmentally safe and recyclable. Please help us
by disposing of the packaging in an environmentally
friendly manner. Please ask your dealer or your local
authority about current means of disposal.
Disposal of your old appliance
Old appliances are not worthless rubbish! Valuable
raw materials can be reclaimed by recycling old
appliances.
WARNING:
1. Pull out the power plug.
2. Cut off the power cord and discard with the power
plug.
3. Remove the drawers from the appliance.
4. Do not allow children to play with the appliance
once it has spent its useful life. Danger of
suffocation!
Refrigerators contain refrigerant and gases in the
insulation. Refrigerant and gases must be recycled by
professionals. Ensure that tubing of the refrigerant
circuit is not damaged prior to proper disposal.
Installing the appliance
For detailed installation instructions, please refer
to the Installation Guide provided with the
appliance.
Have a qualified technician install and connect the
appliance according to the enclosed installation
instructions.
NOTE: For detailed installation instructions, relevant
measurements and information, please, see the
Installation Guide provided with this appliance.
WARNING:
Do not install this appliance:
-
Outdoors
- In an environment with dripping water
- In rooms where there is a risk of frost
It is recommended that a separate circuit serving only
your refrigerator be provided. Use an outlet that cannot be
turned off by a switch. Do not use an extension cord.
Transporting
The appliance is heavy and must be handled with
caution during transportation and installation.
Because of the weight and dimensions of the
appliance, at least two persons are necessary to move
the appliance into position securely and avoid injuries
to people or damage to the appliance.
WARNING:
While handling or moving the appliance avoid any
damaging to the tubing, risk of refrigerant leakage.
Installation location
A dry, well ventilated room is suitable as an installation
location. The installation location should not be
exposed to direct sunlight and not placed near a heat
source, e.g. a cooker, radiator, etc.
If installation next to a heat source is unavoidable, use a
suitable insulating plate or observe the following
minimum distance from the heat source:
To electric or gas cookers 1¼” (3 cm).
To an oil or coal-fired cooker 1113/16” (30cm).
The floor of the installation location must not give
way; if required, reinforce floor. The appliance must be
upright and level to function correctly.
If the appliance seems unsteady there are 4 leveling
legs that can be adjusted to your preference.
Ventilation
The refrigeration unit is ventilated only at the Toe-
Kick in the base. Never cover that area or place
anything in front of it. Otherwise the refrigeration cooling
performance will be affected and the unit must work
harder increasing power consumption.

Page |6
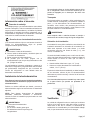
Getting to know the appliance
THERMADOR under-counter Double Drawer
Refrigerator units can be freestanding or built-in and
are available in a number of configurations.
These operating instructions refer to several models;
the diagrams may differ.
1. Cabinet
2. Touch control (over Top Drawer)
3. Top Drawer
4. Handle (“Master”* Style shown)
5. Bottom Drawer
6. Toe-Kick
7. Leveling legs
8. Aluminum divider (Upper)
9. Mat
10. Aluminum divider (Lower)
NOTE: Overlay model does not include the stainless
door nor the handle.
NOTE: The mats are not washable in dishwasher
machine.
WARNING
To avoid the appliance tilting due to unbalanced
overweight do not pull out both drawers at the same
time. Always close one of the drawers before you pull out
the other one.
1
3
4
6
7
5
4
8
9
9
10
2
Top Drawer
Bottom Drawer

Page |9
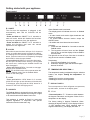
Getting started with your appliance
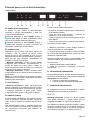
Touch control
A. ON/OFF
The first time the appliance is plugged, it will
automatically start and all functions will be
enabled.
• Press and hold the ON/OFF for 3 seconds to
enter off mode, which will disable the functions
and stop all operations from the appliance.
• Press and hold the ON/OFF for 3 seconds to
enable the functions and start the normal
operation of the appliance.
B. ALARM
When either drawer has been left open for 2 minutes or
longer, an audible alarm sound is triggered in addition
to a flashing blue LED indicator light above the ALARM
button. Press the button once to temporarily disengage
the ALARM, or close the open drawers.
• Press and hold ALARM for 3 seconds to disengage
the door-open ALARM function entirely. The key-press
will sound once, confirming the ALARM function has
been disengaged.
• Press and hold ALARM for 3 seconds to reengage
the door-open ALARM function.
NOTE: The ALARM function will not operate when the
unit is in Sabbath mode. See the Sabbath Mode
section on this same page.
C. LOCK
• Press and hold the LOCK button for 3 seconds,
LOCK LED will light up and all buttons will be blocked.
To disengage, press and hold the LOCK button for 3
seconds or until LOCK LED light goes off.
D. SABBATH
The Sabbath Mode is designed for those users whose
religious observances requires the turning off of lights
or for travelers who will be absent from home.
This appliance is certified by Star-K to meet strict
religious regulations in conjunction with specific
instructions found on www.star-k.org.
When Sabbath mode is activated:
•The display panel will indicate the unit is in Sabbath
mode.
• All other interior and exterior lights deactivate and
cannot be engaged.
• All control buttons become inactive except the
ON/OFF button.
• All audible and visual alarms become inactive.
Activating:
1. Press and hold Sabbath for 3 seconds to start the
Sabbath mode.
2. The key-press will sound once and the Sabbath
light will turn on and the display will show SAB for
a few seconds.
The light will not turn off even if the door is closed as
long as the unit remains in Sabbath mode.
Deactivating:
1. Press and hold Sabbath for 3 seconds.
2. All buttons, displays, lights and alarms will again
become functional.
E. TEMPERATURE SELECTION + / -
The temperature setting is adjusted using the selection
buttons, see chapter “Setting the temperature” for
details.
• Press (-) to lower the set temperature.
• Press (+) to raise the set temperature.
F. DISPLAY PANELS
The set temperature of both refrigerator compartments,
top and bottom, is shown in the display panel.
G. °F / °C
• Press and hold the °F / °C button to switch between
the degrees Fahrenheit and degrees Celsius for the
temperature on the display.
The factory setting is degrees Fahrenheit. When
changing to degrees Celsius (°C) the display will show
°C until switched back. When switching back to
degrees Fahrenheit (°F) the display will show °F.
A
B
C
D
E
F
G
F
H
I
P
a
g
e
|
7

Page |8
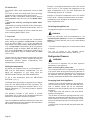
H. QUICK CHILL
The QUICK CHILL mode temperature is fixed to 33°F
(0°C).
This mode is useful for cooling down food or beverage
products within a relatively short period of time.
NOTE: All other temperature setting buttons become
non-functional when the unit is in the QUICK CHILL
mode.
• Activate the mode by pressing the QUICK CHILL
button.
• Deactivate by pressing the QUICK CHILL button again.
The mode will also deactivate automatically after 24
hours.
• The temperature settings will return to what they were
prior to entering QUICK CHILL mode.
I. Temp mode
Press Temp mode to cycle through the 3 temperature
levels, setting your appliance to temp mode 1 by default
has a set point of 34°F ( 1°C), or you can adjust the
temperature to the range between 33°F and 35°F (0°C &
1°C), for temp mode 2 the default is 37°F (3°C) and the
temperature ranges is between 36°F and 40°F (2°C &
4°C), and for temp mode 3 the default is at 53°F (12°C)
and the temperature range is between 41°F and 64°F
(5°C & 18°C).
The set points for each temperature mode apply for both
drawers. The temperature can be adjusted by using the
temperature selection buttons independently from
eachother (See next section).
Setting the temperature
By default, the temperature set in your Refrigerator is:
37°F (3°C) for both drawers’ compartments. You can
adjust the temperature to your liking using the
SELECTION BUTTONS or the TEMP MODE button.
To set a new temperature press the SELECTION
BUTTONS: (-) or (+).
The temperature will increase or decrease by one degree
every time the SELECTION BUTTON is pressed. The
temperature can be displayed in degrees Celsius (°C) or
degrees Fahrenheit (°F). The factory setting is degrees
Fahrenheit (°F).
The appliance includes a lock system to prevent
temperature loss on either of the compartment when the
difference in temperature exceeds 10 degrees.
Once the temperature difference between the lower and
upper compartment exceeds 10 degrees the temperature
will increase or decrese in parallel.
Example 1: If the Upper temperature is set to 44° and the
lower is at 34° if you increase the temperature on the
upper compartment to 45° the lower temperature will
automatically adjust to 35° in parallel.
Example 2: The upper compartment is set to 36° and the
lower is at 46°, increasing the temperature on the lower
compartment to 49° will adjust the temperature on the
upper compartment to 39°.
Switching the appliance on
The appliance begins to cool when plugged in.
WARNING:
Follow the instructions and recommendations in the
“Connecting the appliance” section in the Installation
Guide for a correct and safe use of your Double Drawer
Refrigerator.
• The interior drawer light(s) turn on when either drawer
is opened.
The unit is preset to the following factory
recommended temperature settings: 37°F (3°C).
Refrigerator Drawers
WARNING:
To avoid risk of explosion, do not store explosive
substances in the appliance.
When purchasing food, please note:
The “purchase freshness” is important for the shelf-life
of your food. When buying food, always pay attention to
the degree of freshness. Spoiled food or food close to
the expiration date will decay faster even refrigerated
and may contaminate the drawer with unpleasant odors.
Arranging food in the appliance
• Wrap or cover food before placing in the appliance.
This will retain the aroma, color and freshness of the
food. In addition, flavors will not be transferred
between foods and the plastic parts will not become
discolored.
• Allow warm food and drinks to cool down before
placing in the appliance.
• Do not block air outlet/inlet openings with food in the
refrigerator compartment, otherwise the air circulation
will be impaired. Food which is stored directly in front
of the air outlet openings may be frozen by the cold air
flowing out.
• Avoid contact of oil and fat with the plastic parts and
door seal.

Page |9
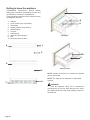
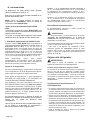
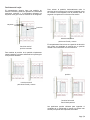
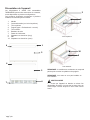
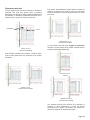
Drawer partitions
The upper drawer has 1 aluminum partition which is
removable, and can be placed in 3 different positions
vertically and 2 different positions horizontally using
the different dimples on the side of the drawers as
shown in the pictures:
To change the position of the partition simply pull out
the partition and slide into the dimples on the desired
position.
To place horizontaly slide out the partition and place
on top of the dimples, this will allow you to have a
second level of storage for easier access.
The lower drawer has 1 aluminum partition which is
removable and can be changed from the vertical
position to 2 different horizontal positions.
The partitions can be used to organize the contents of
your refrigerator or provide a secondary surface to store
and display items above the main storage space.
Partition vertical
middle position
Dimples
Partition
Partition vertical
front & back position
Partition horizontal
front & back position
Partition vertical
position
Partition horizontal
front & back position

Page |10
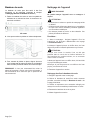
Toe-Kick
The Toe-Kick itself can be removed for service or
cleaning (see “Cleaning behind the Toe-Kick” in the
next section).
1. Remove the stainless steel Toe-Kick by unscrewing
and removing the two front screws with a Philips
screwdriver.
Front
screws
2. You can remove the Toe-Kick by simply pulling it
out.
3. To reattach the Toe-Kick, align the holes with the
support tab and screw the frontal screws in the same
position with a Philips screwdriver.
NOTE: Removal of the kickplate is not encouraged,
but if necessary, it is recommended to be done by an
authorized service personnel.
Cleaning the appliance
WARNING:
Never clean the appliance with a steam cleaner!
CAUTION:
• Do not use abrasive or acidic cleaning agents and
solvents.
• Do not use scouring or abrasive sponges. The metallic
surfaces could corrode.
• Never clean the aluminum partitions in the dishwasher.
The parts may be damaged.
Proceed as follows:
1. Before cleaning: switch the appliance off. For
instructions, see “On/Off” section on the “Touch
Control” page.
2. Remove food and/or frozen food items and store in a
cool location.
3. Clean the appliance with a soft cloth, lukewarm water
and a little pH neutral detergent.
When rinsing, water must not enter the interior drawer
light recesses located on the upper side of both the top
and bottom drawers. Water must also not spill out from
the bottom of the cabinet.
4. Wipe the drawer seals with clear water only and then
wipe dry thoroughly.
5. After cleaning switch the appliance back on.
Cleaning behind the Toe-Kick
1. Before cleaning: switch the appliance off.
2. Remove the Toe-Kick. See “Toe-Kick” section on the
previous page.
3. Use a vacuum cleaner with an extended attachment to
clean the accessible areas when they are dusty or dirty.
4. Replace the Toe-Kick.
5. Switch the appliance on.
CAUTION:

Page |11
Odors
If you experience unpleasant odors:
1. Switch the appliance off.
2. Take all food out of the appliance.
3. Clean the interior. See chapter “Cleaning the
appliance”.
4. Clean all packages.
5. Seal strong smelling foods in order to avoid odors
from forming.
6. Switch the appliance on again.
7. Store food in the appliance.
8. Check whether the formation of odors is still
occurring after 24 hours.
Light (LED)
Your appliance features a maintenance-free LED light
located at the top of the interior cabinet and under the
mullion. This light must be repaired by authorized
technicians only.
Tips for saving energy
• Install the appliance in a dry, well ventilated room. The
appliance should not be installed in direct sunlight or
near a heat source (e.g. radiator, cooker).
If required, use an insulating plate.
• Do not block the ventilation openings in the appliance.
• Allow warm food and drinks to cool down before
placing in the appliance.
• Open the appliance drawers as briefly as possible.
Operating noises
Normal noises
Droning: Motors are running (e.g. refrigeration units,
fan).
Bubbling, humming or gurgling noises: Refrigerant
is flowing through the tubing.
Clicking: Motor, switches or solenoid valves are
switching On/Off.
Preventing noises
Be sure the appliance is leveled
Please align the appliance with a spirit level. Use the
height-adjustable feet.
Containers or storage areas wobble or stick: Please
check the removable parts (aluminum partitions, ice-
bucket, etc.) and re-insert them correctly as needed.
Be sure bottles or containers are not touching each
other.
Move the bottles or containers slightly away from each
other.

Page |12
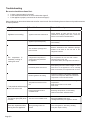
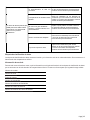
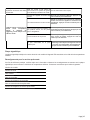
Troubleshooting
Be sure to check these items first:
Is there a power outage in the area?
Is the household fuse blown or the circuit breaker tripped?
Is the appliance properly connected to the electrical supply?
Many problems can be resolved without the need for a service call. See the following list as a reference of possible solutions
of simple problems.
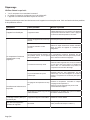
Symptom Possible Cause Potential Remedy
Appliance is not cooling. Appliance has been switched off.
Check display to make sure the unit is not
switched off. If display reads “OFF”, Press and
hold for 3 seconds the ON/OFF Button
The compressor is
constantly running or
running too much.
Appliance opened frequently. Do not open the appliance
unnecessarily.
The ventilation openings have
been covered.
Remove obstacles at the ventilation openings
located at the base of the unit and in the
refrigerator interiors.
A large amount of product, or
warm product was placed into
the appliance.
The compressor will run more than normal
until the product cools. The
more that is added, the longer the motor will run.
Excessively warm environment.
Avoid placing the unit in direct sunlight, or near a
heat source. If the appliance is in an unusually
warm environment, the compressor will run more.
Drawers gasket is not sealing.
Inspect the condition of the gasket. If damaged,
cold air can escape the cabinet and cause the
compressor to run more than normal.
Food products and beverages
in the unit are too cold.
Temperature has been set too
low.
Increase the temperature. See “Setting the
temperature”.
Make sure the unit is not in “Quick
Chill” mode.
Product placed too close to
ventilation holes.
Rearrange the products, so that nothing
obstructs the interior ventilation holes.
The interior light (LED) does
not work. The unit is set to Sabbath mode. Disengage Sabbath mode. See
“Getting started with your appliance” section.
There are unpleasant odors
coming from the appliance.
Strong smelling food is not
sealed.
Clean the appliance. Seal strong smelling
food (See chapter “Odors”).

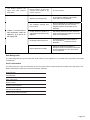
Page |13
The divider between the
upper and lower drawers
feels warm.
Normal operation, as part of the
moisture control system for the
exterior of the unit.
No action required.
Hi-alarm is activated (due to
high temperature inside the
appliance), HI is shown on
the display LED.
Appliance opened frequently. Do not open the appliance unnecessarily.
Press alarm once to deactivate.
The ventilation openings have
been covered.
Remove obstacles at the ventilation openings
located at the base of the unit and in the
refrigerator interiors. Press alarm once to
deactivate.
A large amount of product, or
warm product was placed into the
appliance.
Wait until the products cool off or remove the
warm products from the appliance, then press
alarm once to deactivate.
Excessively warm environment.
Avoid placing the unit in direct sunlight, or
near a heat source. Press alarm once to
deactivate
Drawers gasket is not sealing.
Inspect the condition of the gasket. If
damaged, cold air can escape the cabinet and
cause the temperature to rise. Press alarm
once to deactivate.
Data Rating Label
The data rating label shows the model and serial number of your appliance. It is located at the right side of the bottom
compartment.
Service Information
For handy reference, copy the information in the form below from the data rating label located at the right side of the
bottom compartment. Keep your invoice for Warranty validation.
Model
Number
Serial
Number
Date
of
Purchase_
Dealer’s
Name
Dealer’s
Phone
Number
Service
Center’s
Name
Service
Center’s
Phone
Number

Page |12
Índice
Bienvenido a su electrodoméstico para
bajoencimera de THERMADOR
Instrucciones importantes de seguridad ... 16
- Definición
- Antes de encender el electrodoméstico
- Seguridad técnica
- Información importante para la
utilización del electrodoméstico
- Niños en la vivienda
- Regulaciones generales
Información sobre el desecho .................... 17
- Desecho de embalaje
- Desecho de su electrodoméstico anterior
Instalación del electrodoméstico ............... 17
- Transporte
- Ubicación de la instalación
Ventilación ....................................................... 17
Introducción a su electrodoméstico ......... 18
Primeros pasos con su electrodoméstico ... 19
- Control táctil
- Ajuste de la temperatura
- Encendido del electrodoméstico
- Funciones especiales:
- Modo Sabbat
- Modo Apagado
- Pantalla en Fahrenheit/Celsius
Cajones del refrigerador .............................. 21
Cubierta inferior ............................................. 22
Limpieza del electrodoméstico .................. 22
- Limpieza detrás de la cubierta inferior
Olores ................................................................ 23
Luz (LED) ................................................................. 23
Consejos para ahorrar energía .......................... 23
Ruidos de funcionamiento .................................. 23
- Ruidos normales
- Prevención de ruidos
Resolución de problemas .................................... 24
BSH Home Appliances Corporation
1901 Main Street, Irvine, CA.
¿Tiene preguntas?
1-800-735-4328
www.thermador.com
¡Nos encantaría tener noticias suyas!
Page
│
14

Page |15
Bienvenido
a su electrodoméstico para bajoencimera de
Thermador®
¡Gracias y felicitaciones por su reciente compra de un producto THERMADOR! Ya sea un chef
dedicado o simplemente un conocedor del arte culinario, poseer una cocina THERMADOR es la
máxima expresión de estilo personal, buen gusto y apreciación por la experiencia culinaria completa.
Nuestros productos galardonados han empoderado a los entusiastas culinarios durante más de once
décadas.
Antes de que comience a utilizar su nuevo producto THERMADOR, tómese un momento para revisar
el Manual de uso y cuidado. Encontrará las respuestas para todas sus preguntas, además de
información de seguridad muy importante. Preste especial atención a las Instrucciones importantes de
seguridad que se encuentran al comienzo de este manual.
Nuestros productos están hechos a mano con materiales auténticos de la más alta calidad para
garantizar un servicio confiable. En el caso poco probable de que tenga una pregunta sobre servicio,
tenga a mano los números de modelo y de serie de su producto cuando llame para recibir asistencia
técnica. Puede encontrar esta información en la placa de identificación del electrodoméstico en el
interior del gabinete, en el lado derecho del compartimiento inferior.
Entendemos que ha realizado una inversión considerable en su cocina y le agradecemos una vez más
por elegir THERMADOR. No dude en compartir fotografías de su cocina e historias de remodelación
con nosotros. Síganos en Twitter o publique las fotografías de su cocina en Facebook. ¡Nos encantaría
tener noticias suyas!

Page |16
Instrucciones importantes de
seguridad
¡LEA Y GUARDE ESTAS INSTRUCCIONES!
Definición
ADVERTENCIA:
Esto indica que se podrían producir muertes o
lesiones graves por no respetar esta advertencia.
PRECAUCIÓN:
Esto indica que se podrían producir lesiones
menores o moderadamente graves por no
respetar esta advertencia.
NOTA:
Se utiliza para dirigir la atención del usuario a algo
en particular.
ADVERTENCIA: Para reducir el riesgo de
incendios, descargas eléctricas o lesiones producto de
la utilización de su electrodoméstico, siga estas
precauciones básicas:
Antes de encender el electrodoméstico
Lea las instrucciones de funcionamiento e instalación
con detenimiento. Contienen información importante
sobre cómo instalar, usar y mantener el
electrodoméstico. Conserve todos los documentos para
utilizarlos con posterioridad o para el próximo
propietario.
Seguridad técnica
Si el cable de alimentación de este electrodoméstico
está dañado, debe ser reemplazado por un centro de
servicio autorizado. Las instalaciones y reparaciones
inadecuadas pueden poner al usuario en considerable
riesgo. Las reparaciones deben ser realizadas por un
centro de servicio autorizado.
Solo se deben utilizar las piezas originales
suministradas por el fabricante. Solo las piezas
originales cumplen con los requisitos de seguridad.
El electrodoméstico viene con un cable de alimentación
de 3 hilos registrado en UL. Nunca corte ni retire el
tercer conductor (de conexión a tierra) del cable de
alimentación.
El electrodoméstico requiere una toma de corriente de
3 polos. La toma de corriente solo debe ser conectada
por un electricista. Donde haya una toma de corriente
de pared estándar de 2 polos, es responsabilidad del
cliente reemplazar esta toma con una toma de pared de
3 polos correctamente conectada a tierra. No utilice
enchufes adaptadores. No utilice extensiones.
Información importante para la utilización del
electrodoméstico
Nunca utilice dispositivos eléctricos dentro del
electrodoméstico (p. ej., calentador, máquina de hielo
eléctrica, etc.). ¡Riesgo de explosión!
¡Nunca utilice un limpiador de vapor para descongelar
o limpiar el electrodoméstico! El vapor podría penetrar
las piezas eléctricas y provocar un cortocircuito.
¡Riesgo de descarga eléctrica!
No utilice elementos con puntas o bordes afilados para
retirar la escarcha o las capas de hielo. Podría dañar
componentes internos sensibles, incluidos los tubos
de refrigerante. La pérdida de refrigerante podría
encenderse o provocar lesiones en los ojos.
No utilice aparatos mecánicos o algún otro medio para
acelerar el proceso de descongelamiento además de
lo recomendado por el fabricante.
No almacene productos que contengan propulsores
inflamables (p. ej., latas de aerosol) o sustancias
explosivas en el electrodoméstico. ¡Riesgo de
explosión!
No se pare ni apoye sobre la base del
electrodoméstico, la puerta, los estantes, etc.
Apague el electrodoméstico antes de limpiarlo.
Las botellas que contienen un alto porcentaje de
alcohol deben sellarse y estar en posición vertical.
Mantenga las piezas plásticas y el sello del
refrigerador libres de aceite y grasa. De lo contrario,
las piezas y el sello del refrigerador se volverán
porosos.
Nunca cubra ni bloquee las aperturas de ventilación
del electrodoméstico.
Niños en la vivienda
Mantenga a los niños alejados del embalaje y sus
piezas. ¡Peligro de asfixia con los cartones plegables
y el envoltorio de plastico!
¡No permita que los niños jueguen con el
electrodoméstico!
No se debe permitir a los niños que utilicen el
electrodoméstico, a menos que estén supervisados
por un adulto.
Regulaciones generales
Este electrodoméstico está diseñado exclusivamente
para el almacenamiento de comida y bebidas.
Este electrodoméstico está diseñado para ser utilizado
en el hogar y el entorno doméstico.
Se ha revisado el circuito de refrigeración en busca de
fugas.
ADVERTENCIAS DE LA PROPUESTA 65 DEL
ESTADO DE CALIFORNIA
Este producto puede contener un químico conocido por
el estado de California, que puede causar cancer o
problemas reproductivos. Por lo tanto, el empaque de
su producto puede incluir esta etiqueta requerida por el
estado de California:

Page |17
Información sobre el desecho
Desecho de embalaje
El embalaje protege a su electrodoméstico contra daños
durante el transporte. Todos los materiales utilizados son
seguros para el medioambiente y reciclables. Ayúdenos
desechando el embalaje de manera respetuosa con el
medioambiente. Pregúntele a su distribuidor o autoridad
local sobre los medios actuales de desecho.
Desecho de su electrodoméstico anterior
¡Los electrodomésticos viejos no son basura sin valor! Al
reciclar los electrodomésticos viejos se pueden
recuperar materias primas valiosas.
ADVERTENCIA:
1. Desconecte el cable de alimentación.
2. Corte el cable de alimentación y deséchelo junto con
el enchufe de alimentación.
3. Retire la puerta del electrodoméstico.
4. No permita que los niños jueguen con el
electrodoméstico una vez que haya caducado su vida
útil. ¡Peligro de asfixia!
Los refrigeradores contienen refrigerante y gases en la
aislación. El refrigerante y los gases deben ser reciclados
por profesionales. Asegúrese de que la tubería del
circuito del refrigerante no esté dañada antes de
desecharla correctamente.
Instalación del electrodoméstico
Para obtener instrucciones de instalación detalladas,
consulte la Guía de instalación proporcionada con el
electrodoméstico.
Solicite a un técnico calificado que instale y conecte el
electrodoméstico según las instrucciones de instalación
adjuntas.
NOTA: Para obtener instrucciones de instalación
detalladas, mediciones relevantes e información,
consulte la Guía de instalación proporcionada con este
electrodoméstico.
ADVERTENCIA:
No instale este electrodoméstico:
- Al aire libre.
- En un entorno donde gotee agua.
- En habitaciones donde haya riesgo de
congelamiento.
Se recomienda utilizar un circuito aislado para uso único
de su refrigerador. Utilice un toma de corriente que no
pueda ser apagado por un interruptor. No utilice una
extensión.
Transporte
El electrodoméstico es pesado y debe manipularse con
cuidado durante el transporte y la instalación. Debido al
peso y a las dimensiones del electrodoméstico, se
necesitan, como mínimo, dos personas para moverlo
hasta su lugar de manera segura y evitar lesiones en las
personas o daños en el electrodoméstico.
ADVERTENCIA:
Evite cualquier daño a tuberías durante el manejo o
reubicación de la unidad, riesgo de fuga de refrigerante.
Ubicación de la instalación
Una habitación seca y bien ventilada es una ubicación de
instalación adecuada. La ubicación de la instalación no
debe estar expuesta a luz solar directa y no debe
encontrarse cerca de una fuente de calor; p. ej., una
cocina, un radiador, etc.
Si resulta inevitable instalarlo junto a una fuente de calor,
utilice una placa aislante adecuada o respete la distancia
mínima desde la fuente de calor que se indica a
continuación:
Hasta hornillas eléctricas o a gas, 1¼” (3 cm).
Hasta una cocina alimentada con combustible o
carbón, 1113/16” (30 cm).
El piso de la ubicación de la instalación no debe hundirse;
de ser necesario, refuerce el piso. El electrodoméstico
debe estar en posición vertical y a nivel a fin de funcionar
correctamente.
Si el electrodoméstico parece inestable hay cuatro patas
en la parte inferior que pueden ser ajustadas a su
preferencia.
Ventilación
La unidad de refrigeración solo se ventila por la cubierta
inferior de la base. Nunca cubra dicha área ni coloque
nada frente a ella. De lo contrario, el rendimiento de
enfriamiento se verá afectado y la unidad deberá trabajar
más, lo que aumentará el consumo de energía.

Page |18
Introducción a su electrodoméstico
El refrigerador con doble cajón para bajoencimera de
THERMADOR puede ser independiente o empotrado
y está disponible en varias configuraciones.
Estas instrucciones de funcionamiento se aplican a
varios modelos; los diagramas pueden variar.
1. Gabinete
2. Control táctil (sobre el cajón superior)
3. Cajón superior
4. Manija (Se muestra el estilo “Professional”*)
5. Cajón inferior
6. Cubierta inferior
7. Patas niveladoras
8. Separador de aluminio (largo)
9. Tapete
10. Separador de aluminio (corto)
Cajón superior
Cajón inferior
NOTA: El modelo con revestimiento no incluye la puerta
de acero inoxidable ni la manija.
NOTA: Los tapetes no pueden lavarse en el lavaplatos.
ADVERTENCIA
Para evitar la inclinación del electrodoméstico debido a
un sobrepeso fuera de equilibrio, no extraiga ambos
cajones al mismo tiempo. Siempre cierre uno de los
cajones antes de extraer el otro.
1
3
4
6
7
5
4
8
9
9
10
2

Page |
Primeros pasos con su
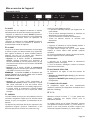
Control táctil
A B C D E
A. ON/OFF (Encendido/Apagado)
La primera vez que conecte el electrodoméstico
comenzara a enfriar automáticamente y todas sus
funciones estarán habilitadas.
• Mantenga presionado el botón ON/OFF durante 3
segundos para apagar la unidad, deshabilitando todas
las funciones y parando todas las operaciones.
• Mantenga presionado el botón ON/OFF durante 3
segundos para encender la unidad y comenzar las
operaciones normales del electrodoméstico.
B. ALARM (Alarma)
Después de que la puerta haya estado abierta por
2 minutos o más, se activará una alarma sonora,
además de una luz LED indicadora de color azul que
parpadeará sobre el botón ALARM (Alarma). Presione el
botón una vez para desactivar temporalmente la
ALARMA o cierre la puerta abierta.
• Mantenga presionado el botón ALARM durante
3 segundos para desactivar permanentemente la
función de alarma por puerta abierta. Cuando se
presione la tecla escuchará un sonido que le confirmará
que la función de alarma se desactivó.
• Mantenga presionado el botón ALARM durante
3 segundos para volver a activar la función de alarma por
puerta abierta.
NOTA: La función de alarma no funcionará cuando la
unidad esté en modo Sabbat. Consulte la sección Modo
Sabbat en esta misma página.
C. LOCK (Bloqueo)
• Mantenga presionado el botón LOCK (Bloquear)
durante 3 segundos; se encenderá el LED LOCK y todos
los botones se bloquearán. Para desactivarlo, presione
y mantenga presionado el botón LOCK durante
3 segundos o hasta que la luz LED LOCK se apague.
D. SABBATH (Sabbat)
El modo Sabbat está diseñado para aquellos usuarios
cuyas observancias religiosas requieren apagar las
luces, o para los viajantes que estarán ausentes de su
hogar.
Este electrodoméstico lleva el certificado Star-K que
indica que cumple con estrictas normas religiosas junto
con instrucciones específicas que aparecen en
www.star-k.org.
Cuando el modo Sabbat está activado:
• El panel de visualización indicará que la unidad está en
modo Sabbath (Sabbat).
• Todas las demás luces interiores y exteriores se
desactivan y no se pueden encender.
• Todos los botones de control quedan inactivos salvo el
botón ON/OFF.
• Todas las alarmas sonoras y visuales quedan inactivas.
Para activar el modo Sabbat:
1. Mantenga presionado el botón Sabbat durante 3
segundos para iniciar el modo Sabbath.
2. Al presionar la tecla se escucha un sonido y el PANEL
DE VISUALIZACIÓN cambiará para mostrar de forma
temporal los caracteres SAB.
Mientras la unidad se encuentre en modo Sabbath la luz
quedara encendida, este la puerta abierta o cerrada.
Para desactivar:
1. Mantenga presionado el botón Sabbath
2. Todas las operaciones comenzaran a funcionar
normalmente.
E. SELECCIÓN DE TEMPERATURA
La temperatura puede ser ajustada utilizando los botones
de selección de temperatura, vea el capitulo de ajuste de
temperatura para mas detalles.
Presione (-) Para bajar la temperatura
Presione (+) Para incrementar la temperatura
F. PANELES DE VISUALIZACION
La configuración actual de la temperatura en ambos
compartimentos es mostrada en los paneles.
G. °F / °C
Mantenga presionado el botón °F / °C para cambiar
entre grados Fahrenheit y grados Celsius para la
temperatura mostrada en el panel de visualización.
Las unidades de Fabrica son grados Farenheit. Cuando
se cambia a grados Celcius (°C) el display mostrara °C
hasta que se revierta el cambio. Una vez que se cambien
las unidades a Farenheit (°F) el display mostrara °F.
Primeros pasos con su electrodoméstico
G F F H I
Page
│
19

Page |
H. ENFRIADO RÁPIDO
La temperatura del modo QUICK CHILL (Enfriado
rápido) se establece en 33 °F (0 °C).
Este modo es útil para enfriar comidas o bebidas en un
período relativamente corto.
NOTA: Todos los demás botones de ajuste de
temperatura se deshabilitan cuando la unidad se
encuentra en modo QUICK CHILL.
• Active el modo presionando el botón QUICK
CHILL.
• Desactívelo presionando el botón QUICK CHILL otra
vez. El modo también se desactivará automáticamente
después de las 24 horas.
• El ajuste de la temperatura regresará al que estaba
establecido antes de ingresar al modo QUICK CHILL.
I. TEMP MODE (MODALIDAD DE TEMPERATURA)
Presione el botón TEMP MODE para ciclar entre los 3
niveles de temperatura disponibles, al entrar al nivel 1 la
temperatura será de 34 °F (1 °C), en este nivel la
temperatura puede ser ajustada dentro del rango de
33 °F y 35 °F (0 °C y 1 °C), para el nivel 2 la temperatura
predeterminada es de 37 °F (3 °C) con un rango de
temperatura entre 36 °F y 40 °F (2 °C y 4 °C), por ultimo
el nivel 3 tiene una temperatura predeterminada de 53 °F
(12 °C) y su rango es de 41 °F y 64 °F (5 °C y 18 °C).
Estas temperaturas aplican para ambos
compartimentos. La temperatura puede ser ajustada
independientemente para cada cajon utilizando los
botones de selección (vea la siguiente sección).
Ajuste de la temperatura
De forma predeterminada, la temperatura configurada
en su refrigerador es: 37 °F (3 °C) para ambos cajones.
Ambos cajones comparten la misma temperatura.
Puede ajustar la temperatura a su gusto mediante los
BOTONES DE SELECCIÓN o los BOTONES DE
CONFIGURACIONES PREDETERMINADAS.
Para establecer una nueva temperatura, presione los
BOTONES DE SELECCIÓN (-) o (+) (Más frío o cálido).
La temperatura aumentará o disminuirá de a un grado
cada vez que presione el BOTÓN DE SELECCIÓN. La
temperatura puede verse en grados Celsius (°C) o en
grados Fahrenheit (°F). El ajuste predeterminado de
fábrica es grados Fahrenheit (°F).
Su electrodomestico incluye un sistema de bloque de
prevención de perdida de temperatura que se activa al
superar los 10 grados de diferencia entre
compartimento.
Una vez que la diferencia entre compartimentos llega a
los 10 grados la temperatura se incrementará o
decrecerá en paralelo entre compartimentos.
Ejemplo 1: Si el compartimento superior encuentra a
44 °F y el compartimento inferior a 34 °F, al incrementar
la temperatura del compartimento superior a 45 °F
automáticamente el compartimento inferior se ajustara a
35 °F.
Ejemplo 2: El compartimento superior se encuentra a
36 °F y el inferior a 46 °F, al incrementar la temperatura
del compartimento inferior a 49 °F el compartimento
superior se ajustara hasta los 39 °F.
Encendido del electrodoméstico
El electrodoméstico comienza a enfriar cuando se
conecta a la toma de corriente.
ADVERTENCIA:
Siga las instrucciones y recomendaciones de la sección
“Conexión del electrodoméstico” de la Guía de
instalación para conocer el uso correcto y seguro de su
refrigerador con doble cajón.
• Las luces interiores de los cajones se encienden cuando
se abre cualquiera de los dos cajones.
• Las luces y los botones de CONTROL TÁCTIL
exteriores quedan no operativas cuando el cajón
superior está cerrado. La unidad está preconfigurada
según el ajuste de temperatura recomendado por la
fábrica: 37 °F (3 °C)
Cajones del refrigerador
ADVERTENCIA:
Para evitar el riesgo de explosión, no almacene
sustancias explosivas en el electrodoméstico.
Cuando compre alimentos, tenga en cuenta:
La “frescura en el momento de la compra” es importante
para la vida útil de sus alimentos. Cuando compre
alimentos, preste siempre atención al grado de frescura.
Los alimentos descompuestos o cerca de la fecha de
vencimiento se deteriorarán más rápido, incluso si están
refrigerados, y podrían contaminar el cajón con olores
desagradables.
Organización de los alimentos en el
electrodoméstico
• Envuelva o cubra los alimentos antes de colocarlos en
el electrodoméstico. Esto conservará su aroma, color y
frescura. Además, los sabores no se transmitirán entre
los alimentos y las piezas plásticas no se decolorarán.
• Espere a que los alimentos y las bebidas calientes se
enfríen antes de colocarlos en el electrodoméstico.
• No bloquee las aperturas de salida/ingreso de aire del
compartimiento del refrigerador con los alimentos; de lo
contrario, la circulación de aire se verá afectada. Los
alimentos que se almacenan directamente frente a las
aperturas de salida de aire podrían congelarse por el
aire frío que sale por ellas.
• Evite el contacto de aceite y grasa con las piezas
plásticas y el sello de la puerta.
Page
│
20
Page is loading ...
Page is loading ...
Page is loading ...
Page is loading ...
Page is loading ...
Page is loading ...
Page is loading ...
Page is loading ...
Page is loading ...
Page is loading ...
Page is loading ...
Page is loading ...
Page is loading ...
Page is loading ...
Page is loading ...
Page is loading ...
Page is loading ...
Page is loading ...
Page is loading ...
Page is loading ...
-
 1
1
-
 2
2
-
 3
3
-
 4
4
-
 5
5
-
 6
6
-
 7
7
-
 8
8
-
 9
9
-
 10
10
-
 11
11
-
 12
12
-
 13
13
-
 14
14
-
 15
15
-
 16
16
-
 17
17
-
 18
18
-
 19
19
-
 20
20
-
 21
21
-
 22
22
-
 23
23
-
 24
24
-
 25
25
-
 26
26
-
 27
27
-
 28
28
-
 29
29
-
 30
30
-
 31
31
-
 32
32
-
 33
33
-
 34
34
-
 35
35
-
 36
36
-
 37
37
-
 38
38
-
 39
39
-
 40
40


Ask a question and I''ll find the answer in the document
Finding information in a document is now easier with AI
in other languages
- français: Thermador T24UR915DS Mode d'emploi
- español: Thermador T24UR915DS Guía del usuario
Related papers
-
Thermador T24UC910DS User manual
-
Thermador T24UR900DP User manual
-
Thermador T24UR820DS Installation For Use
-
Thermador T24UR910RS User manual
-
Thermador T24UW900LP User manual
-
-
-
-
-