Model Number: UPC Code: Color:
DA1011-1 0-65857-17179-2 Walnut
Date of Purchase: _____ / _____ / _____ Lot Number:
(taken from carton)
6-DRAWER DRESSER
Congratulations on your latest furniture purchase! Dorel Living furniture has been developed with
quality, convenience and style in mind. We trust it will provide you with many years of exceptional
comfort and service.
Before beginning assembly, we encourage you to familiarize yourself with your new furniture piece by
taking a few minutes to go through this booklet. It contains important information on our warranty and
care tips to keep your furniture looking as good as new.
Customer satisfaction is important to us at Dorel Asia. Our agents are available Monday to Friday
8am to 5pm (EST) to answer any question you may have. For faster service, always have the model
number ready when calling our toll free number 1-800-295-1980 or emailing us at d[email protected] .
For more great furniture ideas, check out our website at www.dorelliving.com
You can also keep up to date on all the latest trends by liking our Facebook page.
DO NOT RETURN PRODUCT TO THE STORE. If a part is missing or damaged, contact
our customer service department. We will replace the part FREE of charge.
NOTE: THIS INSTRUCTION BOOKLET CONTAINS IMPORTANT SAFETY INFORMATION.
PLEASE READ AND KEEP FOR FUTURE REFERENCE.

Dust regularly with a soft, lint-free cloth to prevent soil build-up. A damp cloth may be used occasionally to
clean surface. Dry immediately. Do not use any abrasives that may damage finish. Excessive exposure to
sunlight and extreme changes in temperature and moisture can damage wood furniture.
MAINTENANCE
Check bolts/screws periodically and tighten them if necessary.
LIMITED WARRANTY
Dorel warrants its product to be free from defects in material and workmanship and agrees to remedy any
such defect. This warranty covers 1 year from the date of original purchase. This warranty is valid only upon
presentation of proof of purchase. This is solely limited to the repair or replacement of defective furniture
components and no assembly labor is included. This warranty does not apply to any product which has been
improperly assembled, subjected to misuse or abuse or which has been altered or repaired in any way. This
warranty gives you specific legal rights and you may also have other rights which vary from State to State.
WARNING: Should this product become damaged, and/or components
are broken or missing, DO NOT USE.
* Unless specifically designed to accommodate, do not set TVs or other heavy objects on top of this product.
* Never allow children to climb or hang on drawers, doors or shelves.
* Never open more than one drawer at a time.
* Do not defeat or remove the drawer interlock system.
* Use of tipover restraints may only reduce, but not eliminate, the risk of tipover.
CARE AND CLEANING
* To avoid unnecessary damage, when levelers have been extended, DO NOT drag across surface when
moving. Be sure to lift and carry the item to its location.
* Estimated assembly time: 60 minutes.
WARNING
Serious or fatal crushing injuries can occur from furniture tipover. To help prevent tipover:
* Install tipover restraint provided.
* Place heaviest items in the lower drawers.
* Assemble on a soft, smooth surface to prevent damage to the product finish.
* Use the wall safety strap provided to secure the unit to the wall.
* A Phillips head screw driver is not included.
* DO NOT use power tools.
* CAUTION: Adult assembly required.
* Assembly will require two people.
12345 Albert-Hudon Boulevard, Suite 100
Montreal, Quebec
Canada H1G 3L1
E-MAIL: [email protected]
NOTES
* Ensure all parts and components are present before beginning assembly.
CUSTOMER SERVICE
If you are missing parts or have any questions about this product, contact our customer service
representative first!
CALL 1-800-295-1980
You can also order parts by writing to the address listed below. Please include the product model number,
color and a detailed description of the part.
Customer Service Department No. 413

HARDWARE LIST
1 2 3
4 5 6
7 8 9
10 11 12
13
SAFETY STRAP
2 KITS
Ø5/32" * 7/8"
Ø6 * 25 mm
BOLT
12 PCS
HANDLE
6 PCS
SMALL WOOD DOWEL
48 PCS
Ø3.5 * 15 mm
Ø4 * 25 mm
Ø6 * 30 mm
SCREW
40 PCS
SCREW
36 PCS
BOLT
1 PC
Ø15 * 12 mm
Ø6 * 36 mm
Ø4 * 30 mm
LARGE CAM LOCK
27 PCS
SMALL CAM BOLT
24 PCS
SCREW
8 PCS
6-DRAWER DRESSER
DA1011-1
Ø6 * 37 mm
Ø8 * 32 mm
Ø13 * 10 mm
LARGE CAM BOLT
27 PCS
WOOD DOWEL
22 PCS
SMALL CAM LOCK
24 PCS

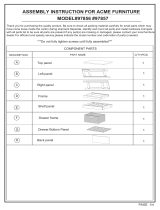
PARTS LIST
A B C
D E F
G H I
J K L
BACK BOTTOM RAIL
2 PCS
FRONT TOP RAIL
1 PC
FRONT BOTTOM RAIL
3 PCS
LEG
4 PCS
SUPPORT PANEL
1 PC
DRAWER BOTTOM
6 PCS
MIDDLE PANEL
1 PC
BACK PANEL
2 PCS
BACK TOP RAIL
1 PC
6-DRAWER DRESSER
DA1011-1
TOP PANEL
1 PC
LEFT SIDE PANEL
1 PC
RIGHT SIDE PANEL
1 PC
Page is loading ...

STEP 1
6-DRAWER DRESSER
DA1011-1
Insert large cam bolts (1) into the front top rail (H), back top rail (F), front bottom rails (I)
and back bottom rails (G) as shown.
(I): 3 PCS
(G): 2 PCS

STEP 2
6-DRAWER DRESSER
DA1011-1
Insert large cam locks (4) into the middle panel (D).
Attach rails (F, G, H & I) to middle panel (D) by rotating the large cam locks (4) 1/2 turn
clockwise using a Phillips head screwdriver (not included).

STEP 3
6-DRAWER DRESSER
DA1011-1
Insert wood dowels (2) and large cam bolts (1) into the right side panel (C).
Attach the right side panel (C) to the assembled unit as shown.
Insert large cam locks (4) into the rails (F, G, H & I).
Secure the right side panel (C) by rotating the large cam locks (4) 1/2-turn clockwise using
a Phillips head screwdriver (not included).
Attach legs (J) to the right side panel (C) by rotating the legs clockwise.

STEP 4
6-DRAWER DRESSER
DA1011-1
Attach support panel (K) to the middle panel (D) with wood dowels (2) and bolt (9).
Use a Phillips head screwdriver (not included) to tighten the bolt.

STEP 5
6-DRAWER DRESSER
DA1011-1
Insert wood dowels (2) and large cam bolts (1) into the left side panel (B).
Attach the left side panel (B) to the assembled unit as shown.
Insert large cam locks (4) into the rails (F,G, H & I).
Secure the left side panel (B) by rotating the large cam locks (4) 1/2-turn clockwise using
a Phillips head screwdriver (not included).
Attach legs (J) to the left side panel (B) by rotating the legs clockwise.

STEP 6
6-DRAWER DRESSER
DA1011-1
Insert large cam bolts (1) into the top panel (A).

STEP 7
6-DRAWER DRESSER
DA1011-1
Insert wood dowels (2) and large cam locks (4) into the left side panel (B), middle panel
(D) and right side panel (C) as shown.
Place the top panel (A) on the assembled unit.
Rotate large cam locks (4) on the left side panel (B), middle panel (D) and right side panel
(C) 1/2-turn clockwise to secure the top panel (A).
Further secure top panel (A) with screws (6) through rails (F & H) and middle
panel (D). Use a Phillips head screwdriver (not included) to tighten the screws.

STEP 8
6-DRAWER DRESSER
DA1011-1
Attach back panels (E) to the assembled unit with screws (7).
Use a Phillips head screwdriver (not included) to tighten the screws.

STEP 9
6-DRAWER DRESSER
DA1011-1
Insert wood dowels (12) and small cam bolts (5) into the left drawer front (Q).
Insert small cam locks (3) into the left drawer side (M) and right drawer side (N).
Attach drawer sides (M & N) to the left drawer front (Q). Secure the drawer sides by
rotating small cam locks (3) 1/2-turn clockwise using a Phillips head screwdriver (not
included).
Slide the drawer bottom (L) into the grooves of drawer sides (M & N) and left drawer front
(Q). Attach drawer support rail (P) to the left drawer front (Q) using wood dowels (12) and
screws (8) as shown below. Use a Phillips head screwdriver (not included) to tighten the
screws.
Repeat this step to assemble right drawers using right drawer fronts (R).

STEP 10
6-DRAWER DRESSER
DA1011-1
Insert wood dowels (12) into the drawer support rail (P).
Attach drawer backs (O) to the drawer sides (M & N) and drawer support rail (P) with
screws (8) using Phillips head screwdriver (not included).
Attach handle (11) to the drawer front (Q) with bolts (10) using Phillips head screwdriver
(not included).
Repeat this step to assemble the other drawers using drawer front (R).
M
N
M
N

STEP 11
6-DRAWER DRESSER
DA1011-1
Insert the drawers into the assembled unit.

That's it! You've finished assembling your 6-drawer dresser.
6-DRAWER DRESSER
DA1011-1
CAUTION: This unit is intended for use only with the
products and/or maximum weights indicated. Use with other
products and/or products heavier than the maximum weights
indicated may result in instability or cause possible injury.
DO NOT RETURN PRODUCT TO THE STORE.
If a part is missing or damaged, contact our customer
service department. We will replace the part FREE of
charge.
Tel #: 1-800-295-1980
E-Mail: [email protected]
Fax #: 514-353-7819
NEED HELP!
CALL US FOR ASSISTANCE
1-800-295-1980
DO NOT RETURN PRODUCT TO STORE
E-MAIL:[email protected]
Top panel
maximum weight
25 LBS
Maximum weight
per drawer 10
LBS
Q
Q
Q
R
R
R

Furniture Wall Safety Strap
A B C D
TOOLS NECESSARY: RUBBER MALLET AND PHILLIPS SCREW DRIVER ARE NOT INCLUDED.
NOTE: 3/8" DRILL BIT AND ELECTRIC DRILL ARE NOT PROVIDED.
PLEASE READ ALL INSTRUCTIONS CAREFULLY BEFORE
USING THIS PRODUCT AND KEEP THESE INSTRUCTIONS FOR
FUTURE REFERENCE. IF YOU HAVE ANY QUESTIONS, PLEASE
CALL OUR CUSTOMER SERVICE NUMBER: 1-800-295-1980.
Step 4:
CONFIRM THAT THE STRAP IS SECURELY LACED AND LOCKED.
TO MOVE THE FURNITURE AFTER THE SAFETY WALL STRAP HAS BEEN INSTALLED, SIMPLY
REMOVE THE SCREW FROM THE WALL TO LOOSEN THE SAFETY WALL STRAP.
Step 1:
ATTACH A MOUNTING BRACKET (A) SECURELY TO THE BACK EDGE OF THE FURNITURE USING THE
SHORT SCREW (D), THROUGH THE SMALLER HOLE.
Step 2:
LOCATE THE OTHER MOUNTING BRACKET (A) ON THE WALL OVER A WALL STUD AND 2 INCHES
BELOW THE MOUNTING BRACKET SECURED TO THE BACK OF YOUR UNIT. ATTACH TO THE WALL
STUD USING THE LONG SCREW (C) PROVIDED, THROUGH THE SMALLER HOLE.
Step 3:
PLACE THE FURNITURE INTO POSITION SO BOTH MOUNTING BRACKETS ARE VERTICALLY IN LINE.
LACE THE END OF THE SAFETY WALL STRAP (B) THROUGH THE LARGER HOLE IN EACH MOUNTING
BRACKET (A). BRING BOTH ENDS TOGETHER AND SLIDE THE FLAT END THROUGH THE LOCKING
END AND DRAW IT THROUGH UNTIL ALL SLACK IS REMOVED.
MOUNTING BRACKET
4 PCS
SAFETY WALL STRAP
2 PCS
LONG SCREW
2 PCS
SHORT SCREW
2 PCS
WARNING: WHEN UPRIGHT, IT IS POSSIBLE THAT THE FURNITURE
MAY TIP OVER. PLEASE INSTALL THE SAFETY WALL STRAP BEHIND
THE FURNITURE TO ENSURE SAFETY.
AB BAB

MODEL #: DA1011-1
PLEASE DO NOT RETURN THIS PRODUCT TO THE STORE
PLEASE CONTACT CUSTOMER SERVICE REPRESENTATIVES AT THE FOLLOWING
NUMBERS SHOULD THERE BE ANY MISSING OR DEFECTIVE PART(S).
Customer Service Fax Number 514-353-7819
Request Date:
Name:
Shipping Address:
Street & Number:
City & State:
Zip Code:
Day Time Phone Number:
(including area code)
Date & Place of Purchase:
Part(s) description and quantity (Please be sure to list model number or SKN number):
Customer Service
Customer Service Phone Number 1-800-295-1980
Email: [email protected]m
Customer Service Representative Mailing Address:
Customer Service Department No. 413, 12345 Albert-Hudon Boulevard, Suite 100, Montreal, QC, Canada, H1G 3L1
Page is loading ...
Page is loading ...
Page is loading ...

LISTA DE PIEZAS
A B C
D E F
G H I
J K L
Cómoda de 6 Cajones
DA1011-1
TAPA DE LA CÓMODA
1 PZA
PANEL LATERAL
IZQUIERDO
1 PZA
PANEL LATERAL
DERECHO
1 PZA
PANEL CENTRAL
1 PZA
PANEL POSTERIOR
2 PZAS
BARRA SUPERIOR
POSTERIOR
1 PZA
BARRA INFERIOR
POSTERIOR
2 PZAS
BARRA SUPERIOR
ANTERIOR
1 PZA
BARRA INFERIOR
ANTERIOR
3 PZAS
PATA
4 PZAS
PANEL DE SOPORTE
1 PZA
FONDO DE CAJÓN
6 PZAS

LISTA DE PIEZAS
M N O
P Q R
Cómoda de 6 Cajones
DA1011-1
LADO IZQUIERDO CAJÓN
6 PZAS
LADO DERECHO CAJÓN
6 PZAS
LADO POSTERIOR CAJÓN
6 PZAS
BARRA DE SOPORTE
CAJÓN
6 PZAS
FRENTE CAJÓN
IZQUIERDO
3 PZAS
FRENTE CAJÓN DERECHO
3 PZAS
Page is loading ...
Page is loading ...
Page is loading ...
Page is loading ...
Page is loading ...
Page is loading ...
Page is loading ...
Page is loading ...
Page is loading ...
Page is loading ...
Page is loading ...
Page is loading ...
Page is loading ...
Page is loading ...
Page is loading ...
Page is loading ...
Page is loading ...
Page is loading ...
Page is loading ...
Page is loading ...
Page is loading ...
Page is loading ...
Page is loading ...
Page is loading ...
Page is loading ...
Page is loading ...
Page is loading ...
Page is loading ...
Page is loading ...
Page is loading ...
Page is loading ...
Page is loading ...
Page is loading ...
/