
CAUTION:
Read Rules for
Safe Operation
and Instructions
Carefully
OWNERS
MANUAL
175# BROADCAST SPREADER
Model No.
45-01873
xxxxxxxxxxxxxxxxxxxxxxxxxxxxxxxxxxxxx
xxxxxxxxxxxxxxxxxxxxxxxxxxxxxxxxxxxxxxxxxx
xxxxxxxxxxxxxxxxxxxxxxxxxxxxxxxxxxxxxxxxxxx
xxxxxxxxxxxxxxxxxxxxxxxxxxxxxxxxxxxxxxxxx
xxxxx
xxxxx
xxxxxx
xxx
xxxxx
xxxxx
xxxxxx
xxx
xxxxxxxxxxxxxxxx
xxxxx xxxxxx
xxxxxx xxxxx
xxx xxxxxx
APPLICATION TIPS
• Safety
• Assembly
• Operation
• Maintenance
• Parts
the fastest way to purchase parts
www.speedepart.com
™
FORMNO.48666(REV.05/08/08)

2
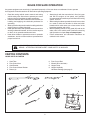
RULES FOR SAFE OPERATION
Anypowerequipmentcancauseinjuryifoperatedimproperlyoriftheuserdoesnotunderstandhowtooperate
theequipment.Exercisecautionatalltimeswhenoperatingequipment.
LOOKFORTHISSYMBOLTOPOINTOUTIMPORTANTSAFETYPRECAUTIONS.IT
MEANS--ATTENTION!BECOMEALERT!YOURSAFETYISINVOLVED.
CARTON CONTENTS
LOOSE PARTS IN CARTON
• Read the towing vehicle owners manual and towing
vehiclesafetyrules.Knowhowtooperateyourtractor
beforeusingthebroadcastspreaderattachment.
• Readthechemicallabelinstructionsandcautionsfor
handling and applying the chemicals purchased for
spreading.
• Weareyeandhandprotectionwhenhandlingandwhen
applyinglawnorgardenchemicals.
• Neveroperatetractorandspreaderattachmentwithout
wearingsubstantialfootwear,anddonotallowanyone
torideorsitonspreaderattachmentframe.
• Neverallowchildrentooperatethetractororspreader
attachment,anddonotallowadultstooperatewithout
properinstructions.
• Alwaysbeginwiththetransmissioninrst(low)gear
and with the engine at low speed, and gradually
increasespeedasconditionspermit.Maximumtowing
speed-6M.P.H.
• Whentowingbroadcastspreaderdonotdrivetooclose
to a creek or ditch and be alert for holes and other
hazardswhichcouldcauseyoutoloosecontrolofthe
broadcastspreaderandtractor.
• Beforeoperatingvehicleonanygrade(hill)refertothe
safetyrulesinthevehicleowner'smanualconcerning
safeoperationonslopes.Stay off steep slopes!
• Follow maintenance and lubrication instructions as
outlinedinthismanual.
1. HitchTube
2. FlowControlArm
3. HitchBracket
4. FlowControlMountBracket
5. Braces(2)
6. FlowControlRod
7. Wheels(DriveandIdler)
8. HopperStrap
9. HopperAssembly
HardwarePackage(seepage3)
5
6
7
1
4
9
2
3
8

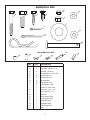
3
REF. QTY. DESCRIPTION
A 6 HexBolt,1/4-20x2"
B 2 HexBolts,3/8-16x1-1/4"
C 4 HexBolt,1/4-20x1"
D 1 CarriageBolt,1/4-20x3/4"
E 10 NylockNuts,1/4"
F 2 NylockNuts,3/8"
G 6 NylonWasher
H 10 FlatWasher,5/16"
I 4 FlatWashers1-5/8"
J 1 CotterPin,3/32"x3/4"
K 1 CotterPin,1/8x1-1/2"
L 1 HairCotterPin,1/8"
M 1 HitchPin
N 1 ShortSpacerTube
O 1 LongSpacerTube
P 1 NylonWingNut
Q 1 AdjustableStop
R 1 Flow Control Link
S 1 Grip
E
F
DCBA
K
L
M
G
H
I
J
N
O
Q
R
S
NOT SHOWN FULL SIZE
SHOWN FULL SIZE
P

4
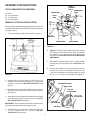
ASSEMBLY INSTRUCTIONS
TOOLS REQUIRED FOR ASSEMBLY
(1) Pliers
(2) 7/16"Wrenches
(2) 1/2"Wrenches
(2) 9/16"Wrenches
REMOVAL OF PARTS FROM CARTON
Removeallpartsandhardwarepackagesfromthecarton.Lay
outallpartsandhardwareandidentifyusingtheillustrations
onpages2and3.
FIGURE 2
FIGURE 3
FIGURE 1
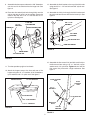
1. Turnthespreaderupsidedownasshowningure1.
2. Assemble the two hitch braces to the inside of the
hopperframeoneachsideusingtwo1/4"x2"hexbolts
andtwo1/4"nylocknuts.DO NOT TIGHTEN YET. See
gure2.
3. Removethelocknutfromthemiddleboltinthecrossover
tubeandshaftsupportplate.Leavetheboltinplace.
Seegure2.
4. Assembletheshortendofthehitchtubeontothemiddle
boltandsecureitwiththesamenutyouremoved.DO
NOT TIGHTEN YET.Seegure2.
IMPORTANT:Thehitchtubemustattachtothesideofthe
crossovertubeoppositetheshaftsupportplate.
5. Assemblethetwohitchbracestothehitchtubeusing
a 1/4"x 2" hex bolt and a 1/4" nylock nut. DO NOT
TIGHTEN YET.Seegure2.
1/4" x 2"
HEX BOLT
1/4" NYLOCK
NUT
CROSSOVER
TUBE
HITCH BRACE
HITCH
TUBE
SHAFT
SUPPORT
PLATE
MIDDLE
NUT
MIDDLE BOLT
HITCH BRACE
6. Tighten thenutsandboltsfasteningthehitchbraces
tothehopper frame and the hitch tube,then tighten
the middle lock nut fastening the hitch tube to the
crossovertube.DO NOT COLLAPSE TUBES WHEN
TIGHTENING.
7. Assemblethelongspacertubeanda1-5/8"atwasher
ontotheendoftheaxlethathasthesmall hole.See
gure3.
8. Placetheidlerwheel(noboltholeinhub)ontotheaxle
sothattheairvalveistotheoutside.Placeoneortwo
1-5/8"dia.atwashersontotheaxleandtheninstall
the1/8"x1-1/2"cotterpinintotheaxle.Seegure3.
SMALL HOLE
LONG SPACER TUBE
1-5/8" DIA.
FLAT WASHER
1-5/8" DIA.
FLAT WASHER
1/8" x 1-1/2"
COTTER PIN
AIR VALVE

5
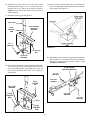
11. Turnthespreaderuprightonitswheels.
12. Attach the hopper strap to the front and rear of the
hopperusingtwo1/4"x1"hexbolts,5/16"atwashers,
nylonwashersand1/4"nylocknuts.Seegure5.
FIGURE 5
9. Assembletheshortspacertubeanda1-5/8"atwasher
ontotheendoftheaxlethathasthelargehole.See
gure4.
10. Placethedrivewheel(boltholethroughhub)ontothe
axlesothattheairvalveistotheoutside.Securethe
wheeltotheaxlewitha1/4"x2"hexboltanda1/4"
nylocknut.Seegure4.
FIGURE 4
15. Assembletheowcontrollink(endwithsmallhole)to
theowcontrolarmusinga1/4"x1"hexbolt,anylon
washeranda1/4"nylocknut.Tighten thenutuntilthe
ow control link pivots with a slight resistance. See
gure7.
FIGURE 6
3/8" x 1-1/4"
HEX BOLT
3/8" LOCK
WASHER
3/8" NYLOCK NUT
HITCH PIN
HAIR COTTER PIN
FLOW CONTROL
LINK
FLOW
CONTROL
ARM
1/4" NYLOCK NUT
1/4" x 1"
HEX BOLT
SMALLEST
HOLE
NYLON
WASHER
13. Assemblethehitchbrackettothetopofthehitchtube
usingtwo3/8"x1-1/4"hexboltsand3/8"nylocknuts.
Seegure6.
14. Assemblethehitchpinthroughthehitchbracketand
thehitchtubeandsecurewiththehaircotterpin.See
gure6.
HOPPER STRAP
NYLON WASHER
5/16" FLAT WASHER
1/4" x 1" HEX BOLT
1/4" NYLOCK NUT
FIGURE 7
1/4" NYLOCK NUT
1/4" x 2"
HEX BOLT
DRIVE WHEEL
AIR VALVE
SHORT SPACER TUBE
1-5/8" DIA.
FLAT WASHER

6
18. Placea5/16"atwasherontotheendoftheowcontrol
rod.Inserttheendoftherodthroughtheslotintheow
controlmountingbracketandthroughtheholeinthe
owcontrollink.Securewitha3/32"x3/4"cotterpin.
Seegure9.
FIGURE 9
19. Hookthefreeendoftheowcontrolrodthroughthe
holeintheslidegatebracketlocatednearthebottom
ofthehopper.Seegure10.
FIGURE 10
20. Assembletheowcontrolmountingbrackettothehitch
tubeusingtwo1/4"x2"hexbolts,six5/16"atwashers
andtwo1/4"hexlocknutsasshowningure11. Do
not tighten at this time.
FIGURE 11
FLOW
CONTROL
ROD
FLOW
CONTROL
LINK
3/32"
COTTER
PIN
5/16" FLAT
WASHER
SLOT
16. Assemble the ow control arm to the ow control
mountingbracketusinga1/4"x1"hexbolt,twonylon
washersand a1/4"nylock nutasshown ingure8.
Tighten thenutuntiltheowcontrolarmpivotswitha
slightresistance.
17. Assemblethevinylgrip.Seegure8.
FIGURE 8
1/4" x 1"
HEX BOLT
1/4" NYLOCK
NUT
FLOW CONTROL
MOUNTING
BRACKET
FLOW
CONTROL
ARM
(2) NYLON
WASHERS
VINYL GRIP
FLOW CONTROL
MOUNTING BRACKET
1/4" x 2"
HEX BOLT
1/4" HEX
LOCK NUT
5/16" FLAT
WASHER
5/16" FLAT
WASHER

7
21. Placetheadjustablestopintothe"ON"endoftheslot
inthetopoftheowcontrolmountingbracket.Secure
withthe1/4"x3/4"carriagebolt,anylonwasher,a5/16"
atwasherandthenylonwingnut.Seegure12.
FIGURE 12
22. Positiontheowcontrolmountingbracket.
(Figure13).
a. Push on ow control arm until it locks in "OFF"
position.
b. Slideowcontrolmountingbracketalongtubeuntil
closureplateinbottomofhopperjustcloses.
c. Snugthe1/4"locknutsjustenoughtoholdow
controlmountingbracketinplace.
d. Set adjustable stop at "5". Pull ow control arm
againststop.Verifythatclosureplatehasopened
abouthalfway.
e. Ifclosureplatedoesnotopenhalfway,itmaybe
closedtoofarat"OFF".Adjustpositionofowcontrol
mountingbracketuntilclosureplatewillopenabout
halfwayat"5"andstillclosewhenarmislocked
in"OFF".Tighten1/4"locknuts.
FIGURE 13
5/16" FLAT
WASHER
NYLON
WASHER
1/4" x 3/4"
CARRIAGE BOLT
NYLON
WING NUT
ADJUSTABLE
STOP
OFF
ON
1
2
3
4
6
7
8
9
10
5
FLOW
CONTROL
ARM
ON
OFF
AJDUSTABLE
STOP
SETTING "5"

8
FIGURE 14
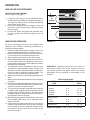
OPERATING SPEED -3MPH.(100ft.in23seconds)
IMPORTANT: Application rates shown in the chart are
affected by humidity and by the moisture content of
the material (granular and pellet). Some minor setting
adjustments may be necessary to compensate for this
condition.
OVERLAP
REFER
TO
CHARTS
USING YOUR SPREADER
We do not recommend the use of any powdered lawn
chemicals, due to difculty in obtaining a satisfactory or
consistentbroadcastpattern.
1. Determineapproximatesquarefootageofareatobe
coveredandestimateamountofmaterialrequired.
2. Beforellingthehoppermakesuretheowcontrolarm
isintheoffpositionandtheclosureplateisshut.
3. Breakupanylumpyfertilizerasyoullthehopper.
4. Settheadjustablestopwiththeowcontrolarmstillin
theoffposition.Refertotheapplicationchartonthis
pageandtotheinstructionsonthefertilizerbagtoselect
theproperowratesetting.
5. The application chart is calculated forlight to heavy
applicationatavehiclespeedof3mph,or100ft.in23
seconds.Avariationinspeedwillrequireanadjustment
of the ow rate to maintain the same coverage.The
fasteryoudrive,thewiderthebroadcastwidth.
6. Alwaysstartthetractorinmotionbeforeopeningclosure
plate.
7. Alwaysshuttheclosureplatebeforeturningorstopping
thetractor.
8. Iffertilizerisaccidentallydepositedtooheavilyinasmall
area,soaktheareathoroughlywithagardenhoseor
sprinklertopreventburningofthelawn.
9. Toinsureuniformcoverage,makeeachpasssothatthe
broadcastpatternslightlyoverlapsthepatternfromthe
previouspassasshowningure14.Theapproximate
broadcastwidthsfordifferent materials areshownin
theapplicationchartonthispage.
10. Whenbroadcastingweedcontrolfertilizers,makesure
the broadcast pattern does not hit evergreen trees,
owersorshrubs.
11. Heavymoistureconditionsmayrequireacoveroverthe
hoppertokeepcontentsdry.Thevinylcover(available
asanaccessory)actsasawindandmoistureshield,
butshouldnot be used asarain cover. Refertothe
partslistonpage11.
HOW TO USE YOUR SPREADER
SETTING THE FLOW CONTROL
(Refertogure13onpage7.)
1. Loosenthenylonwingnut,settheadjustablestopto
thedesiredowratesettingandretightenthewingnut.
Thehigherthesettingnumber,thewidertheopening
inthebottomofthehopper.
2. Refer to the application chart on page 8 and to the
instructions on the fertilizer bag to select the proper
owratesetting.
3. Pulltheow control armagainsttheadjustable stop
for the on positionand towardthehopperforthe off
position.
OPERATION
APPLICATION CHART
MATERIAL
TYPE
FLOW SETTING SPREAD
WIDTH
FERTILIZER
Powder 3-5 3'-4'
Granular 3-5 8'-10'
Pelleted 3-5 10'-12'
Organic 6-8 6'-8'
GRASS SEED
Fine 3-4 6'-7'
Coarse 4-5 8'-9'
ICE MELTER 6-8 10'-12'

9
CHECK FOR LOOSE FASTENERS
1. Beforeeachusemakeathoroughvisualcheckofthe
spreaderforanyboltsandnutswhichmayhaveloosened.
Retightenanylooseboltsandnuts.
CHECK FOR WORN OF DAMAGED PARTS
2. Check for worn or damaged parts before each use.
Repairorreplacepartsifnecessary.
CHECK TIRE INFLATION
3. Checkiftiresareadequatelyinatedbeforeeachuse.Do
notinatebeyondmaximumrecommendedpressure.
FIGURE 15
1. Rinseinsideofhopperandexteriorofspreaderanddry
offbeforestoring.
2. Storeinaclean,dryarea.
CLEANING
4. Rinseinsideofhopperandexteriorofspreaderanddry
offbeforestoring.
LUBRICATE (Seegure15.)
5. Lightly apply automotive grease as needed to the
sprocketandgear.
6. Oil the nylonbushings on the vertical sprocket shaft
andontheaxleatleastonceayear,ormoreoftenas
needed.
7. Oilrighthand(idler)wheelbearingatleastonceayear
ormoreoftenasneeded.
MAINTENANCE
GREASE
OIL
OIL
STORAGE
CAUTION: DO NOT inatetiresbeyondthe
maximumrecommendedpressureprinted
onsideoftire.
REPLACING SLOTTED GEAR
1. If the axle, slotted gear and sprocket assembly is
disassembled,markdownthepositionsofthepartsas
theyareremoved.Thedrivewheelandsprocketpositions
inrelationtotheslottedgeardeterminewhichdirection
thespreaderplatewillspin.Besuretoreassemblethem
intheiroriginalpositions.(Refertogure4onpage5.)
Useshimwashers(Ref.no.21onpages10and11)
asneededforminimumbacklash.Addgreasetogear
andsprocket.
SERVICE AND ADJUSTMENTS
SHAFT SUPPORT PLATE
SLOTTED GEAR
IF THE SPREADER LOCKS UP
1. Turnthespreaderoversothatthewheelsareoffthe
ground.
2. Loosenallthreenutsontheshaftsupportplatejust
enoughsothattheboltscanbeturnedeasilywitha
wrenchbutcannotbeturnedbyhand.
3. Spinthedrivewheelandnotehowfreelyitspinsand
howmuchnoisetheslottedgearmakes.
4. Tofreeupthewheelandgear,tapgentlyonthefront
orrearedgeoftheshaftsupportplatetomoveit
slightlyforwardorbackward.Youcanalsotapatthe
cornersoftheplatetoangleitslightly.
5. Spinthedrivewheelaftereachadjustmenttoseeifit
spinsmorefreelyandifthegearnoiseisreduced.
6. Continuemakingslightadjustmentsuntilyoundthe
positionwherethedrivewheelspinsmostfreelyand
thegearmakestheleastnoise.
7. Secure the shaft support plate in this position by
retighteningallthreenutsthatyouloosened.
FIGURE 16

10
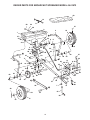
REPAIR PARTS FOR BROADCAST SPREADER MODEL 45-01873
11
62
23
43
50
21
20
21
22
19
18
4
D
E
35
50
15
37
37
39
23
A
A
33
59
27
26
28
3
19
36
34
9
46
9
57
9
40
16
14
7
17
37
24
50
13
E
9
29
5
9
54
9
4
9
35
B
6
52
44
47
58
58
8
42
32
7
D
45
54
48
29
40
37
60
25
B
1
39
10
54
41
54
51
39
9
54
39
31
2
39
54
58
55
56
58
37
9
49
40
C
61
9
C
63

11
REPAIR PARTS FOR BROADCAST SPREADER MODEL 45-01873
REF.
NO.
PART
NO.
QTY. DESCRIPTION
1 44480 1 Hopper
2 43882 4 Rivet,Stainless
3 62482 1 Ass'y,GuideClosure
4 44462 1 Tube,Frame
5 23753 1 SlideGateAngleBracket
6 23758 1 SlideGateBracket
7 HA21362 5 Nut,HexLock3/8-16Thd.*
8 24857 1 Flow Control Link
9 47189 18 Nut,HexNylock1/4-20Thd.*
10 43808 1 Tube,Crossover
11 44180 2 Bolt,Hex5/16-18x2"Lg.
13 47810 2 Nut,HexNylock,5/16-18Thd.*
14 44487 1 Tube,Hitch
15 43008 1 Wheel,Idler
16 44459 1 Wheel,Drive
17 23687 1 Bracket,Hitch
18 25017 1 Shaft,Axle
19 43851 2 Pin,Spring3/16"Dia.x1-1/4"Lg.
20 43871 1 Bushing,AxleShaft
21 1540-032 5 Washer,Flat.78I.D.
22 1540-162 1 Washer,Flat1/2"
23 47615 2 Bearing,Flange
24 48665 1 SpacerTube(Short)
25 25305 1 Shaft,Sprocket
26 04367 1 SpreaderPlate
27 43850 1 Pin,Spring1/8"Dia.x5/8".
28 44468 1 Sprocket,6Tooth
29 44285 2 Bushing,Delrin
31 48934 1 Hairpin,Agitator
32 43070 5 Washer,Flat3/8"*
the fastest way to purchase parts
www.speedepart.com
REF.
NO.
PART
NO.
QTY. DESCRIPTION
33 43054 2 Bolt,Hex3/8-16x2"Lg.*
34 44469 1 Rod,FlowControl
35 23525 2 Brace,Hitch
36 23762 1 ShaftSupportPlate
37 46699 12 Bolt,Hex1/4-20x2"
39 1543-069 12 Washer,Nylon
40 43088 13 Washer,Flat1/4"Std.
41 24858 1 Stop,Adjustable
42 24855 1 Bracket,FlowControlMount
43 62474 1 GearAssembly
44 24859 1 FlowControlArm
45 44101 1 CotterPin3/32"x3/4"Lg.*
46 23533 1 Plate,Closure
47 43848 1 Grip,FlowControlArm
48 43087 2 Bolt,Hex3/8-16x1-1/4"Lg.*
49 43093 1 Pin,Cotter1/8"x1-1/2"
50 43009 4 Washer,Flat1-5/8"O.D.
51 47141 1 WingNut,Nylon
52 HA180132 1 Bolt,Hex3/8-16x2-1/4"Lg.*
54
R19111116
10 Washer,5/16SAE
55 47623 1 HitchPin
56 43343 1 HairCotterPin,1/8"
57 44566 1 Spring,Torsion
58 43661 5 Bolt,Hex1/4-20x1"Lg.*
59 46055 1 Pin,Spring1/8"Dia.x1"Lg.
60 44950 1 Bolt,Carriage1/4-20x3/4"
61 23697 1 Strap,Hopper
62 44474 1 SpacerTube(Long)
63 40825 1 VinylCover(Optional)
48666 1 Owner'sManual

REPAIR PARTS
Agri-Fab,Inc.
303WestRaymond
Sullivan,IL.61951
217-728-8388
www.agri-fab.com
the fastest way to purchase parts
www.speedepart.com
©1991Agri-Fab,Inc.
Thisdocument(ormanual)isprotectedundertheU.S.CopyrightLawsandthecopyrightlawsofforeigncountries,
pursuanttotheUniversalCopyrightConventionandtheBerneconvention.Nopartofthisdocumentmaybereproduced
ortransmittedinanyformorbyanymeans,electronicormechanical,includingphotocopyingorrecording,orbyany
informationstorageorretrievalsystem,withouttheexpresswrittenpermissionofAgri-Fab,Inc.Unauthorizedusesand/or
reproductionsofthismanualwillsubjectsuchunauthorizedusertocivilandcriminalpenaltiesasprovidedbytheUnited
StatesCopyrightLaws.
-
 1
1
-
 2
2
-
 3
3
-
 4
4
-
 5
5
-
 6
6
-
 7
7
-
 8
8
-
 9
9
-
 10
10
-
 11
11
-
 12
12


Ask a question and I''ll find the answer in the document
Finding information in a document is now easier with AI
Related papers
Other documents
-
Sears 486.245951 User manual
-
Craftsman 486243232 Owner's manual
-
-
-
Sears 486.24321 User manual
-
-
-
Craftsman 486.245941 Owner's manual
-
-