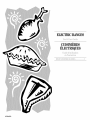
Inglis IJP85801 Owner's manual
- Category
- Cookers
- Type
- Owner's manual
This manual is also suitable for

ELECTRICRANGES
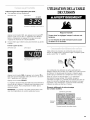
!,J_:i_::_,_!!!ii,_:C_ii:__:ii!:,__il¸¸iil¸_i:_i_!ii_:!!!!_
CUISINIERES
ELECTRIQUES
Table of Contents/Table des matieres .......................... 2
9754170

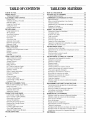
TABLEOF CONTENTS
A NOTE TO YOU ......................................................................... 3
RANGE SAFETY ......................................................................... 4
The Anti-Tip Bracket .................................................................... 4
ELECTRONIC OVEN CONTROL ................................................ 7
Display/Clock ...............................................................................7
Starting/Canceling a Function ..................................................... 7
Indicator Lights ............................................................................. 7
Using the Control Lock ................................................................ 7
Setting the Clock .......................................................................... 8
Using the Minute Timer ................................................................ 8
BEFORE USING .......................................................................... 8
Using Aluminum Foil .................................................................... 8
Air Circulation ............................................................................... 9
Oven Rack Positions .................................................................... 9
Accessory Rack ........................................................................... 9
Oven Vent ................................................................................... 10
Oven Door Vent .......................................................................... 10
Automatic Oven Light ................................................................ 10
Broil Pan Storage Rack .............................................................. 10
Bakeware Chart .......................................................................... 10
USING YOUR OVEN ................................................................. 11
Baking & Roasting ...................................................................... 11
Adjusting Oven Temperature Control ........................................ 12
Broiling ........................................................................................ 12
Broiling Guidelines ..................................................................... 13
Vari-Broil ..................................................................................... 13
USING YOUR COOKTOP ......................................................... 14
Surface Element Controls .......................................................... 14
Warming Zone Element .............................................................. 14
Simmer Element ......................................................................... 14
Dual Element .............................................................................. 15
Bridge Element ........................................................................... 15
HOT Surface Indicator Lights .................................................... 15
Fluorescent Cooktop Light ........................................................ 15
Appliance Outlets ....................................................................... 15
Home Canning Information ........................................................ 15
Optional Canning Kit .................................................................. 16
Cookware ................................................................................... 16
Power on Lights ......................................................................... 16
Control Setting Guide ................................................................ 16
Coil Element Cooktop Models ................................................... 16
Cookware Tips ........................................................................... 17
OVEN SELF-CLEANING CYCLE .............................................. 17
How the Self-Cleaning Cycle Works .......................................... 17
Before You Start ......................................................................... 17
For Best Cleaning Results .......................................................... 18
Automatic Door Lock ................................................................. 18
Setting the Controls ................................................................... 18
CARING FOR YOUR RANGE ................................................... 19
Coil Element Cooktop Models ................................................... 19
Glass Ceramic Cooktop Models ................................................ 20
Removable Oven Door ............................................................... 20
Sweep-Through Base ................................................................ 21
Removing the Storage Drawer ................................................... 21
Replacing the Storage Drawer ................................................... 21
Cleaning Chart ........................................................................... 21
Cooktop Light Replacement ...................................................... 22
Oven Light Replacement ........................................................... 22
Appliance Outlet Circuit Breakers .............................................. 22
TROUBLESHOOTING ............................................................... 23
TABLEDES MATIERES
NOTE A L'UTILISATEUR .......................................................... 24
SleCURITE_ DE LA CUISINIERE ................................................ 25
La bride antibasculement ........................................................... 25
COMMANDE leLECTRONIQUE DU FOUR .............................. 28
Afficheur/horioge ........................................................................ 28
Mise en marche/annulation d'une fonction ............................... 28
Temoins lumineux ...................................................................... 28
Utilisation de ia commande de verrouiilage ............................... 28
Re,glage de I'horloge .................................................................. 29
Utilisation de la minuterie ........................................................... 29
AVANT L'UTILISATION ............................................................. 29
Utilisation de papier d'aluminium ............................................... 29
Circulation de i'air ....................................................................... 30
Positions des grilles .................................................................... 30
Grille accessoire ......................................................................... 30
Event du four .............................................................................. 31
Event de la porte du four ............................................................ 31
Lumiere de four automatique ..................................................... 31
Support de rangement de la lechefrite et sa grille ..................... 31
Ustensiles de cuisson au four .................................................... 32
UTILISATION DU FOUR ........................................................... 32
Cuisson au four et rOtissage ...................................................... 32
Ajustement de la commande de temperature du four ............... 33
Cuisson au gril ............................................................................ 34
Directives pour la cuisson au gril ............................................... 34
Cuisson au gril variable .............................................................. 35
UTILISATION BE LA TABLE BE CUISSON ............................. 35
Commandes des elements de surface ...................................... 35
Element de zone tiede ................................................................ 36
Element de mijotage ................................................................... 36
Element double .......................................................................... 36
Element de liaison ...................................................................... 36
Temoins lumineux de surface chaude ....................................... 36
Lumiere fluorescente de la table de cuisson ............................. 37
Prises pour appareiis menagers ................................................ 37
Remarques concernant les conserves ...................................... 37
Necessaire de conserve en option ............................................ 37
Mat(_riaux des ustensiles de cuisson ......................................... 38
Temoins lumineux de courant .................................................... 38
Guide des regiages .................................................................... 38
Modeles a table de cuisson a elements tubulaires ................... 39
Conseils utiles ............................................................................ 39
PROGRAMME B'AUTONETTOYAGE BU FOUR ..................... 39
Fonctionnement du programme d'autonettoyage ..................... 40
Avant de commencer ................................................................. 40
Pour des resultats de nettoyage optimaux ................................ 40
Verrouiilage automatique de la porte ......................................... 40
Reglage des commandes .......................................................... 41
ENTRETIEN BE LA CUISINIERE .............................................. 41
Modeles a table de cuisson a elements tubulaires ................... 41
Modeles a table de cuisson en vitroc(_ramique ......................... 42
Porte de four amovibie ............................................................... 43
Base de baiayage ....................................................................... 43
Retrait du tiroir de rangement .................................................... 44
Reinstallation du tiroir de rangement ......................................... 44
Tableau de nettoyage ................................................................. 44
Remplacement du tube de la lampe de la table de cuisson .....45
Remplacement de I'ampoule de la lampe du four ..................... 45
Disjoncteurs des prises de I'appareil m(_nager.......................... 45
DI_PANNAGE ............................................................................. 46

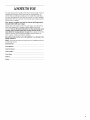
ANOTETOYOU
You have purchased a quality, world-class electric range. Years of
engineering experience have gone into its manufacturing. To
ensure that you will enjoy many years of trouble-free operation,
we have developed this Use and Care Guide. It is full of valuable
information on how to operate and maintain your range properly.
Please read it carefully.
Also, please complete and mail the Ownership Registration
Card provided with your range.
Should you ever require service for your range, you will need to
know your appliance's complete model number and serial
number. You can find this information on the model and serial
number plate located behind the storage drawer panel, in
view when the storage drawer is open. Also, please record the
date the product was purchased/installed and the Builder or
Store's name, address and phone number.
Keep this book and the sales slip together in a safe place for
future reference.
NOTE: You must provide proof of purchase or installation date for
in-warranty service.
Model Number
Serial Number
Date Purchased
Date Installed
Store Name
Address
Phone

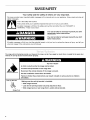
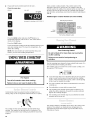
RANGESAFETY
Your safety and the safety of others are very important.
We have provided many important safety messages in this manual and on your appliance. Always read and obey all
safety messages.
This is the safety alert symbol.
This symbol alerts you to potential hazards that can kill or hurt you and others.
All safety messages will follow the safety alert symbol and either the word "DANGER" or
"WARNING." These words mean:
You can be killed or seriously injured if you don't
immediately follow instructions.
You can be killed or seriously injured if you don't
follow instructions.
All safety messages will tell you what the potential hazard is, tell you how to reduce the chance of injury, and tell you
what can happen if the instructions are not followed.
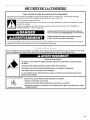
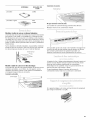
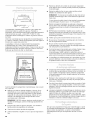
The range will not tip during normal use.However, the range can tip if you apply too much force or weight to the open door
without the anti-tip bracket fastened down properly.
Anti-Tip Bracket
Range Foot
Tip Over Hazard
A child or adult can tip the range and be killed.
Connect anti-tip bracket to rear range foot.
Reconnect the anti-tip bracket, if the range is moved.
See the installation instructions for details.
Failure to follow these instructions can result in death or serious burns to children
and adults.
Making sure the anti-tip bracket is installed:
• Slide range forward.
• Look for the anti-tip bracket securely attached to floor.
• Slide range back so rear range foot is under anti-tip bracket.

iMPORTANT SAFETY iNSTRUCTiONS
WARNING: To reduce the risk of fire, electrical
shock, injuryto persons, or damage when using the
range, follow basic precautions, including the
following:
• WARNING: TOREDUCETHERISKOF
TIPPING OF THE RANGE, THE RANGE MUST BE
SECURED BY PROPERLY INSTALLED ANTI-TIP
DEVICES. TO CHECK IF THE DEVICES ARE
INSTALLED PROPERLY, SLIDE RANGE FORWARD,
LOOK FOR ANTI-TIP BRACKET SECURELY
ATTACHED TO FLOOR, AND SLIDE RANGE BACK
SO REAR RANGE FOOT IS UNDER ANTI-TIP
BRACKET.
• CAUTION: Do not store items of interest to
children in cabinets above a range or on the back-
guard of a range - children climbing on the range to
reach items could be seriously injured.
• Proper Installation - Be sure the range is properly
installed and grounded by a qualified technician.
• Never Use the Range for Warming or Heating the
Room.
• Do Not Leave Children Alone - Children should not
be left alone or unattended in area where the range
is in use. They should never be allowed to sit or
stand on any part of the range.
• Wear Proper Apparel - Loose-fitting or hanging
garments should never be worn while using the
range.
• User Servicing - Do not repair or replace any part of
the range unless specifically recommended in the
manual. All other servicing should be referred to a
qualified technician.
• Storage in or on the Range - Flammable materials
should not be stored in an oven or near surface
units.
• Do Not Use Water on Grease Fires - Smother fire or
flame or use dry chemical or foam-type extinguisher.
• Use Only Dry Potholders - Moist or damp
potholders on hot surfaces may result in burns from
steam. Do not let potholder touch hot heating
elements. Do not use a towel or other bulky cloth.
• DO NOT TOUCH SURFACE UNITS OR AREAS
NEAR UNITS - Surface units may be hot even
though they are dark in color. Areas near surface
units may become hot enough to cause burns.
During and after use, do not touch, or let clothing or
other flammable materials contact surface units or
areas near units until they have had sufficient time
to cool. Among those areas are the cooktop and
surfaces facing the cooktop.
• Use Proper Pan Size - The range is equipped with
one or more surface units of different size. Select
utensils having flat bottoms large enough to cover
the surface unit heating element. The use of under-
sized utensils will expose a portion of the heating
element to direct contact and may result in ignition
of clothing. Proper relationship of utensil to burner
will also improve efficiency.
• Never Leave Surface Units Unattended at High Heat
Settings - Boilover causes smoking and greasy
spillovers that may ignite.
• Make Sure Reflector Pans or Drip Bowls Are in
Place - Absence of these pans or bowls during
cooking may subject wiring or components under-
neath to damage.
• Protective Liners - Do not use aluminum foil to line
surface unit drip bowls or oven bottoms, except as
suggested in the manual. Improper installation of
these liners may result in a risk of electric shock, or
fire.
• Glazed Cooking Utensils - Only certain types of
glass, glass/ceramic, ceramic, earthenware, or other
glazed utensils are suitable for range-top service
without breaking due to the sudden change in
temperature.
• Utensil Handles Should Be Turned Inward and Not
Extend Over Adjacent Surface Units - To reduce the
risk of burns, ignition of flammable materials, and
spillage due to unintentional contact with the utensil,
the handle of a utensil should be positioned so that
it is turned inward, and does not extend over
adjacent surface units.
• Do Not Soak Removable Heating Elements -
Heating elements should never be immersed in
water.
• Do Not Cook on Broken Cooktop - If cooktop
should break, cleaning solutions and spillovers may
penetrate the broken cooktop and create a risk of
electric shock. Contact a qualified technician
immediately.
• Clean Cooktop With Caution - If a wet sponge or
cloth is used to wipe spills on a hot cooking area,
be careful to avoid steam burn. Some cleaners can
produce noxious fumes if applied to a hot surface.
• Use Care When Opening Door - Let hot air or
steam escape before removing or replacing food.
• Do Not Heat Unopened Food Containers - Build-up
of pressure may cause container to burst and result
in injury.
SAVE THESE INSTRUCTIONS

IMPORTANT SAFETY INSTRUCTIONS
• Keep Oven Vent Ducts Unobstructed.
• Placement of Oven Racks - Always place oven
racks in desired location while oven is cool. If rack
must be moved while oven is hot, do not let
potholder contact hot heating element in oven.
• DO NOT TOUCH HEATING ELEMENTS OR
INTERIOR SURFACES OF OVEN - Heating
elements may be hot even though they are dark in
color. Interior surfaces of an oven become hot
enough to cause burns. During and after use, do
not touch, or let clothing or other flammable
materials contact heating elements or interior
surfaces of oven until they have had sufficient time
to cool. Other surfaces of the appliance may
become hot enough to cause burns - among these
surfaces are oven vent openings and surfaces near
these openings, oven doors, and windows of oven
doors.
For self-cleaning ranges -
• Do Not Clean Door Gasket - The door gasket is
essential for a good seal. Care should be taken not
to rub, damage, or move the gasket.
• Do Not Use Oven Cleaners - No commercial oven
cleaner or oven liner protective coating of any kind
should be used in or around any part of the oven.
• Clean Only Parts Listed in Manual.
• Before Self-Cleaning the Oven - Remove broiler pan
and other utensils.
For units with ventilating hood -
• Clean Ventilating Hoods Frequently - Grease should
not be allowed to accumulate on hood or filter.
• When flaming foods under the hood, turn the fan on.
SAVE THESE INSTRUCTIONS

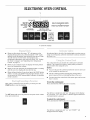
ELECTRONICOVENCONTROL
• When you first plug in the range, "PF" will appear on the
display until you press any command button. If "PF" again
appears on the the display, your electricity was off for a while.
You will need to reset the clock and reprogram any
temperature adjustments you may have made. See "Setting
the Clock" on page 8; and "Adjusting Oven Temperature
Control" on page 12.
• When you are using the oven, the display will show preheat
times and temperature settings.
• When you are not using the self-cleaning function or cooking
with the oven, the display will show time of day.
• When setting a function, if you do not press the START button
within 5 seconds, the START? indicator light will flash. If you
do not press the START button within 5 minutes, the function
will be canceled.
After setting a function for the first time, you must press the
START button to start the function.
An indicator light to the left of the display lights up when you are
using an oven function, when the oven door is locked, and when
the oven is on.
The control lock lets you disable the control panel command
buttons. The control lock comes in handy when you want to
prevent others from using the oven.
NOTES :
• You can only use the control lock when the oven is not in use
or the control has not been set.
• Set the control lock when cleaning the control panel to
prevent yourself from accidentally turning on the oven.
• You must reset the control lock if the power goes out for more
than 1 second.
To lock the control panel :
Press and holdthe STARTbutton for 5 seconds.
The OFF button will cancel any function except the clock, minute
timer, and control lock.
You will hear a single tone and "Loc" will appear on the display
for 5 seconds. "Loc" and "START?" will then appear whenever a
command button is pressed.
To unlock the control panel :
Press and holdthe STARTbutton for 5 seconds.
You will hear a single tone and "Loc" and "START?" will
disappear from the display.

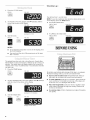
1,
2,
3,
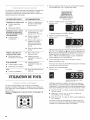
Press the CLOCK button.
PRESS YOUSEE
!!
Start the clock.
PRESS
Set the time. Press the up • or down • button(s) until the
correct time shows on the display.
PRESS YOU SEE
(example for 5:30)
NOTES :
OR YOUSEE
To see the time of day when it is not on the display, press
the CLOCK button.
You must reset the clock if the power goes out for more
than 1 second.
When time isup :
YOU SEE
You will hear four 1-second tones.
NOTE: To see the countdown time when the minute timer is not
on the display, press the TIMER button.
4. Turn off the minute timer.
PRESSTWICE YOU SEE
To CANCEL the minute timer.
PRESSTWICE YOUSEE
BEFOREUSING
The minute timer does not start or stop the oven. It works like a
kitchen timer. It can be set in hours or minutes up to 12 hours, 59
minutes. The minute timer will display minutes and seconds for
settings under 1 hour. You will hear four 1-second tones when the
set time is up.
1. Press the TIMER button.
PRESS YOUSEE
2,
Set the countdown time. Press the up • or down • button(s)
until the correct time shows on the display.
PRESS YOUSEE
B
(example for 10 minutes)
3. Start the minute timer.
PRESS OR YOUSEE
(display counts down)
Do not line oven bottom with any type of foil, liners, or cookware.
Permanent damage will occur to the oven bottom finish.
• Do not cover the entire rack with aluminum foil. Doing so
will reduce air circulation and overall oven performance.
• To catch spillovers from pies or casseroles, place foil on the
oven rack below. Foil should be turned up at the edges and
be at least 1 in. (2.5 cm) larger than the dish.
• Place tent-shaped foil loosely over meat or poultry to slow
down surface browning for long term roasting. Remove foil
for the last 30 minutes.
• Use narrow strips of foil to shield piecrust edges if browning
too quickly.

Thehotairmustcirculatearoundthepansintheovenforeven
heattoreachallpartsoftheoven.Thisresultsinbetterbaking.
Forbest air circulation:
• Place the pans so that one is not directly over the other.
• For best results, allow 11/2in. to 2 in. (3.8-5 cm) of space
around each pan and between pans and oven walls. There
must be a minimum space of 1 in. (2.5 cm).
11/2,,.2'' 11/2,,.2''
wallor
other
pan
When baking with one pan, place pan in the center of the
oven rack.
When baking with two pans, place pans in opposite corners
of the oven rack.
NOTE: Opening the oven door may cause heat loss, longer
cooking times and unsatisfactory baking or roasting results. Rely
on your timer.
Illll:
Your oven has five rack positions. Rack position 1 is the lowest
position, or closest to the bottom of the oven. Rack position 5 is
the highest position, or farthest from the bottom of the oven.
NOTES:
• Always position oven rack(s) in desired location before
turning oven on. Be sure the rack(s) is level.
• Do not let potholders or oven mitts come in contact with hot
heating elements.
Be sure to position the oven rack(s) before putting food into the
oven or turning the oven on.
_lFrontof rack _i l
Rearof rack
To remove oven racks:
Lift rack at front and pull out.
To replace oven racks:
1. Place rear of rack on rack guides.
2. While lifting front of rack, push in all the way. Lower front.
For proper cooking, follow these guidelines:
• When using one rack, place the rack so the top of the food
will be centered in the oven.
• When using two racks, place racks in positions 3 and (1 is the
closest to the oven bottom).
• Use only one cookie sheet in the oven at a time when using
the BAKE setting.
Rack placement for specific foods:
(For rack positions, see the "Oven Rack Positions" section).
FOOD RACK POSITION
Frozen pies 1 or 2
Angel and bundt cakes, most quick 2
breads, yeast breads, casseroles,
meats
Cookies, biscuits, muffins, cakes, non 2 or 3
frozen pies
The accessory rack is specially designed to fit around a large
object to allow you to roast foods in the oven on a lower rack
while heating or cooking other foods on the accessory rack.
style will vary depending on model
OVEN CONTROL
UTENSIL SETTING
Broiler pan BAKE
Broiler pan and BROIL
grid BAKE

Coilelementcooktopmodels:
Theovenventshouldnotbeblockedorcoveredsinceitallows
thereleaseofhotairandmoisturefromtheoven,Doingsowill
causepooraircirculation,affectingcookingandcleaningresults,
Neversetplastics,paper,orotheritemsthatcouldmeltorburn
neartheovenvent.
Oncoilelementmodels,theelementcanbeusedwhentheoven
isonaslongasthecookwaredoesnotextendmorethan1in.
(2.5cm)overtheelement,
I II Oven Vent
Ceramic glass cooktop models:
The oven vent, located on the lower left side of the backguard on
free-standing ranges, or on the rear left side of the cooktop on
slide-in ranges, allows hot air and moisture to escape when the
oven is in use.
Free-standing range
Oven Vent
Slide-in range
Oven Vent
I
t I
Do not block the oven vent.
Poor baking/roasting may result.
Use warm soapy water to clean the vent.
The oven light will turn on automatically once the oven door is
opened, and will remain on while the door is open. Since it
functions separately from the electronic range control, the oven
does not need to be on for the light to come on.
The oven light may also be turned on using the manual switch
located on the control console.
{ : :
A handy rack has been designed at the top of the storage drawer
to hold the broiler pan and broiler pan grid.
The bakeware material affects cooking results. Use the bakeware
size recommended in the recipe and the following chart as a
guide.
BAKEW ARE/ RECOMMENDATIONS
RESULTS
Light colored • Use temperature and time
aluminum recommended in recipe.
• Light golden
crusts
• Even browning
Dark aluminum •
and other
bakeware with
dark, dull and/or •
non-stick finish •
• Brown, crisp
crusts
May reduce baking temperatures
25°F (14°C).
Use suggested baking time.
For pies, breads and casseroles, use
temperature recommended in
recipe.
Place rack in center of oven.
Insulated cookie
sheets or baking
pans
• Little or no
bottom
browning
• Place in the bottom third of oven.
• May need to increase baking time.
Hot air and moisture may escape from the door vent during
certain cooking modes. Some condensation may be observed
occasionally. This will not effect cooking performance.
10

BAKEW ARE/ RECOMMENDATIONS
RESULTS
Stainless steel • May need to increase baking time.
• Light, golden 5.
crusts
• Uneven
browning
Stoneware
• Crisp crusts
• Follow manufacturer's instructions.
USINGYOUROVEN
During preheating and baking, both the top and bottom elements
cycle on and off to provide balanced cooking and even top
browning.
Use this setting for baking, roasting and heating.
11 Place the oven racks where you need them in the oven. For
more information, see "Oven Rack Positions".
Front of rack
2,
3,
Rear of rack
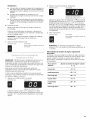
Choose the baking/roasting setting.
PRESS YOU SEE
The BAKE indicator light will light up.
Set the temperature (optional).
PRESS YOUSEE
il
(example for bake/roast at 375°F/
190°C)
Do this step if you want to set a temperature other than
350°F/177°C. Press • to raise the temperature or • to lower
the temperature in 5°F/3°C amounts. You can set the
temperature anywhere from 170°F/77°C to 500°F/260°C. Use
these buttons until the desired temperature is displayed.
When roasting or cooking casseroles.,.
Put your food in the oven,
You do not have to preheat the oven when roasting or
cooking casseroles.
Press the START button.
PRESS YOUSEE
ON • DEPART
I
(examplefor set temperature of
350°F/177°C)
A preheating time will count down on the display The HEAT
and ON indicator lights will light up. The oven control
automatically sets preheating time based on the oven
temperature you select.
• For 245°F/118°C and less, the preheating time is
4 minutes.
• For 250°F-445°F/121 °C - 229°C, the preheating time is 10
minutes.
• For 450°F/232°C and above, the preheating time is 15
minutes.
When preheating is complete you hear a 1-second tone, the
preheat indicator light turns off, and the set temperature is
displayed.
NOTES :
• You can change the temperature setting any time after
pressing the START button. You do not have to press the
START button again.
• The preheating time will not change if you reset the
temperature before the countdown time ends.
• Ifyou are baking/roasting while the minute timer is
counting down, you can see the set baking/roasting
temperature for 5 seconds by pressing the BAKE button.
When baking,..
Put your food in the oven after the preheat countdown ends.
During baking/roasting the elements will turn on and off to
keep the oven temperature at the setting.
NOTE: The top element helps heat during baking/roasting,
but does not turn red.
After cooking, turn off the oven.
PRESS YOU SEE
time of day or minute timer
countdown
11

NOTE:DONOTmeasuretheoventemperaturewitha
thermometer.Openingtheovendoorwilllowertheoven
temperatureandgiveyouanincorrectreading.Also,the
thermometertemperaturewillchangeasyourovencycles.
Althoughyournewovenisproperlyadjustedtoprovideaccurate
temperatures,itmaycookfasterorslowerthanyouroldoven.
Ifyouarenotsatisfiedwiththebaking/roastingresults,youcan
changetheoffsettemperaturebyfollowingthestepsbelow:
1. PressandholdBAKEfor4seconds.
2,
3,
PRESS YOUSEE
(factory setting of "0")
The display will show 350°F/177°C for 4 seconds. Then it will
show the current offset temperature, for example "00", if you
have not already adjusted the temperature.
Set the new offset temperature.
PRESS
B
YOU SEE
(example when making oven 10°F/
5°C cooler)
Press • to raise the temperature or • to lower the
temperature in 10°F/5°C amounts. You can set the
temperature change as low as -30°F/-15°C or as high as
+30°F/+15°C. A minus (-) sign will appear before the number
when decreasing the temperature setting. The minus sign
indicates that the oven will be cooler by the displayed
amount. There is no sign in front of the number when
increasing the temperature setting.
Enter the adjustment.
PRESS YOUSEE
time of day or minutetimer
countdown
NOTE: The offset temperature resets to "00" if the power
goes out for more than 1second.
How to determine the amount of temperature adjustment
needed:
The chart below tells you how much to adjust the offset
temperature to get the cooking results you want. You can figure
out cooking results by the amount of browning, moistness, and
rising times for baked foods.
Adjust by this Number of
To Cook Food... Degrees °F/°C
a little more +10/+5
moderately more +20/+10
much more +30/+15
a little less -10/-5
moderately less -20/-10
much less -30/-15
The top element (as set by the Broil function) operates at full
power when heating.
Use this setting for normal broiling and top browning with the
door open in the Broil Stop position.
This setting can also be used for Vari-Broil with the door
closed. The element will cycle off and on to maintain the
preset temperature.
NOTES :
• Do not preheat when broiling.
• Leave the door partly open when you use the oven to broil.
This lets the oven stay at the proper temperatures.
1. Place the oven rack for broiling.
Front of rack
Rear of rack
Place the oven rack so that the surface of the food is at least
3 in, (7.5 cm) away from the broil element.
12

2. Placeyourfoodonthebroilerpanandplacethepaninthe
centeroftheovenrack.
3. Close the oven door to the broil stop position.
4,
5,
6,
The broil stop position lets the door stay open about 4in.
(10 cm) by itself.
Press the BROIL button.
PRESS
II
YOU SEE
(500°F/260°C standard broiling
temperature)
The broil indicator light will light up.
Start broiling.
PRESS YOUSEE
ON • DEPART
l
The ON and HEAT indicator lights will light up.
NOTES:
• You can change the temperature setting any time after
PVressingthe START button. To change the setting, see
ari-Broil". After changing the setting, you do not have to
press the START button again.
• Ifyou are broiling while the minute timer is counting
down, you can see the set broiling temperature for 5
seconds by pressing the BROIL button.
After broiling, turn off the oven.
PRESS YOUSEE
time of day or minutetimer
countdown
1. Open the door to the Broil Stop position (open about 4 in.
[10 cm]).
2. Use the broiler pan and grid for broiling. They are designed to
drain excess liquid and fat away from the cooking surface to
help prevent spatter and smoke.
3. To make sure juices drain well, do not cover the grid with foil.
4. Turn food only once during broiling. Using tongs to turn
meats prevents loss ofjuices. Use MINUTE TIMER for timing
each side.
5. The surface of the food should be at least 3 in. (7.4 cm) away
from the broil element.
6. For steaks and chops, slash fat evenly, at 2 in. (5 cm)
intervals, around the outside edges of meat to prevent
curling.
7. Meats and poultry can be marinated before broiling. Brush
foods with barbecue sauce only during the last 5 to 10
minutes of broiling.
8. Place food on a cold pan to prevent sticking. Ifthe rack is hot,
grease it or grease the food.
9. After broiling, remove the pan from the oven when removing
the food. Drippings will bake on the pan if left in the heated
oven, making cleaning more difficult.
To custom broil at a lower temperature...
• If the food is cooking too fast,.,
PRESS YOUSEE
II
I!
ON°DEPART
t
(example for broiling at 325°F/163°C)
Press the BROIL button and press the • button until "325°F/
163°C '' shows on the display. After changing the setting, you
do not have to press the START button again.
13

Ifyouwantfoodtobroilslowerfromthestart,.,
Closetheoven door.
PRESS YOU SEE
ON_'DEPART
I
(example for broiling at 400°F/204°C)
Glass ceramic cooktop models: The controls work on the
principle of percent on, percent off. For example, when the
control is turned to setting 5, the element will be on only 50% of
the time. Because of the fast heat-up of radiant heat elements,
you will notice, and perhaps even hear, the element switching on
and off.
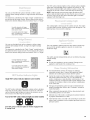
Additional glass ceramic elements (on some models).
Warming Zone Element
Dual
Element
Hot Surface Indicator Lights
Bridge
Element
Press the BROIL button and press the • button so a
temperature between "300°F/149°C '' and "500°F/260°C"
shows on the display.
Press the START button.
Lower temperature settings let the broil heating element cycle
and slow cooking down. The lower the temperature, the
slower the cooking.
NOTE: Fish and chicken are some foods that may cook
better if you use lower broiling temperatures.
USINGYOURCOOKTOP
t _
Food Poisoning Hazard
Do not let food sit for more than one hour before
or after cooking.
Doing so can result in food poisoning or
sickness.
Fire Hazard
Turn off all controls when done cooking.
Failure to do so can result in death or fire.
Control knobs must be pushed in before turning them to a
setting. They can be set anywhere between HI and "0" (OFF).
1L o 0 I
Power on 2
light 3
The controls for the surface elements provide infinite heat
settings. The numbers on the dial serve as a reference. The
control can be turned to any setting to provide the exact heat
required.
Use the warming zone element to keep cooked foods warm. It is
not recommended for heating cold foods.
The warming zone is located in the center of your cooktop. Set
the switch to "ON" for use.
WARMING ZONE
O®O
O O ...........................................................
• Cover all foods with a lid or aluminum foil. Do not use plastic
wrap to cover food because it may melt onto the cooktop
surface. When warming baked goods, allow a small opening
in the cover for moisture to escape.
• Use only cookware and dishes recommended for oven and
cooktop use.
• Use potholders or oven mitts to remove food.
• The warming zone element will not glow red when it is on,
unlike the surface elements, However the surface indicator
light on the cooktop will glow.
• The warming zone element may be used whether the other
elements are in use or not.
The simmer element is identified on the disc in the center of the
element. This element can maintain lower temperatures for
preparation of foods which require very low heat like sauces,
chocolate or cheese.
14

You can use the left front surface element as either a small-
diameter lower-wattage element, or large-diameter full-wattage
element.
The element is controlled by the "Dual/Single" control knob on
the left front of the range console. Push in and turn the control
knob to the desired setting in the area marked "Dual" or "Single".
Use both elements for larger
pans. Controlled by control knob
area marked "Dual".
Use small element for smaller
pans. Controlled by
area marked "Single".
The HOT surface indicator lights on the cooktop surface will glow
when their corresponding surface elements are turned on. The
HOT surface indicator lights will continue to glow as long as the
elements are too hot to touch, even after they are turned off.
NOTE: Heat from the oven vent may cause the left rear HOT
surface indicator light to glow to show that the area is too warm
to touch. There are five hot surface indicator lights on models
equipped with Warming Zone.
{
The cooktop light is in the top of the control console. The switch
is on the control console. Push the switch to turn the light on. The
light may take a few seconds to light up.
You can use the right front surface element as either a large-
diameter full-wattage element, or larger-area higher-wattage
element.
The element is controlled by the "Dual/Single" control knob on
the right front of the range console. Push in and turn the control
knob to the desired setting in the area marked "Dual" or "Single".
The 120v appliance outlets located on the control console may
be used to run portable appliances placed on counter tops
beside the range.
Use both elements for larger
pans. Controlled by control knob
area marked "Dual".
Use small element for smaller
pans. Controlled by
area marked "Single".
Single HOT surface indicator light (on some models)
The HOT surface indicator light on the cooktop surface will glow
when any one of the surface elements are turned on. The HOT
surface indicator light will glow as long as the elements are too
hot to touch, even after they are turned off.
Four or five HOT surface indicator lights (on other models)
The outlets operate independently and are not affected by range
control settings.
NOTE:
• Do not place appliances on the cooktop. Damage to the
appliance could result if the cooktop is hot.
Use flat-bottomed canners on all types of cooktops,
especially ceramic glass. Canners with rippled or ridged
bottoms do not allow good contact with the surface.
Center the canner over the largest surface cooking area. Do
not extend canner more than 1 in. (2.5 cm) outside the
surface cooking area. Large diameter canners/pans, if not
centered correctly, can trap heat and result in damage to the
cooktop. Do not place canner on two surface cooking areas
at the same time.
The type of material the canner is made of determines the
length of heating time. Refer to the "Cookware" section for
more information.
• When canning for long periods of time, allow elements and
surrounding surfaces to cool down.
• Alternate use of the surface cooking areas between batches
or prepare small batches at a time.
• Start with hot water, cover with a lid, and bring to a boil; then
reduce heat to maintain a boil or required pressure levels in a
pressure canner.
Five HOT surface indicator lights (on models equipped with
Warming Zone)
15

Mostwater-bathorpressurecannershavelargediameters.Ifyou
usethemathighheatsettingsforlongperiodsoftime,youcan
shortenthelifeofregularcoilelements.Thiscanalsodamagethe
cooktop.Ifyouplantousethecooktopforcanning,we
recommendtheinstallationofaCanningKit.Orderthekit(Part
No.242905)fromyourdealerordesignatedservicecompany.
Thepanmaterialaffectshowfastheattransfersfromthesurface
cookingareathroughthepanmaterialandhowevenlyheat
spreadsoverthepanbottom.Choosepansthatprovidethebest
cookingresults.
Aluminum
• Heatsquicklyandevenly.
• Useforalltypesofcooking.
• Mediumorheavythicknessisbestformostcooking.
• Usedasacoreorbaseincookwaretoprovideevenheating.
Cast Iron
• Heats slowly and evenly.
• Good for browning and frying,
• Maintains heat for slow cooking,
• Can be coated with porcelain enamel,
Ceramic or ceramic glass
• Heats slowly and unevenly.
• Use for low to medium settings,
• Follow the manufacturer's instructions,
Copper
• Heats very quickly and evenly.
• Used as a core or base in cookware to provide even heating,
Earthenware
• Can be used for cooktop cooking if recommended by the
manufacturer.
• Use on low settings.
Porcelain enamel-on-steel or enamel-on-cast iron
• See cast iron and stainless steel.
Stainless steel
• Heats quickly but unevenly.
• A core or base or aluminum or copper on the cookware
provides even heating.
• Can be coated with porcelain enamel.
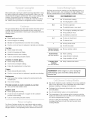
The Power On lights beside the control knobs indicate which
surface elements are turned on by the knobs. A Power On light
will glow when its corresponding surface element is turned on.
Until you get used to the settings, use the following chart as a
guide. For best results, start cooking at the high settings; then
turn the control knob to a lower setting to continue cooking.
SETTING RECOMMENDED USE
HI • To start foods cooking.
• To bring liquids to a boil.
8-6 • To hold a rapid boil.
• To quickly brown or sear meat.
5 • To cook gravy, pudding and sauce.
• To fry poultry or meat.
• To maintain a slow boil.
4-2 • To stew or steam food.
• To simmer food.
1 • To keep foods warm.
• To melt chocolate.
Simmer Element • Precise simmer control.
(on some models)
Dual Element • Home canning.
(on some models) • Large diameter cookware.
• Large quantities of food.
Warming Zone • Keep cooked foods warm.
Element
(on some models)
REMEMBER: When range is in use or during the
Self-Cleaning cycle, the entire cooktop area may
become hot.
Drip bowls should be used at all times. Do not use aluminum
foil to cover drip bowls. Use of aluminum foil could result in
improper cooking, or damage to the element.
Prolonged use of elements without pots can cause damage
and early failure.
Use of round bottom woks is not recommended.
The temperature of the cooktop surface increases with the
number of elements that are on. With 3 or 4 elements turned
on, surface temperatures are high.
See the "Caring For Your Range" section for care and
cleaning instructions for both Coil and Ceramic Glass
Cooktop Models.
16

Select a pan that is about the same size as the surface
cooking area. Cookware should not exceed more than 1 in.
(2.5 cm) outside the area.
For best results and greater energy efficiency, use only flat-
bottomed cookware that makes good contact with the
surface cooking area. Cookware with rounded, warped,
ribbed (such as some porcelain enamelware), or dented
bottoms could cause uneven heating and poor cooking
results.
Cookware designed with slightly indented bottoms or small
expansion channels can be used.
Cookware with a non-stick finish has heating characteristics
of the base material.
Check for rough spots on the bottom of metal or glass cookware
which will scratch the ceramic glass surface (on some models).
Use flat-bottomed cookware for best heat conduction from
the surface cooking area to the cookware. Determine flatness
with the ruler test. Place the edge of a ruler across the bottom
of the cookware. Hold it up to a light. No light should be
visible under the ruler. Rotate the ruler in all directions and
look for any light.
Do not leave empty cookware, or cookware that has boiled
dry, on a hot surface cooking area. The cookware could
overheat, causing damage to the cookware or the surface
cooking area.
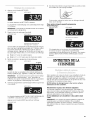
OVENSELF.CLEANING
CYCLE
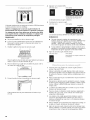
(
E
START
875°F (468°C)
CLEANING CYCLE
OVEN SHUT OFF2c_s__
( normal ]_o_in_ t_e_'at _re_ .....
DOOR UNL
4-= DOOR LOCKS
1 2 3 STOP
Time In Hours
The self-cleaning cycle uses very high heat to burn away soil and
grease. During the cycle, the oven gets much hotter than it does
for normal baking or broiling - approximately 875°F (468°C). This
high heat breaks up the soil or grease and burns it away.
Your oven is preset for a 31/2hour self-cleaning cycle. However,
the cycle time can be adjusted to the amount of soil in your oven.
The graph above is representative of a 3-hour self-cleaning cycle.
Note that the heating stops when the 3-hour setting is up, but it
takes longer for the oven to cool enough to unlock the oven door.
Burn Hazard
Do not touch the oven during the
Self-Cleaning cycle.
Keep children away from oven during
Self-Cleaning cycle.
Do not use commercial oven cleaners in
your oven.
Failure to follow these instructions can result in
burns, or illness from inhaling dangerous fumes.
The self-cleaning cycle operates with the easy-to-use electronic
control. To use this cycle properly, follow the step-by-step
instructions in this section.
IMPORTANT: The health of some birds is extremely sensitive to
the fumes given off during the Self-Cleaning cycle. Exposure to
the fumes may result in death to certain birds. Always move birds
to another closed and well ventilated room.
Before you start the self-cleaning cycle, make sure you:
• Hand-clean the areas shown. They do not get hot enough
during the cleaning cycle for soil to burn away, and could get
baked on during cleaning. Use hot water and detergent or a
soapy steel-wool pad for cleaning.
NOTE: DO NOT clean, move or bend the gasket. Poor
cleaning, baking and roasting may result.
• Wipe out any loose soil or grease. This will help reduce
smoke during the cleaning cycle.
• Remove all items from the storage drawer.
• Remove the broiler pan grid and anything else being stored in
the oven.
Remove the oven racks from the oven if you want them to
remain shiny and easy to slide.
NOTE: If oven racks are cleaned in the self-cleaning cycle,
they will become discolored and more difficult to slide.
If you clean racks in the self-cleaning cycle, place them on
the 2nd, 3rd and 4th rack guides.
17

Remove foil or other liners from the oven. During the self-
cleaning cycle, foil can burn or melt and damage the oven
surface.
DO NOT put broiler pan and grid or drip bowls from coil
element cooktops in oven during self-clean cycle because
damage to the finish can occur.
Check to see that the oven door is closed tightly on all sides.
Do not leave plastic utensils near the oven vent. They may
melt.
Do not block the oven vent during the self-cleaning cycle. Air
must move freely for best cleaning results.
Heat and odors are normal during the self-cleaning cycle.
Keep the kitchen well ventilated by opening a window or by
turning on a vent hood or other kitchen vent during the cycle.
Heating and cooling or porcelain on steel may result in
discolouring, loss of gloss, hairline cracks, and popping
sounds.
• Wipe up food spills containing sugar and/or milk as soon as
possible after the oven cools down. When sugar is heated to
a high temperature in the self-clean cycle, it reacts with the
porcelain causing staining, etching, pitting or faint white
spots.
• Clean the oven before it gets heavily soiled. Cleaning a very
soiled oven takes longer and results in more smoke than
usual.
After the oven is cool, wipe up any residue or ash with a
damp cloth or sponge. If any spots remain, clean with a mild
abrasive cleanser or mildly abrasive pad.
If the self-cleaning cycle does not get the oven as clean as
you expected, the cycle may not have been set long enough
or you may not have prepared the oven properly. Set the self-
cleaning cycle longer the next time and hand-clean areas
noted above.
As soon as you program the oven for the self-cleaning function,
the door will automatically lock. It will remain locked throughout
the entire cycle. The door will automatically unlock when the
temperature has fallen.
1. Press the CLEAN button.
PRESS YOUSEE
The CLEAN indicator light will light up.
The control will automatically set a 31/2hour Self-Cleaning
cycle.
NOTE: There will be a 30 minute cool down 1/2hour before
the cycle is over.
2. Set the cleaning time (optional).
4,
PRESS
!!
YOU SEE
(example for 4_A hour cleaning time)
If you want a Self-Cleaning cycle longer or shorter than 31/2
hours, use the SET TIME buttons to set the cleaning time you
want. Press the up or down button(s) to set a time between
21/2- 41/2hours on the display.
• Use 21/2hours for light soil.
• Use 31/2- 41/2hours for average to heavy soil.
Start the self cleaning cycle.
PRESS YOUSEE
ON • DEPART
I
The oven door will lock and the DOOR LOCKED, ON, and
HEAT indicator lights will light up.
NOTE: If you open the oven door before starting the Self-
Cleaning cycle, "door" will show on the display. Ifyou do not
close the door within 5 minutes the Self-Cleaning cycle will
be canceled.
When the Self-Cleaning cycle ends and the oven has cooled
down.,.
YOU SEE
The CLEAN, DOOR LOCKED, and ON indicator lights will go
out and the door will unlock.
Press the OFF button to clear the display.
PRESS
II
After the oven is cool, wipe off any residue or ash with a
damp cloth or sponge.
If needed, remove spots with a mild abrasive cleanser or
cleaning sponge.
18

Tostop the self-cleaning cycle at any time:
PRESS YOUSEE
After the oven cools:
YOUSEE
If the oven temperature is above normal broiling temperature, the
Self-Cleaning cycle will start a 30 minute cool down. The GLEAN
and DOOR LOCKED indicator lights will stay on.
CARINGFORYOURRANGE
Your range is designed for ease of cleaning. Most cleaning can
be done with soap and water or other mild household cleaners.
Cleaning your range whenever spills or soiling occurs will keep it
looking and operating like new.
DO NOT use commercial oven cleaners on the exterior.
Coil element removal/replacement
The coil elements are self-cleaning. Any spillage will burn off.
However, removal of large pieces of food or excess oil is
recommended to prevent smoking.
DO NOT IMMERSE COIL ELEMENTS IN WATER.
NOTE: Drip bowls reflect heat back to cookware placed on the
coil elements. They also help catch spills. When they are kept
clean, they reflect heat better and look new longer.
Removing a coil element
1. Make sure all coil elements are turned off and cool before
removing coil elements and drip bowls.
2. Lift the edge of the element, opposite the receptacle, just
enough to clear the drip bowl.
3. Pull the element straight away from the receptacle.
4. Lift out the drip bowl.
Replacing a coil element
1. Make sureall coil elements are turned off before replacing
elements and drip bowls.
Line up openings in the drip bowl with the coil element
receptacle.
Hold the element as level as possible with the terminal just
started into the receptacle. Gently push the element terminal
into the receptacle.
4. When terminal is pushed into the receptacle as far as it will
go, push down the edge of the element opposite the
receptacle.
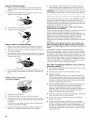
Lift-up cooktop
(on some models)
l i Turn off all surface elements.
21 Make sure the cooktop is cool to touch.
3. Lift front of cooktop at both front corners until the support
rods lock into place.
Be sure both support rods are fully extended and in the
locked position.
4. Wipe with warm, soapy water. Use a soapy steel-wool pad on
heavily soiled areas.
5. To lower the cooktop, lift cooktop from both sides while
pressing the support rods back to unlock them. Lower the
cooktop into place.
NOTE: Do not drop the cooktop. Damage can result to the
porcelain and the cooktop frame.
19

61¸¸! i:iis ,i il 6 :xik i: , i>p
Your range is designed for ease of cleaning. Most cleaning can
be done with soap and water or other mild household cleaners.
Cleaning your range whenever spills or soiling occurs will keep it
looking and operating like new.
DO NOT use commercial oven cleaners on the exterior.
The glass ceramic cooktop is designed for easy care. However,
glass ceramic cooktops need to be maintained differently than
standard electric open-coil elements. Foods spilled directly on
the cooktop will not burn off as on open-coil elements. Because
of this, the surface should be dust-free and soil-free before
heating.
Cooktop Polishing Creme, paper towels or a clean cloth, and
a razor blade scraper is all you need to clean your cooktop.
Your cooktop has been prepolished at the factory for improved
protection and cleanability. For proper cleaning methods, please
review the "Cleaning tips" section. Follow them after each use to
ensure top performance and to preserve the uniquely elegant
look. Cooktop Polishing Creme (Part No. 9780196) and Razor
Scraper (Part No. 3183488) can be purchased through authorized
service centers or major department stores.
To avoid damaging the cooktop, follow these instructions :
• Do not use cooktop cleaner on a hot cooktop.
• To remove spills from hot elements :
Turn OFF the element.
Remove sugary spills with razor scraper while the cooktop is
still warm. You may want to wear oven mitts while doing so.
Clean elements with Cooktop Polishing Creme after it has
cooled down.
Remove heavy or sugary spills IMMEDIATELY from hot
elements following the procedure given above. Sugar spills
and soils (such asjams,jellies and candy syrups) can cause
pitting on the cooktop if not removed while the ceramic
surface is still warm.
Do not allow anything that may melt (such as plastic,
aluminum foil) to come in contact with the surface while it is
hot.
• Do not use the cooktop as a cutting board.
• Do not use steel wool, abrasive powdered cleansers,
abrasive cleaning pads, chlorine bleach, rust remover,
ammonia or glass cleaning products with ammonia. These
could damage the cooktop surface.
• Dropping heavy or hard objects on the cooktop can crack it.
Be careful with heavy skillets. Do not store jars or cans above
the cooktop.
• Lift pots and pans onto and off the cooktop. Sliding metal
pans on the glass ceramic cooktop surface may leave marks.
Remove metal marks from copper or aluminum pans with
Cooktop Polishing Creme before heating the cooktop again.
If heated before cleaning, metal marks may not come off.
• Using a pan with a nicked or scratched bottom may damage
the glass ceramic cooktop.
• Make sure bottoms of pans are clean and dry before using.
Heating a soiled pan may leave a stain on the cooktop.
• Avoid spillovers. Use pans with tall sides.
• Do not cook food directly on glass ceramic cooktop.
• Wipe off the cooktop before and after each use to help to
keep the surface free from stains and give you the most even
heating.
Cleaning tips
What to use :
• Cooktop Polishing Creme with paper towel or clean, damp
cloth. This creme has been developed especially for cleaning
and protecting your cooktop. When using, follow instructions
on container.
Razor blade scraper (single edge razor blade in a holder). Use
to remove cooked-on soils from your ceramic cooktop. Razor
blades will not scratch your cooktop. Store razor blades out
of reach of children.
Steps to follow :
11 Most spills can be wiped off easily using a paper towel or
clean, damp cloth as soon as Hot Surface indicator light(s) go
off.
2. Carefully scrape off any burnt-on food with a razor blade
scraper.
3. Rub Cooktop Polishing Creme into cooked-on soil using a
paper towel. If some soil remains, leave some creme on the
spot(s) and follow Step 2.
4. Finish by polishing entire cooktop with Cooktop Polishing
Creme and a paper towel.
Additional tips :
• Remove dark streaks, specks and discoloration with Cooktop
Polishing Creme after the cooktop has cooled.
• Tiny scratches or abrasions do not affect cooking. In time,
these will become less visible as a result of regular use of
Cooktop Polishing Creme.
The oven door is removable to allow easier cleaning inside the
oven. The door will stand supported by its hinges.
Removing the oven door:
1. Open the door to the Broil Stop position (open about 4 in.
[10 cm]).
2. Lift door slightly and pull out and back until hinges come out
to the catch position.
3. Push door down and pull straight out to remove door
completely.
2O
Page is loading ...
Page is loading ...
Page is loading ...
Page is loading ...
Page is loading ...
Page is loading ...
Page is loading ...
Page is loading ...
Page is loading ...
Page is loading ...
Page is loading ...
Page is loading ...
Page is loading ...
Page is loading ...
Page is loading ...
Page is loading ...
Page is loading ...
Page is loading ...
Page is loading ...
Page is loading ...
Page is loading ...
Page is loading ...
Page is loading ...
Page is loading ...
Page is loading ...
Page is loading ...
Page is loading ...
Page is loading ...
-
 1
1
-
 2
2
-
 3
3
-
 4
4
-
 5
5
-
 6
6
-
 7
7
-
 8
8
-
 9
9
-
 10
10
-
 11
11
-
 12
12
-
 13
13
-
 14
14
-
 15
15
-
 16
16
-
 17
17
-
 18
18
-
 19
19
-
 20
20
-
 21
21
-
 22
22
-
 23
23
-
 24
24
-
 25
25
-
 26
26
-
 27
27
-
 28
28
-
 29
29
-
 30
30
-
 31
31
-
 32
32
-
 33
33
-
 34
34
-
 35
35
-
 36
36
-
 37
37
-
 38
38
-
 39
39
-
 40
40
-
 41
41
-
 42
42
-
 43
43
-
 44
44
-
 45
45
-
 46
46
-
 47
47
-
 48
48


Inglis IJP85801 Owner's manual
- Category
- Cookers
- Type
- Owner's manual
- This manual is also suitable for
Ask a question and I''ll find the answer in the document
Finding information in a document is now easier with AI
in other languages
Related papers
Other documents
-
Whirlpool WGE555S0BB User guide
-
KitchenAid KESC300BAL10 Owner's manual
-
KitchenAid KERI201PBL2 Owner's manual
-
Whirlpool WGE755C0BH User manual
-
-
-
-
KitchenAid KDSS907XSP User manual
-
KitchenAid KDRS483 User manual
-
KitchenAid KERS807SBL03 Owner's manual