Page is loading ...

2
©Copyright LOTRONIC 2016 DJLIGHT65
Unpacking Instructions
Immediately upon receiving a fixture, carefully unpack the carton, check the contents to ensure that all parts are
present and have been received in good condition. Notify the freight company immediately and retain packing
material for inspection if any parts appear to be damaged from shipping or the carton itself shows signs of
mishandling. Keep the carton and all packing materials. In the event that a fixture must be returned to the
factory, it is important that the fixture be returned in the original factory box and packing.
Safety Instructions
Please read these instructions carefully, they include important information about the installation, usage and
maintenance of this product.
• Please keep this User Guide for future reference. If you sell the unit to another user, be sure that he also
receives this instruction booklet.
• Always make sure that you are connecting to the proper voltage, and that the line voltage you are connecting
to is not higher than that stated on the decal or rear panel of the fixture.
• This product is intended for indoor use only!
• To prevent risk of fire or shock, do not expose fixture to rain or moisture. Make sure there are no flammable
materials close to the unit while operating.
• The unit must be installed in a location with adequate ventilation, at least 1m from adjacent surfaces. Be sure
that no ventilation slots are blocked.
• Always disconnect from power source before servicing or replacing fuse and be sure to replace with same fuse
size and type.
• Maximum ambient temperature (Ta) is 104° F (40°C). Do not operate the fixture at temperatures higher than
this.
• In the event of a serious operating problem, stop using the unit immediately. Never try to repair the unit by
yourself. Repairs carried out by unskilled people can lead to damage or malfunction. Please contact the nearest
authorized technical assistance center. Always use the same type of spare parts.
• Make sure the power cord is never crimped or damaged.
• Never disconnect the power cord by pulling or tugging on the cord.
• Avoid direct eye exposure to the light source while it is on.
• DISCONNECT DEVICE: Where the MAINS plug or an appliance coupler is used as the disconnect device, the
disconnect device shall remain readily operable.
• The light source contained in this luminaire shall only be replaced by the manufacturer or his service agent or a
similar qualified person.
GB

3
©Copyright LOTRONIC 2016 DJLIGHT65
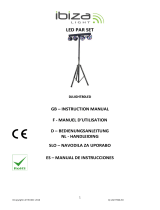
Specifications
Power supply ....................................................................................... AC 220-240, 50/60Hz
Consumption ................................................................................................................. 60W
PAR cans ............................................................................................ 12 x 1W RGBW LED x 2
Laser ........................................................................................... Red: 100mW; green 30mW
Laser class ............................................................................................................................ 3
Height ................................................................................................................. 1.80m max.
Weight........................................................................................................................... 6.7kg
Installation of the units
Before positioning the light stand, ensure the stability of the installation site. Drive the screw into the screw hole
on the stand. Make sure that the units can’t fall from the stand. The manufacturer cannot be held responsible
for damages due to bad installation of the units.
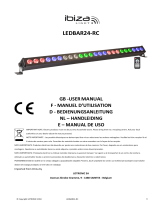
Connections
1. Power supply input: Attach the IEC mains cable here. Built-in fuse
2. DMX input: 3-pin XLR connector for DMX512 signal input
3. DMX output: 3-pin XLR connector for DMX512 signal output
4. LED display: Display of the functions and menu buttons to control the operating mode
5. MENU buttons: See below for operation
6. Mic: Built-in microphone for sound controlled operation
7. PAR can mounts: Attach the PAR cans to the controller bar at the 2 points shown
8. PAR & Laser connections: Connect the PAR & laser at the 2 points shown
9. Light stand socket: Tighten the screw to secure the controller bar to the light stand
10. Laser mounts: Fasten the Laser units to the controller bar at the 2 points shown.
MENU BUTTONS
You can set the operating mode of the unit via the 4 function buttons on the controller bar. Press the MENU
button to display the different functions (see table below for a detailed description of the functions). Use the UP
and DOWN arrow buttons to make your selection. Once you have chosen your desired function, press the ENTER
button to confirm the change.
Button Specifications:
Auto
↔
AutP: PAR auto operation
↔
AP01-AP13: PAR light
effect
↔
S01-S32: PAR light
speed
AutF: Laser auto
operation
↔
AF01-AF07: Laser
effects
↔
S01-S32: Laser effect
speed
↔
N00-N09: Motor
speed
AutN: Light set auto
operation
↔
AN01-An10: Light
effects
↔
S01-S32: Light set
speed
↔
N00-N09: Motor
speed
Sou
↔
SouP: PAR sound
activated
↔
SP01-SP13: PAR light effect
SouF: Laser Sound
activated
↔
SF01-SF07: Laser light effect
SouN: Light set sound
activated
↔
SN01-SN10: Light set sound
activated

4
©Copyright LOTRONIC 2016 DJLIGHT65
COL
↔
COLO
↔
R 0-255
Red
G 0-255
Green
B 0-255
Blue
W 0-255
White
S00-32
Strobe
N01-32
Motor
speed
DMX
↔
D001/d512
↔
3CH
Channels
7CH
Channels
11CH
Channels
SLA
↔
SLAN
SYS
↔
ASEN
↔
SN01-SN04 Sound-activated sensitivity
Operation
DMX address code setting: Press “MENU” button. When the digital LED displays d001-d512, press “UP” or
“Down” to set the address code. The code ranges from 001-512.
When controlling the unit(s) with a DMX controller, each unit must be set to a specific DMX address. You can set
either all units to the same DMX address or you can set every unit to a different DMX address. If all units are set
to the same DMX address, they are all synchronized and operate the same way.
If every unit has its own DMX address, they will receive the DMX signal that is specific to their address and you
can control every unit separately. The DMX address is determined by the number of channels. The units can
work either in 3-channel, 7-channel or 11-channel mode. If you set the starting address to 1, the second unit
must be set either to 4 (1+3 in 3-CH mode) or to 8 (1-7 in 7-CH mode) or to 12 (1+11 in 11-CH mode), etc.
Connection of Signal Cable
You can use the 3-pin XLR cable to connect the OUT socket of the first light and the IN socket of the following
light. Connect all the lights as below:
A DMX signal terminator is recommended on the last unit of the chain. DMX terminator is a XLR connector with
a 120Ω resistor between the pin 2 and pin 3 of the XLR connector

5
©Copyright LOTRONIC 2016 DJLIGHT65
Remote Control:
ON/OFF
DMX Mode
LASER: LASER ON/OFF
AUTO MIX: Auto Mode with PAR-LASER Effects
SOUND MIX: Sound Mode with PAR-LASER Effects
R: Red Laser ON
LED / Auto Mode: Par Effects
LED / Sound Mode: Par Effects
G: Green Laser ON
LASER : Laser Auto Mode
LASER: Laser Sound Mode
RG:RG Laser ON
COLOR -/+ : Color & Speed slow /fast
LASER MOTOR: Motor slow/fast
SEN -/+: Sensitivity -/+
3-CHANNEL OPERATION:
CH1
0-9
Black out
10-49
AFXX
50-89
ALXX
90-129
ANXX
130-169
SPXX
170-209
SFXX
210-255
SNXX
CH2 APXX-SNXX
0-19
AP-01
20-39
AP-02
40-59
AP-02
60-79
AP-04
80-99
AP-05
100-119
AP-06
120-139
AP-07
140-159
AP-08
160-179
AP-09
180-255
AP-10
CH3
Changing speed
0-255

6
©Copyright LOTRONIC 2016 DJLIGHT65
7-CHANNEL OPERATION
CH1
0-255
R
CH2
0-255
G
CH3
0-255
B
CH4
0-255
W
CH5
0-255
Strobe
CH6
0-255
Motor
CH7
0-9
NO
10-99
R
100-199
G
200-255
R+G
11-CHANNEL OPERATION
CH1
0-255
R
Laser
CH2
0-255
G
CH3
0-255
Motor
CH4
0-255
R
PAR
CH5
0-255
G
CH6
0-255
B
CH7
0-255
W
CH8
0-255
R
Laser
CH9
0-255
G
CH10
0-255
Motor
CH11
0-255
Strobe
Fixture Cleaning
The cleaning of internal and external optical lenses and/or mirrors must be carried out periodically to optimize
light output. Cleaning frequency depends on the environment in which the fixture operates: damp, smoky or
particularly dirty surrounding can cause greater accumulation of dirt on the unit’s optics.
• Clean with soft cloth using normal glass cleaning fluid.
• Always dry the parts carefully.
• Clean the external optics at least every 20 days. Clean the internal optics at least every 30/60 days.
This marking indicates that this product should not be disposed with other household wastes throughout
the EU. To prevent possible harm to the environment or human health from uncontrolled waste disposal,
recycle it responsibly to promote the sustainable reuse of material resources. To return your used device,
please use the return and collection systems or contact the retailer where the product was purchased. They can
take this product for environmental safe recycling.

20
©Copyright LOTRONIC 2016 DJLIGHT65
3-KANAALS MODUS:
CH1
0-9
Black out
10-49
AFXX
50-89
ALXX
90-129
ANXX
130-169
SPXX
170-209
SFXX
210-255
SNXX
CH2 APXX-SNXX
0-19
AP-01
20-39
AP-02
40-59
AP-02
60-79
AP-04
80-99
AP-05
100-119
AP-06
120-139
AP-07
140-159
AP-08
160-179
AP-09
180-255
AP-10
CH3
Snelheidswissel
0-255
7-KANAALS MODUS
CH1
0-255
R
CH2
0-255
G
CH3
0-255
B
CH4
0-255
W
CH5
0-255
Stroboscoop
CH6
0-255
Motor
CH7
0-9
NO
10-99
R
100-199
G
200-255
R+G
11-KANAALS MODUS
CH1
0-255
R
Laser
CH2
0-255
G
CH3
0-255
Motor
CH4
0-255
R
PAR
CH5
0-255
G
CH6
0-255
B
CH7
0-255
W
CH8
0-255
R
Laser
CH9
0-255
G
CH10
0-255
Motor
CH11
0-255
Stroboscoop

25
©Copyright LOTRONIC 2016 DJLIGHT65
3-KANALNO DELOVANJE:
CH1
0-9
Black out
10-49
AFXX
50-89
ALXX
90-129
ANXX
130-169
SPXX
170-209
SFXX
210-255
SNXX
CH2 APXX-SNXX
0-19
AP-01
20-39
AP-02
40-59
AP-02
60-79
AP-04
80-99
AP-05
100-119
AP-06
120-139
AP-07
140-159
AP-08
160-179
AP-09
180-255
AP-10
CH3
Spreminjanje hitrosti
0-255
7-KANALNO DELOVANJE
CH1
0-255
R
CH2
0-255
G
CH3
0-255
B
CH4
0-255
W
CH5
0-255
Strobe
CH6
0-255
Motor
CH7
0-9
NO
10-99
R
100-199
G
200-255
R+G

40
©Copyright LOTRONIC 2016 DJLIGHT65
Telecomanda:
PORNIT/OPRIT
Mod DMX
LASER: LASER PORNIT/OPRIT
AUTO MIX: Mod Auto cu efect PAR-LASER
SOUND MIX: Mod Sunet cu effect PAR-LASER
R: Laser rosu Pornit
LED / Auto Mode: Efect Par
LED / Sound Mode: Efect Par
G: Laser verde Pornit
LASER : Auto mod laser
LASER: Mod sunet laser
RG: Pornire laser RG
COLOR -/+ : Culoare & Viteza redus/rapid
LASER MOTOR: Motor redus /rapida
SEN -/+: Sensibilitate -/+
3-FUNCTIONARE CANALE:
CH1
0-9
Black out
10-49
AFXX
50-89
ALXX
90-129
ANXX
130-169
SPXX
170-209
SFXX
210-255
SNXX
CH2 APXX-SNXX
0-19
AP-01
20-39
AP-02
40-59
AP-02
60-79
AP-04
80-99
AP-05
100-119
AP-06
120-139
AP-07
140-159
AP-08
160-179
AP-09
180-255
AP-10
CH3
Schimbare viteza
0-255

GB
LASER FOR PROFESSIONAL USE ONLY
This laser complies with the international standards CEI60825/EN60825. It is meant exclusively for professional use.
Its installation and use should only be carried out by a skilled technician who is aware of the specific dangers of lasers.
REMINDER OF SAFETY INSTRUCTIONS
Lasers of class 3 and 4 are for outdoor use only.
Inside the public area, any laser shooting towards the audience is strictly forbidden except if a safety area of 5 m radius is
marked around the area to which the audience cannot get access.
The area called “public area” is defined by the space of 3m above the area occupied by the audience and a width of 2.5m around
this area. The public area must be clearly identified by signs on the ground.
Inside the public area only a scanning movement is allowed within the terms and conditions defined by the international
technical laser safety report.
The laser unit must be installed out of reach of the audience and at a minimum of 3m above the ground where the audience is
present or protected by a safety perimeter of 5m radius.
The laser unit must be installed in such a way that it can’t be moved under the effect of disruptions such as crowd movements,
vibrations or gusts of wind.
Installation and settings must comply with the regulations defined in the international laser safety report CEI / TR 60825-3
(March 2008).
F
LASER A USAGE EXCLUSIVEMENT PROFESSIONNEL
Ce laser est conforme aux normes CEI60825/EN60825, il est à usage exclusivement professionnel,
Son installation et utilisation doit être effectué exclusivement par un technicien compétent et formé
aux risques spécifiques des lasers.
RAPPEL DES PRECAUTIONS DE SECURITE
Les appareils à lasers de classe 3 et 4, sont utilisables exclusivement en plein air
A l'intérieur de la zone réservée au public, aucun " tir laser " n'est admis en direction du public, quelle que soit la classe du laser,
sauf si un périmètre d'exclusion du public de 5 mètres de rayon, matérialisé, est mis en place.
La zone dite " zone réservée au public " est définie par l'espace situé jusqu'à 3 mètres au-dessus de la surface occupée par le
public et sur une bande de 2, 5 mètres autour de cette dernière. La zone réservée au public est matérialisée au sol.
Dans la zone réservée au public, seul est admis un rayonnement par balayage effectué dans les conditions fixées par le rapport
technique international sur la sécurité des appareils à laser
L'appareil à laser est hors de portée du public et au minimum à 3 mètres au-dessus du sol accessible au public ou protégé par un
périmètre de sécurité de 5 mètres de rayon.
L'appareil laser doit être fixé/posé de telle manière qu'il ne puisse pas être déplacé sous l'effet de perturbations telles que des
mouvements de foule, des vibrations ou des rafales de vent.
L'installation et les réglages respectent les dispositions fixées par le rapport technique international sur la sécurité des appareils
à laser CEI / TR 60825-3 (mars 2008).
D
LASER FÜR AUSSCHLIESSLICH GEWERBLICHEN GEBRAUCH
Dieser Laser entspricht den Normen CEI60825/EN60825. Er ist ausschließlich für gewerblichen Einsatz erlaubt.
Die Installation und Bedienung dürfen nur von einem erfahrenen Techniker vorgenommen werden, der für die spezifischen
Gefahren von Laserstrahlen ausgebildet ist.
ERINNERUNG AN DIE SICHERHEITSVORSCHRIFTEN
Laser der Klassen 3 und 4 dürfen nur im Freien eingesetzt werden.
Innerhalb des öffentlichen Bereichs darf kein Laserstrahl in Richtung des Publikums abgegeben werden, egal um welche
Laserklasse es sich handelt, es sei denn, es wurde ein auf dem Boden klar abgegrenzter und vom Publikum unzugänglicher
Sicherheitsbereich von 5m eingerichtet.
Der sogenannte “öffentliche Bereich“ betrifft den Bereich von 3m über dem vom Publikum eingenommenen Bereich und eine
Breite von 2,5m um diesen Bereich herum. Der öffentliche Bereich muss klar auf dem Boden gekennzeichnet sein.
In diesem öffentlichen Bereich ist nur ein Scannen unter Einhaltung der im internationalen technischen Bericht über die
Sicherheit von Lasern festgelegten Bedingungen zugelassen.
/