BLU-BD2000

IMPORTANT SAFETY INSTRUCTIONS AND PRECAUTIONS ............1
MEDIA COMPATIBILITY..............................................
3
INCOMPATIBLE MEDIA..............................................
4
Panel Description...................................................8
Remote Control Description......................................... 9
Device Connection Description...................................... 10
Setup – customizing setting in the main menu........................ 12
System
.............................................................................12
Language............................................................................13
Play back.............................................................................13
Security..............................................................................15
TV...................................................................................16
Video processing......................................................................18
Audio output..........................................................................18
Speaker setup........................................................................20
Post processing.......................................................................20
Software version......................................................................20
Playing – Advanced Playing Operation............................... 21
Using screen control menu.............................................................21
Using OSD menu..................................................................... 22
Media Player – Special operation of data discs and USB playing........23
Troubleshooting A.................................................. 25
Technical Specifications............................................ 29
INEDX
PLAYER & DISC CARE..............................................
Using Remote & Battery.............................................
6
7
CONTACT INFORMATION............................................31
Troubleshooting B..................................................
27

1
IMPORTANT SAFETY INSTRUCTIONS AND PRECAUTIONS
IMPORTANT SAFETY INSTRUCTIONS AND PRECAUTIONS
•Please read the instructions carefully before using this product
•Observe all warnings and cautions when using this product.
•Retain all manuals and documentation for future referral.
•Only use this product in the manner described in this manual.
•Do not use this device in extremely hot, cold, humid, dusty or sandy environments.
•Do not use this device in electrical storms or other conditions if the likely hood of lightning is possible.
•Do not attempt to clean this product using liquid cleaners or aerosol cleaners. Use only a damp soft cloth
to clean the surface of this device.
•This device may become hot during use. Do not cover vent holes and place in a well ventilated area.
•This device is not waterproof. Do not use this device in the open if there is a high level of moisture in the
air.
•Only place the device on a stable surface and ensure that cables attached to the device can not cause
the device to fall.
•There are no serviceable parts in this device. Attempts to open this device by unauthorised personnel
may cause further damage and void the warranty.
•Images of the product and accessories are indicative only and may vary slightly from actual the product.
•We reserve the right to make changes to this document and the product without notification.
The lightning flash with arrowhead symbol, within an
equilateral triangle, is intended to alert the user to the
presence of uninsulated “dangerous voltage” within
the product's enclosure that may be of sufficient
magnitude to constitute a risk of electric shock to
persons
The exclamation point within an equilateral triangle is
intended to alert the user to the presence of important
operation and maintenance (servicing) instruction in
the literature accompanying the appliance
THIS PRODUCT UTILIZES A LASER. USE OF
CONTROLS OR ADJUSTMENTS OR
PERFORMANCE OF PROCEDURES OTHER THAN
THOSE SPECIFIED HEREIN MAY RESULT IN
HAZARDOUS RADIATION EXPOSURE.
DO NOT OPEN COVERS AND DO NOT REPAIR
YOURSELF.
REFER SERVICING TO QUALIFIED PERSONNEL.
TRADEMARKS
•DVD Logo is a trademark of DVD Format/Logo Licensing Corp., registered in the U.S., Japan and other
countries.
•“AVCHD” and the “AVCHD” logo are trademarks of Panasonic Corporation and Sony Corporation.
•Designed for Windows Media, Microsoft, HDCD, and the HDCD logo are trademarks or registered
trademarks of Microsoft Corporation in the United States and/or other countries.
•DTS is a registered trademark and the DTS logos, Symbol, DTS-HD and DTS-HD Master Audio
| Essential are trademarks of DTS, Inc. © 1996-2008 DTS, Inc. All Rights Reserved.

2
IMPORTANT SAFETY INSTRUCTIONS AND PRECAUTIONS
•Manufactured under license from Dolby Laboratories. “Dolby” and the double-D symbol are trademarks
of Dolby Laboratories.
•HDMI, the HDMI logo and High-Definition Multimedia Interface are trademarks or registered trademarks
of HDMI Licensing LLC.
•All other trademarks are the properties of their respective owners.

3
MEDIA COMPATIBILITY
Media Type Compatibility Limitations
Blu-Ray Disk Supports high bit rate audio (Dolby Digital Plus,
Dolby TrueHD, DTS-HD High Resolution Audio
and DTS-HD Master Audio) adopted in BD-Video.
DVD
Media Type Compatibility Limitations
DVD DVD-ROM, DVD+R
(SL/DL), DVD-R
(SL/DL), DVD-RW
(SL/DL).
DVD Video or files compatible with the
BLU-BD2000 only.
Recordable DVD media must be finalised by a
recorder before playback on the BLU-BD2000.
CD
Media Type Compatibility Limitations
CD CD-Audio, CD-R.
CD-RW
Recordable CD media must be finalised by a
recorder before playback on the BLU-BD2000.
USB
Media Type Compatibility Limitations
USB Flash Drives Formatted in FAT or FAT32 only up to 16GB
USB hard drives connect to the BLU-DB1000 should be powered by another source as well as the USB
port. A secondary power source may be required for some Notebook style USB hard drives.
Blu-ray
BD-ROM (SL/DL)
MEDIA COMPATIBILITY
Since the Blu-ray Disc specifications are new and evolving, some discs may not play properly depending
on the disc type, version and encoding. It is possible that a Blu-ray disc manufactured after the player was
manufactured uses certain new features of the Blu-ray Disc specifications. To ensure the best possible
viewing experience, the player may need a firmware or software update from time to time.

4
INCOMPATIBLE MEDIA
INCOMPATIBLE MEDIA
The following media may not be playable or produce erratic or substandard playback.
•DVD-RAM
•Super Audio CD
•Photo CD
•DVD- Audio
•WMA discs
•DivX discs
•BDs With cartridge
•DVDs with cartridge
•HD DVD
•Data files on CD-Extra discs
•CD Audio with DRM
•Non-finalised media
•BD-Video discs recorded at a rate of 50 fields (frames) per second.
NOTE: It may not be possible to play the above media in some cases due to the type of media, the
condition of the recording, the recording method and how the files were created.
The producers of the disc can control how discs are played, so you may not always be able to control
play as described in this Owner’s Manual. Read the disc’s instructions carefully.
REGION INFORMATION
Blu-ray
This player is designed and manufactured to respond to the region
management information.
If the region number of a BD-Video or DVD disc does not correspond
to the current region number of this player, the player cannot play the
disc.
The BLU-BD2000 is preset to play discs meant for region B
WHATS IN THE BOX
•BLU-BD1000 Blu-ray disc player
•Remote control
•2 x AAA Batteries
•Composite (RCA) Video/Audio cable
•User Manual (This Document)
Region Code Region Country
North America, Central America, South America, Korea, Japan, Taiwan, Hong Kong, South
East Asia
Europe, Greenland, French territories, Middle East, Africa, Australia, and New Zealand
India, China, Russia, Central Asia, and South Asia

5
INCOMPATIBLE MEDIA
DVD
This player is designed to play DVDs from all regions.
Note: Please refer to the GETTING THE BEST FROM THE PLAYER section later in this manual
for information on changing BD & DVD Region Codes.

6
PLAYER & DISC CARE
PLAYER & DISC CARE
Cleaning the BLU-BD2000 Player
Always turn the player off and unplug the power cord before cleaning.
Never use alcohol, paint thinner or benzene to clean this unit.
Before using chemically treated cloth, carefully read the instructions that came with the cloth.
Please use a damp soft cloth. Wring out any excess liquid and gently wipe the external case of the player.
Let the player dry before using again.
Lens Cleaning
Use a commercially available CD/DVD/BD lens cleaner (not supplied) to periodically clean the lens in this
player. Please read the instructions supplied with the lens cleaner carefully before use.
Handling Discs
•Handle discs by the edges to avoid inadvertent scratches or fingerprints on the
disc.
•Do not attach labels or stickers to discs.
•Do not use record cleaning sprays, benzene, thinner, static electricity prevention
liquids or any other solvent.
•Do not use the following discs
•Discs with exposed adhesive from removed stickers or
•Labels (rented discs etc) that are lifting or torn.
•Discs that are warped or cracked.
•Irregularly shaped discs, such as heart shapes.
Cleaning Discs
Wipe discs with a soft damp cloth and allow to dry before placing disc in the players tray.
Never use alcohol, paint thinner or benzene to clean discs.
DO Don’t

7
Using Remote & Battery
Installing the battery
1.Open the battery cover.
2.Insert the battery (R03, AAA).
Align the +/- polarity of the battery to the
sign in the slot.
3.Put on the battery cover.
OPEN
CLO
SE
Using remote control
Aim the remote control at the receiver on the panel
and then operate.
About 7m

8
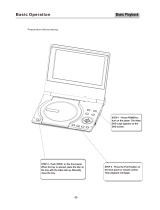
Panel Description
5.Play/Pause
6.Stop
7.ON/Standby
Turn on the player or set to standby mode.
1 2 3
4 5 6 7
1.Disc tray
2.Eject/Insert
3.USB interface
Connect USB device to this interface.
4.Remote receiver
1 2
3 4 5
Parts and operation guide
Front panel
Rear panel
1.Composite video output
2.Audio output (L)
3.HDMI output
4.Digital audio output (coaxial)
5.Audio output (R)

9
Remote Control Description
Remote control
While playing, press the following buttons to operate.
1. Power: turn on/off the player.
2. Screen control: access more options while playing.
3. Subtitle: select subtitle language.
4. Mute: mute or cancel mute.
5. Language: select audio language or channel.
6. Clear: clear error.
7. OK: confirm.
8. Setup: display setup menu.
9. 0~9: select and enter numbers.
10. Play/Pause: press once to pause, and press it again to resume
normal playing.
11. Stop: stop playing.
12. Fast rewind: fast rewind by 1×, 2×, 3×, 4×, 5×
Fast forward: fast forward by 1×, 2×, 3×, 4×, 5×
13. Program/red button: program playing desired tracks.
14. Bookmark/green button: mark the disc being played; press it to
set bookmark, or press and hold it to pop up the bookmark list.
15. Eject/Insert: eject/insert the disc tray.
16. OSD: display the information while playing.
17. Menu: access the main menu of the video disc.
18. Popup menu: enter or exit disc menu.
19. Media center: access media center.
20. Repeat: repeat playing title, chapter, track or disc.
21. Direction: direction keys.
22. Return: return to previous menu.
23. A-B: while playing, press it once to select the starting point, press
it again to select the ending point and repeat playing the
selected segment.
24. Search: select the search time, chapter, etc. Method: press the
Search button to enter the interface, press the Left/Right
key to select time or chapter and press OK to enter
desired node; press the Up/Down key to enter numbers
directly and press OK to confirm and go to search node.
25. VOL+: turn up the volume.
VOL-: turn down the volume.
26. Prev.: go to previous chapter/track, or chapter start of DVD
Next: go to next chapter/track.
27. Zoom/Blue button: has the function of blue button.
zooming image.
28. A-B/yellow button: has the function of yellow button.
press it once to select the starting point, press
it again to select the ending point and repeat
playing the selected segment.
1
2
3
4
5
6
7
8
9
10
11
12
13
14
15
16
17
18
19
20
21
22
23
24
25
26
27
28

10
Device Connection Description
R L
Audio connection cable
Audio input
Connecting two-channel analog input amplifier
Video and composite ouput
TV
Audio/video
connection cable
Audio/video input
VIDEO R L

11
Device Connection Description
Coaxial connection
HDMI connection
Coaxial cable
Coaxial
HDMI IN
HDMI OUT
HDMI connection
TV

12
Setup – customizing setting in the main menu
Specific setting method and description
Menu Submenu Item Setting and description
ON
Enable screen saver. If there is no operation in
five minutes while playing, the screen saver will
be activated automatically, and enters standby
mode if there is no operation in ten minutes.
OFF
Disable this function
ON
Enable auto-play. When a disc is inserted, the
player will read and play automatically.
OFF
Disc
The upgrade program is saved in the disc. When
the auto-upgrade function is set to “OFF”, you
need to select the upgrade option manually after
inserting the disc.
USB
The upgrade program is saved in USB disk.
General System
Screen saver
(prevent screen aging)
Disc Auto playback
CEC
Disc auto-upgrade
Upgrade
(software update)
Load Default
(restore default settings)
Select this option and press [Enter], and the
following dialog box appears:
Press or to select [Enter], and press it to restore
all the settings to default, or select [Cancel] to exit
the dialog box.
Load Default
Do you want to load default
OK Cancel
ON
When this function is enabled, the player is in
standby, and the device connected through HDMI
is also in standby.
OFF
This function is disabled.
ON
Enable: upgrade automatically after disc is
inserted.
OFF
This function is disabled

13
Setup – customizing setting in the main menu
Specific setting method and description
Menu Submenu Item Setting and description
English, Chinese
English, French, Chinese, Spanish……more
ON
Enable PIP function.
General System
Language
Play
back
OSD
(set OSD language)
Menu
(set menu language)
Audio
(set audio language)
Subtitle
(set subtitle language)
PIP Mark
Network
Connect the network cable to the NIC interface
and make sure that the network connection is
normal.
Upgrade
(software update)
Select this function and press [OK], to show “Easy
Setup Wizard” on the screen. Please follow the
prompt to operate.
BUDA info (release the storage space of BUDA
info)
When playing BD-J or BD-LIVE disc, if the
storage space is insufficient, please select
[Format] and press [OK] to clear the BUDA info in
the USB disk to release the space and the USB
Easy setup
(initial setup)
BUDA
(for BD-J disc playing)
disk can be used to save BD-J data.
BUDA setup (setting the storage media of
BUDA info)
USB: USB disk is used as storage media, and
USB disk is required (please note that HDD can’t
be used as the storage media of BUDA info: the
USB disk for BUDA info must be in FAT 32 format)
Closed Caption
ON
When this function is enabled, closed caption is
off automatically.
OFF
English, French, Chinese, Spanish……more,
OFF
If the desired language isn’t in the list, select
“More” to get more options.
Select “OFF” if subtitle isn’t required.

14
Setup – customizing setting in the main menu
Specific setting method and description
Menu Submenu Item Setting and description
OFF
Disable this function.
ON
Enable secondary audio.
The secondary audio function of certain BD discs
allows playing the primary and secondary audio
simultaneously. When the sign of secondary
audio is enabled, the player will automatically
check whether the disc contains secondary audio
and notify the user by showing this sign.
OFF
Disable this function.
Select this function to memorize the playing of
disc.
(The realizing of this function depends on disc.
Certain discs may be incompatible.)
ON
Enable memory playing. When this function is
enabled, the player can memorize the playing
progress of six discs. When the discs are inserted
next time, a dialog box will pop up and ask you
whether press [Return] to play from the start of
the disc, or press [OK] to resume playing from the
point stopped last time, and the memorized points
will be cleared automatically after power off.
OFF
Disable this function.
Open/Close PBC playback
General Play
back
PIP Mark
Secondary audio mark
Last Memory
Secondary
screen
Primary screen
The PIP function of certain BD discs allows the
player plays primary screen and secondary screen
simultaneously. Generally, the primary video is
displayed in full screen, and the secondary video
is displayed in window. When the PIP is enabled,
the player will recognize whether the disc contains
secondary video and notifying the user by showing
this sign.
PBC

15
Setup – customizing setting in the main menu
Specific setting method and description
Menu Submenu Item Setting and description
General
Change password
Parental Control
(allow selecting playing
content according to
disc rating and filtering
the content improper for
children)
Security
Change password
Please enter current password
Change password
New password
Press [0]-[9] to enter current password, and the
following dialog box appears if the password is
valid:
Press [0]-[9] to enter a new password (twice)
and then exit above dialog box automatically.
The initial password is 0000.
Select this function and press [OK], the screen
shows the dialog box below and asks you to enter
the password. Refer to previous page for
password setting.
Press [0]-[9] to enter current password, and the
following dialog box appears if the password is
valid:
Use [ ]/[ ] to select the rating (see the Table
below for description), and press [OK] to exit the
dialog box.
Child lock
Enter password:
<
•
Select rating: OFF
Children safe
G
Child lock
Select this function and press [OK] and the screen
shows the dialog box below:

16
Setup – customizing setting in the main menu
Specific setting method and description
Menu Submenu Item Setting and description
Motion Picture Association of America Film
Rating
Select this function and press [OK], the screen
shows the dialog box below and asks you to enter
the password 0000, the setting of which is
described in previous page.
Press [0]-[9] to enter current password, and the
following dialog box appears if the password is
valid:
Use [ ]/[ ] to select the country, and press [OK]
to exit the dialog box.
A
B
C
General
Country Code
(select country code,
and make sure that the
user only can watch the
content allowed in local
region)
BD Region Code
Security
Rating
Description
Children
safe
Suitable for children
G
Suitable for all ages
PG
Watch under parent guide
PG-13
Children younger than 13 watch under
parente guid
PGR
Parent guide is required
R
Watch under parent guide if younger than 17
NC-17
Prohibit watching if younger than 17
Adult
For adults only
Parental Control
(allow selecting playing
content according to
disc rating and filtering
the content improper for
children)
Country & region
Enter the password
•
<
<
Country & region
Select country: UK.
U.S.
U.S. Minor Outlying Islands
Display
TV Screen
(set the aspect ratio
matching the connected
TV set)
When connected to 16:9 TV, select:
16:9 full screen
In this mode, if the aspect ratio of the disc is 4:3,
the output signal of the player will be stretched to
16:9 full screen.
16:9 normal
In this mode, if the aspect ratio of the disc is 4:3,
TV

17
Setup – customizing setting in the main menu
Specific setting method and description
Menu Submenu Item Setting and description
Display
TV Screen
(set the aspect ratio
matching the connected
TV set)
Resolution
(set the video output
resolution)
TV system
Internet
Interface
TV
the horizontal direction of the output signal will
remain unchanged, and the vertical direction will
be compressed to 9/16 of the horizontal width.
When connected to 4:3 TV, select:
4:3 panoramic
The left side and right side of 16:9 image will be
cut to fit the 4:3 screen, the image quality remains
unchanged, but the left and right edges are cut off.
4:3 letterbox
The top and bottom of 16:9 image are black to fit
the 4:3 screen, but the image quality reduces
because the scanning lines are reduced.
Set the resolution of display device. Number 480
and 720 indicate the resolution lines of video
output, I (interlaced) or P (progressive) indicate
the scanning mode of video output.
Auto
The player checks and selects optimized
resolution automatically.
480P/576P
480i/576i
720P
1080I
1080P
After the resolution is adjusted, above dialog box
pops up; if you are satisfied with the adjusted
resolution, select [OK], or else select [Cancel]; if
you don’t select in 12s, the player resumes
original setting.
According to the selected video output terminal,
the appropriate resolution is also different; please
set according to video output instructions.
Set the system of output TV signal
NTSC
PAL
AUTO
分辨率设值
Restore 12 S OK Cancel
Resolution setting
The resolution has been changed. Save?

18
Setup – customizing setting in the main menu
Specific setting method and description
Menu Submenu Item Setting and description
Display
TV
Set color space
RGB
YcbCr
YcbCr422
Full RGB
Set HDMI color depth to 30-bit, 36-bit, 48-bit or
OFF.
30-bit
36-bit
48-bit
OFF
Enable/disable the output of HDMI 1080P 24HZ.
ON
OFF
Color space
HDMI Deep color
HDMI 1080P 24HZ
Video
processing
Video adjust
Press to adjust the brightness, contrast,
tune and saturation of output image.
Brightness
Contrast
Tune
Saturation
Change Return Exit
Audio
Audio
output
Bit stream:
When “Bit stream” is selected, the digital audio
signal will output in the format of original stream.
Select when connected device can decode.
PCM:
Select “PCM” when the connected device can’t
decode. When this option is selected, output
pulse code modulation (PCM) digital signal.
Spdif
(select the digital audio
signal format from the
digital audio output
terminal)
Sharpness
High
middle
Low
Motion
video
process
• Standard
• vivid
• smooth
Video mode
Page is loading ...
Page is loading ...
Page is loading ...
Page is loading ...
Page is loading ...
Page is loading ...
Page is loading ...
Page is loading ...
Page is loading ...
Page is loading ...
Page is loading ...
Page is loading ...
Page is loading ...
/