Page is loading ...

1 Locate the Main Base (A) and the four Casters (K.) On a solid surface, lay the Base
so the short legs are pointing up. Insert the Casters into the legs and with sufficient
pressure push the casters until they lock in place.
Assembly Instructions
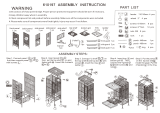
Parts Identification
Unwrap and remove all parts from each box. Keep the box(es) and packing material until the cage is assembled. In case of
return or exchange failure to return product in similar condition as received could result in limited reimbursement. Please save
sales receipt as proof of purchase for warranty purposes. Check to ensure you have all the parts below. If you discover any
parts are missing, immediately call our toll-free service helpline at 1-800-428-8560.
P.O. Box 1031
Muncie, Indiana 47308
800-428-8560
midwesthomes4pets.com
A
B
C
D
E
F
G
H
I
J
K
J
L
M
N
O
Cage
A . . . . .Main Base
B . . . . .Front Panel (with door)
C . . . .Back Panel
D . . . . .Side Panel (with 2 food doors)
E . . . . .Side Panel (with 1 food door)
F . . . . .Top Panel
G . . . . .Bottom Grid
H . . . .Bottom Pan
I . . . . .Long Skirts (2)
J . . . . .Short Skirts (2)
K . . . . .Casters (4)
L . . . . .Feed Cup (3)
M . . . .Feed Cup Holder (3)
N . . . . .Latch Assembly (4 sets)
O . . . .Perch
Playtop
P Playtop Base
Q Playtop Pan
R Crossbar Perch
S Playtop Feed Cups (2)
T Ladders (4)
U Toy Hook (2)
V Decorative Balls & Collars (4 sets)
Assembly Instructions
Q
P
R
T
S
U
V

2 Turn the Base Assembly back over and locate the Front Panel (B.) Slide the Front
Panel onto pegs of one side of the Base assembly.
3 Locate the Back Panel (C.) Slide the Back Panel onto the pegs on opposite side
of the Base Assembly.
4 Locate the Side Panel with 2 food doors (D). Determine which side would be best
for you to have the 2 food doors. Slide the Side Panel over the metal tab at the bottom
of the Front Panel and Back Panel.
5 Insert and push the tabs at the top of the Side Panel into the sleeves on the top of
the Front and Back Panels.
6 Repeat Step 4 & 5 with the opposite Side Panel (E.)
7 Locate the Top Panel (F.) Carefully lower the pegs on the Top Panel into the holes
in the corners of the cage assembly. Push down making sure the Top Panel is totally
insert, locking all the panels together.
8 Locate the Bottom Grid (G) and the Bottom Pan (H.) The Pan can be inserted in
two different positions, depending on the use of the Bottom Grid.
Bottom Grid will be used: Slide the Bottom Grid in the rails just below the
front door. Slide the Bottom Pan immediately under the Bottom Grid.
Bottom Grid won’t be used: For storage purposes, slide the Bottom Grid in
the lower rails. Slide the Bottom Pan in the rails above the Bottom Grid.
9 Open the feed doors on the side panels, and insert the Cup Holders (M) into the
tubes on the inside of the doors.
10 Locate the Feed Cups (L) and insert one into each of the Cup Holders.
11 Locate the Latch assembly components. (Note: If the knob is screwed into the
latch bar, unscrew the knob.) Place a spring over the round end of the latch bar. Insert
the latch bar, with the threaded hole facing outward, into the lock sleeve on the cage door.
Insert it so the round end protrudes through the opposite end of the sleeve.
12 Push the latch in a bit so the threaded hole shows through the “key hole” in the
front of the sleeve. Screw the knob into the latch bar.
Note: Be sure the latch is fully secured when locking doors. For added security, when
the latch knob is in the locked position, screw the knob tight. This will lock it in the “key
hole.” Unscrew the knob enough to clear the sleeve to unlock.
13 Locate the Long Skirts (I) and insert the pegs into the metal sleeves attached to the
lower part of the cage.
14 Locate the Short Skirts (J) and nest them with flat tabs into the Long Skirts.
15 Locate the Playtop Base (P). Slide the Playtop Pan (Q) out of the Base and remove
all packing materials.

16 Locate the Crossbar Perch (R). Remove all packing material from the Playtop Feed
Cups (S.)
17 Locate the Ladders and slide them onto the angled posts on the Perch.
18 Orientate the Crossbar Perch so the Cups are facing toward the front (where the pan
slides in) and fit the other end of the Ladders onto the angled posts on the Base. Ensure
all connections are completely inserted.
19 Insert Toy Hooks (U) into the open square tubes on the Crossbar Perch.
20 Locate the Decorative Balls and Collars. Insert the treads of a ball through a
decorative collar, and screw it into the threaded hole on a corner of the Playpen Base.
Repeat on the remaining corners.
21 Nest the assembled Playpen inside the Top Panel of the assembled cage. The
Playpen can also be used off the cage if/when desired. When installed on the cage, we
recommend removing the Playpen Pan to allow more light in the cage while the bird is in
the cage.
LIMITED MANUFACTURERS WARRANTY
1. For one (1) year from the date of original purchase, MIDWEST Homes For Pets (“MIDWEST”) warrants to the purchaser of this pet home that, should it prove
defective by reason of improper workmanship and/or material, MIDWEST will repair or replace, at its option, any defective part of the pet home, without charge for the
part or for shipping. Replacement parts are warranted for the remainder of the original period.
2. THIS WARRANTY DOES NOT COVER defects in the wire enclosure caused by any animal, any physical abuse to or misuse of the pet home, any damage caused
by the original purchaser or any third party, or any defects arising or discovered more than one (1) year from the original retail purchase date.
3. STEPS TO OBTAIN WARRANTY SERVICE:
A. The purchaser must call MIDWEST’s HELPLINE, 800-428-8560, to report the alleged defect to a customer service representative or obtain missing parts.
B. The customer service representative will determine if the defect is covered by this warranty, and if it is, will authorize and instruct the purchaser in how to obtain
corrective action.
C. MIDWEST may require the purchaser to present the sales receipt or other proof of purchase prior to authorizing any return or replacement. No returns or
replacements will be permitted without proper authorization. If a return or replacement is authorized, you may be requested to return the item to MIDWEST or to make
the item available for pick-up by MIDWEST.
4. ANY EXPRESS WARRANTY NOT PROVIDED IN THIS WARRANTY DOCUMENT, AND ANY REMEDY FOR BREACH OF CONTRACT THAT, BUT FOR
THIS PROVISION, MIGHT ARISE BY IMPLICATION OR OPERATION OF LAW, IS HEREBY EXCLUDED AND DISCLAIMED. THE IMPLIED WARRANTIES
OF MERCHANTABILITY AND OF FITNESS FOR ANY PARTICULAR PURPOSE ARE EXPRESSLY LIMITED TO A TERM OF ONE (1) YEAR. SOME STATES
DO NOT ALLOW LIMITATIONS ON HOW LONG AN IMPLIED WARRANTY LASTS, SO THE ABOVE LIMITATIONS MAY NOT APPLY TO YOU.
5. UNDER NO CIRCUMSTANCES SHALL MIDWEST BE LIABLE TO PURCHASER OR ANY OTHER PERSON OR ANY
SPECIAL, INCIDENTAL OR CONSEQUENTIAL DAMAGES, WHETHER ARISING OUT OF BREACH OF WARRANTY, BREACH
OF CONTRACT OR OTHERWISE, SOME STATES DO NOT ALLOW THE EXCLUSION OR LIMITATIONS OF INCIDENTAL OR
CONSEQUENTIAL DAMAGES, SO THE ABOVE LIMITATIONS OR EXCLUSION MAY NOT APPLY TO YOU.
6. This warranty gives you specific legal rights, and you may also have other rights which vary from state to state.
P.O. Box 1031
Muncie, Indiana 47308
800/428-8560
www.midwesthomes4pets.com
Copyright 2008 Mid-West Metal Products, Inc.
3430PT-Inst (810)
/