Bauknecht DDLE 5790 IN Program Chart
- Category
- Cooker hoods
- Type
- Program Chart
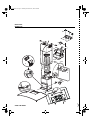
The Bauknecht DDLE 5790 IN is a versatile and powerful kitchen appliance that combines efficient extraction with sleek design. With three speed settings, it effectively removes steam, fumes, and odors from your cooking, ensuring a fresh and clean kitchen environment. The halogen bulbs provide bright and focused lighting, illuminating your cooking surface for added convenience. The grease filter, which should be cleaned at least once a month, captures grease particles to maintain optimal performance.
The Bauknecht DDLE 5790 IN is a versatile and powerful kitchen appliance that combines efficient extraction with sleek design. With three speed settings, it effectively removes steam, fumes, and odors from your cooking, ensuring a fresh and clean kitchen environment. The halogen bulbs provide bright and focused lighting, illuminating your cooking surface for added convenience. The grease filter, which should be cleaned at least once a month, captures grease particles to maintain optimal performance.


-
 1
1
-
 2
2
-
 3
3
-
 4
4


Bauknecht DDLE 5790 IN Program Chart
- Category
- Cooker hoods
- Type
- Program Chart
The Bauknecht DDLE 5790 IN is a versatile and powerful kitchen appliance that combines efficient extraction with sleek design. With three speed settings, it effectively removes steam, fumes, and odors from your cooking, ensuring a fresh and clean kitchen environment. The halogen bulbs provide bright and focused lighting, illuminating your cooking surface for added convenience. The grease filter, which should be cleaned at least once a month, captures grease particles to maintain optimal performance.
Ask a question and I''ll find the answer in the document
Finding information in a document is now easier with AI
Related papers
-
Bauknecht DDB 5790 IN Program Chart
-
Bauknecht DKEL 5790 IN Program Chart
-
Bauknecht DDLE 5790 IN Program Chart
-
Bauknecht DDEI 5790 IN Program Chart
-
-
-
Bauknecht DKEL 5760 IN BK Program Chart
-
-
Whirlpool DDB 5390 AL User guide
-
Whirlpool DNHV 5363 SG User guide
Other documents
-
Whirlpool AKR 950 IX WP Program Chart
-
 Futuro Futuro WL36LUXOREQUO Luxor Wall Installation
-
-
Whirlpool AKB 086 IX Owner's manual
-
Whirlpool AKR 921 AL Program Chart
-
Whirlpool AKR 957 IX WP Program Chart
-
-
Whirlpool AKR 631 IX WP Program Chart
-
-
