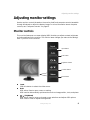
Gateway HD1900 is a flat panel monitor with a 19-inch display. It has a variety of features that make it a great choice for both home and office use. The monitor has a resolution of 1280 x 1024 pixels, a contrast ratio of 1000:1, and a brightness of 250 cd/m2. It also has a 170-degree viewing angle, so you can view it from almost any angle without losing clarity. The monitor has a built-in stand that allows you to tilt and swivel it to find the perfect viewing angle. It also has a VESA mount, so you can mount it on a wall or arm.
Gateway HD1900 is a flat panel monitor with a 19-inch display. It has a variety of features that make it a great choice for both home and office use. The monitor has a resolution of 1280 x 1024 pixels, a contrast ratio of 1000:1, and a brightness of 250 cd/m2. It also has a 170-degree viewing angle, so you can view it from almost any angle without losing clarity. The monitor has a built-in stand that allows you to tilt and swivel it to find the perfect viewing angle. It also has a VESA mount, so you can mount it on a wall or arm.


-
 1
1
-
 2
2
-
 3
3
-
 4
4
-
 5
5
-
 6
6
-
 7
7
-
 8
8
-
 9
9
-
 10
10
-
 11
11
-
 12
12
-
 13
13
-
 14
14
-
 15
15
-
 16
16
-
 17
17
-
 18
18
-
 19
19
-
 20
20
-
 21
21
-
 22
22
-
 23
23
-
 24
24
-
 25
25
-
 26
26
-
 27
27
-
 28
28
-
 29
29
-
 30
30
-
 31
31
-
 32
32
-
 33
33
-
 34
34
-
 35
35
-
 36
36
-
 37
37
-
 38
38


Gateway HD1900 User manual
- Type
- User manual
- This manual is also suitable for
Gateway HD1900 is a flat panel monitor with a 19-inch display. It has a variety of features that make it a great choice for both home and office use. The monitor has a resolution of 1280 x 1024 pixels, a contrast ratio of 1000:1, and a brightness of 250 cd/m2. It also has a 170-degree viewing angle, so you can view it from almost any angle without losing clarity. The monitor has a built-in stand that allows you to tilt and swivel it to find the perfect viewing angle. It also has a VESA mount, so you can mount it on a wall or arm.
Ask a question and I''ll find the answer in the document
Finding information in a document is now easier with AI
Related papers
Other documents
-
Toshiba TR2015X User manual
-
eMachines 1280 User manual
-
 Preference Audio FPD1975W User manual
-
-
-
-
-
eMachines E161HQ User manual
-
-
Hyundai D19W12C User manual
