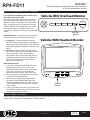
PAC RP4-FD11 is an interface that enables you to replace the factory radio in your Ford/Lincoln/Mercury vehicle with an aftermarket radio while retaining factory features like steering wheel controls, rear seat entertainment, and the THX or Sony amplifier. It also offers dual command functionality, allowing you to assign two functions to each steering wheel button. Installation is straightforward, and the interface comes pre-programmed for your vehicle's factory SWC functions.
PAC RP4-FD11 is an interface that enables you to replace the factory radio in your Ford/Lincoln/Mercury vehicle with an aftermarket radio while retaining factory features like steering wheel controls, rear seat entertainment, and the THX or Sony amplifier. It also offers dual command functionality, allowing you to assign two functions to each steering wheel button. Installation is straightforward, and the interface comes pre-programmed for your vehicle's factory SWC functions.


-
 1
1
-
 2
2
-
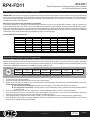 3
3
-
 4
4
-
 5
5


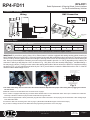
PAC RP4-FD11 is an interface that enables you to replace the factory radio in your Ford/Lincoln/Mercury vehicle with an aftermarket radio while retaining factory features like steering wheel controls, rear seat entertainment, and the THX or Sony amplifier. It also offers dual command functionality, allowing you to assign two functions to each steering wheel button. Installation is straightforward, and the interface comes pre-programmed for your vehicle's factory SWC functions.
Ask a question and I''ll find the answer in the document
Finding information in a document is now easier with AI
Related papers
Other documents
-
 Rockford Fosgate Power BD1000.1 Operation & Installation
-
 Vizualogic A1150/A1250 Install Manual
-
Discount Car Stereo AUX-FRD04 Installation guide
-
 HYDRONIX HYDRONIX-SWC-25-1020 User manual
-
VISTEON 2W CLUSTER_ML Operating instructions
-
Scosche HDSWC1 Application Manual
-
 Peripheral Electronics Automobile Parts User manual
-
Hyundai RP4.2-HY11 Radio Replacement & Steering Wheel Control Interface User manual
-
VISTEON SLA8 User manual
-
Advent DODGE 2012 Owner's manual


