Page is loading ...

OXFORD APRON FRONT STAINLESS
STEEL DOUBLE BOWL FARMHOUSE
KITCHEN SINK WITH ACCESSORIES
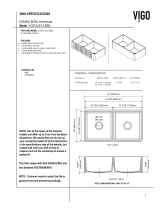
MODEL # BOWL SIZE SINK DEPTH EXTERIOR GAUGE
VGS3320FA
10"
33" x 20 1/2"
16
15" x 16 1/8"
DIMENSIONS
TOP VIEW
FRONT VIEW
FEATURED MODEL VGS3320FA
10" Bowl depth
FEATURES
16 gauge, stainless steel
304 Stainless Steel
Zero radius corners
Elegant and functional drain grooves
Long-lasting, easy-to-clean, satin
finish
Sound-deadening insulation
Rear drain placement
PACKING LIST
Sink
2 Grid
2 Strainer
2 Drain cover
Cutting board
Roll up drying rack
1
NOTE:
These sinks are intended for indoor
kitchen use only. They are not rated
for outdoor use. Installation of this
sink in an outdoor setting will void any
warranty on this product.
9 "
[299mm]
10 "
[254mm]
20 1/2 "
[521mm]
16 1/8 "
[409mm]
33 " [838mm]
15 " [381mm]

Installation Options:
Vigo Farmhouse series sinks offer installation options depending on your design.
Figure 1
Figure 2
Caution: All installation types need to allow room for faucet installation. Ensure adequate clearance
behind the sink for any faucet and backsplash, as well as full range of motion for faucet spouts
and handles.
Typical undermount installation with 1/4" reveal recommended.
3
Typical flush mount and above counter installation
Above counter installation may expose sink sides to be raised above the countertop.
Undermount Installation
Flush mount Installation
Above counter Installation
Figure 3
Figure 4
Figure 6
Figure 5
Figure 7
Contact your retailer if any product is damaged or missing prior to installation. Never install a
damaged sink as it can void your warranty.
Typical
Sink Profile
Finished Wall
from
countertop
front end
Sink Front End
Cabinet
Front Line
Typical
Sink Profile
Finished Wall
from
countertop
front end
Sink Front End
Cabinet
Front Line
1. Prepare the sink base cabinet
Farmhouse sinks require custom order sink base cabinets with a
front cutout to accommodate a 10" deep sink. Build structural
supports on the inside frame of the sink base cabinet. The structural
supports must support the weight of the sink and any attachments
such as garbage disposals. When the sink is placed onto the
cabinet support, make sure the top of the sink is evenly flush
against the bottom of the countertop. Allow clearance for water
supply line and drains or garbage disposal, as necessary.
2. Make template and cutout
Depending on the installation option, make proper cutout of the
countertop. Vigo recommends a 1/4" reveal on 3 sides when
installed undermount style. For a flush mount or above counter
installation, cut countertop along with outside of sink profile. Front
end of Vigo Farmhouse sinks are designed to be installed 3/4"
extended out beyond the front end of the countertop. Cut
countertop accordingly. No template is provided due to the custom
nature of each application and installation. The actual sink is used
as the template guide for each installation. After centering the sink
and allowing for faucets and backsplashes, use a pencil to outline
the sinks as your guide for the cutout, allowing for any reveal before
the actual cutting.
3. Set the sink
Set the sink on top of the cabinet or into the cabinet front cutout.
Apply sealant if necessary as a gasket between the sink and
cabinet.
4. Install the countertop
Carefully clean bottom of countertop and top flange of sink with
denatured alcohol. Apply bead of silicone adhesive (not supplied)
around the top edge of the sink. Place countertop onto the sink.
Remove excess sealant from the lip of any surfaces with a cleaner
recommended by manufacture of adhesive sealant.
4

/


