TRIBECA
COLLECTION
A-FRAME LADDER SHELF
Item#: 62758
Questions, problems, missing parts?
Before returning to your retailer, our exceptional customer service is available.
Call us toll-free at (866) 985-7877, email us at cservice@welltraveled.net, or go online
and live chat at www.wtliving.com. Our hours are: 9 a.m. – 6 p.m., EST, Monday – Friday
SAVE THESE INSTRUCTIONS
FOR FUTURE REFERENCE.
ATTACH YOUR RECEIPT HERE
Keep a copy of your proof of purchase or order
conrmation which will be needed if you need to
contact us about warranty coverage.
Purchase Date:
Manual updated April 2018

Contact us for assistance: (866) 985-7877 | www.wtliving.com 2
INFORMATION
BEFORE YOU BEGIN
Before beginning assembly, make sure all parts are present. Compare parts received with the “Parts List.” If any part
is missing or damaged, do NOT attempt to assemble the product. Please read and understand this entire manual
before attempting to assemble, operate or install this product. If you have any questions regarding the product,
please call us toll-free at (866) 985-7877, email us at cservice@welltraveled.net, or go online and live chat at
www.wtliving.com. Our hours are: 9 a.m. – 6 p.m., EST, Monday – Friday.
GENERAL INFORMATION
This item is made of hollow board and a metal frame. For safe assembly, set up on a dry, soft, secure and clean
surface. Do not clean with detergent or chemicals. Do not sit or stand on the ladder shelf. Do not place hot items
such as coffee cups directly on the surface of this furniture item. Keep away from direct sunlight and water. Do
not drag the ladder shelf. For indoor use only.
SAFETY INFORMATION
WARNING
This item is for storage/display of objects. Do NOT use as a step or ladder. DO NOT sit, stand, or climb or allow
children to sit, stand, or climb on the assembled product. Make sure connectors are securely in place. After
assembly, anchor the shelf to the wall for additional security, especially in environments with small children or
pets. Perform periodic checks to make sure the assembly connectors and anchors are secure and adjust if needed.
Keep unassembled parts and hardware away from children and infants. This package contains small parts and
sharp points. Adult assembly required.
CAUTION
READ all instructions before beginning assembly. Failure to do so may result in faulty assembly and potential
injury. Assemble the item on a soft, non-abrasive surface such as carpet or cardboard to avoid damaging the item.
Max safe load limit: 6 KG / 13 LB per shelf and 24 KG / 53 LB in total.

Contact us for assistance: (866) 985-7877 | www.wtliving.com 3
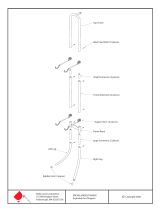
PArts list
PArt descriPtion QuAntitY
A
A-Frame Top
2
B
Front Frame Leg
2
C
Back Frame Leg
2
D
X-Brace
1
E
Joint Bracket
4
F
Bottom Shelf
1
G
2nd Shelf
1
H
3rd Shelf
1
I
Top Shelf 1
J
Screw M7x48mm
Qty: 16
P
S
mall Hex Wrench
Qty: 1
M
Screw M4x30mm
Qty: 4
S
Screw M4x15mm
Qty: 1
L
Female Screw
M8x15mm
Qty: 8
R
Wall
Anchor Bracket
Qty: 1
O
Large Hex Wrench
Qty: 2
U
Drywall Anchor
Qty: 1
K
Male Screw
M6x10mm
Qty: 8
Q
Wrench
Qty: 1
N
Screw Cap M4mm
Qty: 4
T
Tapping Screw
M4x35mm
Qty: 1
hArdWAre contents
A
B
C
D
E
F
G
H
I

Contact us for assistance: (866) 985-7877 | www.wtliving.com 4
ASSEMBLY
1
Locate one A-Frame Top A and one Front Frame Leg B.
(HINT: the Front Frame Legs are slightly longer than the Back
Frame Legs.) Place the A-Frame Top flat on the ground with the
90° angle to the left. Align the Front Frame Leg to the right side
of the A-Frame Top as shown. (Check orientation by
comparing the drilled holes to the inset drawing below right.)
Connect the pieces by fitting the Joint Bracket E over the joint
(matching the holes in the Joint Bracket with the holes in the
two frame pieces where they meet). Insert 2 Female Screws L
through the Joint Bracket and into the frame. Insert 2 Male
Screws K from the opposite side, as shown. Tighten each
Male Screw into the corresponding Female Screw using the
Hex Key O.
2
Finish assembling the first A-Frame by connecting the Back
Frame Leg C. Align the Back Frame Leg with the A-Frame Top
as shown. (Check orientation by comparing the drilled holes to
the inset drawing below right.)
Connect the pieces by fitting the Joint Bracket E over the joint
(matching the holes in the Joint Bracket with the holes in the
two frame pieces where they meet). Insert 2 Screws L
through the Joint Bracket and into the frame. Insert 2 Screws K
from the opposite side, as shown. Tighten hardware using the
Hex Key O.
A
B
L
K
Hardware Used:
K
Male Screw (6x10mm) x 2
L Female Screw (8x15mm) x 2
Hardware Used:
K Male Screw (6x10mm) x 2
L Female Screw (8x15mm)
x 2
The left A-Frame is now complete. Assemble the right A-
Frame by following the same steps described above, but be
sure to place the Joint Brackets on the opposite side of the
joints (the Joint Brackets on each A-Frame should face
outwards, AWAY from the shelves supported by the A-
Frames.)
Hardware Used:
K Male Screw (6x10mm) x 4
L Female Screw (7x48mm) x 4
E
L
K
E
C

Contact us for assistance: (866) 985-7877 | www.wtliving.com 5
ASSEMBLY
3
Attach the shelves to the left A-Frame by aligning the Shelves
IHGF with the appropriate set of holes in the A-Frame and
inserting 2 Screws J through the frame and into each Shelf as
shown. Tighten using the Hex Key O.
4
5
Check that all hardware installed to this point is secure, then
carefully stand the unit upright.
Attach the X-Brace D to the back (vertical face) of the unit by
aligning the holes in the ends of the X-Brace with the 4 holes
drilled in the back of the A-Frames. Insert 4 Screws
M through
the X-Brace and then through the A-Frame. Secure each
Screw with a Screw Cap N on the end. Tighten using the
Wrench Q.
Attach the Wall Anchor Bracket R to the underside of the top
Shelf I using 1 Screw S.
Hardware Used: J Screw (7x48mm) x 8
Attach the shelves to the right A-Frame by aligning the
Shelves IHGF with the appropriate set of holes in the A-
Frame and inserting 2 Screws J through the frame and into
each Shelf as shown. Tighten using the Hex Key O.
Hardware Used: J Screw (7x48mm) x 8
J
J
J
J
I
H
G
F
J
J
J
J
Hardware Used: M Screw (4x30mm) x 4
N Screw Cap (4mm) x 4
R Wall Anchor Bracket x 1
S Screw (4x15mm) x 1
R
N
N
N
N
M
M
M
M
D
S
U
R
S
T
Anchor the unit to the wall for safety. The included
hardware is appropriate for drywall installation and may
require the use of a drill. If needed, consult a qualified
tradesperson or online resources for the appropriate steps
to safely anchor this unit.
Attach
to the wall.

Important Notice
Do NOT return to place of purchase—for customer service
and warranty issues contact our Customer Service Center at:
online and live chat at www.wtliving.com. Our hours are:
9 a.m. – 6 p.m., EST, Monday – Friday
Distributed By:
Well Traveled Living
716 S 8th Street, Amelia Island, FL 32034
wtliving.com | cservice@welltraveled.net
(866) 985-7877
Avalon Home
®
, Fire Sense
®
, Patio Sense
®
, Mojave Sun
®
, and Well Traveled Living
®
are registered trademarks of Well Traveled Imports, Inc.
®
All assembly instruction presentations are the property of Well Traveled Imports, Inc.
®
and are protected by U.S. copyrights and trademarks. All rights reserved.
1 YEAR LIMITED WARRANTY
Customers in the Continental US
All components are warranted for a period of 1 year after date of purchase by the original owner against defects in
materials and workmanship under normal use. This warranty does NOT cover normal wear and weathering, assembly
and/or maintenance OR use in a commercial application if model is not designated as a commercial model. At Well
Traveled Living’s sole discretion, products under warranty will be repaired and/or replaced at no charge to the customer.
Any returns sent back to Well Traveled Living must be sent via prepaid freight and in the original retail packaging.
For warranty service contact Well Traveled Living at the address, phone numbers or internet site and email listed in this
owner’s manual. Be sure to have your sales receipt, date of purchase and catalogue/model numbers available when
calling. All warranty service will be coordinated by the Well Traveled Living’s, Amelia Island, Florida service center.
This warranty is extended only to the original purchaser. Proof of purchase will be required before warranty service
is rendered. The sales receipt is the only valid proof of purchase. This warranty only covers failures due to defects
in materials or workmanship which occur during normal use. Failures and/or damage which result from accident,
negligence, misuse, abuse, neglect, mishandling, alteration or modication, failure to maintain, improper assembly or
maintenance, service by unauthorized agency or use of unauthorized components or damage that is attributable to
acts of God are NOT covered.
This limited warranty gives you specic legal rights and you may also have other rights which vary from jurisdiction to jurisdiction. The provisions of the United
Nations Convention on Contracts for the Sales of Goods shall not apply to this limited warranty or the sale of products covered by this limited warranty.
• THERE ARE NO EXPRESS WARRANTIES EXCEPT AS LISTED ABOVE
• PURCHASER ASSUMES ALL RISKS IN THE ASSEMBLY OF THIS UNIT
• FAILURE TO FOLLOW WARNINGS AND INSTRUCTIONS
CONTAINED IN THIS MANUAL CAN RESULT IN SEVERE PROPERTY
DAMAGE AND/OR PERSONAL INJURY
• IN NO EVENT WILL WELL TRAVELED LIVING, OR ITS DIRECTORS,
OFFICERS OR AGENTS BE LIABLE TO THE PURCHASER OR
ANY THIRD PARTY, WHETHER IN CONTRACT, IN TORT, OR ON
ANY OTHER BASIS, FOR ANY INDIRECT, SPECIAL, PUNITIVE,
EXEMPLARY, CONSEQUENTIAL, OR INCIDENTAL LOSS, COST,
OR DAMAGE ARISING OUT OF OR IN CONNECTION WITH THE
SALE, MAINTENANCE, USE, OR INABILITY TO USE THE PRODUCT,
EVEN IF WELL TRAVELED LIVING OR ITS DIRECTORS, OFFICERS
OR AGENTS HAVE BEEN ADVISED OF THE POSSIBILITY OF SUCH
LOSSES, COSTS OR DAMAGES, OR IF SUCH LOSSES, COSTS,
OR DAMAGES ARE FORESEEABLE. IN NO EVENT WILL WELL
TRAVELED LIVING, OR ITS OFFICERS, DIRECTORS, OR AGENTS
BE LIABLE FOR ANY DIRECT LOSSES, COSTS OR DAMAGES THAT
EXCEED THE PURCHASE PRICE OF THE PRODUCT.
• SOME JURISDICTIONS DO NOT ALLOW THE EXCLUSION OR
LIMITATION OF INCIDENTAL OR CONSEQUENTIAL DAMAGES, SO
THE ABOVE LIMITATION OR EXCLUSION MAY NOT APPLY TO THE
PURCHASER.
/