Page is loading ...

Jeep® Wrangler JL Sound Deadening
NOTES: This kit is designed to fit Jeep Wranglers equipped with factory hardtops. One person can install
the front panels over the driver and passenger seats (JK Models). However, it is recommended that a mini-
mum of 2 people install the panels on the back part of the hardtop, as they are large (JK & TJ Models).
We suggest you remove the hardtop from vehicle and place on the floor in an inverted position. Placing the
hardtop on a blanket is recommended to protect it from scratches. Lay the parts in place with the paper
release liner left in place to note its position and where it will be installed. Once the adhesive contacts a
clean surface, it is extremely difficult to remove the adhesive. Be sure the part is in the desired position
before adhering it!
Figure 1 – Hardtop removed and
inverted (4 Door Shown)
2.) Once the hardtop is removed, clean
the inside surface of the hardtop with
isopropyl alcohol. This will ensure a
good adhesive bond between the head-
liner and the hardtop.
*Note: The adhesive will not stick
properly to a dirty surface.
T
H
E
R
M
A
L
A
C
O
U
S
T
I
C
C
O
N
T
R
O
L
T
H
E
R
M
A
L
A
C
O
U
S
T
I
C
C
O
N
T
R
O
L
T
H
E
R
M
A
L
A
C
O
U
S
T
I
C
C
O
N
T
R
O
L
T
H
E
R
M
A
L
A
C
O
U
S
T
I
C
C
O
N
T
R
O
L
T
H
E
R
M
A
L
A
C
O
U
S
T
I
C
C
O
N
T
R
O
L
T
H
E
R
M
A
L
A
C
O
U
S
T
I
C
C
O
N
T
R
O
L
T
H
E
R
M
A
L
A
C
O
U
S
T
I
C
C
O
N
T
R
O
L
T
H
E
R
M
A
L
A
C
O
U
S
T
I
C
C
O
N
T
R
O
L
Figure 1
1.) Remove the hardtop from vehicle following the manufacturer’s suggested removal. Placing the hardtop on
a blanket is recommended to protect it from scratches. Make sure to place the hardtop on the blanket in an
inverted position.
INSTALLATION INSTRUCTIONS
TOOLS:
Use manufacturer’s suggested tools for hardtop removal.
SURFACE PREP:
Vacuum or wipe down installation area to remove all loose
debris/dust. Then clean with isopropyl alcohol to remove any
contaminants.
INS-3024 rev 11/18
PART #’s 050168, 050169, 050170,
050171, 050172
9 Piece kit plus 20 filler strips:
A. 2 - .25” x 1.7” x 21.6”
B. 2 - .25” x 1.7” x 23.22”
C. 2 - .25” x 1.7” x 24.6”
D. 2 - .5” x 1” x 16.5”
E. 2 - .5” x 1” x 16.8”
F. 2 - .25” x 1.7” x 11.8”
G 4 - .25” x 1.7” x 13.8”
H. 2 - .25” x 1” x 2.7”
I. 2 - .25” x 1” x 11”
KEY:
REMOVABLE FRONT TOPS
D, E, I, H
REAR SEAT SECTION
A, B, C
CARGO AREA
F, G

4.) Remove one edge of the paper release liner from
the back of the part about to be installed. (Figure 4)
T
H
E
R
M
A
L
A
C
O
U
S
T
I
C
C
O
N
T
R
O
L
T
H
E
R
M
A
L
A
C
O
U
S
T
I
C
C
O
N
T
R
O
L
T
H
E
R
M
A
L
A
C
O
U
S
T
I
C
C
O
N
T
R
O
L
T
H
E
R
M
A
L
A
C
O
U
S
T
I
C
C
O
N
T
R
O
L
T
H
E
R
M
A
L
A
C
O
U
S
T
I
C
C
O
N
T
R
O
L
T
H
E
R
M
A
L
A
C
O
U
S
T
I
C
C
O
N
T
R
O
L
T
H
E
R
M
A
L
A
C
O
U
S
T
I
C
C
O
N
T
R
O
L
T
H
E
R
M
A
L
A
C
O
U
S
T
I
C
C
O
N
T
R
O
L
www.BoomMat.com
800-264-9472
INS-3024 rev11/18
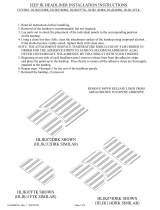
3.) Install the foam filelr strips in the recessed
molded ribs. This will minimize the ribs showing
through to the surface. Showing of some of the
ribs contours is normal. Test fit the filler strips in
each location before sticking down. Strips are dif-
ferent lengths, widths and thicknesses. See notes
for guide. (Figure 3)
It helps to use a utility knife
to gently separate the paper
liner from the
adhesive backing
Figure 3
I
D
E
H
E
D
I
H
C
B
A A
B
C
FG G G G F
NO FILLER STRIPS NEEDED
NO FILLER
STRIPS
NEEDED
NO FILLER
STRIPS
NEEDED
DRIVER SIDE PASSENGER SIDE
REMOVABLE FRONT TOPS
2ND ROW SEATS
CARGO AREA
FILLER STRIP LOCATION DIAGRAM
Figure 4

5.) Once the starting edge is adhered, lay down
the rest of the part pulling the backer liner off
while applying gentle pressure by hand as
shown in Figure 5.
Figure 5. Lay panel in place by applying gentle pressure
6.) Once the parts have been installed,
apply pressure by hand. (Figure 6)
7.) Once all parts are installed, allow parts to sit
in the top inverted for 25 minutes.
(Figure 7). This will allow the adhesive to set
properly. Once the parts have set, you are ready
to install the top back on your Jeep.
Figure 6.
T
H
E
R
M
A
L
A
C
O
U
S
T
I
C
C
O
N
T
R
O
L
T
H
E
R
M
A
L
A
C
O
U
S
T
I
C
C
O
N
T
R
O
L
T
H
E
R
M
A
L
A
C
O
U
S
T
I
C
C
O
N
T
R
O
L
T
H
E
R
M
A
L
A
C
O
U
S
T
I
C
C
O
N
T
R
O
L
T
H
E
R
M
A
L
A
C
O
U
S
T
I
C
C
O
N
T
R
O
L
T
H
E
R
M
A
L
A
C
O
U
S
T
I
C
C
O
N
T
R
O
L
T
H
E
R
M
A
L
A
C
O
U
S
T
I
C
C
O
N
T
R
O
L
T
H
E
R
M
A
L
A
C
O
U
S
T
I
C
C
O
N
T
R
O
L
Figure 7
www.BoomMat.com
800-264-9472
8.) Reinstall the hardtop according to the
manufacturer’s suggested installation.
INS-3024 rev 11/18
Figure 7

Boom Mat & Boom Mat XL
• Eliminate unwanted engine
& road noise
• Enhance audio performance
• Dampen vibrations
• Easy peel & stick application
• 2MM thick Boom Mat &
4MM Boom Mat XL
Under Carpet UC
• Perfect to use over
Boom Mat
• Insulate your interior
from heat & cold
• Provide additional
sound deadening
• 3/8” thick
Leather Look Sound Barrier
• Embossed leather grain
• Finishing touch for
your interior
• Insulate interior from
unwanted heat & noise
• Moisture resistant
• 5/16” thick
Floor & Tunnel Shield II FT II
• Peel & stick application
• Withstands 1750˚F direct
continuous heat
• Use to shield & reflect
unwanted heat
• 3/16” thick
Boom Mat Spray
• Spray application for hard
to reach areas
• Eliminate unwanted engine
& road noise
• Dampen vibrations
• Spray multiple coats for
desired thickness
Heat Moldable Barrier
• Flexible .5lb/ft2
sound barrier
• Installs with scissors
and a heat gun
• Sound and moisture barrier
• Perfect to use behind
door panels
• 1/6” thick
Under Carpet Lite UC Lite
• Multi-layered waterproof
composite material
• Lightweight
• Superior heat &
noise barrier
• P
erfect to use over Boom Mat
• 1/2” thick
www.BoomMat.com
www.DesignEngineering.com
EXHAUST WRAP
PLUG BOOT &
WIRE PROTECTION
PLUG BOOT &
WIRE PROTECTION
LINE & HOSE
SLEEVING
HEAT BARRIERS
TURBO SHIELDS
/


