Thermador POD302LW User manual
- Category
- Kitchen & houseware accessories
- Type
- User manual

Use and care
GUIDE
THERMADOR.COM
Thermador Professional
®
Series Built-in Oven
PO301W POD301W POD301LW POD301RW
PO302W POD302W POD302LW POD302RW
POM301W PODMC301W PODMCW31W


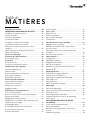
Table of
CONTENTS
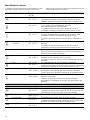
Table of Contents
Use and care manual
Safety Definitions ....................................................... 4
IMPORTANT SAFETY INSTRUCTIONS ........................ 5
Proper Installation and Maintenance .............................. 5
Fire Safety ....................................................................... 5
Burn Prevention .............................................................. 6
Child Safety ..................................................................... 6
Cleaning Safety ............................................................... 6
Cookware Safety ............................................................. 7
Warming Drawer Safety .................................................. 7
State of California Proposition 65 Warning: ................... 7
Causes of Damage ...................................................... 8
Protecting the Environment ....................................... 8
Saving Energy ................................................................. 8
Accessories ................................................................. 9
Accessories Included ...................................................... 9
Special Accessories (not included) .................................. 9
Getting to Know the Appliance ................................ 10
Oven Overview ............................................................. 10
Oven Cavities ................................................................ 10
Oven Cavity Features .................................................... 11
Control Panel ................................................................ 11
Heating Modes Menu ................................................... 13
Before First Use ........................................................ 15
Before Using the Appliance for the First Time ............. 15
Initial Use ....................................................................... 15
Cleaning the Accessories .............................................. 16
Adjust Basic Settings .................................................... 16
General Operation ................................................... 17
High Altitude Baking ..................................................... 17
Switching the appliance on and off .............................. 17
Timer Options ............................................................... 17
Setting a Heating Mode ............................................... 18
Changing or Cancelling the Appliance Operation ....... 19
Fast Preheat .................................................................. 19
Panel Lock ..................................................................... 20
Auto Convection Conversion ........................................ 20
Temperature Offset ....................................................... 20
Meat Probe ................................................................... 20
Sabbath Mode .............................................................. 22
Yom Tov Mode .............................................................. 22
Rack Positions ............................................................... 23
Inserting Racks .............................................................. 23
Rotisserie ....................................................................... 24
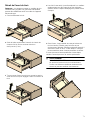
Warming Drawer Operation .................................... 26
Setting the Warming Drawer ........................................ 26
Warming Empty Serving Bowls and Plates ................... 27
Warming Drawer Charts ................................................ 27
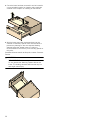
Remove Drawer Insert ................................................... 27
Home Connect ......................................................... 29
Setting Up ..................................................................... 29
Remote Start ................................................................. 30
Home Connect Settings ................................................ 31
Software Update ........................................................... 32
Information on Data Protection .................................... 32
Wi-Fi
®
Module .............................................................. 32
Cleaning Your Oven ................................................. 33
Suitable Cleaning Agents ............................................. 33
Surfaces in the Oven Cavity .......................................... 34
Keeping the Appliance Clean ....................................... 34
Easy Clean ..................................................................... 35
Self Clean ...................................................................... 35
Avoid These Cleaners ................................................... 36
Service ..................................................................... 37
Troubleshooting Chart .................................................. 37
Maximum Operating Time Exceeded ........................... 38
Oven Light ..................................................................... 38
Product Rating Label ..................................................... 40
How to Obtain Service or Parts .................................... 40
STATEMENT OF LIMITED PRODUCT WARRANTY ... 41
What this Warranty Covers & Who it Applies to .......... 41
How Long the Warranty Lasts ....................................... 41
Repair/Replace as Your Exclusive Remedy ................... 41
Out of Warranty Product ............................................... 41
Warranty Exclusions ...................................................... 41
THERMADOR® Support .......................................... 42
Service ........................................................................... 42
Parts and Accessories ................................................... 42

4
.
Safety Definitions
Safety Defi nitions
9 WARNING
This indicates that death or serious injuries may
occur as a result of non-observance of this warning.
9 CAUTION
This indicates that minor or moderate injuries may
occur as a result of non-observance of this warning.
NOTICE: This indicates that damage to the appliance or
property may occur as a result of non-compliance with
this advisory.
Note: This alerts you to important information and/or
tips.

5
9 IMPORTANT SAFETY INSTRUCTIONS
READ AND SAVE THESE INSTRUCTIONS
IMPORTANT SAFET Y I NST RUCT I ONS RE AD AND SAVE THESE INSTRUCTIONS
WARNING
When properly cared for, your new appliance has been
designed to be safe and reliable. Read all instructions
carefully before use. These precautions will reduce the
risk of burns, electric shock, fire, and injury to persons.
When using kitchen appliances, basic safety precautions
must be followed, including those in the following pages.
Proper Installation and Maintenance
Have the installer show you the location of the circuit
breaker or fuse. Mark it for easy reference.
This appliance must be properly installed and grounded
by a qualified technician. Connect only to properly
grounded outlet. Refer to Installation Instructions for
details.
This appliance is intended for normal family household
use only. It is not approved for outdoor use. See the
Statement of Limited Product Warranty. If you have any
questions, contact the manufacturer.
Do not store or use corrosive chemicals, vapors,
flammables or nonfood products in or near this
appliance. It is specifically designed for use when
heating or cooking food. The use of corrosive chemicals
in heating or cleaning will damage the appliance and
could result in injury.
Do not operate this appliance if it is not working properly,
or if it has been damaged. Contact an authorized
servicer.
Do not obstruct oven vents.
Do not repair or replace any part of the appliance unless
specifically recommended in this manual. Refer all
servicing to an authorized servicer.
In the event of an error the display will show an error
code. If pressing the TIMERS button does not resolve the
error, disconnect the appliance from the power supply
and call Customer Service.
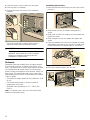
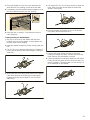
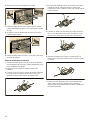
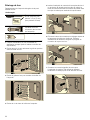
WARNING
When removing the door make sure oven is cool and
power to the oven has been turned off before removing
the door. Failure to do so could result in burns.
The oven door is heavy and fragile. Use both hands to
remove the oven door. The door front is glass. Handle
carefully to avoid breaking.
Grasp only the sides of the oven door. Do not grasp the
handle as it may swing in your hand and cause injury or
damage.
Failure to grasp the oven door firmly and properly could
result in personal injury or product damage.
Lay the door on a flat smooth surface so that the door
cannot fall over. Failure to do so may result in personal
injury or damage to the appliance.
WARNING
To avoid injury from hinge bracket snapping closed, be
sure that both levers are securely in place before
removing door. Also, do not force door open or closed -
the hinge could be damaged and injury could result.
WARNING
Make sure the appliance and lights are cool and power
to the appliance has been turned off before replacing the
light bulb(s). Failure to do so could result in electrical
shock or burns. The lenses (if equipped) must be in
place when using the appliance. The lenses (if equipped)
serve to protect the light bulb from breaking. The lenses
(if equipped) are made of glass. Handle carefully to
avoid breaking. Broken glass can cause an injury.
WARNING
Light socket is live when door is open if main power
supply is not turned off. To avoid electric shock
disconnect main fuse or circuit breaker before accessing
light bulb(s).
Fire Safety
WARNING
NEVER cover any slots, holes or passages in the oven
bottom or cover an entire rack with materials such as
aluminum foil. Doing so blocks air flow through the oven.
Aluminum foil linings may also trap heat, causing a fire
hazard.
If materials inside an oven or warming drawer should
ignite, keep door closed. Turn off the appliance and
disconnect the circuit at the fuse or circuit breaker panel.
WARNING
Use this appliance only for its intended use as described
in this manual. NEVER use this appliance as a space
heater to heat or warm the room. Doing so may result in
overheating the appliance. Never use the appliance for
storage.
Always have a working smoke detector near the kitchen.
In the event that personal clothing or hair catches fire,
drop and roll immediately to extinguish flames.
Have an appropriate fire extinguisher available, nearby,
highly visible and easily accessible near the appliance.
Smother flames from food fires other than grease fires
with baking soda. Never use water on cooking fires.

9 IMPORTANT SAFETY INSTRUCTIONS
READ AND SAVE THESE INSTRUCTIONS
6
WARNING
TO REDUCE THE RISK OF INJURY TO PERSONS IN
THE EVENT OF A GREASE FIRE, OBSERVE THE
FOLLOWING:
a.
SMOTHER FLAMES with a close-fitting lid, cookie
sheet, or metal tray, then turn off the burner. BE
CAREFUL TO PREVENT BURNS. If the flames do not
go out immediately, EVACUATE AND CALL THE FIRE
DEPARTMENT.
b.
NEVER PICK UP A FLAMING PAN – You may be
burned.
c.
DO NOT USE WATER, including wet dishcloths or
towels – a violent steam explosion will result.
d.
Use an extinguisher ONLY if:
- You know you have a Class ABC extinguisher, and
you already know how to operate it.
- The fire is small and contained in the area where it
started.
- The fire department is being called.
- You can fight the fire with your back to an exit.
Burn Prevention
DO NOT TOUCH HEATING ELEMENTS OR INTERIOR
SURFACES OF OVEN - Heating elements may be hot
even though they are dark in color. Interior surfaces of an
oven become hot enough to cause burns. During and
after use, do not touch, or let clothing, potholders, or
other flammable materials contact heating elements or
interior surfaces of oven until they have had sufficient
time to cool. Other surfaces of the appliance may
become hot enough to cause burns. Among these
surfaces are oven vent openings, surfaces near these
openings and oven doors.
Exercise caution when opening the appliance. Standing
to the side, open the door (or drawer) slowly and slightly
to let hot air and/or steam escape. Keep your face clear
of the opening and make sure there are no children or
pets near the unit. After the release of hot air and/or
steam, proceed with your cooking. Keep doors shut
unless necessary for cooking or cleaning purposes. Do
not leave open doors unattended.
Do not heat or warm unopened food containers. Build-up
of pressure may cause the container to burst and cause
injury.
Use caution when cooking foods with high alcohol
content (e.g. rum, brandy, bourbon) in the oven. Alcohol
evaporates at high temperatures. There is a risk of
burning as the alcohol vapors may catch fire in the oven.
Use only small quantities of alcohol in foods, and open
the oven door carefully.
Always place oven racks in desired location while oven is
cool. Always use oven mitts, when the oven is warm. If a
rack must be moved while oven is hot, do not let
potholder contact the heating elements.
CAUTION
To avoid possible injury or damage to the appliance,
ensure rack is installed exactly per installation
instructions and not backwards or upside down.
Always use dry potholders. Moist or damp potholders on
hot surfaces may result in burns from steam. Do not let
potholder touch hot heating elements. Do not use a towel
or other bulky cloth.
Secure all loose garments, etc. before beginning. Tie
long hair so that it does not hang loose, and do not wear
loose fitting clothing or hanging garments, such as ties,
scarves, jewelry, or dangling sleeves.
Child Safety
When children become old enough to use the appliance,
it is the responsibility of the parents or legal guardians to
ensure that they are instructed in safe practices by
qualified persons.
Do not allow anyone to climb, stand, lean, sit, or hang on
any part of an appliance, especially a door, warming
drawer, or storage drawer. This can damage the
appliance, and the unit may tip over, potentially causing
severe injury.
Do not allow children to use this appliance unless closely
supervised by an adult. Children and pets should not be
left alone or unattended in the area where the appliance
is in use. They should never be allowed to play in its
vicinity, whether or not the appliance is in use.
WARNING
Items of interest to children should not be stored in an
appliance, in cabinets above an appliance or on the
backsplash. Children climbing on an appliance to reach
items could be seriously injured.
Cleaning Safety
IMPORTANT SAFETY NOTICE: The California Safe
Drinking Water and Toxic Enforcement Act requires the
Governor of California to publish a list of substances
known to the state to cause cancer, birth defects or other
reproductive harm, and requires businesses to warn
customers of potential exposure to such substances. The
burning of gas cooking fuel and the elimination of soil
during self-cleaning can generate some by-products
which are on the list. To minimize exposure to these
substances, always operate this unit according to the
instructions contained in this booklet and provide good
ventilation.
When self-cleaning, confirm that the door locks and will
not open. If the door does not lock, do not run Self-
Clean. Contact service.
Wipe out excessive spillage before self-cleaning the
oven.

7
9 IMPORTANT SAFETY INSTRUCTIONS
READ AND SAVE THESE INSTRUCTIONS
Birds have very sensitive respiratory systems. Keep pet
birds out of the kitchen or other rooms where kitchen
fumes could reach them. During self-clean, fumes are
released that may be harmful to birds. Other kitchen
fumes such as overheating margarines and cooking oils
may also be harmful.
Keep oven free from grease build up.
WARNING
RISK OF INJURY
Scratched glass in the appliance door can burst. Do not
use any glass scrapers or strong or abrasive cleaning
agents.
WARNING
RISK OF ELECTRICAL SHOCK
Moisture entering the appliance can cause an electrical
shock. Don't use a high-pressure cleaner or steam
cleaner.
Cookware Safety
Do not place food directly on oven bottom.
Follow the manufacturer’s directions when using cooking
or roasting bags.
WARNING
RISK OF ELECTRIC SHOCK
Use of a wrong meat probe can damage the insulation.
Use only the meat probe intended for this appliance.
Warming Drawer Safety
Close supervision is necessary when any appliance is
used by or near children.
Do not touch hot surfaces. Use handles or knobs.
The use of accessory attachments not recommended by
the appliance manufacturer may cause injuries.
Do not use outdoors.
Do not place on or near a hot gas or electric burner or in
a heated oven.
Do not use appliance for other than intended use.
Extreme caution must be used when moving an
appliance containing hot oil or other hot liquids.
To reduce the risk of fire, do not locate any heating or
cooking appliance beneath the appliance.
To reduce the risk of fire, do not store anything directly
on top of the appliance surface when the appliance is in
operation.
To reduce the risk of fire, do not store anything in the
warming drawer (such as groceries, bags, etc.) which
could cause fire if the drawer is turned on.
Do not touch interior surface of the drawer while it is in
use. The interior of the drawer could become hot enough
to cause burns. Allow drawer and rack (if equipped) to
cool before handling.
CAUTION
Plastic containers or plastic wrap can melt if in direct
contact with the drawer or a hot utensil. If it melts onto
the drawer, it may not be removable.
WARNING
To prevent burns, do not remove drawer insert while hot.
Be sure drawer is empty before removing.
CAUTION
To maintain food safety, follow these guidelines:
e.
DO NOT use the warming drawer to heat cold food
(exception: it is safe to use the drawer to crisp
crackers, chips or dry cereal and to warm plates.
f.
Be sure to maintain proper food temperature. The
USDA recommends holding hot food at 140°F or
warmer.
g.
DO NOT warm food for longer than one hour.
State of California Proposition 65
Warning:
WARNING
This product can expose you to chemicals including vinyl
chloride, which is known to the State of California to
cause cancer and birth defects or other reproductive
harm. For more information go to
www.P65Warnings.ca.gov.

8
Causes of Damage
NOTICES
▯ Do not place accessories, foil, greaseproof paper or
ovenware on the oven cavity bottom. This will prevent
the oven from heating properly resulting in increased
cooking (or baking and roasting) times and overheat
the oven cavity bottom causing damage to the enamel.
▯ Aluminum foil: Aluminum foil in the oven cavity must
not come into contact with the door glass. This could
cause permanent discoloration of the door glass.
▯ Water in a hot oven cavity: Do not pour water into the
oven cavity when it is hot. This will cause steam. The
change in temperature can cause damage to the
enamel.
▯ Moisture in the oven cavity: Over an extended period
of time, moisture in the oven cavity may lead to
corrosion. Allow the oven cavity to dry after use. Do
not keep moist food in the closed oven cavity for
extended periods of time. Do not store food in the
oven cavity.
▯ Cooling with the appliance door open: Following
operation at high temperatures, only allow the oven
cavity to cool down with the door closed. Do not use
anything to block the door from closing. Even if the
door is only left ajar, the front of nearby furniture may
become damaged over time.
Only leave the oven cavity to dry with the door open if
a large amount of moisture was produced during
operation.
▯ Fruit juice: When baking juicy fruit pies, do not pack
the dish too generously. Dripping fruit juice leaves
stains that cannot be removed. If possible, place on a
baking sheet lined with aluminum foil.
▯ Appliance door: Do not sit on the appliance door, or
place or hang anything on it. Do not place any
cookware or accessories on the appliance door. The
appliance door should never be used as a seat, shelf
or worktop.
▯ Inserting accessories: Depending on the appliance
type, accessories can scratch the door glass when
closing the door. Always fully slide accessories into
the oven cavity.
▯ Transporting the appliance: Do not carry or hold the
appliance by the door handle. The door handle cannot
support the weight of the appliance and could break.
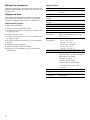
Protecting the Environment
Your new appliance is energy-efficient. Here you can find
tips on how to save even more energy when using the
appliance, and how to dispose of your appliance
properly.
Unpack the appliance and dispose of the packaging in
an environmentally friendly manner.
Saving Energy
▯ You may remove unneeded oven racks or accessories
from the oven cavity before cooking. This will reduce
the amount of preheat time required.
▯ Open the appliance door as infrequently as possible
when the appliance is in use.
▯ It is best to bake several cakes one after the other
while the cavity is still warm and the oven does not
need to preheat again.
▯ Keep your oven clean and avoid grease buildup as
this may lengthen preheat times and increase
emissions.

9
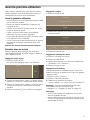
Accessories
Your appliance is accompanied with a variety of
accessories. Below is an overview of the accessories
included and information on how to use them correctly.
Accessories listed below can be ordered through
Thermador’s eshop. The address is
Store.thermador.com/us.
9 CAUTION
Do not slide any accessories between the rack
positions. This may cause the accessory to tip.
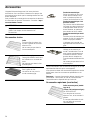
Accessories Included
--------
Only use original accessories. They are specially
adapted for your appliance.
You can buy accessories from Customer Service, from
specialist retailers or online.
Note: The accessories may deform when they become
hot. This does not affect their function. Once they have
cooled down again, they regain their original shape.
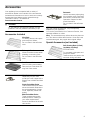
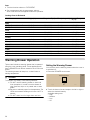
Special Accessories (not included)
--------
Wire Rack
For baking sheets, cake pans
and ovenproof dishes.
Do not clean in the self-clean
oven.
Telescopic Rack
Allows for easier access when
inserting or removing food.
Do not clean in the self-clean
oven.
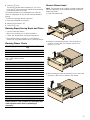
Broil Pan and Grid
Use for broiling and roasting.
Remove from oven when run-
ning Self Clean mode.
Meat Probe
Depending on your oven
model, the oven comes with a
Single-Point or Multi-Point Meat
Probe.
Single-Point Meat Probe
One measurement point deter-
mines the internal doneness or
the end temperature of many
foods, especially meats and
poultry.
Multi-Point Meat Probe
Three measurement points
enable precision roasting to
your exact requirements.
Its use is described in the rele-
vant section.
Rotisserie
Use this accessory when using
the rotisserie mode. See Rotis-
serie under Conventional Oven
Operation Chapter for addi-
tional information.
Do not clean in the self-clean
oven.
Self Cleaning Rack (3 Pack)
(available via eShop)
#SDCLNRCK30
For ovenware, cake pans and
ovenproof dishes.
These racks do not need to be
removed during self clean.

10
Getting to Know the Appliance
This section outlines and describes the features,
indicators and controls of the appliance. You will also
find information on the various functions of your
appliance.
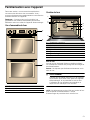
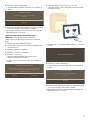
Note: Picture shows a double oven. Depending on the
appliance model, individual details and colors may differ.
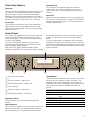
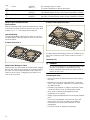
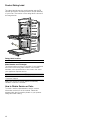
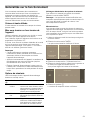
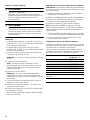
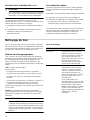
Oven Overview
Oven Cavities
Oven Bottom
The oven bottom conceals the lower heating element. As
a result the element is protected from damage and spills.
Tip: Do not place food directly on the oven bottom.
9 WARNING
Do not use aluminum foil or protective liners to line
any part of the appliance, especially the oven
bottom. Installation of these liners may result in a
risk of electric shock or fire.
NOTICE: Do not place broil pan on the oven bottom to
catch spills. Doing so will damage the oven bottom
porcelain.
9 WARNING
NEVER cover any slots, holes or passages in the
oven bottom or cover an entire rack with materials
such as aluminum foil. Doing so blocks air flow
through the oven. Aluminum foil linings may also
trap heat, causing a fire hazard.
A Control panel and display
B Upper oven cavity
C Lower oven cavity
$
%
&
7UXH&RQYHFWLRQ
Ý
³
U
)$6735(+($7/,*+7 7,0(56 6(77,1*6 ,1)2
/2&.
6(/)&/($1
2))
025(02'(6
758(&219
&219%$.(
%$.(
&21952$67
5(027(67$57
527,66(5,(
3,==$
%52,/
&219%52,/
&/($102'(6
2))
6(/)&/($1
2))
025(02'(6
758(&219
&219%$.(
%$.(
&21952$67
5(027(67$57
:$50
3,==$
%52,/
&219%52,/
&/($102'(6
2))
T
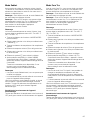
1 Convection system
2 Accessory racks
3 Door hinges
4 Door gasket
5 Meat probe socket
6 Broil element
7 Oven vents
8 Rotisserie socket

11
Oven Cavity Features
Oven Vent
The oven vent is located along the top and bottom of the
unit. Warm air may be released from the vent before,
during and after cooking. It is normal to see steam
escaping from the vent and condensation may collect.
This area may be warm when the oven is in use. Do not
block the vent since it is important for air circulation.
Cooling Fan
The cooling fan runs based on the oven temperature.
Warm air may be felt as it is released from the oven
vents while the fan operates. The fan may also operate
after the oven is off.
Convection Fan
The convection fan operates during all convection
modes. When the oven is operating in a convection
mode, the fan turns off automatically when the door is
opened.
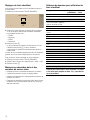
Oven Light
When you open the appliance door, the oven light turns
on. If the door remains open for longer than 20 minutes,
the lighting switches off again. To turn the light back on,
touch the LIGHT button.
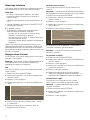
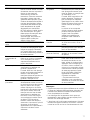
Control Panel
You can set your appliance's various functions with the
control knobs and on the control panel using the full
touch color display. The full touch color display shows
you the current settings.
If you have purchased a triple oven model, which
includes a warming drawer, the control panel of your
oven will appear slightly different.
Where the LOCK button currently appears will be
changed to DRAWER. This is the button used to operate
the warming drawer from the control panel. The LOCK
function is now turned on and off using the TIMERS
button.
If you have purchased a combination oven model that
includes a microwave oven, please consult the Use and
Care Guide included with the microwave oven and make
sure you read and understand all Important Safety Notes
that are included.
Operating Controls
Use the controls to set your appliance simply and
directly.
Rotary Selectors
Turn the function selector to the left or right to select the
desired heating mode. Use the temperature selector to
set the temperature for conventional cooking modes.
Touch Buttons
There are sensors under the touch buttons. Press on the
words of the touch buttons to select a function. The
available functions are indicated by a light above the
respective touch button. Depending on the operation you
are running, the number of available functions can
change.
--------
U
T
)$6735(+($7/,*+7 7,0(56 6(77,1*6 ,1)2 /2&.
6(/)&/($1
2))
025(02'(6
758(&219
&219%$.(
%$.(
&21952$67
5(027(67$57
:$50
3,==$
%52,/
&219%52,/
&/($102'(6
2))
# + 3
7UXH&RQYHFWLRQ
³
6(/)&/($1
2))
025(02'(6
758(&219
&219%$.(
%$.(
&21952$67
5(027(67$57
527,66(5,(
3,==$
%52,/
&219%52,/
&/($102'(6
2))
(
Full touch color display
0
Function selector - Upper Oven
8
Temperature selector - Upper Oven
@
Touch buttons
H
Function selector - Lower Oven
P
Temperature selector - Lower Oven
Touch button Use
LIGHT Switches the appliance light on or off
TIMERS Sets the kitchen timer, or cooking
time
SETTINGS Opens the basic settings menu
FAST PREHEAT Activates/Deactivates fast preheating
INFO Displays additional information
LOCK Activates/Deactivates panel lock

12
Full Touch Color Display
Use the full touch color display to navigate through the
menus and select the settings. The feature that is active
will be illuminated in blue.
Basic way of operating the display:
▯ To select a feature/setting, touch the desired area on
the display.
▯ The touch screen also supports swiping to move left or
right through the various settings.
In some instances you have further options to navigate
through the menu:
▯ For double ovens: Touch the q symbol to select the
upper oven cavity. Touch the r symbol to select the
lower oven cavity.
The settings you make afterwards will only affect the
oven cavity you have selected.
▯ Some operations allow returning to the prior screen by
touching the ; symbol.
▯ Some operations allow confirmation by touching the
8 symbol.
¬
6ORZ5RDVW
Ï
'HK\GUDWH
£
3URRI
Å
0D[%URLO
0D[&RQY%URLO
5RDVW
:DUP
¬
6ORZ5RDVW
Ï
'HK\GUDWH
£
3URRI
Å
0D[%URLO
0D[&RQY%URLO
5RDVW
:DUP
'HVFDOH
U
T
¬
6ORZ5RDVW
Ï
'HK\GUDWH
£
3URRI
Å
0D[%URLO
0D[&RQY%URLO
:DUP
(DV\&OHDQ

13
Heating Modes Menu
Your appliance has multiple heating modes. After
switching the appliance on, you can select the desired
heating mode and temperature using the rotary
selectors.
Heating mode Temperature
°F (°C)
Use
‚
True Convection 150-525°
(65-275°)
For baking and cooking small food items on one or more racks.
The fan distributes the heat from the ring heating element in the
back panel evenly around the oven cavity.
¶
Convection Bake 150-525°
(65-275°)
Use for large baked items and breads on 1 or 2 racks. Also
suitable for side dishes and casseroles.
Heat is emitted from above and below while the fan distributes
the heat evenly around the oven cavity.
ƒ
Bake 150-525°
(65-275°)
For traditional baking and roasting on one level. Especially
suitable for cakes on multiple racks. Heat is emitted evenly from
the top and bottom.
þ
Convection Roast 150-525°
(65-275°)
Roasting of poultry, larger pieces of meat and vegetables.
Heat is emitted from above and below while the fan distributes
heat evenly around the oven cavity.
Remote Start For starting an oven operation using your mobile device.
Allows for changes to be made in current operation or starting a
new operation.
μ
Rotisserie 175°-550°
(80°-290°)
For roasting poultry and large pieces of meat. Food is slowly
turned on a skewer.
Uses heat radiated from the upper element.
ú
Pizza 150-525°
(65-275°)
For preparing pizza fresh or frozen.
Heat is emitted from above and below. The fan distributes the
heat evenly around the oven cavity.
‰
Broil 450-550°
(230-290°)
For broiling flat items, such as steaks or hamburgers, for
making toast, and for cooking au gratin.
The whole area under the broil heating element becomes hot.
‡
Convection Broil 450-550°
(230-290°)
For roasting poultry, whole fish and larger pieces of meat.
The broil element and the fan switch on and off intermittently.
The fan circulates the hot air around the food.
Clean Modes For selecting available cleaning modes.
More Modes
÷
Speed Convection 150-525°
(65-275°)
For frozen convenience foods.
Heat is emitted from top and bottom while the fan circulates hot
air around the food.
¿
Warm* 150-225°
(65-110°)
For keeping cooked food warm.
Œ
Proof 85-110°
(30-45°)
For yeast doughs and sourdough.
Dough will rise considerably more quickly than at room
temperature. The surface of the dough does not dry out.
ý
Dehydrate 100-160°
(40-70°)
For drying herbs, fruits and vegetables.
ÿ
Slow Roast 150-250°
(65-120°)
For gentle slow cooking of seared, tender pieces of meat in
ovenware without a lid.
Heat is emitted evenly from the top and bottom at low
temperatures.
ù
Max Convection Broil 450°-550°
(230°-290°)
For thick tender cuts of meat, poultry and fish. Uses the larger
broil element with the convection fan to allow for more food to
cook at one time.
ˆ
Max Broil 450°-550°
(230°290°)
For cooking thin, tender cuts of meat, poultry and fish. Uses the
larger broil element to allow cooking more food at one time.

14
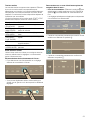
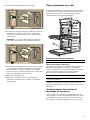
General Tips-Conventional Oven
Pan Placement
Baking results are better if pans are placed in the center
of the oven. If baking more than one pan on a rack, allow
at least 1" to 1 ½ " of air space around the pan.
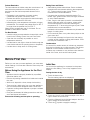
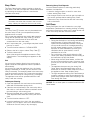
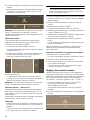
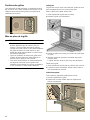
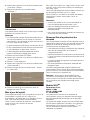
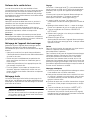
One Rack Baking
For best results when baking layer cakes on one rack,
use Bake Mode. Place the cakes on rack 4 in the oven
as shown below.
2 Cakes, Rack Level 4
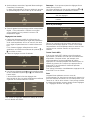
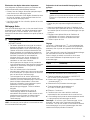
Multiple Rack Baking for Cakes
When baking four layer cakes at the same time, stagger
pans on two racks so that one pan is not directly above
the other. For best results use Bake mode. Place the
cakes on racks 3 and 5, staggering the cakes in the
oven as shown below.
4 Cakes, Rack Placement 3 and 5
For best results when baking cookies on multiple racks,
use True Convection mode. Place cookies on racks 3
and 6.
Aluminum Foil
9 WARNING
Do not use aluminum foil or protective liners to line
any part of the appliance, especially the oven
bottom. Installing these liners may result in risk of
electric shock or fire.
Preheating the Oven
▯ Place oven racks in desired position before heating
the oven.
▯ Preheat the oven when using the Bake, Convection
Bake, True Convection, Pizza, Broil, Convection Broil,
and Warm modes.
▯ Preheat is not required for Speed Convection, Roast,
Convection Roast, Proof, and Dehydrate modes.
▯ Allow oven to preheat while preparing recipe
ingredients or food items.
▯ Setting a higher temperature does not shorten preheat
time.
▯ Once oven is preheated, open the oven door and
place food in the oven as quickly as possible to
minimize the loss of heat and reduction of oven
temperature.
▯ Use Fast Preheat to speed up preheating.
ü
Roast 150-525°
(65-275°)
For roasting poultry or meats.
The heat is emitted from above and below.
›
Sabbath 100-450°
(40-230°)
Will appear in Heating Modes if enabled in Settings.
See Sabbath Mode section under General Operations Chapter.
›
Yom Tov 100-450°
(40-230°)
Will appear in Heating Modes if enabled in Settings.
See Yom Tov Mode section under General Operations Chapter.
* Warm Mode is found in Rotisserie Mode knob position for lower oven.

15
Preheat Reminders
The lower element is hidden under the oven bottom. It is
normal that the preheat time is different than your
previous oven that had an exposed element on the
bottom.
▯ Preheating is not necessary for meats, poultry,
casseroles and Speed Convection mode.
▯ Preheat time will be longer when the electrical supply
to your house is less than 240 volts.
▯ Increasing the oven temperature will require a longer
preheat time. For example, the preheat time for 425° F
is longer than the preheat time for 350° F.
When broiling, preheat the oven 3-4 minutes. Do not
preheat for more than 5 minutes.
For Best Results
▯ Use the cooking recommendation charts which can be
found in the Cooking Charts Use and Care Guide.
▯ Open the door as briefly as possible to avoid
temperature reduction.
▯ Use the interior oven light to view the food through the
oven window rather than opening the door frequently.
▯ Use the timer to keep track of cooking times.
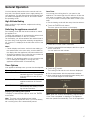
Baking Pans and Dishes
▯ Glass baking dishes absorb heat. Some cookware
manufacturers recommend reducing the temperature
25° F when using this type of dish. Follow
manufacturers’ recommendations.
▯ Use pans that provide the desired browning. For
tender, light, golden brown crusts, use light, anodized
or shiny metal bakeware.
▯ Dark, rough or dull pans (nonstick or anodized) will
absorb heat and result in a browner, crisper crust.
Some manufacturers recommend reducing the
temperature 25° F when using this type of pan. Follow
manufacturers’ recommendations.
▯ Insulated cookie sheets or bakeware may increase the
length of cooking time.
▯ Do not set broil pans or any other heavy object on the
open oven door.
▯ Do not keep the empty broil pan in the oven during
cooking as this changes cooking performance. Store
the broil pan outside the oven.
Condensation
It is normal for certain amount of moisture to evaporate
from the food during any cooking process. The amount
depends on the moisture content of the food. The
moisture may condense on any surface cooler than the
inside of the oven, such as the control panel.
Before First Use
Before you can use your new appliance, you must enter
certain settings. You must also clean the oven cavity and
accessories.
Before Using the Appliance for the First
Time
▯ Appliance must be properly installed by a qualified
technician before use.
▯ Remove all packing materials from inside and outside
the oven.
▯ While cool, wipe with a clean, damp cloth and dry.
▯ There may be a slight odor from your new appliance;
this is normal and will disappear after a short time.
▯ Optimum cooking results depend on proper cookware
being used.
▯ Read and understand all safety precautions and Use
and Care Manual information.
Execute the following sections prior to operating:
Initial Use
As soon as the appliance is connected to the power
supply, the first setting "Time of day" appears on the
display.
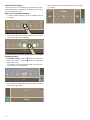
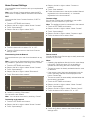
Setting the time of day
1.
Touch the bottom line.
The time setting options are displayed.
2.
Touch the “Hours” touch field and swipe to the left or
right to select the current hour.
3.
Touch the "Minutes" touch field and swipe to the left or
right to select the current minute.
4.
Touch the 8 symbol to apply the settings.
0LQXWHV
+RXUV

16
Setting the language
1.
Touch the bottom line.
2.
Swipe to the left or right to select the required
language.
3.
Touch the top line.
Setting the Clock Display
1.
Touch "Clock display".
2.
Touch the bottom line.
3.
Swipe to the left or right to select “digital” or
“analogue”.
4.
Touch the top line.
Setting up Home Connect
You can start the Home Connect assistant to connect to
the Home Connect network and pair your mobile device.
1.
Touch “Home Connect”.
2.
Touch “Start assistant”.
3.
Follow the instructions in the chapter “Home
Connect”.~ "Home Connect" on page 29
Note: You can also activate this feature later in the
“Settings” menu.~ "Adjust Basic Settings" on page 16
Notes
▯ You can change these settings at any time in the basic
settings.
▯ After connecting the appliance to the power or
following a power failure, the settings for initial use are
shown in the display.
Cleaning the Accessories
Clean the accessories thoroughly using soapy water and
a dish cloth or soft brush.
Adjust Basic Settings
You can adjust various settings of your appliance, to
make using your appliance easy and convenient. If
necessary, you can change these settings in the menu
“Settings”.
Changing the Settings
The appliance has to be switched off.
1.
Touch the SETTINGS touch button.
2.
Swipe to the left or right to select the required setting.
3.
Touch the bottom line.
4.
Swipe to the left or right to select the required setting.
5.
If required touch the 8 symbol to apply the setting.
6.
Touch the top line.
7.
Touch the SETTINGS touch button.
8.
Touch "Save" to save the changes.
Available Settings
--------
/DQJXDJH
(QJOLVK
6HWWKHODQJXDJH\RXUHTXLUH
7LPHRI'D\ &ORFN'LVSOD\
/DQJXDJH
(QJOLVK
6HWWKHODQJXDJH\RXUHTXLUH
)UDQoDLV(VSDxRO
Setting Option
Time of day Time in hours and minutes
Language English, Français, Español
Clock format 12 hr, 24 hr
Clock display Digital, Analogue
Signal volume 1 - 5
Key press sound On, Off
Display
brightness
1 - 5
Standby mode On, Off
Convection
Conversion
On, Off
Decreases oven temperature by
25° F (4 °C)
Temperature
offset
▯ Temp offset: Upper
-35°F to +35° F
(-20 °C to +20 °C)
▯ Temp offset: Lower
-35°F to +35° F
(-20 °C to +20 °C)
Sabbath mode On, Off
Home Connect WiFi: On, Off
Remote control: On, Off
Disconnect from network
Connect to app
Show network status
Customer Service access:
▯ Allow (Display shows t)
▯ Deny
Demo mode On, Off
Factory settings Restore
Customer
Service
Displays Customer Service contact
information

17
General Operation
You have already learned about the controls and how
they work. Now we will explain how to apply settings on
your appliance. You will learn about what happens when
you switch the appliance on and off, and how to select
the operating mode.
High Altitude Baking
When cooking at high altitudes, recipes and cooking
times will vary.
Switching the appliance on and off
Set a heating mode with the function selector to switch
the appliance on.
To switch the appliance off set the function selector and
the temperature selector to the OFF position.
On the display, you will see whether the residual heat in
the oven cavity is still high after switching the appliance
off. “Oven hot” is displayed in the left lower corner of the
display.
Notes
▯ Certain displays and notes, such as those relating to
the residual heat in the oven cavity, remain visible on
the display after the appliance has been switched off.
▯ After device operation, the cooling fan may continue to
operate until the oven cavity has cooled.
▯ Switch off your appliance when you do not need to use
it. If no settings are applied for a long time, the
appliance switches itself off automatically.
Timer Options
Your appliance will beep once your set time has elapsed.
Displaying and hiding timer options
To display or hide the timer options, touch the TIMERS
touch button.
Note: The timer options displayed are hidden
automatically after a particular time. If you have already
set a cooking time, this is automatically stored.
Oven Timer
You can set the cooking time for your meal on the
appliance. This means that the oven will turn off after the
oven timer is complete. This offers convenience for you
so you do not need to interrupt other work to tend to your
meal.
1.
Set the heating mode with the rotary function selector.
2.
Touch the TIMERS touch button.
The timer options are shown on the display.
3.
Touch the “+ Oven Timer” touch field.
4.
Touch the required field and swipe to the left or right to
set the oven timer.
You can set hours and minutes.
5.
Touch the 8 symbol.
The heating mode and the cook time are displayed.
6.
Set the temperature with the temperature selector.
7.
After a few seconds the appliance starts heating and
the cook timer begins to count down.
Note: When the set time has elapsed, a signal sounds.
“Oven Timer completed” is displayed. The appliance
ends the operation automatically. Turn off the appliance.
Timer option Use
.
Kitchen Timer The kitchen timer works like any
standard egg timer. The appliance
does not switch on and off auto-
matically.
+
Oven Timer After the set time has elapsed, the
appliance switches off automati-
cally.
*
End time The appliance switches on and off
automatically after setting a cook-
ing time and end time.
PLQV
&DQFHO
.LWFKHQ7LPHU
KPLQ
&DQFHO
2YHQ7LPHU
5HVHW
(QG7LPH
0LQXWHV
+RXUV
7UXH&RQYHFWLRQ
³
KPLQ

18
Kitchen Timer
The Kitchen Timer can be set when the appliance is
switched on or off.
1.
Touch the TIMERS touch button.
The kitchen timer is shown in the display.
If the appliance is switched on, first touch the
. field.
2.
Swipe to the left or right to select the timer value. You
can set hours, minutes and seconds.
3.
Touch the 8 icon.
The kitchen timer begins to count down.
The . symbol and timer value are displayed in the top
left corner of the display.
Note: When the set time has elapsed, a signal sounds.
“Kitchen Timer completed” is displayed.
Delayed Operation - "End time"
The appliance switches on automatically, then off at the
time preselected for the end of operation. To do this, you
set the cooking time and specify the end of operation.
Delayed operation can only be used in combination with
a heating mode.
Notes
▯ Ensure that food is not left in the oven cavity for too
long, as it may spoil.
▯ The option to delay the start of operation is not
available for every heating mode.
9 CAUTION
To maintain food safety, do not leave food in the
oven for more than one hour before or after
cooking.
1.
Place the food onto the appropriate accessory in the
oven cavity and close the appliance door.
2.
Set the heating mode with the rotary selector.
3.
Touch the TIMERS touch button.
The timer options are shown in the display.
4.
Select Oven Timer and set a cook time. Touch the 8
icon.
5.
Select TIMERS again and set an End Time. Touch the
8 icon.
6.
Select the temperature with the rotary selector.
The appliance waits until the appropriate time to start
the operation.
As soon as the end time has been reached, an audible
signal sounds and the appliance ends the operation
automatically.
Checking, changing or deleting settings
1.
Touch the TIMERS touch button.
The time-setting options are shown in the display.
2.
Touch the required timer option.
3.
Swipe to the left or right on the touch display to
change the settings.
To delete a timer value, set “00:00“, or touch
“Cancel”.
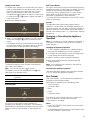
Setting a Heating Mode
Use the function selector and temperature selector to set
the operating mode and temperature.
Use the touch buttons and the touch fields on the touch
screen to enter the different operating menus.
Example: True Convection with 325° F (160 °C)
1.
Turn the function selector to TRUE CONV to switch on
the appliance.
You go directly to the True Convection mode.
2.
Turn the temperature selector to the required
temperature.
3.
After a few seconds the appliance starts operating.
For heating modes that require a preheat the status
bar appears in the display to indicate the preheating
progress.
4.
When the appliance has reached the set temperature,
“Oven preheated” is displayed and an audible signal
sounds. The oven continues cooking with the set
temperature.
0LQXWHV+RXUV 6HFRQGV
7UXH&RQYHFWLRQ
³
7UXH&RQYHFWLRQ
³

19
Setting Double Oven
1.
Use the rotary selectors on the left side of the control
panel to make settings for the upper oven cavity, use
the rotary selectors on the right side of the control
panel to make settings for the lower oven cavity.
For additional settings select the upper or lower cavity
by touching the q or r symbol to select the upper or
lower oven cavity.
2.
Make your settings as usual.
3.
When you have finished the settings for the first oven
cavity, touch the q or r symbol to select the other
cavity.
The settings for the two oven cavities are shown side
by side on the display. The upper cavity is on the left,
the lower cavity on the right side of the display.
To adjust the settings, touch the field of the required
oven cavity on the display.
Note: You can only set one oven at a time.
The display icons for the upper q and lower r oven
cavity light up in different colors:
Preheating Bar
As soon as a new heating mode is started, the
preheating bar appears on the display. The preheating
bar indicates the temperature increase in the oven cavity.
When the oven is fully preheated, a sound signal will
occur.
INFO Touch Button
If the INFO touch button lights up, important information
regarding the mode you are using is available. This may
include for example recommendations on suitable
cookware or how to prepare food for a safe cooking
result. When you touch the INFO touch button, the
information is displayed for a few seconds.
To exit the INFO text immediately, touch the INFO touch
button or the display.
Sounds
The appliance uses various sound signals during
operation. A sound signal can be heard whenever you
use a touch button or touch field, or when an operation is
started or finished. You can adjust the volume of these
sounds in the Settings menu. ~ "Adjust Basic Settings"
on page 16
Changing or Cancelling the Appliance
Operation
Note: In a double oven, if both cavities are operating, it
is necessary to select the cavity in which you wish to
make changes.
Changing the appliance operation
1.
To set a different temperature or a different heating
mode use the temperature or function selectors.
2.
To change any other settings, touch the display area
for the setting that should be changed.
3.
Swipe to the left or right to change the setting.
4.
After a few seconds the oven continues with the
changed settings.
Note: The cooling fan may continue to run while an
operation is interrupted.
Cancelling the appliance operation
Turn the temperature selector and the function selector
to OFF to cancel the appliance operation.
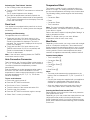
Fast Preheat
With "Fast Preheat", you can shorten the preheat time
required for some heating modes.
Fast Preheat is available for the following modes:
▯ True Convection
▯ Convection Bake
▯ Bake
▯ Roast
▯ Convection Roast
To achieve an even cooking result, do not place your
food or accessories into the oven cavity until
“Fast Preheat” is complete.
Notes
▯ If the FAST PREHEAT touch button is lit, the function
can be activated.
▯ To deactivate the function before it has finished, touch
the FAST PREHEAT touch button.
Blue The oven cavity is selected; you can set
the oven
White The oven cavity is operating
Grey The oven cavity is inactive
7UXH&RQYHFWLRQ
³
U
T
7UXH&RQYHFWLRQ
³
%DNH
7UXH&RQYHFWLRQ
³

20
Activating the "Fast Preheat" function
1.
Set a heating mode and temperature.
2.
Touch the FAST PREHEAT touch button to activate the
function.
The ° symbol appears on the display.
3.
Once the set temperature has been reached, the
"Fast Preheat" function switches itself off automatically.
The
° symbol disappears from the display. Place the
food in the oven cavity.
Panel Lock
Your appliance is equipped with a panel lock so that it
cannot be switched on or a setting cannot be changed
accidentally.
Activating and Deactivating
The appliance has to be turned off.
1.
Touch and hold the LOCK touch button (or the
TIMERS touch button if LOCK is not present) until
"Panel Lock activated" is displayed. The lock is
activated. The 1 symbol is displayed in the top left
corner of the display.
2.
Touch and hold the LOCK touch button (or the
TIMERS touch button if LOCK is not present) until
"Panel Lock deactivated" is displayed.
The lock is deactivated.
Note: If the unit has a warming drawer, the TIMERS
touch button must be used.
Auto Convection Conversion
True Convection and Convection Bake modes require a
25° F (5 °C) reduction in temperature. Auto Convection
Conversion reduces the temperature you enter
automatically.
Enter the package or recipe temperature when setting
the mode. The oven control calculates the correct
temperature for these modes automatically by reducing
the input temperature by 25° F (5 °C). This is then
shown in the display.
To turn on this feature:
1.
Ensure the oven is turned off.
2.
Press the SETTINGS touch button.
3.
Scroll over to Conv. Conversion.
4.
Touch the bottom of the screen and select ON.
5.
Touch the top of the screen.
6.
Press the SETTINGS touch button again to accept.
7.
Select “Save” to save your settings.
Temperature Offset
This feature is useful if food is consistently either too
brown or too light. The setting increases or decreases
the set oven temperature according to the chosen value.
The following heating modes support this functionality:
▯ Bake
▯ Convection Bake
▯ Roast
▯ Convection Roast
▯ True Convection
Note: The oven is carefully calibrated to provide
accurate results. This feature is useful if you prefer your
foods darker or lighter.
Refer to the section entitled “Adjusting Basic Settings” to
apply a temperature offset.
Note: For double ovens you can set a different
temperature offset for each oven cavity.
Meat Probe
Depending on the model, your oven comes with a single-
point or a multi-point meat probe. This means that the
probe measures the temperature either in one or in three
different areas of your food ensuring the most accurate
cooking results. Once the set temperature has been
reached, the appliance automatically switches itself off.
Suitable Heating Modes
▯ True Convection ‚
▯ Convection Bake ¶
▯ Bake ƒ
▯ Convection Roast þ
▯ Roast ü
▯ Slow Roast ÿ
Notes
▯ The meat probe measures the temperature on the
inside of the food between 85° F (30 °C) and 210° F
(99 °C).
▯ Use only the meat probe supplied with your appliance.
Additional or replacement meat probes can be
ordered as a spare part from Customer Service.
▯ After use, always remove the meat probe from the
oven cavity. Never store it inside the oven cavity.
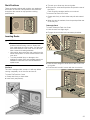
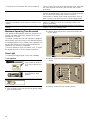
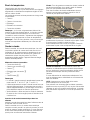
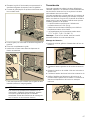
Inserting the Meat Probe into the Food
Before placing your food into the oven cavity, insert the
meat probe into the food.
Depending on your oven model, the meat probe has one
(single-point meat probe) or three (multi-point meat
probe) measuring points. If you have a multi-point meat
probe, ensure that the middle measuring point is inserted
in the food.
Page is loading ...
Page is loading ...
Page is loading ...
Page is loading ...
Page is loading ...
Page is loading ...
Page is loading ...
Page is loading ...
Page is loading ...
Page is loading ...
Page is loading ...
Page is loading ...
Page is loading ...
Page is loading ...
Page is loading ...
Page is loading ...
Page is loading ...
Page is loading ...
Page is loading ...
Page is loading ...
Page is loading ...
Page is loading ...
Page is loading ...
Page is loading ...
Page is loading ...
Page is loading ...
Page is loading ...
Page is loading ...
Page is loading ...
Page is loading ...
Page is loading ...
Page is loading ...
Page is loading ...
Page is loading ...
Page is loading ...
Page is loading ...
Page is loading ...
Page is loading ...
Page is loading ...
Page is loading ...
Page is loading ...
Page is loading ...
Page is loading ...
Page is loading ...
Page is loading ...
Page is loading ...
Page is loading ...
Page is loading ...
Page is loading ...
Page is loading ...
Page is loading ...
Page is loading ...
Page is loading ...
Page is loading ...
Page is loading ...
Page is loading ...
Page is loading ...
Page is loading ...
Page is loading ...
Page is loading ...
Page is loading ...
Page is loading ...
Page is loading ...
Page is loading ...
Page is loading ...
Page is loading ...
Page is loading ...
Page is loading ...
-
 1
1
-
 2
2
-
 3
3
-
 4
4
-
 5
5
-
 6
6
-
 7
7
-
 8
8
-
 9
9
-
 10
10
-
 11
11
-
 12
12
-
 13
13
-
 14
14
-
 15
15
-
 16
16
-
 17
17
-
 18
18
-
 19
19
-
 20
20
-
 21
21
-
 22
22
-
 23
23
-
 24
24
-
 25
25
-
 26
26
-
 27
27
-
 28
28
-
 29
29
-
 30
30
-
 31
31
-
 32
32
-
 33
33
-
 34
34
-
 35
35
-
 36
36
-
 37
37
-
 38
38
-
 39
39
-
 40
40
-
 41
41
-
 42
42
-
 43
43
-
 44
44
-
 45
45
-
 46
46
-
 47
47
-
 48
48
-
 49
49
-
 50
50
-
 51
51
-
 52
52
-
 53
53
-
 54
54
-
 55
55
-
 56
56
-
 57
57
-
 58
58
-
 59
59
-
 60
60
-
 61
61
-
 62
62
-
 63
63
-
 64
64
-
 65
65
-
 66
66
-
 67
67
-
 68
68
-
 69
69
-
 70
70
-
 71
71
-
 72
72
-
 73
73
-
 74
74
-
 75
75
-
 76
76
-
 77
77
-
 78
78
-
 79
79
-
 80
80
-
 81
81
-
 82
82
-
 83
83
-
 84
84
-
 85
85
-
 86
86
-
 87
87
-
 88
88


Thermador POD302LW User manual
- Category
- Kitchen & houseware accessories
- Type
- User manual
Ask a question and I''ll find the answer in the document
Finding information in a document is now easier with AI
in other languages
- français: Thermador POD302LW Manuel utilisateur
Related papers
-
Thermador MED302LWS User guide
-
Thermador PODMCW31W User guide
-
-
Thermador MED301RWS User manual
-
-
-
Thermador MEDS302WS User guide
-
-
-
Other documents
-
Bosch HBL8443UC Owner's manual
-
Fujioh FV-EL63 User manual
-
Bosch HBL5651UC/04 User manual
-
Fulgor Milano F6SP30W1 User and Care Guide
-
Bosch HBN5451UC/02 Owner's manual
-
Bosch HBE5453UC User manual
-
Bosch HBL5751UC/01 Owner's manual
-
Bosch HBL8461UC/01 User manual
-
-
Bosch HBL5351UC User manual