Page is loading ...
Page is loading ...
Page is loading ...
Page is loading ...
Page is loading ...
Page is loading ...
Page is loading ...
Page is loading ...
Page is loading ...
Page is loading ...
Page is loading ...
Page is loading ...
Page is loading ...
Page is loading ...
Page is loading ...
Page is loading ...
Page is loading ...
Page is loading ...

19
Index
Important Observations
Disposal of packaging ………………………………20
Disposal of your old appliance ………………………20
Before connecting your new appliance ……………20
If there are children in the home ……………………21
Your new appliance
Description of your appliance ………………………22
Installation requirements
Operation warnings……………………………………24
Transportation requirements…………………………24
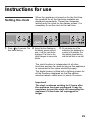
Instructions for use
Setting the clock ………………………………………25
Setting the timer ………………………………………26
Dehumidification ………………………………………28
Operation at low temperatures………………………29
Air purification …………………………………………29
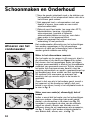
Cleaning and Maintenance
Emptying condensed water …………………………30
Changing the purifying filter …………………………31
Technical service ……………………………………32
Warranty ………………………………………………32
Things that can save you from making
unnecessary phone calls …………………………32
Noise……………………………………………………33

20
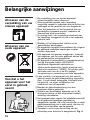
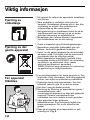
Disposal of
packaging
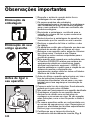
❏ Respect the environment when disposing of the
material your appliance comes packed in.
❏ Our products are all carefully packed for
transportation purposes. The packaging is
designed to not harm the environment. All the
materials used in the production of this packaging
are environmentally friendly or can be re-used.
❏ Recycling the material your appliance comes
packed in helps contribute to the conservation of
raw materials and reduces the amount of waste
produced in the world.
❏ It may be possible to return packaging to the
establishment that supplied you with your
appliance. Contact them for more information.
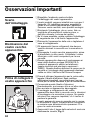
Important Observations
Disposal of your
old appliance
❏ Unplug your old appliance from the mains
electricity supply and cut the power cable.
❏ Appliances of this kind contain refrigerants which
need to be disposed of in accordance with
current regulations.
❏
Do not dispose of your old appliance yourself. Get
in touch with your local council or other competent
body for information about how best to dispose of it.
❏ This appliance is labelled in accordance with
European Directive 2002/96/EG concerning used
electrical and electronic appliances (waste
electrical and electronic equipment - WEEE).
The guideline determines the framework for the
return and recycling of used appliances as
applicable throughout the EU.
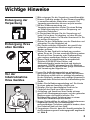
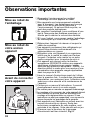
❏ Read the instructions book before using your
appliance for the first time. It contains important
information, not only concerning use, but
maintenance and personal safety as well.
❏ Keep this instructions book. It may be useful for
later owners.
❏ Do not turn a damaged appliance on.
❏ Your appliance must be assembled and connected
in accordance with the assembly instructions and
current regulations. If these instructions are not
observed, you run the risk of losing your warranty.
❏ All our appliances are made in accordance with
present-day safety regulations. Only technicians
instructed in these matters are authorised to
repair them. Your safety is at stake.
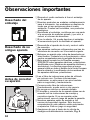
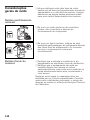
❏ Make sure that the plug is properly inserted in the
drainage valve, Fig. 8.
Before connecting
your new appliance

21
❏ The manufacturer informs that these appliances
are exclusively intended for household and/or
commercial use, commercial being understood
as offices or rooms, the size and characteristics
of which comply with those specified in the
commercial catalogues (except laundries).
❏ Do not sit on, climb onto or lean against the
dehumidifier. The appliance may fall over, hurting
persons and/or damaging objects.
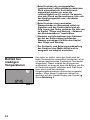
❏ Do not allow children to play or tamper with the
dehumidifier.
❏ Keep small children away from the dehumidifier
to prevent them from hanging from or leaning
against it. The appliance may fall over.
❏ Do not allow children to play with or insert objects
in the air outlets or any other cavity on the
appliance.
If there are
children in the
home

22
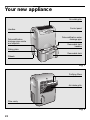
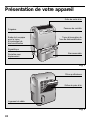
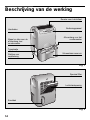
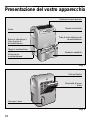
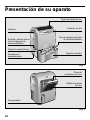
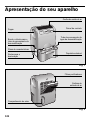
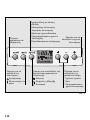
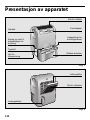
Your new appliance
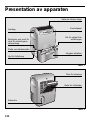
Air outlet grille
Handles
Dehumidification
drainage pipe nozzle
and stopcock
Removable tank
handles
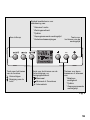
Control panel
Rating plate
Dehumidification water
drainage pipe
Removable tank
Fig. 1
Fig. 2
Wheels
Purifying filters
Air-intake grille
Wire cavity

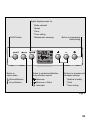
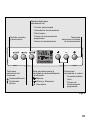
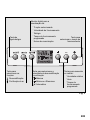
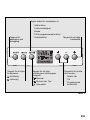
On/Off button
Button to
select mode:
Dehumidification
Air purification
Button to programme
timer setting
Buttons to increase and
decrease settings:
·Relative humidity
·Clock
·Timer setting
Digital display screen for:
·Mode selected
·Speed
·Clock
·Timer setting
·Maintenance warnings
Button to set dehumidification
and purification speed:
Maximum
Minimum or Silent
Automatic
Fig. 3
23

24
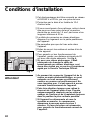
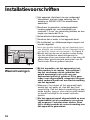
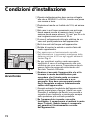
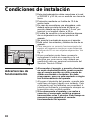
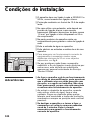
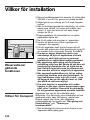
Installation requirements
❏ This appliance must be connected to a 220/240
V 50 Hz mains electricity supply using an
earthed plug.
❏ It must be protected with a 10 A slow-action fuse.
❏ Should an extension lead be needed, this lead
must be at least 1.5 mm
2
per terminal thick, no
more than 25 m. long and earthed.
❏ There is a cavity at the back of the appliance for
the mains electricity lead.
❏ Do not allow water to enter the appliance.
❏ Do not block the air inlets or outlets on your
appliance, especially when used for heating.
❏ To ensure correct appliance operation, maintain
minimum distances of 20 cm to adjacent objects.
see fig 4.
❏ The mains electricity supply connection cable
must only be replaced by authorised
members of the manufacturer’s Official
Technical Service.
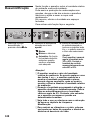
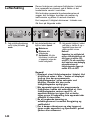
❏ When the appliance is switched on and set to
work in dehumidification mode, the user may
hear a whistling or bubbling sound. There is
no cause for concern; these noises are not
symptomatic of a fault.
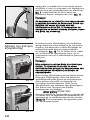
❏ Be careful on removing the tank from the
appliance when full of water. Hold the sides
gently but firmly and try to keep the tank in
as upright a position as possible at all times.
❏ If the appliance is turned off and then turned
back on again, there is a 3-minute interval
before the compressor starts up again. This
interval is necessary in order for the
appliance to work properly.
Operation
warnings
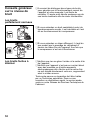
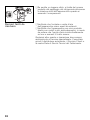
The appliance is fitted with wheels in order to make
it easier to move. Should it be necessary to tilt the
appliance in order to move it, empty the removable
water tank beforehand. See Cleaning and
Maintenance, "Emptying condensed water".
❏ You should not turn the appliance back on again
for a minimum period of one hour.
Transportation
requirements
Fig. 4
mín.
20 cm.
mín.
20 cm.

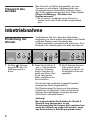
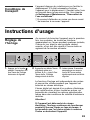
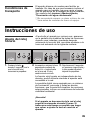
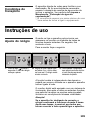
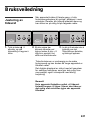
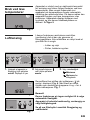
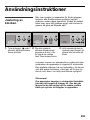
Setting the clock
The clock function is independent of all other
functions and can be used as long as the appliance
is connected to the mains electricity supply.
The digital screen is fitted with a lighting system for
all the functions displayed so that the options
selected remain visible even in poorly lit corners.
Important!
The clock continues working for 8 hours after
the appliance has been unplugged. It may be
necessary to reset the clock on connecting the
appliance if it has been left unplugged for
longer.
When the appliance is turned on for the first time,
the symbols for all the functions available are
displayed momentarily. These then disappear
leaving only the clock on the display screen. It is
necessary to set the clock to the real time:
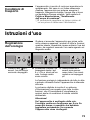
Instructions for use
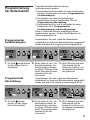
1.
Press for 2 seconds. The
time starts flashing.
2.
Adjust the time flashing on
the display screen using
+
and
–
until the real time is
displayed. The time on the
clock changes in one-minute
blocks.
3.
Do not press any of the
buttons on the appliance for
a period of 5 seconds. The
time display stops flashing
and the real time is now set.
25

26
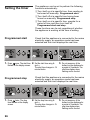
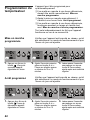
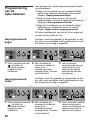
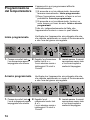
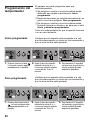
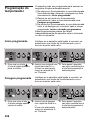
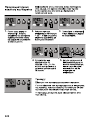
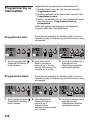
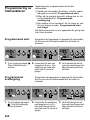
Setting the timer
The appliance can be set to perform the following
functions automatically:
❏ Turn itself on at a specific time, then needing to
be turned off manually. Programmed start.
❏ Turn itself off at a specific time having been
turned on manually. Programmed stop.
❏ Turn itself on at a specific time, operate for a
period of time and then turn itself off.
Programmed start and stop.
These functions can be set regardless of whether
the appliance is working at the time of setting.
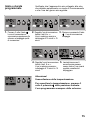
1.
Press once. The start time
flashes on the display screen.
2.
Set the start time using
+
and
–
.
The start time changes in 15-
minute blocks.
3.
Do not press any of the
buttons on the appliance for
a period of 5 seconds. The
start time display stops
flashing and is now set.
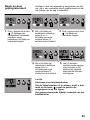
Programmed start
Check that the appliance is connected to the mains
electricity supply, an operation mode has been
selected and the clock displays the real time.
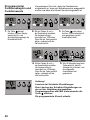
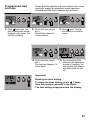
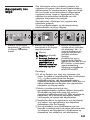
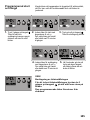
1.
Press twice. The stop
time flashes on the display
screen.
2.
Set the stop time using
+
and
–
.
The stop time changes in 15-
minute blocks.
3.
Do not press any of the
buttons on the appliance for
a period of 5 seconds. The
stop time display stops
flashing and is now set.
Programmed stop
Check that the appliance is connected to the mains
electricity supply, an operation mode has been
selected and the clock displays the real time.

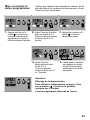
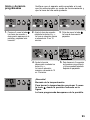
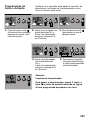
4.
Set the stop time using
+
and
–
.
The stop time changes in 15-
minute blocks.
5.
Do not press any of the
buttons on the appliance for
a period of 5 seconds. The
start and stop time displays
stop flashing and are now
set.
1.
Press three times. The
start and stop times are both
displayed on the screen. The
start time is flashing.
2.
Set the start time using
+
and
–
.
The start time changes in
15-minute blocks.
3.
Press again. The stop
time flashes on the display
screen.
Programmed start
and stop
Check that the appliance is connected to the mains
electricity supply, an operation mode has been
selected and the clock displays the real time.
27
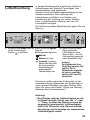
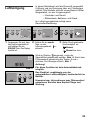
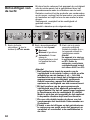
Important!
Deleting the timer setting.
To delete the timer setting, press 3 times
from the position indicated in the figure.
The time setting disappears from the display.

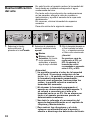
28
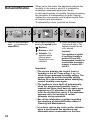
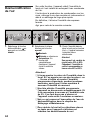
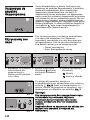
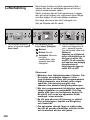
Dehumidification
When set to this mode, the appliance reduces the
humidity in the room in which it is installed by
extracting condensed water from the air.
It rids closed spaces of humidity thereby preventing
the formation of condensation on walls, helping
clothes dry more quickly and lengthening the lives
of furniture and instruments.
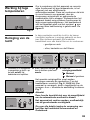
To dehumidify a room, proceed as follows:
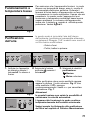
1.
Select the dehumidification
mode by pressing the
mode
button.
2.
Set the speed required by
pressing the
speed
button:
Maximum.
Minimum or silent.
Automatic. The
appliance selects
optimum speed
depending on room
conditions.
3.
Select the desired humidity
level using
+
and
–
, The
appliance records the last
entry selected.
Important!
Your appliance is capable
of regulating humidity to
between 30% and 80%.
Recommended humidity for
a comfortable atmosphere,
however, is between 40%
and 60%.
Important!
❏ The screen displays the current level of
humidity in the air. Press either + or – to
check the programmed humidity setting. The
screen lights up and the humidity setting
flashes for a few seconds before displaying
current humidity once again.
❏ The appliance turns itself off automatically
when the programmed humidity level is
reached and turns itself back on again upon
registering a 5% alteration in the humidity
level. Do not therefore worry if the appliance
appears not to be working at certain
moments during operation.
❏ See all the information provided regarding
the emptying of dehumidification water in
Cleaning and Maintenance.
❏ In order to reduce any noise and/or vibration,
place a mat beneath the appliance and
eliminate/reduce unevenness on the floor.

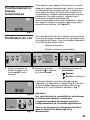
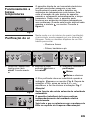
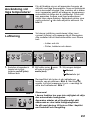
The air inside the room (ventilation) is circulated
through a filtering system when the appliance is set
to this function. All models have a basic filter
against
– Smells and smoke.
– Pollen, bacteria and dust.
The purifying filter needs to be replaced when is
displayed on the screen. Fig. 6. When the filter has
been changed, press + and – at the same time to
cancel the “change filter” indication. Fig. 7.
Important!
Automatic speed cannot be selected when the
appliance is set to this mode.
The appliance works non-stop regardless of the
programmed humidity setting.
See all the information provided regarding filter
replacement in Cleaning and Maintenance.
Air purification
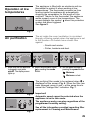
Operation at low
temperatures
The appliance is fitted with an electronic anti-ice
thermostat to protect it when working at low
temperatures. The thermostat prevents ice from
forming inside the appliance by automatically
stopping the compressor for the length of time
required. Thanks to this thermostat, the appliance
works properly even at low temperatures. The
screen displays the symbol when this protection
system has been triggered.
See figure 5.
1.
Make sure that the appliance
is plugged in and press
on/off
. The display screen
lights up.
2.
Select the purification mode
by pressing the
mode
button
.
3.
Set the speed required by
pressing the
speed
button:
Maximum.
Minimum or silent.
Fig. 5
Fig. 6
Fig. 7
29

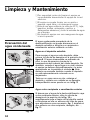
30
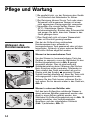
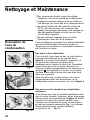
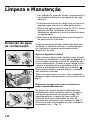
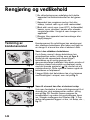
Emptying
condensed water
Cleaning and Maintenance
❏ For safety reasons, you should unplug the
appliance from the mains electricity supply
before cleaning it.
❏ The appliance can be cleaned with a cloth or
sponge, slightly warm water and a mild
detergent.
❏ Never use hot water (more than 40ºC), bleach,
petrol, acid, scouring pads, brushes or strong
detergents. Prevent water from entering the
appliance.
❏ Do not clean the appliance with a water hose or
compressed air.
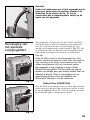
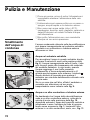
Condensed water collected by dehumidification can
be stored in the removable tank or piped to an
external receptacle or drainage system.
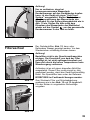
Water in the removable tank
To collect the condensed water produced during
dehumidification in this tank, set the drainage
stopcock to the position indicated in figure 8. As
the tank is transparent the water level can be
checked at any time. When the level reaches its
maximum level, however, the machine stops and
the symbol is displayed on the screen. This
symbol also appears when the tank has not been
fitted properly.
In either case, remove the tank and carefully pour
its contents down the drain. Carry the tank as
shown in fig. 9.
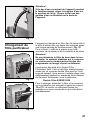
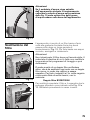
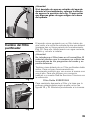
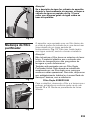
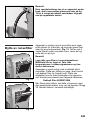
Water to an external receptacle or drainage
system
If you wish the water produced during
dehumidification to be collected in an external
receptacle, set the drainage stopcock to the
position indicated in fig. 10 and remove the plug
from the central nozzle. Insert one end of the
rubber pipe provided as an accessory onto the
nozzle, fig. 1, and lead the other end of the pipe
into a receptacle, drainage system, etc…, fig. 11.
Fig. 10
Fig. 8
Fig. 9

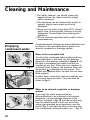
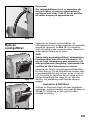
Changing the
purifying filter
The appliance is supplied with a basic air filter
joined to the air inlet grille. This filter needs to be
cleaned when the appliance has been in operation
for a long period of time, Fig. 12. To clean the filter,
flush it under a running tap, dry and replace.
Warning!
Do not try to clean the basic filter in a
dishwasher. The plastic the basic filter is made
of is unable to withstand the high temperatures
involved in washing programmes and may
deform.
The appliance is also fitted with a Double Active
Purifying Filter. This filter must be changed on a
yearly basis in order for the appliance to work
properly and can be acquired at high street
suppliers or from our Technical Service Network.
The reference of the filter is:
Double Filter B1REZ12000
To change the filter, dismantle the filter and the
cover which protects it, extracting them as shown
in figures 12 and 13. Reassemble by following the
same procedure in reverse order.
Fig. 11
Important!
If the water tank is extracted during operation,
set the water stopcock to the position indicated
in fig. 10 to prevent any water from dripping
onto the base of the appliance.
31
Fig. 12
Fig. 13

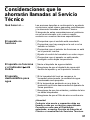
32
Things that can save you from
making unnecessary phone calls
The suggestions below will help you to correct
minor faults for yourself and save you calls to
Technical Services.
If, after checking through these possibilities, the
problem remains unsolved, contact our specialised
technical service.
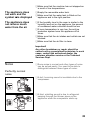
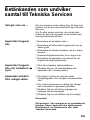
What to do if ...
❏ Make sure that the appliance is plugged in properly.
❏ Make sure that there is power in the mains
electricity supply and all the fuses are in working
order.
❏ Make sure that the mode selector is not set to
off.
❏ Adjust the humidity setting to a higher level.
The appliance doesn’t
work
Technical Service
Should your appliance fail to work properly and all
the instructions for use and installation (especially
the section headed "Things that can save you
from making unnecessary phone calls") have
been carefully observed, then remember that our
Technical Service Network is at your full disposal.
When contacting the Technical Service, quote the
model code (E-NR) and the appliance’s factory
number (FD). This information can be found on the
characteristics plate.
Warranty
The conditions of warranty depend on the relevant
supplier in a particular country. Contact the
establishment where you purchased your appliance
for more information and quote the appliance
model code (E-NR) and factory number (FD)
The receipt of purchase for the appliance must be
produced prior to any work carried out under
warranty.

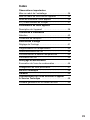
❏ Make sure that the machine has not stopped as
a result of low temperatures.
❏ If the humidity level in the room is similar to the
humidity level set on the appliance, the amount
of condensed water collected should be low.
❏ If room temperature is very low, the anti-ice
protection system turns the appliance off at
times.
❏ Make sure that the air intakes and outlets are not
blocked.
❏ Make sure that the air filter is clean.
Important!
Any other breakdown or repair should be
carried out by a specialised technician. In such
cases, contact the authorised dealer, the
customer attention service or the Technical
Services Dept.
The appliance does
not remove much
water from the air
❏ Empty the removable water tank.
❏ Make sure that the water tank is fitted on the
appliance and in the right position.
The appliance does
not work and the
symbol is displayed
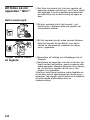
33
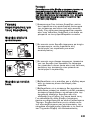
❏ Some noise is normal and other types of noise
can be solved easily. You need to be able to
distinguish between these types of noise:
Perfectly normal
noise
Noise
❏ A dull, humming sound is inevitable due to the
compressor.
❏ A faint, whistling sound is due to refrigerant
passing through the thinner pipes on the
appliance when the compressor starts up.

34
Easy-to-solve noises
❏ Make sure that the air intakes and outlets on the
appliance are free of obstruction.
❏ Make sure that the appliance is not in direct
contact with furniture or other appliances. The air
output may be flowing directly onto these and
increasing the noise level.
Any other type of fault or repair work should be
dealt with by a specialised Technician. Get in touch
with your authorised dealer, customer service or
the Manufacturer’s Technical Service Network.
Page is loading ...
Page is loading ...
Page is loading ...
Page is loading ...
Page is loading ...
Page is loading ...
Page is loading ...
Page is loading ...
Page is loading ...
Page is loading ...
Page is loading ...
Page is loading ...
Page is loading ...
Page is loading ...
Page is loading ...
Page is loading ...
Page is loading ...
Page is loading ...
Page is loading ...
Page is loading ...
Page is loading ...
Page is loading ...
Page is loading ...
Page is loading ...
Page is loading ...
Page is loading ...
Page is loading ...
Page is loading ...
Page is loading ...
Page is loading ...
Page is loading ...
Page is loading ...
Page is loading ...
Page is loading ...
Page is loading ...
Page is loading ...
Page is loading ...
Page is loading ...
Page is loading ...
Page is loading ...
Page is loading ...
Page is loading ...
Page is loading ...
Page is loading ...
Page is loading ...
Page is loading ...
Page is loading ...
Page is loading ...
Page is loading ...
Page is loading ...
Page is loading ...
Page is loading ...
Page is loading ...
Page is loading ...
Page is loading ...
Page is loading ...
Page is loading ...
Page is loading ...
Page is loading ...
Page is loading ...
Page is loading ...
Page is loading ...
Page is loading ...
Page is loading ...
Page is loading ...
Page is loading ...
Page is loading ...
Page is loading ...
Page is loading ...
Page is loading ...
Page is loading ...
Page is loading ...
Page is loading ...
Page is loading ...
Page is loading ...
Page is loading ...
Page is loading ...
Page is loading ...
Page is loading ...
Page is loading ...

115
PPeerriieeccoommeennaa
SShhmmaannttiikkeevv ppaarraatthhrrhhsseeiivv
Aposursh thv suskeuasiav ...............................116
Aposursh thv palaiav suskeuhv sav ..............116
Prin sundesete th suskeuh sto reuma ............116
Se periptwsh pou uparcour paidia sta spiti
.....117
PPeerriiggrraajjvv tthhvv ssuusskkeeuuhhvv ssaavv
............................118
SSuunnqqhhkkeevv eeggkkaattaassttaasshhvv
Proeidopoihseiv leitourgiav.............................120
Sunqhkev metajorav ..........................................121
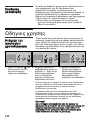
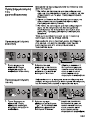
OOddhhggiieevv ccrrhhsshhvv
Ruqmish tou wrologiou cronodiakopth...........121
Programmatismov tou cronodiakopth .............122
Ajugransh tou aera...........................................124
Leitourgia se camhlev qermokrasiev ..............125
Exugeiansh tou aera...........................................125
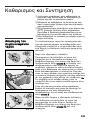
KKaaqqaarriissmmoovv kkaaii SSuunntthhrrhhsshh
Aposursh tou sumpuknwmenou nerou .............126
Allagh tou jiltrou exugeianshv......................127
TTeeccnniikkoo SSeerrbbiivv
.....................................................128
EEgggguuhhsshh
................................................................128
YYppooddeeiixxeeiivv ggiiaa nnaa aappoojjeeuuggeettee aasskkooppaa
tthhlleejjwwnnhhmmaattaa ssttoo TTeeccnniikkoo SSeerrbbiivv
...................128
Cenikev parathrhseiv gia touv qorubouv.......130

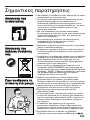
AAppoossuurrsshh tthhvv
ssuusskkeeuuaassiiaavv
❏ Na sebeste to periballon otan aposurete ta ulika
suskeuasiav thv suskeuhv sav.
❏ Ta proionta mav ampalarontai prosektika gia na
projulassontai kata th metajora touv. H
suskeuasia scediazetai kata tropo wste na mhn
einai epikindunh gia to jusiko periballon. Ta ulika
thv mporoun na anakuklwqoun mia pou einai
oikologika proionta.
❏ Me thn anakuklwsh twn ulikwn suskeuasiav
suneisjerete ki eseiv apo th mia sthn exoikonomhsh
prwtwn ulwn kai, apo thn allh, sth meiwsh tou
ogkou twn apoblhtwn.
❏ An to apodecetai, mporeite na epistreyete th
suskeuasia sto katasthma apo to opoio
promhqeuthkate th suskeuh.
Shmantikev parathrhseiv
AAppoossuurrsshh tthhvv
ppaallaaiiaavv ssuusskkeeuuhhvv
ssaavv
❏ Ajaireste to busma thv suskeuhv apo to reuma kai
koyte to kalwdio sundeshv.
❏ Oi suskeuev periecoun yuktikev ousiev pou prepei
na exoudeterwnontai sumjwna me touv iscuontev
kanonismouv.
❏ Paradwste thn palaia sav suskeuh sthn katallhlh
uphresia, anti na apallageite apo authn me alla
mesa. Epikoinwneiste me ton Dhmo sav h me ta
exousiodothmena kentra perisulloghv acrhstwn
suskeuwn gia na thn aposuroun.
❏ Auth h suskeuh carakhrizetai sumjwna me thn
eurwpaikh odhgia 2002/96/EK peri hlektrikwn kai
hlektronikwn suskeuwn (waste electrical and electronic
equipment - WEEE). H odhgia prokaqorizei ta plaisia
gia mia aposursh kai axiopoihsh twn paliwn
suskeuwn me iscu s’ olh thn EE.
❏ Diabaste prosektika to entupo odhgiwn prin
crhsimopoihsete th suskeuh gia prwth jora.
Periecei shmantikev plhrojoriev toso gia th crhsh
thv oso kai gia thn sunthrhsh kai thn asjaleia sav.
❏ Diathreiste auto to entupo odhgiwn. Mporei na
crhsimeusei sto mellon kai se allouv crhstev.
❏ Mhn qetete se leitourgia mia suskeuh pou
parousiazei blabh.
❏ To montarisma kai h sundesh thv suskeuhv prepei
na ginontai sumjwna me tiv odhgiev montarismatov
kai touv iscuontev kanonismouv. An den threite tiv
odhgiev autev, diatrecete ton kinduno na casete
thn egguhsh.
❏ Oi suskeuev mav plhroun touv iscuontev
kanonismouv asjaleiav. Monon eidikeumenoi sta
qemata auto tecnikoi einai exousiodothmenoi na tiv
episkeuazoun. Apo auto exartatai h asjaleia sav.
❏ Na bebaiwneste oti to kapaki thv balbidav
exagwghv nerou einai swsta topoqethmeno,
EEiikk.. 88..
PPrriinn ssuunnddeesseettee tthh
ssuusskkeeuuhh ssttoo rreeuummaa
116
Page is loading ...

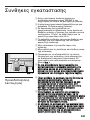
Perigrajv thv suskeuhv sav
Grilia exodou tou aera
podocev ceirwn
Stomio kai balbida gia
to swlhna exagwghv tou
nerou thv ajugranshv
Pinakav elegcou
Plaka carakthristikwn
Swlhnav exagwghv tou
nerou thv ajugranshv
Exagomeno ntepozito
Eik. 1
Eik. 2
Trocoi
metakinhshv
Filtra exugeianshv
tou aera
Grilia eisodou
tou aera
Perisullekthv
kalwdiou
118

119
Plhktro
anammatov kai
sbhsimatov
Plhktro gia na
epilexete tiv
leitourgiev:
Ajugranshv
Exugeianshv tou
aera
Plhktro gia na
epilexete to crono
leitourgiav
Plhktra gia na
auxhsete h na
meiwsete ta exhv:
·Scetikh ugrasia
·Ωra
·Programatismeno
crono leitourgiav
Yhjiakh oqonh me optikev
endeixeiv:
·Epilegmenhv leitourgiav
·Tacuthtav leitourgiav
·Ωrologiou cronodiakopth
·Programmatismenou cronou
leitourgiav
·Proeidopoihsewn sunthrhshv
Plhktro gia na epilexete thn
Tacuthta ajugranshv kai
exugeianshv:
Megisth
Elacisth h Aqorubh
Automath
Eik. 3
Page is loading ...
Page is loading ...
Page is loading ...
Page is loading ...
Page is loading ...
Page is loading ...
Page is loading ...
Page is loading ...
Page is loading ...
Page is loading ...
Page is loading ...
Page is loading ...
Page is loading ...
Page is loading ...
Page is loading ...
Page is loading ...
Page is loading ...
Page is loading ...
Page is loading ...
Page is loading ...
Page is loading ...
Page is loading ...
Page is loading ...
Page is loading ...
Page is loading ...
Page is loading ...
Page is loading ...
Page is loading ...
Page is loading ...
Page is loading ...
Page is loading ...
Page is loading ...
Page is loading ...
Page is loading ...
Page is loading ...
Page is loading ...
Page is loading ...
Page is loading ...
Page is loading ...
Page is loading ...
Page is loading ...
Page is loading ...
Page is loading ...
Page is loading ...
-
 1
1
-
 2
2
-
 3
3
-
 4
4
-
 5
5
-
 6
6
-
 7
7
-
 8
8
-
 9
9
-
 10
10
-
 11
11
-
 12
12
-
 13
13
-
 14
14
-
 15
15
-
 16
16
-
 17
17
-
 18
18
-
 19
19
-
 20
20
-
 21
21
-
 22
22
-
 23
23
-
 24
24
-
 25
25
-
 26
26
-
 27
27
-
 28
28
-
 29
29
-
 30
30
-
 31
31
-
 32
32
-
 33
33
-
 34
34
-
 35
35
-
 36
36
-
 37
37
-
 38
38
-
 39
39
-
 40
40
-
 41
41
-
 42
42
-
 43
43
-
 44
44
-
 45
45
-
 46
46
-
 47
47
-
 48
48
-
 49
49
-
 50
50
-
 51
51
-
 52
52
-
 53
53
-
 54
54
-
 55
55
-
 56
56
-
 57
57
-
 58
58
-
 59
59
-
 60
60
-
 61
61
-
 62
62
-
 63
63
-
 64
64
-
 65
65
-
 66
66
-
 67
67
-
 68
68
-
 69
69
-
 70
70
-
 71
71
-
 72
72
-
 73
73
-
 74
74
-
 75
75
-
 76
76
-
 77
77
-
 78
78
-
 79
79
-
 80
80
-
 81
81
-
 82
82
-
 83
83
-
 84
84
-
 85
85
-
 86
86
-
 87
87
-
 88
88
-
 89
89
-
 90
90
-
 91
91
-
 92
92
-
 93
93
-
 94
94
-
 95
95
-
 96
96
-
 97
97
-
 98
98
-
 99
99
-
 100
100
-
 101
101
-
 102
102
-
 103
103
-
 104
104
-
 105
105
-
 106
106
-
 107
107
-
 108
108
-
 109
109
-
 110
110
-
 111
111
-
 112
112
-
 113
113
-
 114
114
-
 115
115
-
 116
116
-
 117
117
-
 118
118
-
 119
119
-
 120
120
-
 121
121
-
 122
122
-
 123
123
-
 124
124
-
 125
125
-
 126
126
-
 127
127
-
 128
128
-
 129
129
-
 130
130
-
 131
131
-
 132
132
-
 133
133
-
 134
134
-
 135
135
-
 136
136
-
 137
137
-
 138
138
-
 139
139
-
 140
140
-
 141
141
-
 142
142
-
 143
143
-
 144
144
-
 145
145
-
 146
146
-
 147
147
-
 148
148
-
 149
149
-
 150
150
-
 151
151
-
 152
152
-
 153
153
-
 154
154
-
 155
155
-
 156
156
-
 157
157
-
 158
158
-
 159
159
-
 160
160
-
 161
161
-
 162
162
-
 163
163


Ask a question and I''ll find the answer in the document
Finding information in a document is now easier with AI
in other languages
- français: Bosch PAD16001/07 Manuel utilisateur
- Deutsch: Bosch PAD16001/07 Benutzerhandbuch
Related papers
Other documents
-
Siemens PA20001M User manual
-
Fakir Prestige AC9 Owner's manual
-
-
Silvercrest SLE 320 C4 Operating Instructions Manual
-
-
-
Silvercrest SLE 265 B3 Operating Instructions Manual
-
-
 Pro Breeze PB-13-UK-FBA-2 User manual
-
DeLonghi PINGUINO S1000 User manual
