
MIKRO KOMPONENTEN SYSTEM
MICRO-CHAÎNE
SISTEMA MICRO
MIKRO KOMPONENT SYSTEM
MICRO SISTEMI
MICRO SYSTEEM
SISTEMA DE MICRO COMPONENTE
MICRO COMPONENT SYSTEM
MODELL
MODÈLE
MODELO
MODELL
MODELLO
MODEL
MODELO
MODEL
XL-UH240H
BEDIENUNGSANLEITUNG
MODE D’EMPLOI
MANUAL DE MANEJO
BRUKSANVISNING
MANUALE DI ISTRUZIONI
GEBRUIKSAANWIJZING
MANUAL DE OPERAÇÃO
OPERATION MANUAL
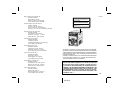
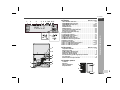
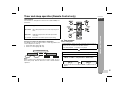
Mikro Komponenten System XL-UH240H besteht aus XL-UH240H (Hauptgerät)
und CP-UH240H (Lautsprechersystem).
Micro-chaîne XL-UH240H composée de XL-UH240H (appareil principal) et CP-
UH240H (enceinte acoustique).
Sistema micro XL-UH240H que consta de XL-UH240H (aparato principal) y CP-
UH240H (sistema de altavoces).
XL-UH240H mikro komponent system bestående av XL-UH240H (huvudenhet)
och CP-UH240H (högtalarsystem).
Micro sistemi XL-UH240H composto da XL-UH240H (apparecchio principale) e
CP-UH240H (sistema di diffusori).
XL-UH240H micro systeem bestaande uit XL-UH240H (hoofdtoestel) en CP-
UH240H (luidsprekersysteem).
XL-UH240H Sistema de Micro Componente composto de XL-UH240H (unidade
principal) e CP-UH240H (sistema de alto-falante).
XL-UH240H Micro Component System consisting of XL-UH240H (main unit) and
CP-UH240H(speaker system).
Siehe Seiten i bis x und D-1 bis D-38.
Se reporter aux pages i à x et F-1 à F-38.
Consulte las páginas i a x y S-1 a S-38.
DEUTSCH
Favor consultar as páginas i a x e P-1 a P-38.
PORTUGUÊS
FRANÇAIS
ESPAÑOL
Hänvisa till sidorna i till x och V-1 till V-38.
Leggere le pagine i a x e I-1 a I-38.
Raadpleeg de bladzijden i t/m x en N-1 t/m N-38.
SVENSKA
ITALIANO
NEDERLANDS
Please refer to pages i to x and E-1 to E-38.
ENGLISH
Note:
This product is not compatible with MTP and AAC file systems.
Page is loading ...
Page is loading ...

03/12/16
iii
XL-UH240H
0307
● Når ON/STAND-BY-knappen er sat i STAND-BY positionen,
er der stadig netspaending til stede i apparatet.
Når ON/STAND-BY-knappen er sat i STAND-BY position,
kan apparatet startes v.hj.a. timer-funksionen eller
fjernbetjeningen.
Advarsel:
Apparatet indeholder ingen dele, der kan repareres af
brugeren selv. Fjern aldrig kabinettet med mindre De er
kvalificeret hertil. Apparatet indeholder farlig
strømspaending. Traek altid stikket ud af stikkontakten før
der foretages reparationer, eller hvis apparatet ikke er i
brug i laengere tid.
DENNA APPARAT ÄR ANSLUTEN TILL 230 V
VÄXELSTRÖM NÄR STICKPROPPEN ÄR INSKJUTEN I
VÄGGUTTAGET. FÖR ATT FULLSTÄNDIGT KOPPLA IFRÅN
APPARATEN, V.G. DRAG UT STICKPROPPEN.
● Audio-visuelles Material kann Urheberrechte umfassen, die
ohne Genehmigung des Eigentümers dieser Urheberrechte
nicht aufgenommen werden dürfen. Siehe die entsprechenden
nationalen Gesetze.
● Le matériel audio-visuel peut comporter des oeuvres faisant
l’objet de droits d’auteur qui ne peuvent être enregistrées sans
l’autorisation du possesseur du droit d’auteur, veuillez vous
référer aux réglementations nationales en vigueur.
● El material audiovisual puede consistir en trabajos que tengan
derechos de autor y que no deben grabarse sin la autorización
del poseedor de dichos derechos de autor. Sírvase consultar
las leyes aplicables en su país.
● Audiovisuellt material kan innehålla upphovsrättsarbete som
inte skall mångfaldigas utan tillstånd av copyrightinnehavaren.
Se den tillämpliga lagen i ditt land.
● Il materiale audio-visivo che fosse soggetto a copyright non
può essere registrato senza l’autorizzazione del possessore
del copyright. Si prega di attenersi alle leggi in vigore sul
territorio nazionale.
● Audio-visueel materiaal kan worden beschermd door
auteursrechten, in welk geval het niet mag worden opgenomen
zonder de toestemming van de auteursrechthouder. Zie voor
nadere informatie de betreffende wetten in het land van
gebruik.
● O material audiovisual pode consistir de trabalhos de direitos
autorias que não devem ser gravados sem autorização do
proprietário dos direitos. Favor consultar as leis vigentes em
seu país.
● Audio-visual material may consist of copyrighted works which
must not be recorded without the authority of the owner of the
copyright. Please refer to relevant law in your country.

03/12/16
iv
XL-UH240H
● Advarsel:
Til at forbygge ild og stød risiko, lad vaere med at undsaette
denne indretning for drypning eller overstaenkning. Der må
ikke anbringes nogen genstande fyldt med vand, som for
eksempel vaser, på dette apparat.
● Advarsel:
For å unngå brann eller kortslutning, utsett ikke produktet for
vann eller fuktighet. Gjenstander som inneholder vaeske, feks.
en blomstervase, må ikke plasseres oppå apparatet.
● Varoitus:
Älä vie laitetta sateeseen tai kosteisiin tiloihin. Jos laite on
kostunut, anna sen kuivua ennen kuin käytät sitä
verkkovirralla. Nestettä sisältäviä astioita kuten esim.
kukkamaljakoita ei saa asettaa laitteen päälle.
● Vorsicht:
Das Gerät weder Tropf- noch Spritzwasser aussetzen.
Ansonsten besteht die Gefahr eines Brandes oder
elektrischen Schlages. Es dürfen keine mit Flüssigkeiten
gefüllten Gegenstände wie Vasen auf dem Gerät abgestellt
werden.
● Attention:
Pour éviter un incendie ou une secousse électrique, mettre
l’appareil à l’abri de l’eau (éclaboussure, goutte). Ne pas poser
sur l’appareil un récipient contenant du liquide.
● Advertencia:
Para evitar incendios y descargas eléctricas, no exponga
el aparato a goteo o salpicadura de líquidos. No deberán
ponerse encima del aparato objetos que estén llenos de
líquido, como por ejemplo un florero.
● Varning:
Utsätt inte enheten för dropp eller stänk för att förhindra
brand eller elektriska stötar. Inga vätskefyllda föremål
såsom vaser får placeras på enheten.
● Attenzione:
Per prevenire incendi o scosse elettriche, non fare
gocciolare nessun liquido sull’apparecchio e non bagnarlo.
Non collocarvi sopra nessun oggetto riempito d’acqua,
come per esempio vasi.
● Waarschuwing:
Stel het toestel niet bloot aan druipend of spattend water
om brand en elektrische schokken te voorkomen. Met
vloeistoffen gevulde voorwerpen, zoals vazen, mogen niet
op het toestel geplaatst worden.
● Cuidado:
Para evitar incêndio ou choque elétrico, não exponha este
aparelho a gotejamento ou salpicamento de água. Não
coloque objetos com água como, por exemplo, um vaso de
flores, em cima do aparelho.
● Warning:
To prevent fire or shock hazard, do not expose this appli-
ance to dripping or splashing. No objects filled with liquids,
such as vases, shall be placed on the apparatus.
Dieses Produkt ist ein Laserprodukt der Klasse 1.
Ce produit est classifié comme étant un LASER DE CLASSE 1.
Este producto está clasificado como un PRODUCTO LÁSER DE
CLASE 1.
Denna produkt klassificeras som KLASS 1 LASERPRODUKT.
Questo prodotto è classificato come CLASS 1 LASER PRODUCT.
Dit product is geclassificeerd als een KLASSE 1 LASER PRODUCT.
This product is classified as a CLASS 1 LASER PRODUCT.
Este produto é classificado como PRODUTO LASER DE CLASSE 1.
Dette produktet er klassifisert som et KLASSE 1 LASERPRODUKT.
Dette produkt er klassificeret som et KLASSE 1 LASERPRODUKT.
Tämä laite on luokiteltu LUOKAN 1 LASERLAITTEEKSI.
Denna produkt klassificeras som KLASS 1 LASERAPPARAT.
0402_A5_2
Page is loading ...
Page is loading ...
Page is loading ...
Page is loading ...
Page is loading ...

x
03/12/16
XL-UH240H
A. Informações sobre a Eliminação de
Produtos para os Utilizadores (particulares)
1. Na União Europeia
Atenção: Se quiser eliminar este equipamento, não o
deve fazer juntamente com o lixo doméstico comum!
O equipamento eléctrico e electrónico deve ser tratado
separadamente e ao abrigo da legislação aplicável que obriga
a um tratamento, recuperação e reciclagem adequados de
equipamentos eléctricos e electrónicos usados.
Após a implementação desta legislação por parte dos
Estados-membros, todos os cidadãos residentes na
União Europeia poderão entregar o seu equipamento
eléctrico e electrónico usado em estações de recolha
específicas a título gratuito*.
Em alguns países* o seu revendedor local também pode
recolher o seu equipamento usado a título gratuito na
compra de um novo equipamento.
*) Contacte as entidades locais para mais informações.
Se o seu equipamento eléctrico e electrónico usado
funcionar a pilhas ou baterias, deverá eliminálas em
separado, conforme a legislação local, e antes de
entregar o seu equipamento.
Ao eliminar este produto correctamente estará a contribuir
para que o lixo seja submetido aos processos de tratamento,
recuperação e reciclagem adequados. Desta forma é
possível evitar os efeitos nocivos que o tratamento
inadequado do lixo poderia provocar no ambiente e na saúde.
2. Em outros Países fora da UE
Se quiser eliminar este produto, contacte as entidades
locais e informese sobre o método correcto para
proceder à sua eliminação.
Na Suíça: O equipamento eléctrico e electrónico é aceite,
a título gratuito, em qualquer revendedor, mesmo que
não tenha adquirido um novo produto. Poderá encontrar
uma lista das estações de recolha destes equipamentos
na página da Web www.swicho.ch ou www.sens.ch.
B. Informações sobre a Eliminação de
Produtos para Utilizadores-Empresas
1. Na União Europeia
Se o produto for usado para fins comerciais e quiser
eliminá-lo:
Contacte o seu revendedor SHARP que irá informá-lo
sobre a melhor forma de eliminar o produto. Poderá ter de
pagar as despesas resultantes da recolha e reciclagem do
produto. Alguns produtos mais pequenos (e em pequenas
quantidades) poderão ser recolhidos pelas estações locais.
Na Espanha: Contacte o sistema de recolhas público ou
as entidades locais para mais informações sobre a
recolha de produtos usados.
2. Em outros Países fora da UE
Se quiser eliminar este produto, contacte as entidades
locais e informese sobre o método correcto para
proceder à sua eliminação.
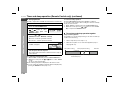
Atenção: O seu pro-
duto está identifica-
do com este sím-
bolo. Significa que
os produtos eléctri-
cos e electrónicos
não devem ser mis-
turados com o lixo
doméstico comum.
Existe um sistema
de recolhas específi-
co
para estes pro-
dutos.
Informação sobre Eliminação de Produtos
A. Information on Disposal for Users (private
households)
1. In the European Union
Attention: If you want to dispose of this equipment,
please do not use the ordinary dust bin!
Used electrical and electronic equipment must be treated
separately and in accordance with legislation that
requires proper treatment, recovery and recycling of used
electrical and electronic equipment.
Following the implementation by member states, private
households within the EU states may return their used
electrical and electronic equipment to designated
collection facilities free of charge*. In some countries*
your local retailer may also take back your old product
free of charge if you purchase a similar new one.
*) Please contact your local authority for further details.
If your used electrical or electronic equipment has
batteries or accumulators, please dispose of these
separately beforehand according to local requirements.
By disposing of this product correctly you will help ensure
that the waste undergoes the necessary treatment,
recovery and recycling and thus prevent potential
negative effects on the environment and human health
which could otherwise arise due to inappropriate waste
handling.
2. In other Countries outside the EU
If you wish to discard this product, please contact your
local authorities and ask for the correct method of
disposal.
For Switzerland: Used electrical or electronic equipment
can be returned free of charge to the dealer, even if you
don't purchase a new product. Further collection facilities
are listed on the homepage of www.swico.ch or
www.sens.ch.
B. Information on Disposal for Business Users
1. In the European Union
If the product is used for business purposes and you
want to discard it:
Please contact your SHARP dealer who will inform you
about the take-back of the product. You might be charged
for the costs arising from take-back and recycling. Small
products (and small amounts) might be taken back by
your local collection facilities.
For Spain: Please contact the established collection
system or your local authority for take-back of your used
products.
2. In other Countries outside the EU
If you wish to discard of this product, please contact your
local authorities and ask for the correct method of
disposal.
Attention: Your prod-
uct is marked with
this symbol. It
means that used
electrical and elec-
tronic products
should not be mixed
with general house-
hold waste. There is
a separate collec-
tion system for
these products.
Information on Proper Disposal

E-1
ENGLISH
XL-UH240H
ENGLISH
General Information
Introduction
Thank you for purchasing this SHARP product. To obtain the best
performance from this product, please read this manual carefully. It
will guide you in operating your SHARP product.
Special Note
Supply of this product does not convey a license nor imply any right
to distribute content created with this product in revenue-generating
broadcast systems (terrestrial, satellite, cable and/or other distribu-
tion channels), revenue-generating streaming applications (via Inter-
net, intranets and/or other networks), other revenue-generating
content distribution systems (pay-audio or audio-on-demand appli-
cations and the like) or on revenue-generating physical media (com-
pact discs, digital versatile discs, semiconductor chips, hard drives,
memory cards and the like). An independent license for such use is
required. For details, please visit http://mp3licensing.com.
MPEG Layer-3 audio coding technology licensed from Fraunhofer
IIS and Thomson.
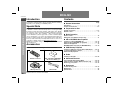
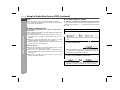
Accessories
Please confirm that the following accessories are included.
Note:
Only the above accessories are included.
Contents
Page
General Information
Precautions . . . . . . . . . . . . . . . . . . . . . . . . . . . . . . . . . . . . . . . . . . 2
Controls and indicators . . . . . . . . . . . . . . . . . . . . . . . . . . . . . 3 - 5
Preparation for Use
System connections . . . . . . . . . . . . . . . . . . . . . . . . . . . . . . . 6 - 8
Remote control . . . . . . . . . . . . . . . . . . . . . . . . . . . . . . . . . . . . . . . 9
Basic Operation
General control . . . . . . . . . . . . . . . . . . . . . . . . . . . . . . . . . . . . . . 10
Setting the clock (Remote Control only) . . . . . . . . . . . . . . . . . 11
CD or MP3/WMA disc Playback
Listening to a CD or MP3/WMA disc . . . . . . . . . . . . . . . . 12 - 14
Advanced CD or MP3/WMA disc playback . . . . . . . . . . . 15 - 16
Advanced CD playback . . . . . . . . . . . . . . . . . . . . . . . . . . . . . . . 17
MP3/WMA folder mode (only for MP3/WMA files) . . . . . . 18 - 19
USB Memory Playback
Listening to USB mass storage device / MP3 Player . . . 20 - 21
To remove USB memory device . . . . . . . . . . . . . . . . . . . . . . . . 21
Advanced USB playback . . . . . . . . . . . . . . . . . . . . . . . . . . . . . . 22
Radio
Listening to the radio . . . . . . . . . . . . . . . . . . . . . . . . . . . . . 23 - 24
Advanced Features
Using the Radio Data System (RDS) . . . . . . . . . . . . . . . . 25 - 29
Timer and sleep operation (Remote Control only) . . . . . 30 - 33
Enhancing your system . . . . . . . . . . . . . . . . . . . . . . . . . . . 34 - 35
References
Troubleshooting chart . . . . . . . . . . . . . . . . . . . . . . . . . . . . 35 - 37
Maintenance . . . . . . . . . . . . . . . . . . . . . . . . . . . . . . . . . . . . . . . . 37
Specifications . . . . . . . . . . . . . . . . . . . . . . . . . . . . . . . . . . . . . . . 38
Remote control 1 "AA" size battery (UM/SUM-3,
R6, HP-7 or similar) 2
AM loop aerial 1 FM aerial 1

E-2
ENGLISH
8
XL-UH240H
General Information
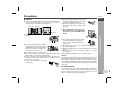
Precautions
General
Please ensure that the equipment is positioned in a well-ventilated
area and ensure that there is at least 10 cm (4") of free space
along the sides, top and back of the equipment.
Do not place anything on top of the unit.
Do not expose the unit to moisture, to temperatures higher than
60
˚
C (140
˚
F) or to extremely low temperatures.
If your system does not work properly, disconnect the AC power
lead from the wall socket. Plug the AC power lead back in, and
then turn on your system.
No naked flame sources, such as lighted candles, should be
placed on the apparatus.
Attention should be drawn to the environmental aspects of battery
disposal.
This unit should only be used within the range of 5˚C - 35˚C
(41˚F - 95˚F).
The apparatus is designed for use in moderate climate.
Warning:
The voltage used must be the same as that specified on this unit. Us-
ing this product with a higher voltage other than that which is speci-
fied is dangerous and may result in a fire or other type of accident
causing damage. SHARP will not be held responsible for any dam-
age resulting from use of this unit with a voltage other than that which
is specified.
Volume control
The sound level at a given volume setting depends on speaker effi-
ciency, location, and various other factors. It is advisable to avoid ex-
posure to high volume levels. Do not turn the volume on to full at
switch on and listen to music at moderate levels.
Use the unit on a firm, level surface free from
vibration.
Keep the unit away from direct sunlight,
strong magnetic fields, excessive dust,
humidity and electronic/electrical equip-
ment (home computers, facsimiles, etc.)
which generate electrical noise.
In case of an electrical storm, unplug the
unit for safety.
10 cm (4")10 cm (4")
10 cm (4")
10 cm (4")
C
D
U
S
B
Hold the AC power plug by the head when
removing it from the wall socket, as pulling
the lead can damage internal wires.
The AC power plug is used as disconnect
device and shall always remain readily
operable.
Do not remove the outer cover, as this
may result in electric shock. Refer inter-
nal service to your local SHARP service
facility.
The ventilation should not be impeded by
covering the ventilation openings with
items, such as newspapers, tablecloths,
curtains, etc.

E-3
ENGLISH
XL-UH240H
General Information
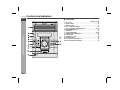
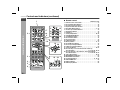
Controls and indicators
Front panel
Reference page
1. Disc Trays . . . . . . . . . . . . . . . . . . . . . . . . . . . . . . . . . . . . . . . 13
2. Timer Indicator . . . . . . . . . . . . . . . . . . . . . . . . . . . . . . . . . . . 31
3. Remote Sensor . . . . . . . . . . . . . . . . . . . . . . . . . . . . . . . . . . . . 9
4. Disc or USB Stop Button . . . . . . . . . . . . . . . . . . . . . . . . . . . 14
5. Disc or USB Play or Repeat Button . . . . . . . . . . . . . . . 12, 16
6. ON/STAND-BY Button . . . . . . . . . . . . . . . . . . . . . . . . . . . . . 10
7. CD Button . . . . . . . . . . . . . . . . . . . . . . . . . . . . . . . . . . . . . . . 12
8. Tuner (Band) Button . . . . . . . . . . . . . . . . . . . . . . . . . . . 23, 25
9. Video/Auxiliary/USB Button . . . . . . . . . . . . . . . . . . . . . . . . 20
10. USB Terminal . . . . . . . . . . . . . . . . . . . . . . . . . . . . . . . . . . . . 20
11. Headphone Socket . . . . . . . . . . . . . . . . . . . . . . . . . . . . . . . . 34
12. Volume Control . . . . . . . . . . . . . . . . . . . . . . . . . . . . . . . . . . . 10
13. Disc Number Select Buttons . . . . . . . . . . . . . . . . . . . . . . . . 12
14. Disc Tray Open/Close Button . . . . . . . . . . . . . . . . . . . . . . . 12

E-4
ENGLISH
8
XL-UH240H
General Information
Display
Reference page
1. Disc Number Indicators . . . . . . . . . . . . . . . . . . . . . . . . . . . . 13
2. MP3/WMA Folder Indicator . . . . . . . . . . . . . . . . . . . . . . . . . 20
3. MP3/WMA Title Indicators . . . . . . . . . . . . . . . . . . . . . . . 19, 21
4. MP3 Indicator . . . . . . . . . . . . . . . . . . . . . . . . . . . . . . . . . 13, 20
5. WMA Indicator . . . . . . . . . . . . . . . . . . . . . . . . . . . . . . . . 13, 20
6. RDS Indicator . . . . . . . . . . . . . . . . . . . . . . . . . . . . . . . . . . . . 25
7. Traffic Announcement Indicator . . . . . . . . . . . . . . . . . . . . . 25
8. Dynamic PTY Indicator . . . . . . . . . . . . . . . . . . . . . . . . . . . . 25
9. Traffic Programme Indicator . . . . . . . . . . . . . . . . . . . . . . . . 25
10. Sleep Indicator . . . . . . . . . . . . . . . . . . . . . . . . . . . . . . . . . . . 33
11. Timer Play Indicator . . . . . . . . . . . . . . . . . . . . . . . . . . . . . . . 31
12. MP3/WMA Total Indicator . . . . . . . . . . . . . . . . . . . . . . . . . . 13
13. Daily Timer Indicator . . . . . . . . . . . . . . . . . . . . . . . . . . . . . . 31
14. FM Stereo Mode Indicator . . . . . . . . . . . . . . . . . . . . . . . . . . 23
15. FM Stereo Receiving Indicator . . . . . . . . . . . . . . . . . . . . . . 23
16. Memory Indicator . . . . . . . . . . . . . . . . . . . . . . . . . . . . . . 17, 24
17. Extra Bass Indicator . . . . . . . . . . . . . . . . . . . . . . . . . . . . . . 10
18. Disc or USB Repeat Play Indicator . . . . . . . . . . . . . . . . 16, 22
19. Disc or USB Pause Indicator . . . . . . . . . . . . . . . . . . . . . . . . 14
20. Disc or USB Play Indicator . . . . . . . . . . . . . . . . . . . . . . 13, 21
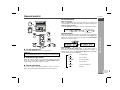
Rear panel
Reference page
1. Speaker Terminals . . . . . . . . . . . . . . . . . . . . . . . . . . . . . . . . . 7
2. AC Power Lead . . . . . . . . . . . . . . . . . . . . . . . . . . . . . . . . . . . . 8
3. FM 75 Ohms Aerial Socket . . . . . . . . . . . . . . . . . . . . . . . . . . 7
4. AM Aerial Earth Terminal . . . . . . . . . . . . . . . . . . . . . . . . . . . 7
5. AM Loop Aerial Terminal . . . . . . . . . . . . . . . . . . . . . . . . . . . 7
6. Video/Auxiliary (Audio Signal) Input Sockets . . . . . . . . . . 34
7. Cooling Fan . . . . . . . . . . . . . . . . . . . . . . . . . . . . . . . . . . . . . . 8
8. Subwoofer Pre-output Socket . . . . . . . . . . . . . . . . . . . . . . 35
Speaker system
RATED SPEAKER IMPEDANCE:
6 OHMS MIN.
AC INPUT
RIGHT
RIGHT LEFT
VIDEO/AUX IN
SPEAKERS
LEFT
FM
75 OHMS
AM
GND
SUBWOOFER
PRE-OUT
RATED SPEAKER IMPEDANCE:
6 OHMS MIN.
AC INPUT
RIGHT
RIGHT LEFT
VIDEO/AUX IN
SPEAKERS
LEFT
ANTENNA
FM
75 OHMS
AM
GND
SUBWOOFER
PRE-OUT
1
2
8
5
4
3
5
6
7
12
3
4 5 10 11
13 14 15
12
16
17 18
19
20
6 7 8 9
1. Tweeter
2. Woofer
3. Bass Reflex Duct
4. Speaker Wire
3
4
1
2

E-5
ENGLISH
XL-UH240H
General Information
Controls and indicators (continued)
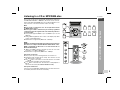
Remote control
Reference page
1. Remote Control Transmitter . . . . . . . . . . . . . . . . . . . . . . . . . 9
2. Disc Number Select Buttons . . . . . . . . . . . . . . . . . . . . . . . . 12
3. Disc Direct Search Buttons . . . . . . . . . . . . . . . . . . . . . . . . . 15
4. Equaliser Mode Select Button . . . . . . . . . . . . . . . . . . . . . . . 10
5. Extra Bass/Demo Button . . . . . . . . . . . . . . . . . . . . . . . . . 8, 10
6. Volume Up and Down Buttons . . . . . . . . . . . . . . . . . . . . . . 10
7. On/Stand-by Button . . . . . . . . . . . . . . . . . . . . . . . . . . . . . . . 10
8. CD Button . . . . . . . . . . . . . . . . . . . . . . . . . . . . . . . . . . . . . . . 12
9. Tuner (Band) Button . . . . . . . . . . . . . . . . . . . . . . . . . . . 23, 25
10. Video/AUX/USB Button . . . . . . . . . . . . . . . . . . . . . . . . . . . . 20
11. Clear/Dimmer Button . . . . . . . . . . . . . . . . . . . . . . . . . . . . . . 17
12. Disc Random Button . . . . . . . . . . . . . . . . . . . . . . . . . . . . . . 16
13. Disc Stop Button . . . . . . . . . . . . . . . . . . . . . . . . . . . . . . . . . 14
14. USB Stop Button . . . . . . . . . . . . . . . . . . . . . . . . . . . . . . . . . 20
15. Memory Button . . . . . . . . . . . . . . . . . . . . . . . . . . . . . . . . 11, 17
16. Disc/USB Pause Button . . . . . . . . . . . . . . . . . . . . . . . . . . . . 14
17. Disc Play and Repeat Button . . . . . . . . . . . . . . . . . . . . . . . 12
18. USB Play and Repeat Button . . . . . . . . . . . . . . . . . . . . . . . 20
19. Tuning Up Button . . . . . . . . . . . . . . . . . . . . . . . . . . . . . . 20, 23
20. Disc Track Up or Fast Forward, Tuner Preset Up,
Time Up Button . . . . . . . . . . . . . . . . . . . . 11, 14, 20, 23, 24, 25
21. Disc Track Down or Fast Reverse, Tuner Preset Down,
Time Down Button . . . . . . . . . . . . . . . . . 11, 14, 20, 23, 24, 25
22. Tuning Down Button . . . . . . . . . . . . . . . . . . . . . . . . . . . 20, 23
23. MP3/WMA Display Button. . . . . . . . . . . . . . . . . . . . . . . . . . . 20
24. MP3/WMA Folder Button . . . . . . . . . . . . . . . . . . . . . . . . . . . 20
25. Clock/Timer Button . . . . . . . . . . . . . . . . . . . . . . . . . 11, 30, 33
26. RDS ASPM Button . . . . . . . . . . . . . . . . . . . . . . . . . . . . . . . . 25
27. RDS PTY Button . . . . . . . . . . . . . . . . . . . . . . . . . . . . . . . . . . 25
28. RDS Display Button . . . . . . . . . . . . . . . . . . . . . . . . . . . . . . . 25
10
9
8
7
2
3
4
5
19
20
22
21
1
11
12
13
14 18
17
16
15
6
2625 27 28
23 24

E-6
ENGLISH
8
XL-UH240H
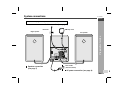
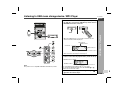
Preparation for Use
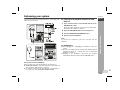
System connections
RATED SPEAKER IMPEDANCE:
6 OHMS MIN.
AC INPUT
RIGHT
RIGHT LEFT
VIDEO/AUX IN
SPEAKERS
LEFT
ANTENNA
FM
75 OHMS
AM
GND
SUBWOOFER
PRE-OUT
Left speaker
Right speaker
Wall socket
(AC 230 V, 50 Hz)
Speaker connection
(see page 7)
AM loop aerialFM aerial
Make sure to unplug the AC power lead before any connections.
Aerial connection (see page 7)
AC power connection (see page 8)

E-7
ENGLISH
XL-UH240H
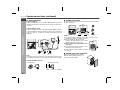
Preparation for Use
System connections (continued)
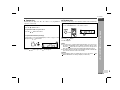
Aerial connection
Supplied FM aerial:
Connect the FM aerial wire to the FM 75 OHMS socket and position
the FM aerial wire in the direction where the strongest signal can be
received.
Supplied AM loop aerial:
Connect the AM loop aerial to the AM and Earth (GND) terminals.
Position the AM loop aerial for optimum reception. Place the AM loop
aerial on
a shelf, etc., or attach it to a stand or a wall with screws (not
supplied).
Note:
Placing the aerial on the unit or near the AC power lead may cause
noise pickup. Place the aerial away from the unit for better reception.
Installing the AM loop aerial:
Speaker connection
Connect the black wire to the minus (-) terminal, and the red wire to
the plus (+) terminal.
Caution:
Speaker grilles are removable
< Assembling > < Attaching to the wall >
Wall Screws (not supplied)
RATED SPEAKER IMPEDANCE:
6 OHMS MIN.
AC INPUT
RIGHT
RIGHT LEFT
VIDEO/AUX IN
SPEAKERS
LEFT
ANTENNA
FM
75 OHMS
AM
GND
SUBWOOFER
PRE-OUT
ANTENNA
FM
AM
GND
75 OHMS
Use speakers with an impedance of 6 ohms or more, as lower
impedance speakers can damage the unit.
Do not mistake the right and the left
channels. The right speaker is the one on the
right side when you face the unit.
Do not let the bare speaker wires touch
each other.
Do not allow any objects to fall into or to be
placed in the bass reflex ducts.
Do not stand or sit on the speakers. You may
be injured.
Make sure nothing comes into contact
with the speaker diaphragm when you
remove the speaker grilles.
RATED SPEAKER IMPEDANCE:
6 OHMS MIN.
AC INPUT
RIGHT
RIGHT LEFT
VIDEO/AUX IN
SPEAKERS
LEFT
ANTENNA
FM
75 OHMS
AM
GND
SUBWOOFER
PRE-OUT
RATED SPEAKER IMPEDANCE:
6 OHMS MIN.
RIGHT
SPEAKERS
LEFT
BlackRed
RATED SPEAKER IM
PEDANCE:
6 OHM
S M
IN.
RIGHT
SPEAKERS
LEFT
Incorrect

E-8
ENGLISH
8
XL-UH240H
Preparation for Use
AC power connection
After checking all the connections have been made correctly, plug
the AC power lead of this unit into the wall socket. If you plug in the
unit first, the unit will enter the demonstration mode.
Note:
Unplug the AC power lead from the wall socket if the unit will not
be in use for a prolonged period of time.
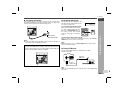
Demonstration mode
External FM aerial
Use an external FM aerial if you require better reception.
Consult your dealer.
Note:
When an external FM aerial is used, disconnect the supplied FM
aerial wire.
Cooling fan:
The main unit is built with a cooling fan at the rear of the unit for im-
proved cooling. Please do not cover the opening of the fan with any
obstacles, as this will block proper ventilation.
Wall socket
(AC 230 V, 50 Hz)
RATED SPEAKER IMPEDANCE:
6 OHMS MIN.
AC INPUT
RIGHT
RIGHT LEFT
VIDEO/AUX IN
SPEAKERS
LEFT
ANTENNA
FM
75 OHMS
AM
GND
SUBWOOFER
PRE-OUT
RATED SPEAKER IMPEDANCE:
6 OHMS MIN.
AC INPUT
RIGHT
RIGHT LEFT
VIDEO/AUX IN
SPEAKERS
LEFT
ANTENNA
FM
75 OHMS
AM
GND
SUBWOOFER
PRE-OUT
The first time the unit is plugged in, the
unit will enter the demonstration mode.
You will see words scroll.
To cancel the demonstration mode:
When the unit is in the power stand-
by mode (demonstration mode),
press the X-BASS/DEMO button on
the remote control. The unit will
enter the low power consumption
mode.
To return to the demonstration mode:
When the unit is in the power stand-by mode, press the X-BASS/
DEMO button on the remote control again.
Note:
When the power is on, the X-BASS/DEMO button can be used to
select the extra bass mode.
External
FM aerial
75 ohms
coaxial cable
ANTENNA
FM
75 OHMS
AM
GND

E-9
ENGLISH
XL-UH240H
Preparation for Use
Remote control
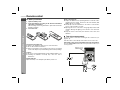
Battery installation
Precautions for battery use:
Replace all old batteries with new ones at the same time.
Do not mix old and new batteries.
Remove the batteries if the unit will not be used for long periods
of time. This will prevent potential damage due to battery leakage.
Caution:
Do not use rechargeable batteries (nickel-cadmium battery, etc.).
Installing the batteries incorrectly may cause the unit to
malfunction.
Battery removal:
Open the battery cover and pull up the battery to take out.
Notes concerning use:
Replace the batteries if the operating distance is reduced or if the
operation becomes erratic. Purchase 2 "AA" size batteries (UM/
SUM-3, R6, HP-7 or similar)
Periodically clean the transmitter on the remote control and the
sensor on the unit with a soft cloth.
Exposing the sensor on the unit to strong light may interfere with
operation. Change the lighting or the direction of the unit if this
occurs.
Keep the remote control away from moisture, heat, shock, and
vibrations.
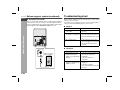
Test of the remote control
Check the remote control after checking all the connections (see
pages 6 - 8).
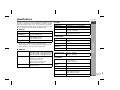
Point the remote control directly at the remote sensor on the unit.
The remote control can be used within the range shown below:
Press the ON/STAND-BY button. Does the power turn on? Now, you
can enjoy music.
1 Open the battery cover.
2 Insert the batteries according to the direction indicated in
the battery compartment.
When inserting or removing the batteries, push them towards the
battery terminals.
3 Close the cover.

E-10
ENGLISH
8
XL-UH240H
Basic Operation
General control
To turn the power on
Press the ON/STAND-BY button to turn the power on.
Illumination light control
When the power is turned on, ring around the volume control light
up. To turn on/off the light, hold down the CLEAR/DIMMER button
on the remote control for more than 2 seconds.
Volume auto fade-in
If you turn off and on the main unit with the volume set to 27 or
higher, the volume starts at 16 and fades in to the last set level.
Volume control
Main unit operation:
When the VOLUME control is turned clockwise, the volume will
increase. When it is turned anti-clockwise, the volume will decrease.
Remote control operation:
Press the VOLUME (+ or -) button to increase or decrease the volume.
Bass control
When the power is first turned on, the unit will enter the extra bass
mode which emphasises the bass frequencies, and "X-BASS" will
appear. To cancel the extra
bass mode, press the X-BASS/DEMO
button on the remote control
.
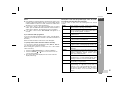
Equaliser
When the EQUALIZER MODE button on the remote control is
pressed, the current mode setting will be displayed. To change to a
different mode, press the EQUALIZER MODE button repeatedly
until the desired sound mode appears.
After use:
Press the ON/STAND-BY button to enter the power stand-by mode.
30 MAXIMUM0
.....
ROCK For rock music.
FLAT No equalisation.
CLASSIC For classical music.
POPS For pop music.
JAZZ For jazz.
VOCAL Vocals are enhanced.

E-11
ENGLISH
XL-UH240H
Basic Operation
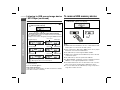
Setting the clock (Remote Control only)
In this example, the clock is set for the 24-hour (0:00) display.
To confirm the time display:
[When the unit is in the stand-by mode]
Press the CLOCK/TIMER button.
The time display will appear for about 10 seconds.
[When the power is on]
Press the CLOCK/TIMER button.
Within 10 seconds, press the or button to display the time.
The time display will appear for about 10 seconds.
Note:
The "CLOCK" will appear or time will flash to confirm the time
display when the AC power supply is restored after a power failure
or unplugging the unit. If incorrect, readjust the clock as follows.
To readjust the clock:
Perform "Setting the clock" from step 1. If the "CLOCK" does not
appear in step 3, step 4 (for selecting the 24-hour or 12-hour
display) will be skipped.
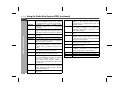
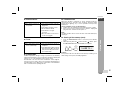
To change the 24-hour or 12-hour display:
1
Press the ON/STAND-BY button to turn the power on.
2
Press the CLOCK/TIMER button.
3
Within 10 seconds, press the or button to select
"CLOCK", and press the MEMORY button.
4
Press the or button to select 24-hour or 12-hour
display and then press the MEMORY button.
"0:00" The 24-hour display will appear.
(0:00 - 23:59)
"AM 12:00" The 12-hour display will appear.
(AM 12:00 - PM 11:59)
"AM 0:00" The 12-hour display will appear.
(AM 0:00 - PM 11:59)
5
Press the or button to adjust the hour and then
press the MEMORY button.
Press the or button once to advance the time by 1 hour.
Hold it down to advance continuously.
6
Press the or button to adjust the minutes and then
press the MEMORY button.
Press the or button once to advance the time by 1
minute. Hold it down to change the time in 5-minute intervals.
1 Clear all the programmed contents. [Refer to "Clearing all the
memory (reset)" on page 36 for details.]
2 Perform "Setting the clock" from step 1.

E-12
ENGLISH
8
XL-UH240H
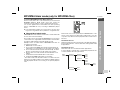
CD or MP3/WMA disc Playback
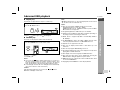
Listening to a CD or MP3/WMA disc
This system can play back a standard CD, CD-R/RW in the CD format
and CD-R/RW with MP3 or WMA files, but cannot record on them.
Some audio CD-R and CD-RW discs may not be playable due to the
state of the disc or the device that was used for recording.
MP3:
MP3 is a form of compression. It is an acronym which stands
for MPEG Audio Layer 3.
MP3 is a type of audio code which is processed by significant
compression from the original audio source with very little loss
in sound quality.
This system supports MPEG 1 Layer 3, MPEG 2 Layer 3, and
VBR files.
During VBR file playback, time counter in the display may differ
from its actual playback time.
Bitrate which is supported by MP3 is 32 ~ 320 kbps.
WMA:
WMA files are Advanced System Format files that include audio
files which are compressed with Windows Media Audio codec.
WMA is developed by Microsoft as an audio format file for
Windows Media Player.
"MP3" and "WMA" indicator will light up after the unit reads
information on an MP3 or WMA disc.
Bitrate which is supported by WMA is 64 ~ 160 kbps.
Auto power on function:
When you press any of the following buttons, the unit turns on.
CD button (main unit and remote control): The unit turns on and
the "CD" function is activated.
CD / button on the remote control: The unit turns on and CD
playback starts (regardless of the last function).
/ button on the main unit: The unit turns on and playback of
the last function starts (CD,TUNER,VIDEO/AUX/USB).
Auto power off function:
In the stop mode of CD, MP3 or WMA operation, the main unit enters
the stand-by mode after 15 minutes of inactivity.

E-13
ENGLISH
XL-UH240H
CD or MP3/WMA disc Playback
Listening to a CD or MP3/WMA disc (continued)
Playback will begin from track 1 on DISC 1. After that disc
finishes playing, the next disc will automatically play.
After the last track on the fifth disc is played, the unit will stop
automatically.
When there is no disc in one of the disc trays (1 - 5), the empty
tray will be skipped to the next tray with a disc.
To exchange other discs whilst playing a disc:
Press one of the 1 - 5 buttons for the stopped disc and within 5
seconds, press the OPEN/CLOSE button and exchange discs.
To remove the discs:
In the stop mode, press the 1 - 5 button and within 5 seconds,
press the OPEN/CLOSE button.
To skip to a desired disc:
Press one of the 1 - 5 buttons and within 5 seconds, press the
(CD ) button.
Caution:
Do not place two discs in a same tray.
Do not play discs of special shapes (heart, octagon, etc).
It may cause malfunctions.
Do not push the disc tray whilst it is moving.
If the power fails whilst the tray is open, wait until the power is
restored.
If the disc tray is stopped with force, "ER-CD20" will appear on the
display for 3 seconds and the unit will not function. If this occurs,
press the ON/STAND-BY button to enter the power stand-by
mode and then turn the power on again.
If TV or radio interference occurs during CD operation, move the
unit away from the TV or radio.
If a disc is damaged, dirty, or loaded upside down, the disc will be
skipped.
1 Press the ON/STAND-BY button to turn the power on.
2 Press the CD button.
3 Press the 1 button and within 5 seconds, press the
OPEN/CLOSE button to open the disc tray 1.
4 Place the disc on the disc tray 1, label side up.
Be sure to place 8 cm (3") disc in the middle of the disc trays.
5 Press the OPEN/CLOSE button to close the disc tray 1.
Due to the structure of the disc information, it takes longer to
read an MP3/WMA disc than a normal CD (approximately 20
to 90 seconds).
6 You can place discs on the trays 2 - 5 by following steps
3 - 5.
7 Press the / button to start playback.
12 cm (5") 8 cm (3")
O
N
/
S
T
A
N
D
-
B
Y
C
D
T
U
N
E
R
/
(
B
A
N
D
)
O
P
E
N
/
C
L
O
S
E
V
I
D
E
O
/
A
U
X
V
O
L
U
M
E
[CD]
Total number of
tracks on the disc
Total playing
time of the disc
Total number
of files
MP3 indicator
[MP3/WMA]
WMA indicatorTOTAL indicator
Disc play indicator

E-14
ENGLISH
8
XL-UH240H
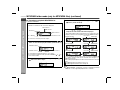
CD or MP3/WMA disc Playback
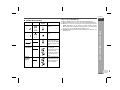
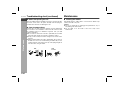
Various disc functions
Notes for CD or MP3/WMA disc:
Function Main unit Remote
control
Operation
Play Press in the stop
mode.
Stop Press in the playback
mode.
Pause Press in the playback
mode. Press the /
button to resume play-
back from the paused
point.
Track up/
Track down
Press in the playback
or stop mode.
If you press the button
in the stop mode,
press the / button
to start the desired
track.
Fast for-
ward/Fast
reverse
Press and hold down
in the playback mode.
Release the button to
resume playback.
Track up/track down is possible only within individual discs.
Fast forward/fast reverse is possible only within individual discs.
When the end of the last track is reached during fast forward,
"END" will appear on the display and CD operation will be
paused. When the beginning of the first track is reached during
fast reverse, the unit will enter the playback mode.
Rewritable multi session discs which writing is not finished, can
still be played.

E-15
ENGLISH
XL-UH240H
CD or MP3/WMA disc Playback
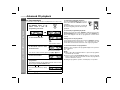
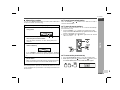
Advanced CD or MP3/WMA disc playback
Direct track search
By using the direct search buttons, the desired tracks on the current
disc can be played.
Notes:
A track number higher than the number of tracks on the disc
cannot be selected.
During random play, direct search is not possible.
To stop playback:
Press the (CD ) button.
Use the direct search buttons on
the remote control to select the
desired track whilst playing the
selected disc.
Selected track number
The direct search buttons allow you to select up to number 9.
When selecting number 10 or higher, use the "+10" button.
A. For example, to choose 13
1 Press the "+10" button once.
2 Press the "1" button.
3 Press the "3" button.
B. For example, to choose 130
1 Press the "+10" button twice.
2 Press the "1" button.
3 Press the "3" button.
4 Press the "0" button.

E-16
ENGLISH
8
XL-UH240H
CD or MP3/WMA disc Playback
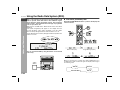
Repeat play
Repeat play can play one disc, all 5 discs or a programmed
sequence continuously.
To cancel repeat play:
Press the / button again until " " will disappear.
Random play
The tracks on the disc(s) can be played in random order automatically.
To cancel random play:
Press the / button.
"R" will disappear.
Notes:
If you press the button during random play, you can move to
the track selected next by the random operation. On the other
hand, the button does not allow you to move to the previous
track. The beginning of the track being played will be located.
In random play, the unit will select and play tracks automatically.
(You cannot select the order of the tracks.)
Caution:
After performing repeat or random play, be sure to press the (CD
) button. Otherwise, the disc(s) will play continuously.
To repeat one disc:
Press the / button twice.
To repeat all tracks on up to 5 discs:
Press the / button three times.
To repeat desired tracks (CD only):
Perform steps 1 - 6 in "Programmed play" section on page 17 and
then press the / button twice.
To random play all tracks on up to 5 discs:
Press the RANDOM button on the remote control.
Page is loading ...
Page is loading ...
Page is loading ...
Page is loading ...
Page is loading ...
Page is loading ...
Page is loading ...
Page is loading ...
Page is loading ...
Page is loading ...
Page is loading ...
Page is loading ...
Page is loading ...
Page is loading ...
Page is loading ...
Page is loading ...
Page is loading ...
Page is loading ...
Page is loading ...
Page is loading ...
Page is loading ...
Page is loading ...
Page is loading ...
Page is loading ...
-
 1
1
-
 2
2
-
 3
3
-
 4
4
-
 5
5
-
 6
6
-
 7
7
-
 8
8
-
 9
9
-
 10
10
-
 11
11
-
 12
12
-
 13
13
-
 14
14
-
 15
15
-
 16
16
-
 17
17
-
 18
18
-
 19
19
-
 20
20
-
 21
21
-
 22
22
-
 23
23
-
 24
24
-
 25
25
-
 26
26
-
 27
27
-
 28
28
-
 29
29
-
 30
30
-
 31
31
-
 32
32
-
 33
33
-
 34
34
-
 35
35
-
 36
36
-
 37
37
-
 38
38
-
 39
39
-
 40
40
-
 41
41
-
 42
42
-
 43
43
-
 44
44
-
 45
45
-
 46
46
-
 47
47
-
 48
48
-
 49
49
-
 50
50
-
 51
51


Ask a question and I''ll find the answer in the document
Finding information in a document is now easier with AI