
• GETTING STARTED
• MAKING COPIES
• SPECIAL FEATURES
• STATUS INDICATORS
• GENERAL INFORMATION
• OPTIONAL EQUIPMENT
2
13
32
42
51
69
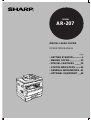
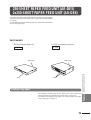
DIGITAL LASER COPIER
OPERATION MANUAL
MODEL
Page
AR-207

➢➣➢➣➢➣➢➣➢➣➢➣➢➣➢➣➢➣➢➣➢➣➢➣➢➣➢➣➢➣➢➣
➢
➣➢➣➢➣➢➣➢➣➢➣➢➣➢➣➢➣➢➣
➢
➣➢➣➢➣➢➣➢➣➢➣➢➣➢➣➢➣➢➣➢➣➢➣➢➣➢➣➢➣➢➣➢➣
➢
➣➢➣➢➣➢➣➢➣➢➣➢➣➢➣➢➣➢
➣
➢
➣
FOR YOUR RECORDS ...
To protect against loss or theft, record and retain for reference the
copier’s serial number located on the back of the unit.
Model Number
Serial Number
Date of Purchase
Place of Purchase
Authorized Sharp Copier
Service Department Number
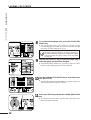
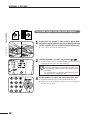
CAUTIONS
Follow the cautions below when using this copier.
●
The fusing area is hot. Exercise care in this area when removing misfed paper.
●
Do not look directly at the light source. Doing so may damage your eyes.
●
The socket-outlet shall be installed near the equipment and shall be easily accessible.
●
Place the copier on a firm, level surface.
●
Do not install the copier in a humid or dusty location.
●
When the copier is not used for a long time, for example, during prolonged holidays, turn the power
switch off and remove the power cord from the outlet.
●
When moving the copier, be sure to turn the power switch off and remove the power cord from the
outlet.
●
Do not cover the copier with a dust cover, cloth or plastic film while the power is on. Doing so may
prevent heat dissipation, damaging the copier.
●
Use of controls or adjustments or performance of procedures other than those specified herein may
result in hazardous laser radiation exposure.
SAFETY PRECAUTIONS
This Digital Copier is rated Class 1 and complies with 21 CFR 1040.10 and 1040.11 of the CDRH standards. This
means that the copier does not produce hazardous laser radiation. For your safety, observe the precautions below.
●
Do not remove the cabinet, operation panel or any other covers.
●
The copier’s exterior covers contain several safety interlock switches. Do not bypass any safety interlock by
inserting wedges or other items into switch slots.
AR-207

1
GETTING STARTED
STATUS
INDICATORS
MAKING COPIES
GENERAL INFORMATION
OPTIONAL
EQUIPMENT
SPECIAL FEATURES
CONTENTS Page
GETTING STARTED
●
INTRODUCTION. . . . . . . . . . . . . . . . . . . . . . . . . . . . . . . . . 2
●
MAIN FEATURES . . . . . . . . . . . . . . . . . . . . . . . . . . . . . . . . 3
●
PART NAMES AND FUNCTIONS . . . . . . . . . . . . . . . . . . . 4
– Overall layout . . . . . . . . . . . . . . . . . . . . . . . . . . . . . . . . . . . . . . . 4
– Operation panel . . . . . . . . . . . . . . . . . . . . . . . . . . . . . . . . . . . . . 6
●
COPIER INSTALLATION . . . . . . . . . . . . . . . . . . . . . . . . . . 8
●
CAUTIONS ON HANDLING . . . . . . . . . . . . . . . . . . . . . . . . 9
●
LOADING COPY PAPER . . . . . . . . . . . . . . . . . . . . . . 10
MAKING COPIES
●
AUDITING ACCOUNTS . . . . . . . . . . . . . . . . . . . . . . . . . . 13
●
NORMAL COPYING . . . . . . . . . . . . . . . . . . . . . . . . . . . . . 14
●
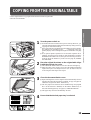
COPYING FROM THE ORIGINAL TABLE. . . . . . . . . . . . 19
●
REDUCTION/ENLARGEMENT/ZOOM. . . . . . . . . . . . . . . 23
●
BYPASS FEED (special paper). . . . . . . . . . . . . . . . . . . . 25
●
SORT/GROUP . . . . . . . . . . . . . . . . . . . . . . . . . . . . . . . . . 27
●
INTERRUPTING A COPY RUN . . . . . . . . . . . . . . . . . . . . 29
●
AUTOMATIC EXPOSURE ADJUSTMENT . . . . . . . . . . . 30
●
TONER SAVE MODE . . . . . . . . . . . . . . . . . . . . . . . . . . . . 31
SPECIAL FEATURES
●
XY ZOOM . . . . . . . . . . . . . . . . . . . . . . . . . . . . . . . . . . . . . 32
●
B/W REVERSE . . . . . . . . . . . . . . . . . . . . . . . . . . . . . . . . . 34
●
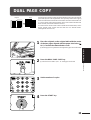
DUAL PAGE COPY . . . . . . . . . . . . . . . . . . . . . . . . . . . . . 35
●
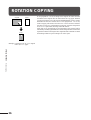
ROTATION COPYING . . . . . . . . . . . . . . . . . . . . . . . . . . . 36
●
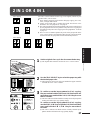
2 IN 1 OR 4 IN 1 . . . . . . . . . . . . . . . . . . . . . . . . . . . . . . . . 37
●
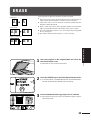
ERASE . . . . . . . . . . . . . . . . . . . . . . . . . . . . . . . . . . . . . . . 39
●
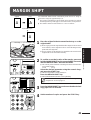
MARGIN SHIFT . . . . . . . . . . . . . . . . . . . . . . . . . . . . . . . . 41
STATUS INDICATORS
●
TONER CARTRIDGE REPLACEMENT . . . . . . . . . . 42
●
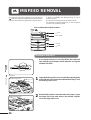
MISFEED REMOVAL . . . . . . . . . . . . . . . . . . . . . . . . 44
●
DEVELOPER REQUIRED . . . . . . . . . . . . . . . . . . . . . 50
●
MAINTENANCE REQUIRED . . . . . . . . . . . . . . . . . . . 50
GENERAL INFORMATION
●
USER PROGRAMS . . . . . . . . . . . . . . . . . . . . . . . . . . . . . 51
– Settings for auditing accounts . . . . . . . . . . . . . . . . . . . . . . 54
●
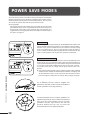
POWER SAVE MODES . . . . . . . . . . . . . . . . . . . . . . . . . . 58
●
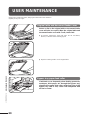
USER MAINTENANCE . . . . . . . . . . . . . . . . . . . . . . . . . . . 60
●
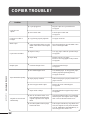
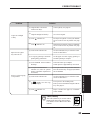
COPIER TROUBLE? . . . . . . . . . . . . . . . . . . . . . . . . . . . . 62
●
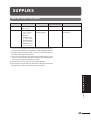
SUPPLIES. . . . . . . . . . . . . . . . . . . . . . . . . . . . . . . . . . . . . 65
– Types and sizes of copy paper . . . . . . . . . . . . . . . . . . . . . . 65
– Genuine supplies statement . . . . . . . . . . . . . . . . . . . . . . . . 66
●
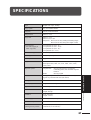
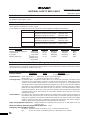
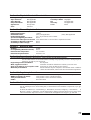
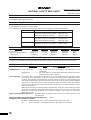
SPECIFICATIONS . . . . . . . . . . . . . . . . . . . . . . . . . . . . . . 67
OPTIONAL EQUIPMENT
●
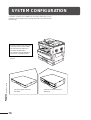
SYSTEM CONFIGURATION . . . . . . . . . . . . . . . . . . . . . . 70
●
250-SHEET PAPER FEED UNIT (AR-DE5)/
2x250-SHEET PAPER FEED UNIT (AR-DE6) . . . . . . . . . 71
INDEX. . . . . . . . . . . . . . . . . . . . . . . . . . . . . . . . . . . . . . . . 74

2
GETTING STARTED
GETTING STARTED
Introduction
INTRODUCTION
This copier has been designed to provide convenient copying features in a minimum
amount of office space and with maximum operational ease. To get full use of all copier
features, be sure to familiarize yourself with this manual and the copier.
For quick reference during copier use, keep this manual in a handy location.
●
This copier can be used as a laser printer and as a facsimile machine by installing optional
components. However, this manual describes only the copier features. For description of the
printer features and facsimile features, see their separate manuals.
●
Depending on the country or area, some keys of this copier will be indicated with either an English
name or a symbol. ––Example: XY-ZOOM ( ) key, START ( ) key.
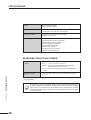
Conventions used in this manual
In this manual, the following icons are used to provide the user with
information pertinent to the use of the copier.
Warns the user that injury to the user or damage to the
copier may result if the contents of the warning are not
properly followed.
Cautions the user that damage to the copier or one of its
components may result if the contents of the caution are
not properly followed.
Notes provide information relevant to the copier regarding
specifications, functions, performance, operation and such,
that may be useful to the user.
Indicates a letter displayed in the copy quantity display.

3
GETTING STARTED
Main features
As an ENERGY STA R
®
Partner, SHARP has determined that this product meets
the ENERGY STA R
®
guidelines for energy efficiency.
MAIN FEATURES
High-speed laser copying
●
First-copy time is only 7.2 seconds (except in a power save mode or immediately after power on).
●
Copying speed is 20 copies/min., which adapts to business use, allowing improvement of working efficiency.
High-quality digital image
●
High-quality copying at 600 dpi is performed.
●
In addition to the automatic exposure mode, the manual exposure can be adjusted in five steps.
●
The photo mode copying function allows clear copying of delicate halftone original images such as monochrome
photos and color photos. Photo mode is adjustable in five steps.
Substantial copying features such as:
●
Copies up to ledger size originals from the original table, or through the 30 sheet automatic document feeder
●
Continuous copying up to 99 sheets
●
Scan once/print many to increase reliability and productivity
●
8 pre-set reduction and enlargement ratios plus 50% - 200% zoom in 1% increments
●
Automatic two-sided copying can be performed.
●
Electronic sorting eliminates the need for a bulky, mechanical sorter
●
Dual page copy mode for books, magazines and manuals
●
Editing features like XY zoom and black/white reverse
●
Digital editing features like 2 IN 1/4 IN 1 copying
Optional features
●
This copier can be used as a laser printer by installing an optional printer expansion kit.
●
This copier can be used as a facsimile machine by installing an optional facsimile expansion kit.
Environmentally friendly design
●
Paper output tray is housed in the copier for space saving.
●
Preheat and auto power shut-off modes are provided to reduce power consumption in standby mode and meet the
Energy Star Guidelines.
The Environmental Choice Program guidelines are applied to the products only in
Canada. The products that meet the Environmental Choice Program guidelines carry
the logo shown to the left. The products without the logo may not meet the
Environmental Choice Program guidelines.

4
GETTING STARTED
GETTING STARTED
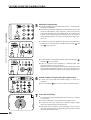
PART NAMES AND FUNCTIONS
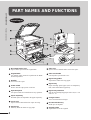
Overall layout
Document feeder cover
Open to make copies from the original table.
Original table
All originals which cannot be copied from the RSPF
must be copied here.
Handles
Use to move the copier.
Power switch
Press to turn the copier power on and off.
Operation panel
All copier controls are located here for easy operation.
Paper output tray
Finished copies are deposited in the paper output tray.
Front cover
Open to remove misfeeds and for copier servicing.
Paper trays
Each tray holds 250 sheets of copy paper.
Side cover
Open to remove misfeeds and to service the copier.
Side cover handle
Lift and pull to open the side cover.
Bypass tray guides
Adjust to the width of the copy paper.
Bypass tray
Paper including special paper (such as transparency
film) can be fed from the bypass tray.
Bypass tray extension
Pull out when feeding large paper such as 8-1/2" x 14"
and 11" x 17".
Charger cleaner
Use to clean the transfer charger.
Document feeder tray
Holds up to 30 originals.
Original guides
Adjust to the size of the originals.
Part names and functionsGETTING STARTED

5
GETTING STARTED
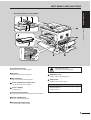
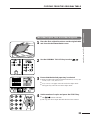
PART NAMES AND FUNCTIONS
Feeding roller cover
Open to remove misfed originals.
Exit area
Finished originals are output here.
Reversing tray
Pull out to remove misfed originals.
Toner cartridge lock release lever
Use to unlock the toner cartridge.
Toner cartridge
Contains toner.
Photoconductive drum
Copy images are formed on the photoconductive drum.
Roller rotating knob
Turn to remove misfed paper.
Fusing unit release levers
Lower to remove misfed paper.
Part names and functions
GETTING STARTED
The fusing unit is hot.
Take care in removing paper.
Right side cover
Open to remove misfed originals.
Paper guide
Open to remove misfed paper.
Accessories
Operation manual . . . . . . . . . . . . . . . . . . . . . . 1
Charger cleaner . . . . . . . . . . . . . . . . . . . . . . . . 1
Reversing single pass feeder (RSPF)

6
GETTING STARTED
GETTING STARTED
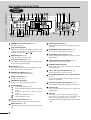
Operation
panel
PART NAMES AND FUNCTIONS
INTERRUPT key and indicator (p. 29)
Interrupts a copy run.
Copy quantity display
Displays the specified copy quantity during the ready
condition and displays the copy countdown as copies
are made. Also see items and .
ZOOM indicator (p.24)
Lights up when a zoom ratio is set.
Copy ratio display key (p. 24)
Press and hold down during standby to display the copy
ratio in the copy quantity display.
Zoom keys (p. 24)
Use to select any reduction or enlargement copy ratio
from 50% to 200% in 1% increments.
PAPER SIZE ENTER key (p.12)
Use to set the paper size in paper trays.
AUDIT CLEAR key (p.13)
Closes an open account.
PAPER SIZE indicators
Light up to show the selected copy paper size.
Alarm indicators
: Maintenance indicator (p. 50)
: Toner cartridge replacement required indicator
(p. 42)
: Developer replacement required indicator
(p. 50)
: Paper required indicator (p. 10)
: Misfeed indicator (p. 44)
POWER SAVE indicator (p. 58)
Lights up when the copier is in a power save mode.
RSPF indicator (p. 14)
Lights up when originals are set in the document feeder
tray.
Output tray full indicator
Indicates documents must be removed from the paper
output tray.
B/W REVERSE key and indicator (p. 34)
Press to reverse the black and white areas.
XY-ZOOM key and indicator (p. 32)
Press to change the horizontal and vertical copy ratios
independently.
SORT/GROUP key and indicators (p. 27)
Press to select the sort or group mode.
ORIGINAL DATA indicator
Blinks when the memory becomes full of scanned
original image data.
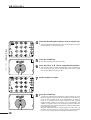
2 IN 1 / 4 IN 1 key and indicators (p. 37)
Press to select the 2 in 1 or 4 in 1 mode.
AUTO/MANUAL/PHOTO key and indicators
(p. 15)
Use to sequentially select the exposure modes: AUTO,
MANUAL, or PHOTO.
Light and dark keys and indicators (p. 15)
Use to adjust the MANUAL or PHOTO exposure level.
Numeric keys
Use to select the desired copy quantity or to make user
program entries.
Zero key
Use as part of numeric keys to enter copy quantity.
Press during a continuous copy run to display the
number of copies completed in the current run.
Press and hold during standby to display the total output
count.
GETTING STARTED
Part names and functions
Not used for the copier features.

7
GETTING STARTED
GETTING STARTED
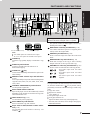
PART NAMES AND FUNCTIONS
Press and hold down the key.
12,345
sheets output
1st display
2nd display
Note:
●
Two-sided copies are counted as two copies.
●
11" x 17" size copies are counted as two copies.
CLEAR key
Clears the copy quantity display or terminates a copy
run.
START key and indicator
Copying is possible when the indicator is on.
Press to start copying.
CLEAR ALL ( ) key
Clears all selected settings and returns the copier to the
initial settings.
PRESET RATIO selector keys and indicators
(p. 24)
Use to sequentially select preset reduction/enlargement
copy ratios: 50%, 64%, 77%, 95%, 100%, 121%, 129%,
141%, 200%.
ORIGINAL SIZE ENTER key and indicators
Use to input the original size.
AUTO PAPER SELECT indicator
Paper of the proper size will be automatically selected
depending on the original size and selected copy ratio
when this indicator is on.
TRAY SELECT key (p. 15)
Use to manually select a paper tray.
AUTO IMAGE key and indicator
Press for automatic copy ratio selection.
Paper feed location/misfeed location indica-
tors (p. 44)
The selected paper feed location is shown by a lit
indicator ( ).
The general location of misfed paper is shown by a
blinking red indicator (
).
DUAL PAGE COPY key and indicator (p. 35)
Use to make individual copies of two originals placed
side by side on the original table.
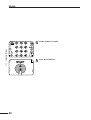
ERASE key and indicators (p. 39)
Press to select the edge erase and/or the center erase
mode.
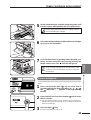
MARGIN SHIFT key and indicator (p. 41)
Shifts text or image on the copy to leave a binding
margin on the left (or the top) side of the copy.
ORIGINAL TO COPY key and indicators (p. 15)
Press to select one-sided and two-sided copy modes.
:Two-sided copies from one-sided
originals.
:Two-sided copies from two-sided
originals.
:One-sided copies from two-sided
originals.
Initial settings
The copier assumes the initial settings when it is first turned
on, when the CLEAR ALL (
) key is pressed, and ap-
proximately one minute* after the last copy is made in any
mode.
●
Copy ratio: 100%
●
Exposure: Automatic
●
Copy quantity: 0
●
All special copier modes: Off
●
Auto paper selection: On
●
Paper feed station: Previously selected paper tray
* This time (auto clear time) can be changed. See page 51,
USER PROGRAMS.
Part names and functions
Depending on the country or area, some keys will be
indicated with either an English name or a symbol.
Not used for the copier features.

8
GETTING STARTED
GETTING STARTED
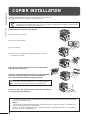
COPIER INSTALLATION
Improper installation may damage the copier. Please note the following
during initial installation and whenever the copier is moved.
If the copier is moved from a cool place to a warm place, condensation may form inside the copier.
Operation in this condition will cause poor copy quality and malfunctions. Leave the copier at room
temperature for at least 2 hours before use.
Do not install your copier in areas that are:
●
damp, humid, or very dusty
●
exposed to direct sunlight
●
poorly ventilated
●
subject to extreme temperature or humidity changes, e.g., near an
air conditioner or heater.
The copier should be installed near an accessible power
outlet for easy connection.
Be sure to connect the power cord only to a power outlet that
meets the specified voltage and current requirements.
Also make certain the outlet is properly grounded.
Connect the copier to a power outlet which is not used
for other electric appliances. If a lighting fixture is
connected to the same outlet, the light may flicker.
Be sure to allow the required space around the machine for
servicing and proper ventilation.
Copier installation
A small amount of ozone is produced within the copier during operation. The emission level is insufficient
to cause any health hazard.
NOTE:
The present recommended long term exposure limit for ozone is 0.1 ppm (0.2 mg/m
3
) calculated as an
8 hr. time-weighted average concentration.
However, since the small amount that is emitted may have an objectionable odor, it is advisable to
place the copier in a ventilated area.
4" (10cm)

9
GETTING STARTED
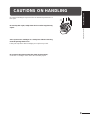
CAUTIONS ON HANDLING
Be careful in handling the copier as follows to maintain the performance of
this copier.
Do not drop the copier, subject it to shock or strike it against any
object.
Store spare toner cartridges in a dark place without removing
from the package before use.
If they are exposed to direct sunlight, poor copies may result.
Do not touch the photoconductive drum (green portion).
Scratches or smudges on the drum will cause dirty copies.
Cautions on handling

10
GETTING STARTED
GETTING STARTED
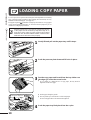
LOADING COPY PAPER
To save space, this copier has been designed with adjustable front-loading
trays, which are easily opened for paper loading. For best results, use only
SHARP recommended paper. (See page 65.)
The paper required ( ) indicator will light up when there is no copy paper
in the selected paper feed station, or when the selected paper tray is not
installed or is improperly installed.
When the paper size is changed in a paper tray, the size
of the paper must be entered by steps 8 through 11 on
page 12. If not, the edges of copies may become smudged
with toner. Also, the AUTO PAPER SELECT and the AUTO
IMAGE features will not function properly.
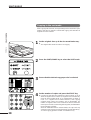
1
Gently lift and pull out the paper tray until it stops.
2
Push the pressure plate down until it locks in place.
3
Fan the copy paper and insert it into the tray. Make sure
the edges go under the corner hooks.
●
If you change to a different size of copy paper, the tray must be
adjusted. See the next page.
●
Set the paper along the guides.
●
The tray holds up to 250 sheets of 21 lb. bond paper.
Do not load paper above the maximum height line.
4
Push the paper tray firmly back into the copier.
Loading copy paper
Maximum height line

11
GETTING STARTED
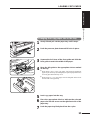
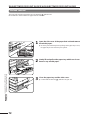
Changing the copy paper size in the tray
1
Gently lift and pull out the paper tray until it stops.
2
Push the pressure plate down until it locks in place.
3
Squeeze the lock lever of the front guide and slide the
front guide to match the width of the paper.
4
Move the left guide to the appropriate slot as marked
on the tray.
●
When using 5-1/2" x 8-1/2" copy paper, load it into the uppermost
paper tray. If other trays (including trays in optional paper feed units)
are used, paper misfeeds may occur.
●
When using 11" x 17" copy paper, store the left guide in the slot at
the left front of the paper tray.
5
Load copy paper into the tray.
6
Place the appropriate label to indicate the selected
paper size into the recess on the right front side of the
paper tray.
7
Push the paper tray firmly back into the copier.
Loading copy paper
LOADING COPY PAPER
Front guide
Left guide

12
GETTING STARTED
GETTING STARTED
Loading copy paper
LOADING COPY PAPER
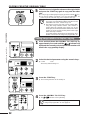
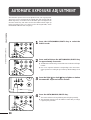
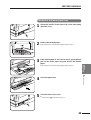
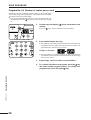
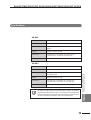
8
To set the selected paper size, press the PAPER SIZE
ENTER key.
●
The selected paper feed location indicator will blink and the
corresponding paper size (which is currently set) indicator will light
up steadily. All other indicators will go out.
For paper size setting, ensure that the COPY mode
has been selected. However, if copying, printing or
facsimile printing is being performed, paper size setting
cannot be made even in the COPY mode. See Note
on page 63.
9
Use the TRAY SELECT key to select the paper tray of
which the paper size has been changed.
●
Each time the TRAY SELECT key is pressed, a paper tray will be
indicated with a blinking paper feed location indicator.
10
Use the ORIGINAL SIZE ENTER key to select the paper
size which is set.
●
Each time the ORIGINAL SIZE ENTER key is pressed, a paper size
will be indicated with a paper size indicator.
11
Press the START key and then the PAPER SIZE ENTER
key.
●
To change the paper size setting of another tray, repeat steps 9 to 10
after pressing the START key.

13
MAKING COPIES
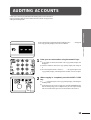
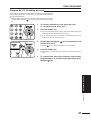
AUDITING ACCOUNTS
If this copier has been programmed in the auditing mode, it will not function
until an assigned 3-digit account number has been entered. See page 54 for
setting the auditing mode.
If the copier has been programmed in the auditing mode, “ ” will appear
in the copy quantity display in the initial conditions.
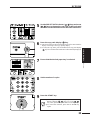
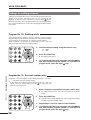
1
Enter your account number using the numeric keys.
●
As each digit is entered, the dashes in the copy quantity display will
disappear.
●
After the number is entered, the copy quantity display will change to
0.
●
If an unassigned number is entered, “ ” will appear again in the
copy quantity display, indicating that the number was not accepted.
2
When copying is completed, press the AUDIT CLEAR
key.
●
“ ” will appear again in the copy quantity display, indicating the
auditing mode.
●
In the interrupt copy mode (see page 29), press the INTERRUPT key
after an interrupt copy run is completed. All previous copier settings
will be restored and the previous account number will be active.
Auditing accounts

14
MAKING COPIES
NORMAL COPYING
This copier has two document input stations –– a reversing
single pass feeder (RSPF) for automatic document feeding
and an original table for manual handling of bound
documents. The RSPF is designed to hold up to 30 originals
measuring from 5-1/2" x 8-1/2" to 11" x 17" and in the
weight range of 15 to 24 lbs.
●
Be sure to remove any staples or paper clips from the
originals.
●
Damaged or crumpled originals may misfeed in the RSPF.
It is recommended that these originals be copied from the
original table.
●
Before placing curled or wavy originals into the document
feeder tray, be sure to flatten them. If not, original misfeeds
may result.
●
For best feeding of originals which have binding holes
punched into them, insert them so that the holes are
positioned to the right or along the side guides. In this case
the settings for location of margin and image rotation in
duplex copying may need to be changed to ensure the
images are produced in the desired orientation. See pages
22 and 41.
●
Special originals such as transparency film and tracing
paper should not be fed through the RSPF but should be
copied from the original table.
●
The bypass tray and any tray with non-standard size paper
cannot be used in the duplex copy mode.
●
Paper sizes that can be used in the duplex mode are 8-1/2"
x 11", 8-1/2" x 11"R, 8-1/2" x 14", and 11" x 17".
●
If the offset stack mode is enabled using user program No.
19, each set of copies will be offset from the previous set
in the sort and group modes.
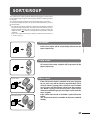
Stream feeding mode
If the stream feeding mode has been enabled using user program No. 4, the RSPF indicator
will continue to blink for approximately 5 seconds after feeding of all originals is completed.
While this indicator is blinking, any new originals placed in the RSPF will be fed and copied
automatically. See page 51, USER PROGRAMS.
Power on
Power on
1
Turn the power switch on.
●
It will take about 35 seconds for the copier to warm up.
However, you can make desired settings and press the START key
during warm-up. Copying will start after warm-up.
●
If the copier has been programmed in the auditing mode, the START
key indicator will not light up and “ ” will appear in the copy
quantity display. Enter an assigned 3-digit account number. See page
13.
●
If an optional printer expansion kit or facsimile expansion kit is
installed, when the power is already on and all indicators except the
POWER SAVE indicator are off, the copier is in the auto power shut-
off mode. Press the START key in this case. See page 58, POWER
SAVE MODES.
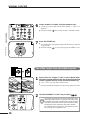
One-sided copies from one-sided originals
1
Ensure that no original is left on the original table.
2
Adjust the original guides to the size of the originals.
3
Set the originals face up in the document feeder tray.
●
The RSPF indicator will light up. If this indicator does not light up, the
originals are not properly set, or the RSPF is not properly closed.
Normal copying

15
MAKING COPIES
●
The ORIGINAL SIZE indicator for the detected original size will
light up, and the paper tray with the corresponding paper size will be
automatically selected.
●
The auto paper select function can be disabled using user program No.
8. If this function has been disabled, use the TRAY SELECT key to
select the desired paper tray. See page 51, USER PROGRAMS.
●
To copy onto a different size paper, use the TRAY SELECT key to
make the selection.
●
The bypass tray cannot be automatically selected.
4
Ensure that the one-sided to one-sided copying mode is
selected in the ORIGINAL TO COPY section of the
operation panel.
●
When no indicator in the ORIGINAL TO COPY section is lit, the
one-sided to one-sided copying mode is selected.
5
Adjust the copy density.
●
This copier has three exposure modes to choose from — AUTOMATIC,
MANUAL, and PHOTO.
●
Automatic exposure is the standard initial setting for this copier. In
this mode, the characteristics of the original are “read” by the
exposure system and adjustments are automatically made. This
optimizes the contrast of the copied images by reducing the effect of
colored or shaded background areas. See page 30 to adjust the
automatic exposure level.
●
For manual density adjustment, press the AUTO/MANUAL/PHOTO
key to select MANUAL and adjust with the light ( ) and dark ( )
keys as desired.
●
For photographs, select PHOTO and then adjust with the light ( )
and dark ( ) keys as desired.
●
There are 5 exposure steps indicated by 3 indicator lights. (The
indicators light up one or two at a time.)
If exposure level 2 is selected, the two left-handmost indicators for
that level will light up simultaneously. Also, if level 4 is selected, the
two right-handmost indicators for that level will light up
simultaneously.
Normal copying
NORMAL COPYING

16
MAKING COPIES
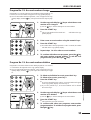
6
Set the number of copies using the numeric keys.
●
A single copy can be made with the initial setting, i.e., when “0” is
displayed.
●
Press the CLEAR ( ) key to clear an entry if a mistake is made.
7
Press the START key.
●
The number in the copy quantity display will decrease by 1 each time
a copy is made.
●
Press the CLEAR ( ) key to stop copying in the middle of a run.
Two-sided copies from one-sided originals
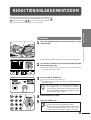
1
Ensure that no original is left on the original table.
Adjust the original guides to the size of the originals and
set the originals face up in the document feeder tray.
●
5-1/2" x 8-1/2" size copy paper cannot be used.
●
If an uneven number of originals is set, the last copy will be one-sided.
2
Use the ORIGINAL TO COPY key to select .
The image of every front side can be rotated 180° using
the image rotation feature. This feature is useful when
the originals and copies are in the landscape (horizontal)
orientation and the two-sided copies are to be read by
turning them left to right rather than top to bottom.
To set this feature, see page 22. This feature can also
be set using user program No. 20.
Normal copying
NORMAL COPYING

17
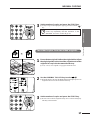
MAKING COPIES
Two-sided copies from two-sided originals
1
Ensure that no original is left on the original table. Adjust
the original guides to the size of the originals and set the
originals face up in the document feeder tray.
●
5-1/2" x 8-1/2" size original or copy paper cannot be used.
2
Use the ORIGINAL TO COPY key to select .
●
When this mode is selected, the RSPF indicator will light up even if no
original has been set in the document feeder tray.
3
Set the number of copies and press the START key.
●
Be sure not to touch the originals as they move on the reversing tray.
This may cause misfeeds.
Normal copying
NORMAL COPYING
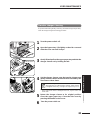
3
Set the number of copies and press the START key.
●
To stop a copy run during duplex copying, press the CLEAR ( )
key.
To cancel the duplex mode, press the ORIGINAL TO
COPY key repeatedly until the indicators in the
ORIGINAL TO COPY section all go out.

18
MAKING COPIES
Normal copying
NORMAL COPYING
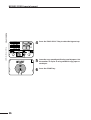
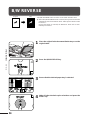
One-sided copies from two-sided originals
1
Ensure that no original is left on the original table.
Adjust the original guides to the size of the originals and
set the originals face up in the document feeder tray.
●
5-1/2" x 8-1/2" size original cannot be used.
2
Use the ORIGINAL TO COPY key to select .
●
When this mode is selected, the RSPF indicator will light up even if no
original has been set in the document feeder tray.
The image of every front side can be rotated 180° using
the image rotation feature. This feature is useful when
the originals and copies are in the landscape (horizontal)
orientation.
To set this feature, see page 22. This feature can also
be set using user program No. 20.
3
Set the number of copies and press the START key.
●
Press the CLEAR key to stop copying in the middle of a run.
●
Be sure not to touch the originals as they move on the reversing tray.
This may cause misfeeds.
Page is loading ...
Page is loading ...
Page is loading ...
Page is loading ...
Page is loading ...
Page is loading ...
Page is loading ...
Page is loading ...
Page is loading ...
Page is loading ...
Page is loading ...
Page is loading ...
Page is loading ...
Page is loading ...
Page is loading ...
Page is loading ...
Page is loading ...
Page is loading ...
Page is loading ...
Page is loading ...
Page is loading ...
Page is loading ...
Page is loading ...
Page is loading ...
Page is loading ...
Page is loading ...
Page is loading ...
Page is loading ...
Page is loading ...
Page is loading ...
Page is loading ...
Page is loading ...
Page is loading ...
Page is loading ...
Page is loading ...
Page is loading ...
Page is loading ...
Page is loading ...
Page is loading ...
Page is loading ...
Page is loading ...
Page is loading ...
Page is loading ...
Page is loading ...
Page is loading ...
Page is loading ...
Page is loading ...
Page is loading ...
Page is loading ...
Page is loading ...
Page is loading ...
Page is loading ...
Page is loading ...
Page is loading ...
Page is loading ...
Page is loading ...
Page is loading ...
Page is loading ...
Page is loading ...
Page is loading ...
Page is loading ...
Page is loading ...
Page is loading ...
Page is loading ...
-
 1
1
-
 2
2
-
 3
3
-
 4
4
-
 5
5
-
 6
6
-
 7
7
-
 8
8
-
 9
9
-
 10
10
-
 11
11
-
 12
12
-
 13
13
-
 14
14
-
 15
15
-
 16
16
-
 17
17
-
 18
18
-
 19
19
-
 20
20
-
 21
21
-
 22
22
-
 23
23
-
 24
24
-
 25
25
-
 26
26
-
 27
27
-
 28
28
-
 29
29
-
 30
30
-
 31
31
-
 32
32
-
 33
33
-
 34
34
-
 35
35
-
 36
36
-
 37
37
-
 38
38
-
 39
39
-
 40
40
-
 41
41
-
 42
42
-
 43
43
-
 44
44
-
 45
45
-
 46
46
-
 47
47
-
 48
48
-
 49
49
-
 50
50
-
 51
51
-
 52
52
-
 53
53
-
 54
54
-
 55
55
-
 56
56
-
 57
57
-
 58
58
-
 59
59
-
 60
60
-
 61
61
-
 62
62
-
 63
63
-
 64
64
-
 65
65
-
 66
66
-
 67
67
-
 68
68
-
 69
69
-
 70
70
-
 71
71
-
 72
72
-
 73
73
-
 74
74
-
 75
75
-
 76
76
-
 77
77
-
 78
78
-
 79
79
-
 80
80
-
 81
81
-
 82
82
-
 83
83
-
 84
84


Ask a question and I''ll find the answer in the document
Finding information in a document is now easier with AI
Related papers
Other documents
-
Xerox XC355 User guide
-
Savin 7700W User manual
-
Olivetti 2701 User manual
-
Creative AL-1551 User manual
-
Panasonic DP150FP Operating instructions
-
Ricoh FW 870 Owner's manual
-
Panasonic DP-1810F User manual
-
-
Savin 1502 User manual
-