Electrolux 9CHG583299 User manual
- Category
- Deep fryers
- Type
- User manual

Thermetic
TILTING PRESSURE BRAISING PANS, ELECTRIC
(GX........)
US OPERATING AND SAFETY INSTRUCTIONS
Doc. 62.9696.01
Edition 1
03.2005

Doc. 62.9696.01

CONTENTS
I GENERAL INFORMATION .........................................................................3
1. INSTRUCTIONS FOR SAFETY AND USE ......................................................................... 3
2. TECHNICAL DATA ............................................................................................................. 4
3. PACKAGING ....................................................................................................................... 4
4. TESTS / CERTIFICATES .................................................................................................... 4
5. SPECIFICATION PLATE .................................................................................................... 4
6. SERIAL NUMBER YWWXXXXX ......................................................................................... 4
7. FURTHER DOCUMENTS ................................................................................................... 4
II OPERATING INSTRUCTIONS ....................................................................5
1. DESCRIPTION/ CONSTRUCTION ..................................................................................... 5
2. INITIAL OPERATION .......................................................................................................... 5
3. STANDBY ........................................................................................................................... 5
4. AUTOMATIC CONTROL .................................................................................................... 6
5. LID LOCK ............................................................................................................................ 8
6. ADDITIONAL EQUIPMENT .............................................................................................. 10
7. WORKING RULES ............................................................................................................ 10
8. CLEANING ........................................................................................................................ 13
9. TROUBLESHOOTING ...................................................................................................... 13
10. TREATMENT OF COMMERCIAL KITCHEN APPLIANCES ............................................ 13

Doc. 62.9697.01

GENERAL INFORMATION
62.9696.01 Page 3
I . GENERAL INFORMATION
1. INSTRUCTIONS FOR SAFETY AND USE
1.1 INSTALLATION AND INITIAL OPERATION
1.2 OWNER'S OBLIGATIONS
1.3 USE AS PRESCRIBED
1.4 SAFETY-CONSCIOUS WORKING
1.5 AFTER-SALES SERVICE AND REPAIR
S The installation, adjustment and initial opera-
tion of the appliance must be carried out
according to the manufacturer's instructions
and only by an authorised specialist.
S Installations for the supply of electricity and
gas must be carried out by approved special-
ists in compliance with specific national and
local regulations. They bear the responsibility.
S The appliance must not be placed in opera-
tion until the user has become familiar with its
operation. The operating instructions and the
related safety precautions must be followed
precisely. Follow strictly the attention and
warning label indications on the appliances.
S The manager is responsible for ensuring that
all components relevant for safety are in per-
fect working order at all times. The operating
condition of these components must be exam-
ined by an authorized technician at least once
a year and any defects remedied if required.
S The appliance must only be used for cooking
food in commercial kitchens. The appliance
has only been approved for supervised oper-
ation by trained persons.
S Closed containers (jars, cans, bottles, tubes,
etc.) must not be heated owing to the danger
of bursting and injuries.
S During pressureless cooking the filling of the
appliance must never rise above 1.6“ (4 cm)
below the boiler rim. Depending on the type
of food to be cooked, filling must be less so
as to prevent bubbling over.
S During pressure cooking the pan must be
only half or less filled.
S This appliance must not be used for deep fat
frying purposes. Do not use large cuantities
of oil. The appliance must not be operated
close to materials and vapours which consti-
tute a fire hazard.
S During operation, no objects are to be placed
on the lid
S Overheated oil can self-ignite. Never leave
braising oil unattended.
S Never quench burning oil with water, but
smother the flames with the cover or a wet
cloth.
S Devices on wheels set up in block configura-
tion must be checked before each start-up
whether the potential equalization is con-
nected with the neighbour equipment. The
connection may be done only by authorized
technical personnel.
S Spraying the appliance or parts of it with a
high-pressure cleaning device may cause
malfunctions and is not to be done.
S To avoid damage to the appliance, do not let
water flow from the mixer tap onto the cook-
ing plates.
S When putting oil, fat, water or ingredients in
the preheated hot boiler, they may splash -
danger of burning!
S Always use the handle to open the cover.
Note that while doing so, hot air or steam
may flow out or hot fat may spit out - danger
of burning!
S Keep your distance from the lid closing area
when closing the lid - danger of injury!
S To avoid damage to the appliance the mixer
tap outlet must be to the front before the lid is
opened or closed.
S Tilting is only to be carried out slowly to avoid
the contents spilling over the rim.
S Hot steam can be expelled on opening the
lid. Staff must take appropriate measures
(stand well back) to avoid injuries.
S The area around the tilting boiling pan must
be kept free. Tilting is only to take place with
the lid fully open - danger of burning!
S If the operator observes the change in the
lock, the lid must not be closed and the appli-
ance must not be used for pressure cooking.
The Customer Service must be contacted
immediately.
S Devices on wheels set up in block configura-
tion must be checked before each start-up
whether the potential equalization is con-
nected with the neighbour equipment. The
connection may be done only by authorized
technical personnel.
S Appliances on wheels must be fastened with
the wall.
S In the event of a permanent fault which inter-
feres with operation, the appliance must be
switched off and disconnected from the
power supply.
S Repair, maintenance work and other adjust-
ments are only to be carried out by an author-
ized specialist. The valid local and national
regulations must be observed. This applies
especially to burners, ignition, safety and con-
trol elements. Parts requiring replacement are
only to be replaced by original spare parts.
Periodic tests for gas leaks must be carried
out. A service contract is recommended.
S Cleaning and maintenance must be done only
when the heating surfaces are cold. Do not
use inflammable liquids to clean the appli-
ance.
S An obligatory service check is required
annually.

GENERAL INFORMATION
Page 4 62.9696.01
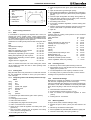
2. TECHNICAL DATA
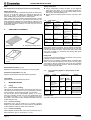
3. PACKAGING
All the packaging materials used are environmentally friendly.
They may burnt at an incineration plant or sent for recycling.
4. TESTS / CERTIFICATES
All electrical appliances are UL 197 and NSF/ANSI 4-2002 and
NSF/ANSI 8-2002 tested.
The appliance noise level is negligible. The statutory guidelines
are fulfilled; the sound pressure level is less than 70 dB (A).
5. SPECIFICATION PLATE
The specification plate (E) is located in each case inside and
outside on the right of the control panel (C).
6. SERIAL NUMBER YWWXXXXX
The serial number of the appliance is marked on the type
plate. The 8 digits give following information:
Y last digit of the year of production
WW week of production
XXXXX running number
7. FURTHER DOCUMENTS
• Installation instruction
• Service manual
• Wiring diagram
• Spare parts list
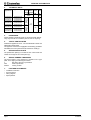
PNC
Appliances
Appliance type Width
Depth
Height
Feet,
Wheel
Height
Electr.
Power
Boiler
size
inch
(mm)
kW lt
(gal)
9CHG583299
9CHG583300
9CHG583301
GXWBOEOOOO
GXXBOEOOOO
GXYBOEOOOO
47.2
35.4
27.6
(1200
900
700)
7.9
(200)
12.2
60
(15.9)
9CHG583302
9CHG583303
9CHG583304
GXWDOEOOOO
GXXDOEOOOO
GXYDOEOOOO
90
(23.8)
9CHG583305
9CHG583306
9CHG583307
GXWEOEOOOO
GXXEOEOOOO
GXYEOEOOOO
63
35.4
27.6
(1600
900
700)
18.2
100
(26.4)
9CHG583308
9CHG583309
9CHG583310
GXWHOEOOOO
GXXHOEOOOO
GXYHOEOOOO
150
(39.6)

OPERATING INSTRUCTIONS
62.9696.01 Page 5
II . OPERATING INSTRUCTIONS
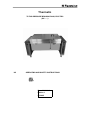
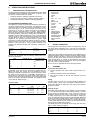
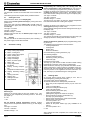
1. DESCRIPTION/ CONSTRUCTION
The tilting pressure braising pan with polished chromium nickel
steel plated bottom essentially serves three purposes, which
can also be combined with one another:
• Roasting, Browning, Stewing, Preparation of sauces
• Cooking, Pressure cooking, Sauteing, Steaming, Boiling
• Pressureless steaming, Pressure steaming, Braising
TILTING PRESSURE BRAISING PAN
The appliance is totally constructed externally and internally of
corrosion-resistant chrome nickel steel. The appliance is floor
mounted on the two consoles. The pan is supported on bear-
ings which allow it to tilt. Precise amounts of food can be
poured out of the pan by turning the knob of the appliance
which features motorized tilting. A precise, state-of-the-art
electronic microprocessor control system with digital preselec-
tion of temperature, cooking time, starting time and steam con-
densation ensures perfect adherence to the pre-programmed
cooking functions. The methods used for roasting and cooking
are the same as those in normal roasting pans or cooking
appliances. The steaming procedure refers to gentle, rapid
and uniform cooking alternatively without pressure in the tem-
perature range up to 212°F (100°C) or under saturated steam
pressure of 0,4 bar (228°F, 109°C) positive pressure. The
cooking time decrease sharply with increasing cooking tem-
perature:
The pan can be loaded with the following Gastro-Norm con-
tainers of size GN1/1:
Depending on the type of food, perforate or imperforate con-
tainers are used. The former are most frequently used for
steaming. Perforated containers are used for food from which
the water is to be removed (e.g. vegetables). Imperforate con-
tainers are for food which is to remain moist in the water. The
containers are either placed directly on the inserted perforated
base or are hung in the frames provided. The appliance must
not be used for deep fat frying.
Technical data:
2. INITIAL OPERATION
Thoroughly wash the entire pan with hot soapy water, rinse it
with clean water and allow it to dry. The new pan should then
be heated up at a temperature of 320°F (160°C) for about 30
minutes.
Tilting pans with polished steel bottoms should additionally be
treated as follows: load the cold pan with good quality roasting
fat (lard, butter) and about 2“ thick raw potato slices. Then
lightly roast the potato slices for about 60 minutes, turning
them several times. As a result of this treatment, the bottom
loses its metallic flavour. Empty the pan and rub it thoroughly
with a dry cloth or absorptive paper.
Do not use oil or vegetable fat for the above procedure.
3. STANDBY
Check each time before use:
D The lid regulation and safety valve must be built in cor-
rectly.
D Operating elements must not be damaged.
D The correct function of the lid lock elements must be
checked.
Filling
Fill with water via mixer unit or hose. Maximum fillings see
chapter „Filling“. Salt is only to be added in dissolved form. It
must not be added to an empty pan. Use only a wood or plastic
spatula for stirring.
Heating up time
After filling with liquid produce, the appliance can be switched
on. The lid should be kept closed during heating to reduce
energy losses and heating time. At full power, the maximum
heating-up times from 68°F (20°) to 194°F (90°C) for pans full
of water correspond to the values listed below. Heating-up
times are reduced when pans are only partially filled. Whilst full
power is required for initial heating, this is not the case for fur-
ther cooking. The power requirements for cooking with lid open
is many times that with the lid closed. The lid should therefore
always remain closed during cooking.
The heating-up time in (minutes) for an empty pan from 68°F
(20°) to 446°F (230°C) is approx.:
Temperature 212°F (100°C) 228°F(109°C)
Pressure 0 5.8 psi (0,4 bar)
Cooking time % 100 54
Type Number GN 1/1 max.depht of the
containers mm
60 LT 2 150
90 LT 2 250
100 LT 3 150
150 LT 3 250
Type El. power rating Cooking area Capacity
kW mm lt gal
60 LT 12,2 620 x 490 x 220 67 17.7
90 LT 12,2 620 x 490 x 290 94 24.8
100 LT 18,2 990 x 490 x 220 104 27.5
150 LT 18,2 990 x 490 x 290 145 38.3
bLid knob
c Pressure lid
d Suspension
frame
ePan
f GN 1/1 con-
tainer
g Bottom grid
h Control ele-
ments
iConsole
k Support
m Spout
n Tilting devices
s Steam baffle of
lid regulation
and safety valve
t Steam baffle of
steam release
valve
Fig. 1 Construction
Type Pan empty Water 100% Water 50%
60 LT 14 30 17
90 LT 14 45 24
100 LT 15 34 20

OPERATING INSTRUCTIONS
Page 6 62.9696.01
4. AUTOMATIC CONTROL
The automatic controls can be fitted with more or fewer func-
tions.
The following instructions explain all the possible functions.
4.1 Setting the clock
The clock time is shown on the display (AZ).
Switch on the control system switch (S) by turning them from
position 0 to I.
Then press and hold down buttons (ZT) and (Q). After the
second acoustic signal, the clock time can be set by turning
the knob (Z).
Turn right = increase
Turn left = reduction
Smallest change = 1 minute
After the time has been set, the buttons (ZT) and (Q) can be
released again.
4.2 Starting
The pan must be in the horizontal position prior to starting, or
the power supply must be disconnected.
4.3 Automatic cooking
Switching on
Switch on the control switch (S) turn from position 0 to I. This
switches on the temperature pre-setting function. The lamp
(LS) lights up.
0 = Off
I = On
Set the desired cooking temperature (flashing nominal
value) with the temperature selection knob (T) on the display
(AT).
Turn right = increase
Turn left = reduction
Smallest change = 1°F
Programming the cooking time, the starting time and
steam condensation in the compartment (or only one func-
tion). The starting-time programme only exists as an option.
Pressing the button (DT) switches on the programme for the
cooking time (flashing nominal value). The desired cooking
time is set with the cooking time knob (D) on the display (AD).
Turn right = increase
Turn left = reduction
Smallest change = 1 minute
The lamp (LD) only lights up when the desired temperature
has been reached and the cooking time expires.
Pressing the button (ZT) switches on the programme for the
starting point (flashing nominal value).
Set the desired starting time with the starting time knob (Z) on
the display (AZ)
Turn right = increase
Turn left = reduction
Smallest change = 1 minute
The acoustic signal will sound three times and the lamp (LZ)
will light up when the starting time has been reached.
Steam condensation (optional) is pre-programmed by press-
ing button (V).
The following pre-programmed nominal functions
• Cooking temperature
• Cooking time
• Starting time
• Steam condensation
are all activated by pressing the button (TT).
The following displays
• Cooking temperature (AT)
• Remaining cooking time (AD)
• Clock time (AZ)
indicate the current value.
The lamp (LT) will continue to flash until the nominal cooking
temperature is reached. It then stays on permanently.
When illuminated, this lamp (LV) indicates that steam conden-
sation is switched on. When cooking is completed, steam con-
densation will start automatically and will remain in operation
until the pressure in the appliance has been reduced to nor-
mal. The lamp (LV) will flash during the cooling phase.
4.4 Shutting down
An acoustic signal sounds when cooking is over. This is
acknowledged by pressing the button (Q).
The power supply is then switched off.
All activated functions are subsequently switched off:
• Press the pre-set temperature button (TT) for some sec-
onds.
Lamp (LT) extinguishes.
• Press the cooking time button (DT).
Lamp (LD) extinguishes.
• Press the starting time button (ZT).
Lamp (LZ) extinguishes.
(Starting-time programme exists as an option)
• Press the button for steam condensation (V).
The lamp (LV) will extinguish.
• Switch off the Soft button (R), if this was activated.
• Switch off the control switch (S).
Turn from position I to 0.
Lamp (LS) extinguishes.
• Switch off the power isolator (H) (only available as an
option).
• Turn from position I to 0.
0 = Off
After cooking has been completed, the control switch (S) is
switched off.
150 LT 15 50 28
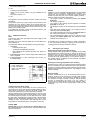
TT Button, activation of settings
LT Lamp, cooking temperature
DT Button, cooking time
LD Lamp, cooking time expires
ZT Button, starting time
LZ Lamp, starting time
LR Lamp, soft settings
Q Button, acoustic signal
R Button, soft
LS Lamp, temperature
pre-setting
AT Display, cooking tempera-
ture
T Temperature selection knob
AD Display, remaining cooking
time
D Cooking time knob
AZ Display, time
Z Starting time knob
S Control switch
Fig. 2 Right console

OPERATING INSTRUCTIONS
62.9696.01 Page 7
• Turn from position I to 0.
0 = Off
• The lamp (LS) extinguishes.
• Switch off the power isolator (H) (only available as an
option).
Turn from position I to 0.
0 = Off
The appliance can be switched off before cooking has been
completed.
If the function buttons (TT), (DT) and (ZT) are switched on and
switching off is only done by means of the control switch (S),
all the functions and previously set data for temperature, cook-
ing time and starting time remain saved and active when the
switch (S) is turned on again.
If the appliance develops a fault, the electrical switch in the
building must also be switched off.
4.5 Additional functions
SOFT
Pressing the Soft button (R) adapts the power supply to the
food, i.e. reduces it.
The lamp (LR) on the button (R) lights up if the soft setting has
been switched on.
The following functions are activated by pressing button (Q):
1. All displays
Food temperature (AT)
Cooking time (AD)Starting time (AZ)
flash indicating the nominal value that has been pro-
grammed in.
2. Acknowledgement of the acoustic signal when cooking has
been completed.
3. Acknowledgement of error messages (see section 12,
Troubleshooting).
Cooking using the SOFT setting
Normally (Soft setting deactivated), the food is heated up at
maximum power and in the shortest possible heating-up time.
This method of operation is suited to food with a high water
content and which has good heat conductivity properties.
When maximum power is used to heat them up, viscous, pasty
and difficult to heat food (dairy products) tends to dry out along
the heated surface of the pan, to turn dark and to burn. When
the Soft setting is activated, the heating power is automatically
adapted via the temperature difference to the type of food.
Heating-up times are extended a little although the pre-set
temperature is reached without the food sticking or burning.
CLOCK TIME
Display (AZ) shows the clock time and display (AT) shows
the actual temperature of the pan when the control switch (S)
alone is switched on.
HACCP
Appliances can be optionally equipped with the program-linked
cooking process procedure THERMACAM. Cooking pro-
cesses can be programmed, analyzed, logged and docu-
mented and are thus part of the HACCP system (HACCP =
hazard analysis and critical control points).
• The program system is started by pressing the HACCP
button (C).
• The lamp (LC) lights up.
• The number of the cooking program appears on the dis-
play (AZ): HP 00 to 99.
• The program number can be changed by turning the knob
(Z).
• After setting the desired program, the cooking process is
started by pressing the key (TT).
• The nominal temperature is shown on the display (AT) and
the cooking time appears on the display (AD).
• The program-linked cooking process is switched off by
pressing the HACCP button (C). The appliance is then
switched off according to 4.4.
A separate set of operating instructions contains information
on the programming, analyzing, logging and documenting of
cooking processes using an external computer.
4.6 Altering the pan settings
Altering the nominal values while working
All the nominal values programmed in originally can be easily
altered during the working process by setting the buttons for
temperature (T), for the cooking time (D) and for the starting
time (Z) to the new values. When the buttons are turned, the
nominal value will appear flashing on the relevant display. If
the nominal value is not altered for a few seconds, the display
reverts to the actual value.
Altering the cooking programmes while working
Switching off the button (TT) will interrupt the heating/cooking
process. Switching off the cooking time button (DT) reverts to
continuous cooking. Switching off the starting time button (ZT)
deletes the programmed-in starting time. The appliance can be
started manually.
Manual cooling
If steam condensation is not to be automated using the pro-
gramme, cooling can be switched on manually when cooking
is completed. However, it is necessary to determine the start
and duration of cooling manually. Procedure: halt the cooking
process by deactivating the button (TT); the cooling is
switched on by pressing button (V); lamp (LV) will flash. Deac-
tivate button (V) to turn off the cooling again. Lamp (LV) will
extinguish.
ZT Button, starting time
LZ Lamp, starting time
LR Lamp, soft settings
Q Button, acoustic signal
R Button, soft
Fig. 3 Right console

OPERATING INSTRUCTIONS
Page 8 62.9696.01
4.7 Tilting
MECHANICAL TILTING
The pan is tilted with the help of an electric motor. It only works
when the control switch (S) are switched on by turning from
position 0 to I.
0 = Off
I = On
Lamp (LS) will light up.
Tilting at variable speed by turning the tilting knob (K):
Emptying the pan turn to the right
Tilting back turn to the left
Turning the knob further will accelerate the tilting function.
.
Tilting is only to be activated with lid fully open and with the
swivel outlet of the water mixing unit in the correct position
(precisely towards the front) and where no object is present
under the appliance in the tilting zone. The pan is tilted down
by turning tilting switch clockwise (to the right) and tilted up by
turning it anti clockwise (to the left). Tilting at variable speed
will only take place as long as the tilting switch (K) is held in
the tilting position. On being released, the switch returns to the
neutral, centre position and due to the drive self-locking, the
boiling pan immediately comes to rest, whatever the position
and filling level. The tilting motor is automatically switched off
in the extreme positions of the pan; the horizontal and fully
tilted positions, so any further actuation of the tilting switch (K)
has no effect.
The heating can no longer be operated with even the smallest
degree of tilt from the horizontal.
Select the rate of tilting so that the produce is discharged in the
region of the pouring lip. This is easy to do by varying the tilting
speed. Avoid spillage of the contents over the rim of the boiling
pan.
4.8 Temperature settings
Temperature setting
Dependent on the cooking functions required, the temperature
selection button (T) on the display (AT) is used to set the fol-
lowing recommended temperatures:
Cooking 68° - 212°F (20° - 100°C)
Pressure-cooking 230° - 394°F (110° - 250°C)
Braising 356° - 394°F (180° - 250°C)
When pressure-cooking, select lower heating-up temperatures
(110°C) for low food quantities and higher temperatures
(250°C) for larger food quantities. If the desired value set
exceeds 230°F (110°C), this display will automatically revert to
the temperature < 230°F (110°C) when the working pressure is
reached. Any change to the desired value can then only be
made to set lower temperatures. Any new temperature value
setting can only be entered again after the appliance has been
switched off.
Cooking with pressure
After filling with water and food (either directly into the water or
in insert containers) adjust the temperature to 230°F (110°C)
and switch on the pan. The appliance starts to heat. After-
wards close the lid. The generated steam will press the
remaining air out of the pan. Therefore, the lid regulation and
safety valve must remain open (handle in position A) until only
steam evaporates out of the valve opening. Now, the valve is
to be closed (i.e. handle is to be moved to position B). Within
the pan, the pressure will be increased to 0,45 bar (corre-
sponding to 228°F (109 °C)) and remains constant. When the
heating is switched off, by hand or automatically, the pan
should be cooled during about 4-6 minutes, in order to decom-
pose the steam and the pressure
4.9 Switching off
The appliance is shut down by turning the power isolator (H)
(available as an option) as well as the control switch (S) to
zero. All lights will extinguish when this is done.
In the case of faults, the appliance must also be disconnected
from the electric supply connection.
4.10 Power failure
The loss of mains electricity while a cooking pan is being used
can result in cooking being halted or interrupted. Cooking staff
are then required to make an additional intervention in the con-
trols or to monitor further processing.
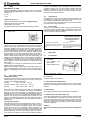
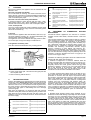
5. LID LOCK
5.1 Lid elements
H Lock lever
Causes the lock hook to snap in.
S Lid regulation and safety valve
Combined valve for manual operation and as safety valve
(blows off automatically at pressures above 6.5 psi (0.45 bar)).
Position:
D Steam outlet
The condensed steam flows out through this canalization.
V Steam release valve with safety lock
This valve predominantly has a safety function. With the valve
open, steam pressure for cooking cannot build up in the cook-
ing vessel. The steam release valve can be closed only when
the lid is properly closed and the lock mechanism is correctly
snapped in. Only then it is possible to build up the steam pres-
sure in the appliance.
Caution:
At the steam outlet (D/Fig. 5) large amounts of steam blow
out.
K Tilting knob
Fig. 4 Left-hand console (at the top)
Power failure when: The measure to be
implemented to restart the
cooking process after the
mains supply has been
restored
The cooking process is taking place Press the key (TT)
The cooking process has been programmed
with a starting time although this has not yet
expired
After the mains supply has been restored, the
starting time comes to an end and the heating
process starts automatically without any inter-
vention in the controls
D Steam outlet
H Lock lever
S Lid regulation and
safety valve
V Steam release valve
Fig. 5 Pressure lid - Locking

OPERATING INSTRUCTIONS
62.9696.01 Page 9
5.2 Closing and opening the lid
The lid of the tilting braising pan is a fast- action lock of a pres-
sure vessel. This lock must be operated with care.
5.2.1 Closing
D The pan must be brought to the horizontal position.
1:
D The appliance must be heated up and the cooking process
started with the lid open. Before the lid is closed, the food
should be boiled at least once (owing to burning).
D The upper edge of the pan and the seal must be clean and
free from food residues.
D Before closing the lid, it must be ensured that the locking
lever, the lever of the steam release valve, and the lever of
the lid regulation and safety valve are in position A (open).
D The swivel arm of the mixing faucet for the water must
point to the front.
2:
D Press the lid downwards onto the pan by means of the lid
knob and at the same time move the lock lever from the
open position A backwards to the closed position B.
3:
D Turn the lever of the steam release valve from the open
position A to the closed position B. The lid is thus closed
and ready for pressure cooking.
4:
D The lid regulation and safety valve must be closed (lever
position B).
Pressureless cooking
When the appliance is used as a normal pan or open cooking
vessel, the lid is placed loosely (on its own weight) on the pan
without being locked.
5.2.2 Opening
D Before the lid is opened, the operator must ensure that
there is no longer any pressure in the cooking space. This
is done as follows:
1:
D Turn off energy supply to the appliance by turning the time
setting switch (3) and the temperature setting switch (1) to
zero.
2:
D Slowly open the steam release valve from position B to
position A.
3:
D Slowly open the lid regulation and safety valve by bringing
the grip from position B to position A.
Wait until the pressure indicator (pivot P on the top of the lid
regulation and safety valve, Fig. 8) reaches its lowest position,
which corresponds to a pressure of 0.6 psi (0.04 bar).
Again wait until:
D no further liquid
D no further water
D no further steam
escapes through the upward-pointing opening of the lid
regulation and safety valve.
4:
D Push the lid downwards onto the pan by means of the lid
knob and at the same time move the lock lever from the
closed position B forwards to open position A.
5:
As there is still a residual pressure again wait until:
D no further liquid
D no further water
D no further steam
comes out.
D Hold the lid by the knob and carefully open.
A open B closed
Fig. 6 Pressure lid - Closing
A open B closed
Fig. 7 Pressure lid - Opening
P Pressure indicator
Fig. 8 Lid regulation and safety valve

OPERATING INSTRUCTIONS
Page 10 62.9696.01
Note:
The manual force on the knob should not exceed 25 kg.
Safety information
When the lid is opened, it should be noted that hot vapors may
flow out or hot fat may splash out. Staff must take this into
account by means of appropriate measures (standing far
away, holding lid by knob) in order to avoid injuries.
After cooking with the lid closed, either pressureless or under
pressure, the lid must not be opened until the pressure has
been completely released from the appliance. Particular care
is required if the food froths. If the lid is opened when there is a
small residual positive pressure, hot food may flow out and
injure the operator.
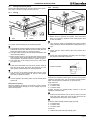
6. ADDITIONAL EQUIPMENT
Perforated base plate (Fig. 9A)
Baskets and other inserts can be placed on the base plate.
Suspension frame GN1/1 (Fig. 9B)
Support of perforated and not perforated trays GN1/1.
Trays GN1/1
Perforated and not perforated trays GN1/1.
7. WORKING RULES
7.1 Filling
7.1.1 Pressureless cooking
Throughout the complete cooking process the level of the liq-
uid food may never rise above 1.6“ (4 cm) below the pan edge.
During operation, the lid must be closed, but not locked.
For the "Cook" function (temperature setting up to 212°F
(100°C)) to operate correctly, the pan must be filled with food
to a depth of at least 1.5“ (3 - 4 cm) to prevent the food from
being burnt. The SOFT function should be activated if the pan
is filled with less food.
7.1.2 Pressure cooking
Depending on the type of liquid food, i.e. smaller or greater
tendency to froth and boil over, the pan must be only half filled
to allow sufficient steam to remain above the food.
7.1.3 Pressure steaming
When inserted containers are used, water is poured in only to
below the bottom grid, i.e. level about 1“ (2 cm).
Safety information
S During pressureless cooking the filling of the appliance
must never rise above 1.6“ (4 cm) below the boiler rim.
Depending on the type of food to be cooked, filling must be
less so as to prevent bubbling over.
S During pressure cooking the pan must be only half or less
filled.
7.2 Use as pan:
When laying meats to be fried on the pan bottom, the sensitive
regulation must be watched.The temperature of the pan bot-
tom will stay equally the same, that is when laid in the middle
of the pan. To begin it is necessary that placing takes place
partially in the middle.
Sticky food
To prevent the food from sticking to the bottom of the pan, the
following procedure can be applied:
Mix about 2 kg of unpeeled, uncleaned slices of potatoes with
about 2 kg of salt and spread out this mixture on the empty
cold bottom of the pan. Afterwards, heat up the pan gradually
to the maximum heat during one hour. Then let it slowly cool,
without quenching it with water.
7.3 Use as cooking appliance, pressureless or with
pressure
Cooking times
The total cooking time for a food is composed of three phases.
A Base plate
B Suspension frame GN 1/1
CTrays
Fig. 9 Accessories
Cooking
process
Food Temperature Comments
Sauteing,
brief roasting
Escalope, steaks,
diced meat, shred-
ded meat
374°F (190°C) Cover opened
Roasting Pieces of meat initially 391°F
(200,°C)
then 230-320°F (110-
160°C)
Cover opened
Stewing, braising White meat, poultry initial roasting 392°F
(200°C)
glazing 392°F
(200°C)
Cover opened
Cover closed
Steaming, glazing Vegetables 284-320°F (140-
160°C)
Cover closed
Poaching,
light browning
Poultry initially (284-320°F
(140-160°C)
then 176°F (80°C)
Cover closed
Cooking
process
Food Temperature Remark
pressure-
less
with
pressure
Cooking Meat, Vegetables,
Potatoes, Rice,
Sauces, Noodles,
Clear broth
212°F
(100°C)
225°F
(107°C)
with or without inserted
containers, suspension
frames and bottom grid
Steaming Meat, Vegetables,
Fish, Eggs, Fruit
212°F
(100°C)
225°F
(107°C)
with or without inserted
containers, suspension
frames and bottom grid
Thawing of
frozen food
Vegetables, Rice,
Meat, Fruit
212°F
(100°C)
225°F
(107°C)
with or without inserted
containers, suspension
frames and bottom grid

OPERATING INSTRUCTIONS
62.9696.01 Page 11
7.4 Some cooking instructions
7.4.1 Meat
In all methods for preparing meat together with a sauce, for
example pot roasts, goulash, stews, various jugged meats,
braised beef, etc., the meat must first be individually browned,
i.e. roasted without pressure. The meat is then cooked with the
sauce in the same appliance under pressure.
Guide times for cooking under pressure after closing the valve.
Beef 15 - 20 min
Pork 10 - 15 min
Stewed beef dumplings 25 - 35 min
Beef goulash 30 - 40 min
Beef stew, depending on size of pieces 50 - 70 min
Salted or smoked beef tongue 60 - 90 min
Smoked pork, depending on size of pieces 30 - 40 min
Boiling beef, depending on size of pieces 60 - 90 min
Boiled chicken, depending on size of pieces 40 - 50 min
Jugged venison 40 - 50 min
Jugged venison or jugged pork 50 - 60 min
About 15 minutes before the end of the cooking time, switch
off the heating and allow the meat to stand (cooking times
must be observed).
7.4.2 Cooking ham
Bring the water to the boil, place ham in to water and close the
lid. Turn temperature controller to 167°F (75°C) and allow to
cook overnight.
7.4.3 Hungarian goulash with boiled potatoes and vege-
tables
20 kg beef
500 g lard
10 kg onions
200 g paprika, salt, pepper
900 g tomato puree
4 l red wine
5 l water
8 kg potatoes
D Preheat the pan without bottom grid to 482°F (250°C).
D Heat fat.
D Thoroughly brown the meat.
D Add onions and boil down.
D Add paprika, salt, pepper and tomato puree.
D Add 4 l of red wine and 5 l of water.
D Close the lid. Leave lid regulation and safety valve open
(position A).
D Wait until steam escapes from lid egulation and safety
valve. Close the valve (position B).
D Set cooking time at 25 min.
D After the signal has been given, open steam release valve
(V).
D Open lid and season goulash again quickly.
D Place potatoes/vegetables in perforated GN containers in
the retaining grid of the pan. (Note size of potato/vegetable
pieces.)
D Close lid. Open lid regulation and safety valve (position A).
D Wait until steam escapes from the safety valve. Close lid
regulation and safety valve (position B).
D Set cooking time to 8 min.
D In the case of sensitive vegetables, continue cooking with-
out pressure.
D After the signal has been obtained, wait until no more pres-
sure is in the vessel or open steam release valve (V).
D Open lid.
7.4.4 Vegetables
Cooking times for cooking under pressure in the containers
after closing the valve
Fresh artichokes 20 - 30 min
Beans 8 - 12 min
Peas 5 - 8 min
Carrots, depending on size when cut 10 - 15 min
Cabbage or Savoy cabbage, cut 15 - 25 min
Kohlrabi, cut 15 - 20 min
Celery, cut 10 - 15 min
Fennel 15 - 20 min
Chicory 8 - 12 min
Jacket potatoes, depending on size 18 - 25 min
Boiled potatoes, cut 10 - 15 min
Red beets, depending on size 70 - 90 min
Cauliflower, Brussel sprouts, broccoli 4 - 6 min
Frozen vegetables, steam very carefully 5 - 10 min
7.4.5 Poaching terrines
D Fill water up to the bottom plate and bring to the boil.
D Place terrines on top, close lid and lock. The valve remains
slightly open in position A. T
D urn the temperature to 185°F (85°C) and allow to cook.
D According to size, try after 40 minutes, to see if it is done.
Puddings can be poached in the same way.
7.4.6 Steamed red cabbage
Marinade the chopped red cabbage on the previous evening
with red wine, chopped apples, onions and vinegar.
Place the marinaded red cabbage in the pressure braising pan
and allow to cook. Add the marinade. If necessary add a little
broth, allow everything to boil and stir thoroughly with a spat-
ula.
D Close the lid and close the lid valve.
D Set temperature regulator to 230°F (110°C).
D After 10 minutes, set temperature regulator to 212°F
(100°C)
D Cooking time 40 - 60 minutes.
7.4.7 Mixed vegetables
20 kg of carrots, leeks, Chinese cabbage, celery
D Preheat the pan to 302°F (150°C). Set time switch to 30
min.
D Fill water up to below the bottom plate.
D Place vegetables in perforated GN containers. Lightly salt.
D Close lid. Leave safety valve open (position A).
T Temperature in food
SStart
EEnd
ZTime
ZG Total cooking time
ZS Rise time
ZH Holding time
ZF Fall-off time
Fig. 10 Cooking times

OPERATING INSTRUCTIONS
Page 12 62.9696.01
Very important:
The cooking area must be thoroughly vented, otherwise poor
results will be obtained (irregular cooking result).
D Wait until steam escapes from the lid regulation and safety
valve. Close lid egulation and safety valve (position B).
D Set cooking time to 4 min. (There is no need to set the tem-
perature. Pressure is automatically regulated).
D After the signal has been obtained, wait until no more pres-
sure is in the vessel or open the steam release valve (V).
D Open lid.
7.4.8 Rice
20 kg 330 portions of 60 g each
500 portions of 40 g each
D Preheat pan to 302°F (150°C). Set time switch to 30 min.
D Introduce water until level with bottom grid. Then fill in a
ratio of 1:2 with water and add salt.
D Introduce rice in perforated GN container.
D Bring water to the boil with the lid open.
D Stir the rice.
D Close lid. Leave safety valve open (position A).
D Thoroughly vent pan until steam escapes from the safety
valve.
D Close safety valve (position B).
D Set cooking time to 8.5 min.
D After the signal has been obtained, wait until no more pres-
sure is in the vessel or open the steam release valve (V).
D Open lid.
7.4.9 Jacket potatoes/Asparagus/Broccoli
D Preheat pan to 302°F (150°C). Set time switch to 30 min.
D Introduce water up to below bottom plate.
D Introduce potatoes into perforated GN containers and
place in the pan.
D Close lid. Leave lid regulation and safety valve open (posi-
tion A).
D Thoroughly vent pan until steam escapes from lid
regulation and safety valve.
D Close regulation and regulation and safety valve (position
B).
D Set cooking time:
• Jacket potatoes 18 min
• Asparagus 5.5 min
• Broccoli 4.5 min
D After a signal has been obtained, wait until no more pres-
sure is in the vessel or open the steam release valve (V).
D Open lid.
7.4.10 Gravy
D Preheat pan to 302°F (150°C).
D Add a little fat and brown the bones.
D Add Mirepoix and lightly roast.
D Add a little water and then fill up with water.
D Add spices.
D Cook under pressure for 40 min.
D then boil down for 10 min with the lid open.
7.4.11 General
The described cooking times are guide values and will be influ-
enced by the factors listed below. The user of the appliance
must take these deviations into account.
Food quality: Fresh or dried
Ripeness
Size of the pieces: Small pieces reduce the cooking time
Quantity: The larger the batch, the longer the heat-
up time
Food temperature: Cold room or room temperature
The enjoyment value of the food will be influenced only to a
very small extent, if at all, by the choice of the cooking temper-
ature and whether cooking is carried out with or without pres-
sure.

OPERATING INSTRUCTIONS
62.9696.01 Page 13
8. CLEANING
Before being cleaned, the appliance must be switched off and
allowed to cool.
Pan with a polished steel bottom
Do not use water for cleaning. This would cause the food to
stick to the pan, which in turn would necessitate a treatment as
described in chapter 10. Clean the pan by rubbing it with a dry
cloth or with absorptive paper.
Pan with a chrome nickel steel plated bottom
In general it suffices to clean the pan with hot water, a stan-
dard grease solvent, and a brush. Afterwards, rinse the pan
with hot water and rub it dry with a cloth or absorptive paper.
Cover, lid and panels
The cover, lid and panels are made of stainless chrome nickel
steel. Clean them with hot soapy water and a standard grease
solvent and rub them dry.
In general
Do not clean the appliance with steel brushes, steel wool, cop-
per cloths, abrasive products, etc., as these would destroy the
metal surfaces and thus facilitate corrosion.
The appliance must not be cleaned with high pressure clean-
ers or water jets, owing to the danger of malfunctions.
Lid regulation and safety valve
This valve must be cleaned after every cooking process.
D Screw off the upper part T and remove the upper part with
the complete valve
D Remove the ring with the lever U
9. TROUBLESHOOTING
Faults in the appliance are registered by the control electronics
and shown on the display (AT) dependent on the type of fault
by the letters A or E in combination with a double-digit number.
When the fault occurs, an intermittent acoustic signal sounds,
the power supply is interrupted and the lamp is switched off.
Press button (Q) again to acknowledge the error message
(acoustic signal).
Shut down the appliance if a continuous fault that prevents
operation arises (see section 5.5 Shutting down). Summon the
after sales service to remedy the fault. Until this is done, the
appliance must not be used and must be disconnected from
the mains supply.
10. TREATMENT OF COMMERCIAL KITCHEN
APPLIANCES
Commercial kitchen appliances are executed in corrosion
resistant chrome nickel steels, material numbers 1.4301 and
1.4404.
The corrosion resistance of these steels is based on a passive
layer formed on the surface with access to atmospheric oxy-
gen. Accelerated formation or reformation of the passivity
occurs by treating surfaces with running water containing oxy-
gen. Aggressive media with a reducing effect (oxygen con-
suming) such as substances containing hydrochloric acid,
chlorides and seasoning concentrates, mustard, vinegar
essence, seasoning or spice tablets, salt solutions, etc.,
depending on concentration and temperature, can result in
chemical damage or the destruction of the passive layer. Dam-
age can also result from foreign rust (iron particles) due to the
formation of galvanic elements and lack of oxygen (no air
access or low oxygen water).
Therefore the following principles should be observed when
working with high grade steel equipment:
1. Surfaces of equipment of corrosion resistant steel are
always to be kept clean and exposed to the air. Remove cov-
ers from utensils when not in use to provide free air access.
Regularly remove lime scale, grease, starch and egg white
deposits by cleaning. Corrosion can occur under these layers
due to the absence of air exposure. Lime scale can be
removed with 10% acetic acid, 10% phosphoric acid or with
suitable lime scale removers available on the market.
2. Corrosion resistant steel objects must not be kept in long-
term contact with acids, spices and seasonings, salt, etc. Also
promoters of corrosion are acid vapors as produced during
floor cleaning. Contact surfaces are to be rinsed off with fresh
water. This applies after use, especially after cooking pota-
toes, noodles, rice etc. in salt water. Dried-on cooking water
residues form high concentration salt solutions which can
cause point corrosion. So, immediately after use, rinse cooking
utensils in fresh water or keep filled with cold water to cool
them. It is not advisable to use one utensil exclusively for cook-
ing e.g. potatoes in salt water. For stainless steel it is beneficial
to use utensils for different produce, e.g. for soups containing
fat or acid-containing vegetables (such as sauerkraut, for
example).
3. Stainless steel surfaces should, where possible, be pro-
tected from mechanical damage, especially from other metals.
Corrosion can occur if stainless steel comes into contact with
iron (steel wool, chips from pipes, water containing iron). New
corrosion locations can be removed with a mild abrasive or
fine emery cloth. Heavier corrosion can be washed off with a
warm 2-5% solution of oxalic acid. Treatment with 10% nitric
acid is necessary if this proves ineffectual. Due to the associ-
ated hazards, this type of cleaning is only to be carried out by
suitably trained staff in compliance with the valid regulations.
T Upper part with
valve
U Ring and lever
Fig. 11 Lid regulation and safety valve- Cleaning
E1
Failure of produce temperature sensor Summon service agent and report read-
ing
E2
Failure of bottom temperature sensor Summon service agent and report read-
ing
E4
Failure of steam condensation sensor Summon service agent and report read-
ing
E5
Failure of control circuit board tempera-
ture sensor
Summon service agent and report read-
ing
E6
Sensor J15 of produce temperature is
too high
Summon service agent and report read-
ing
T
U
E7
Sensor J16 of bottom temperature is too
high
Summon service agent and report read-
ing
E9
Failure of analogue/digital converter Summon service agent and report read-
ing
E10
Safety thermostat for dry cycle protec-
tion has responded
Summon service agent and report read-
ing
E21
HACCP Master Personal Computer is
not connected.
Discharge fault display and signal by
pressing button (Q).
E22
HACCP Interface COP485.1 is not con-
nected.
Discharge fault display and signal by
pressing button (Q).
E23
HACCP configuration; EEPROM
COP485.1 (memory chip) has found a
reading fault.
Discharge fault display and signal by
pressing button (Q) and repair fault.
E24
HACCP configuration; EEPROM
COP485.1 (memory chip) has found a
spelling fault.
Discharge fault display and signal by
pressing button (Q) and repair fault.

OPERATING INSTRUCTIONS
Page 14 62.9696.01
4. No bleaching or chlorine-containing cleaning agents are to
be used for cleaning. Utensils are to be thoroughly rinsed with
water and dried after cleaning. The surfaces of appliances are
of corrosion resistant chrome nickel steel. They are to be
washed down with hot soapy water with the addition of a stan-
dard grease solvent. Avoid cleaning with steel brushes, steel
wool, copper scouring pads or cloths, products containing
sand, etc. as such media destroy the surfaces and create the
conditions for corrosion formation. Spraying appliances or
parts of appliances with a water jet or high pressure cleaning
equipment is harmful and can cause malfunction. This is there-
fore prohibited.
Note:
The type and concentration of solvents used for cleaning the
surfaces must comply with the code of the Federal Regulations
21 CFR Part 178.1010.
-
 1
1
-
 2
2
-
 3
3
-
 4
4
-
 5
5
-
 6
6
-
 7
7
-
 8
8
-
 9
9
-
 10
10
-
 11
11
-
 12
12
-
 13
13
-
 14
14
-
 15
15
-
 16
16


Electrolux 9CHG583299 User manual
- Category
- Deep fryers
- Type
- User manual
Ask a question and I''ll find the answer in the document
Finding information in a document is now easier with AI
Related papers
-
Electrolux GX5DOEOOOO (583401) Operating instructions
-
-
Electrolux GPYEOEOOBO (583292) User manual
-
-
-
Electrolux KUYJOEWOOO (582579) User manual
-
-
-
-
Other documents
-
 LavoHome ED780Brkfastmaker User guide
-
Hans Grohe 10145XX1 User manual
-
Firex UDBRE038AV1 Owner's manual
-
Hobart LEGACY 60-QUART Installation Operation And Care
-
-
Firex UDBRG029AV1 Owner's manual
-
-
Bartscher 2856011 Operating instructions
-
Firex UCBTE024V1 Owner's manual
-
