Page is loading ...

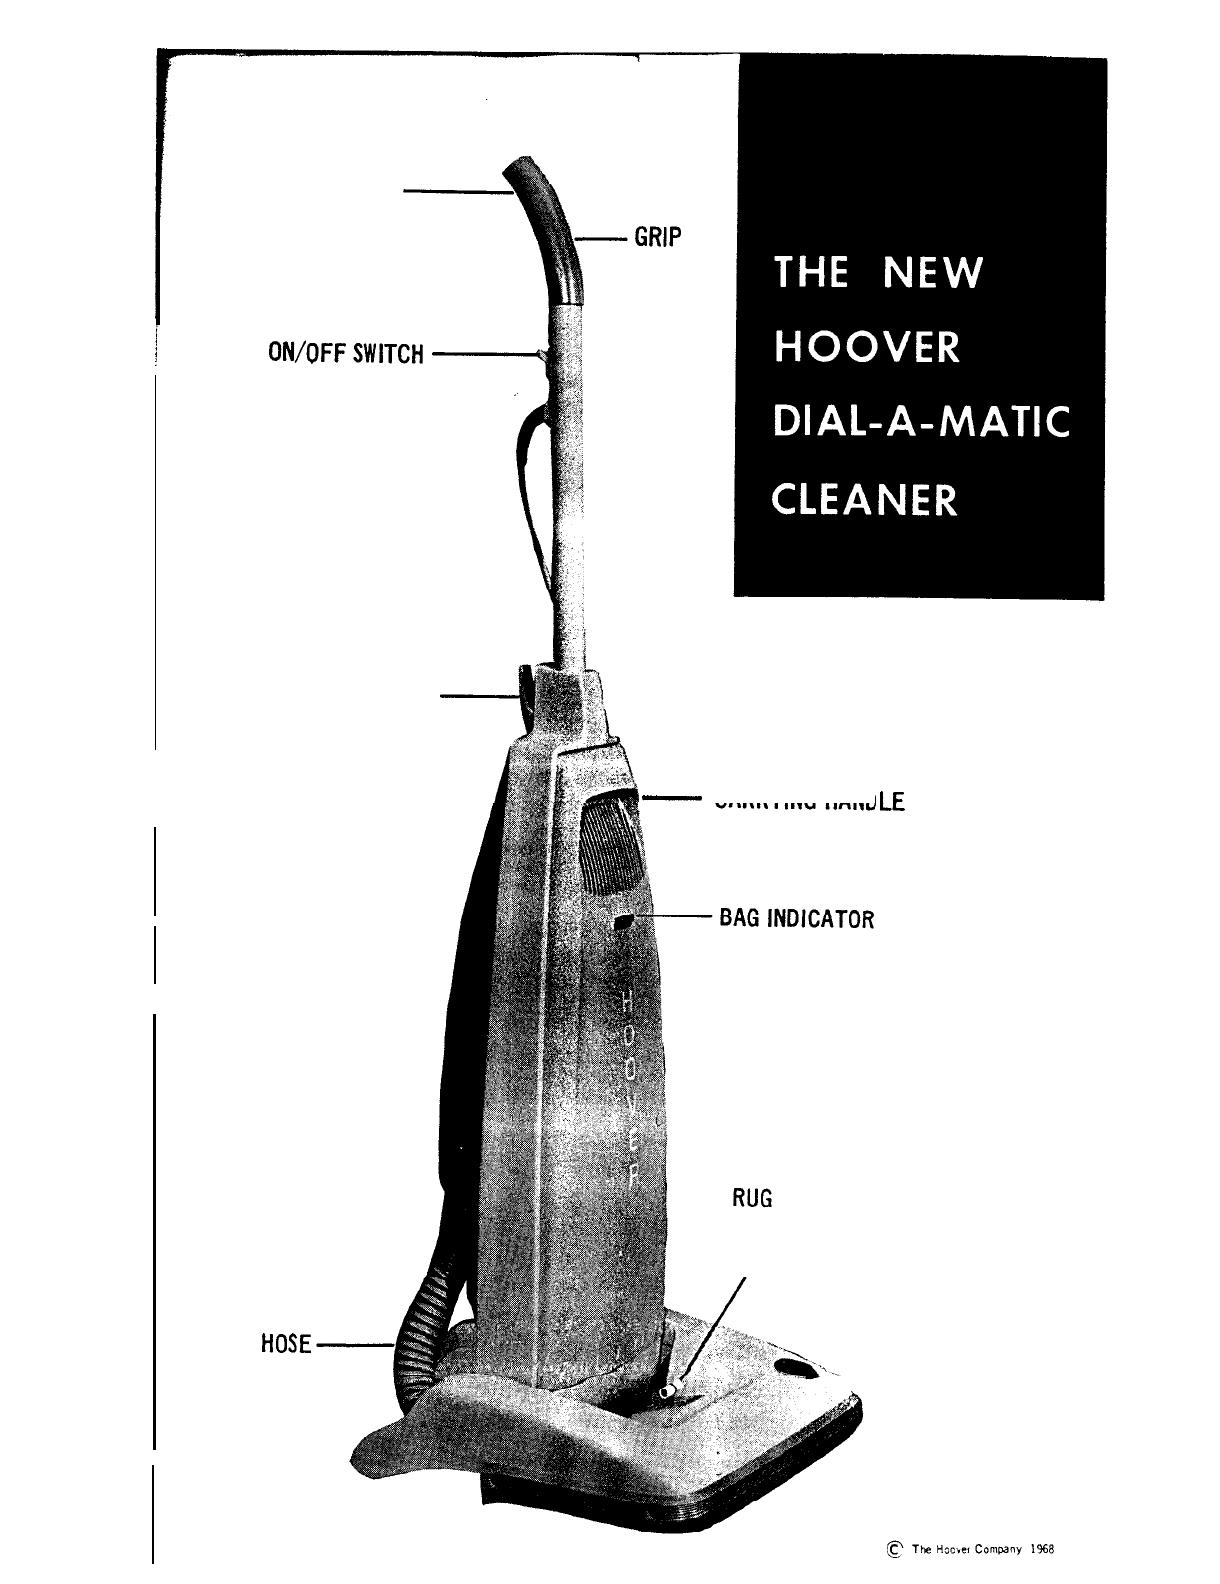
Instructions for
YOUR
NEW
HOOVER
DIAL-A-MATIC
CLEANER
4
&&.&
rnQ
OPENINGFOR
HANGING
CLEANER IN
STORAGE AREA
ON/OFFSWlTCH
HANDLE
-GRIP
COVERLATCH
NOZZLE
HOSE-
1
-
CARRYING HAND
ADJUSTMENT
LEVER
ILE
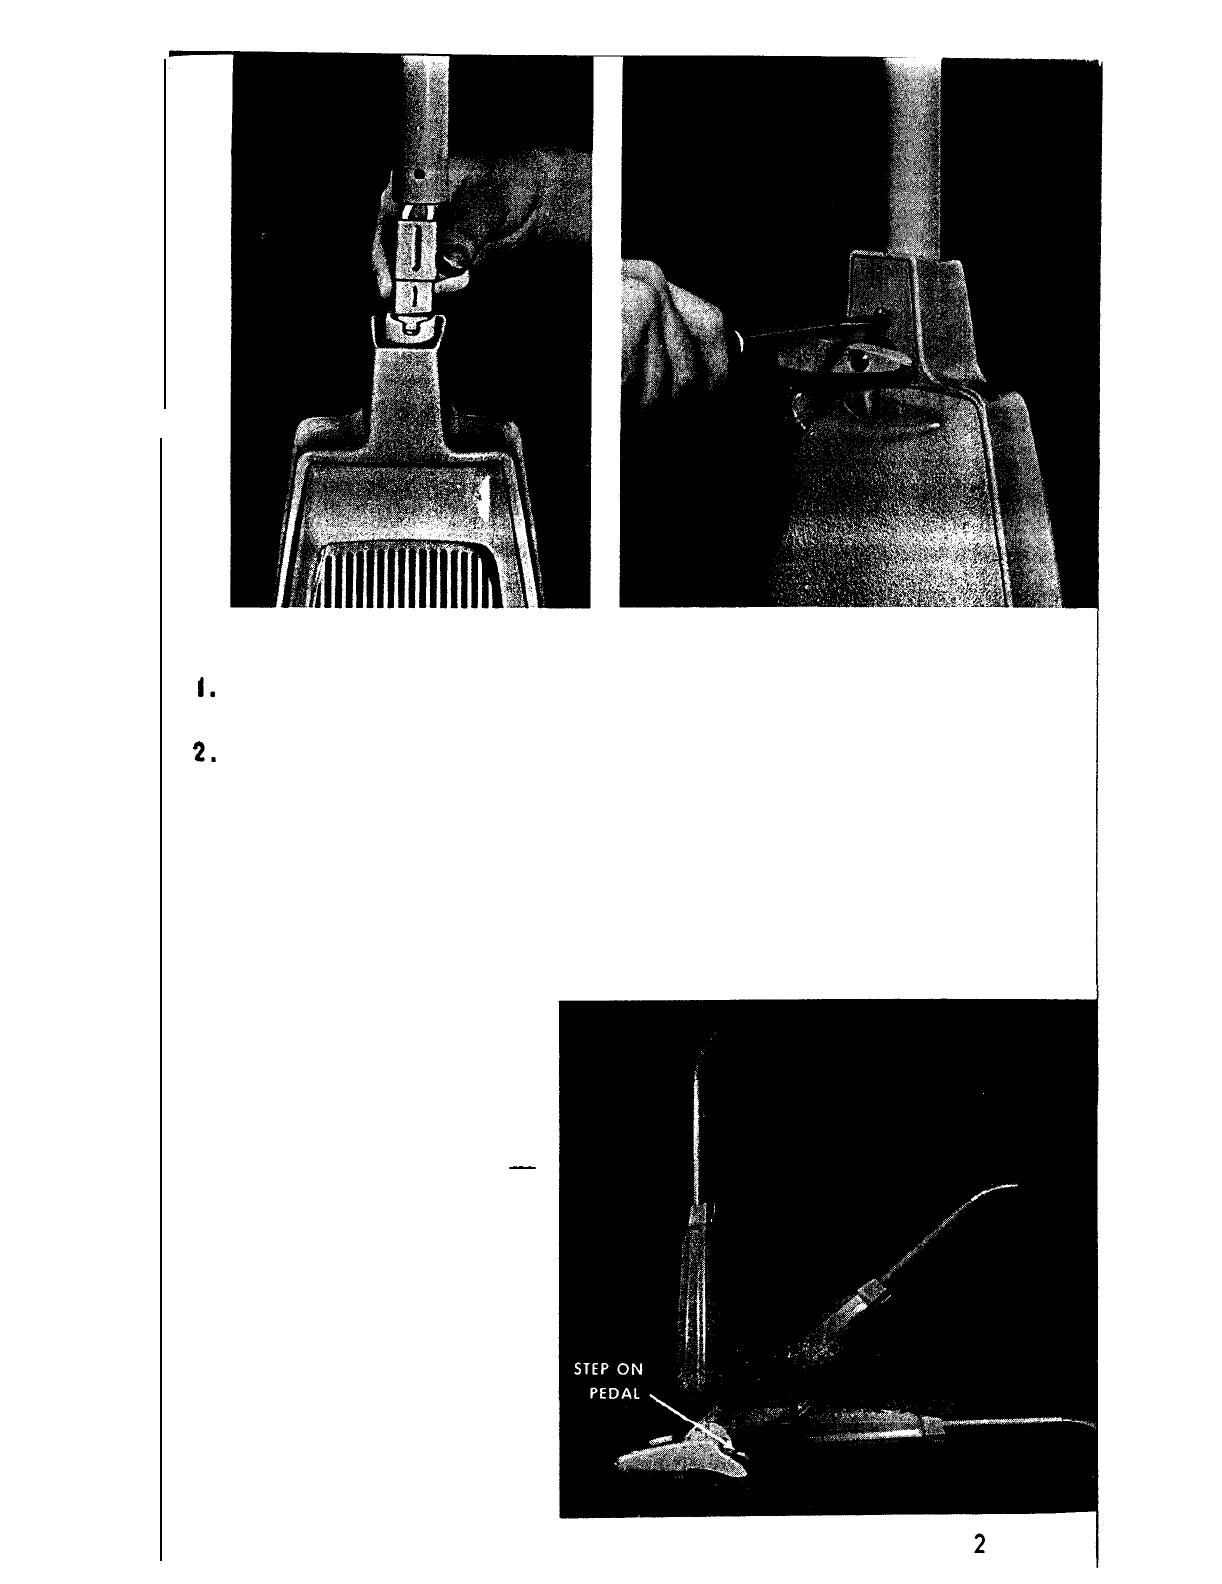
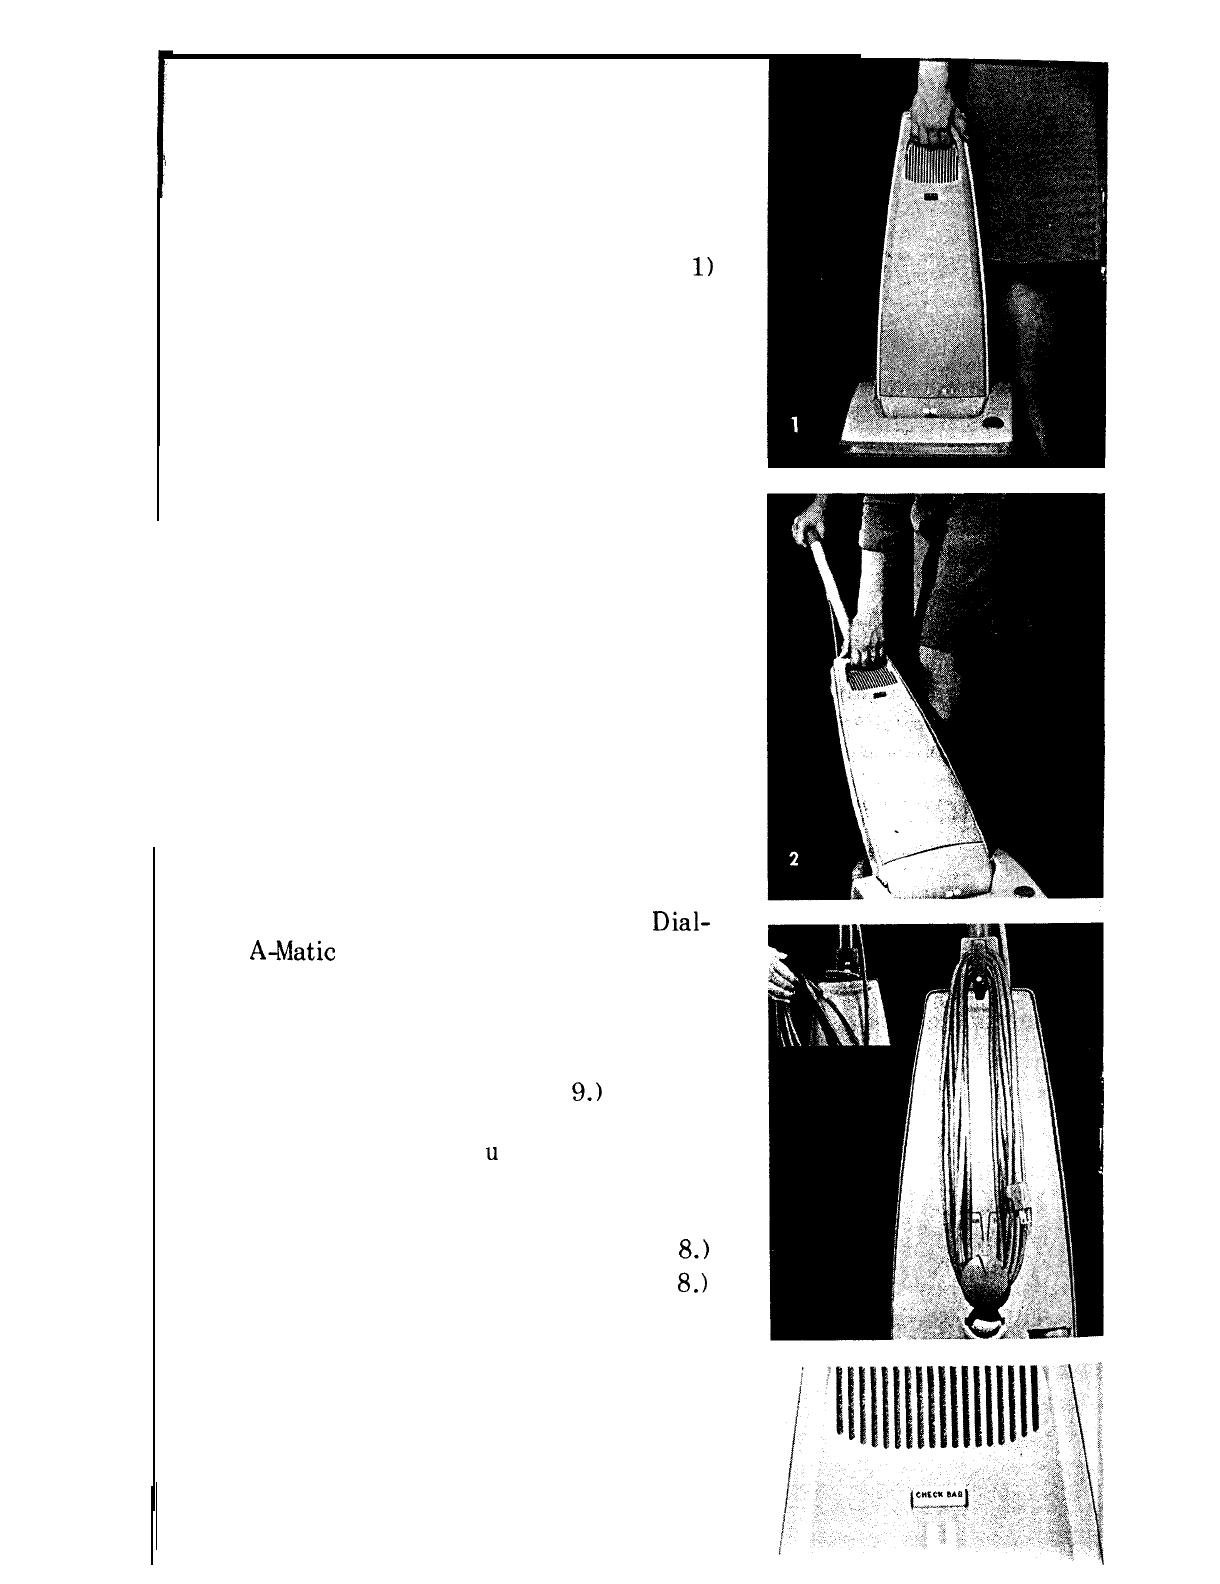
TO ATTACH HANDLE TO CLEANER
1.
Remove tape and screw from h an d 1 e s o c k e t. Set screw aside for
later use.
3. Connect electric plug from bottom of handle to electric plug projecting
from handle socket. Make sure plug assembly is positioned as shown
in illustration.
3. Push handle into place in handle socket. The excess wire and electric
plugs are guided into handle tube.
4. Line up holes in handle and handle socket. Insert screw and tighten
with screwdriver. Be sure that screw is tightened securely.
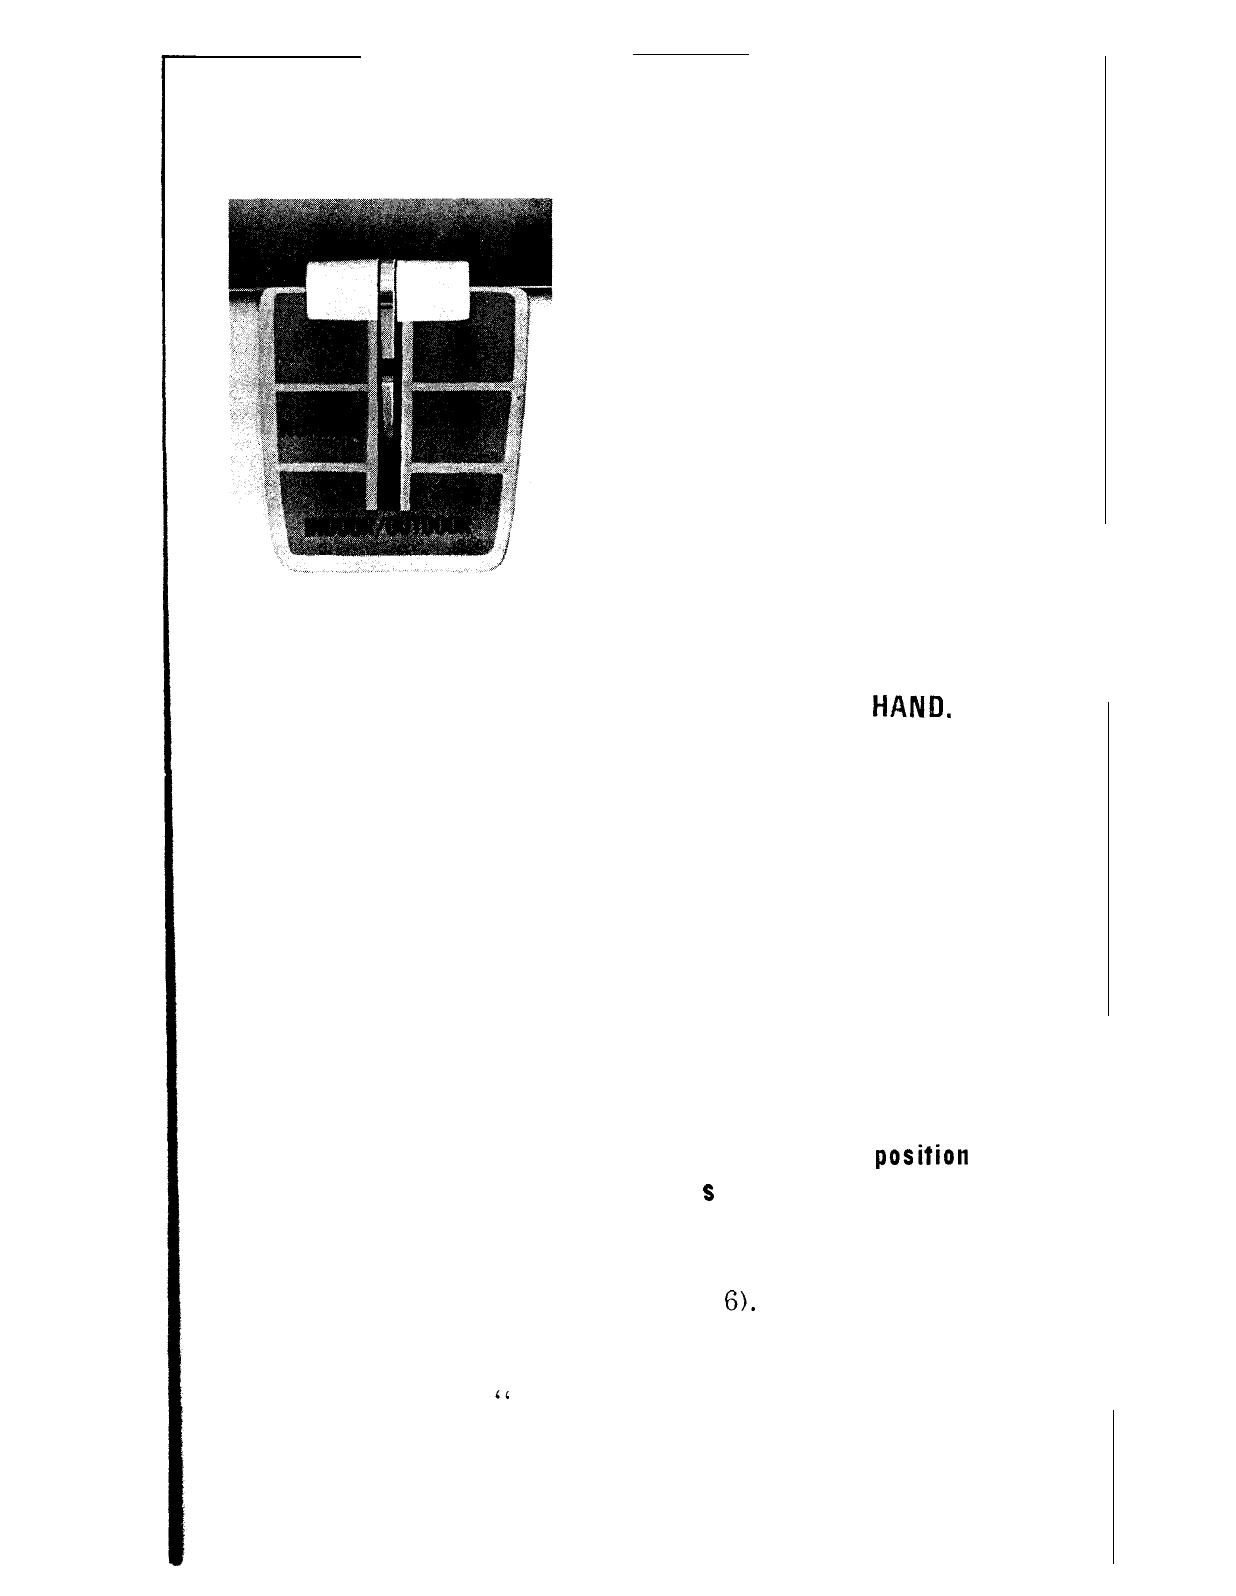
HANDLE
ADJUSTMENTS
The handle on your clean-
er has three positions
-
storage, operating,
and
low (for reaching under
low furniture). The handle
can be lowered by step-
ping on pedal at the left
rear
of cleaner.
The
handle should always be
in storage position when
cleaning tools are used.

THIS IS THE
“HEART”
OF YOUR NEW
HOOVER
DIAL-A-MATIC
CLEANER
FIG.
1
YOUR NEW HOOVER DIAL-A-MATIC IS THE MOST
POWERFUL UPRIGHT CLEANER EVER BUILT.
To handle the wide range of pile depth of modern carpets
and rugs we have provided you with TWO
(2)
adjustable
features. When used properly, they will assure the best
cleaning efficiency and ease of operation.
NOTE: It is recommended that the cleaner be operated
only on dry carpet.
SUCTION ADJUSTMENT (Fig.
1)
Set the dial to MEDIUM. This will be the correct setting
for the majority of rugs. If your HOOVER cleaner seems
hard to push, move the dial toward the LOW position. For
low pile, sculptured or multi-level rugs it may be necessary
to move the lever toward HIGH for most effective cleaning.
NOTE: Be certain d i a I indicator points to desired
suction
-- not to the neutral area between car-
pet and tool suction.
NOZZLE ADJUSTMENT
(Fig. 2
&
3)
On the front of your
Dial-A4atic
is an easy-to-use nozzle adjust-
ment lever. It is marked: SHAG;
NORMAL; INDOOR/OUTDOOR.
(see Fig.
3
1
‘.
”
.’
3
FIG. 2
Set the lever at SHAG for all
long pile loosely woven car-
pets or rugs.
Use the NORMAL setting for
all carpets or rugs with a
tightly woven pile.
The INDOOR/OUTDOOR set-
ting should be used for all
floor coverings that have a
very flat surface pile. . . or
are cemented to the floor.
FIG. 3
FOR BEST RESULTS, TIP THE CLEANER BACK ON ITS
REAR WHEELS AND ADJUST THE LEVER BY
HAN&
(FIG. 2)
NOTE: When removing loose dirt from hard surface
floors, adjust the cleaner to the NORMAL position. The
INDOOR/OUTDOOR setting on the c 1 e a ne r lowers’ the
nozzle to the carpet for effective cleaning of INDOOR/
OUTDOOR carpet. However, be certain to change the rug
position when cleaning normal or shag pile carpet. If the
INDOOR/OUTDOOR setting is used when cleaning normal
or shag pile carpet, there is an increase in the belt load
and pushing effort is greatly increased.
SET THE DIAL FOR CLEANING TOOLS
The handle of the cleaner should be in Storage
POSitiOn
(see Page I) when cleaning to o I
s
are used. When the
handle is in this position,
the nozzle is raised and the
agitator does not come in contact with the rug.
Attach hose and cleaning tools (Page
6).
Set lever on Suc-
tion Control Dial to “HIGH” under “TOOL SUCTION” for
most cleaning. For cleaning draperies and delicate fabrics,
move lever toward
“
LOW’
The lever can be placed at “HIGH”, “MEDIUM”, “LOW”
or any space between these markings.
4
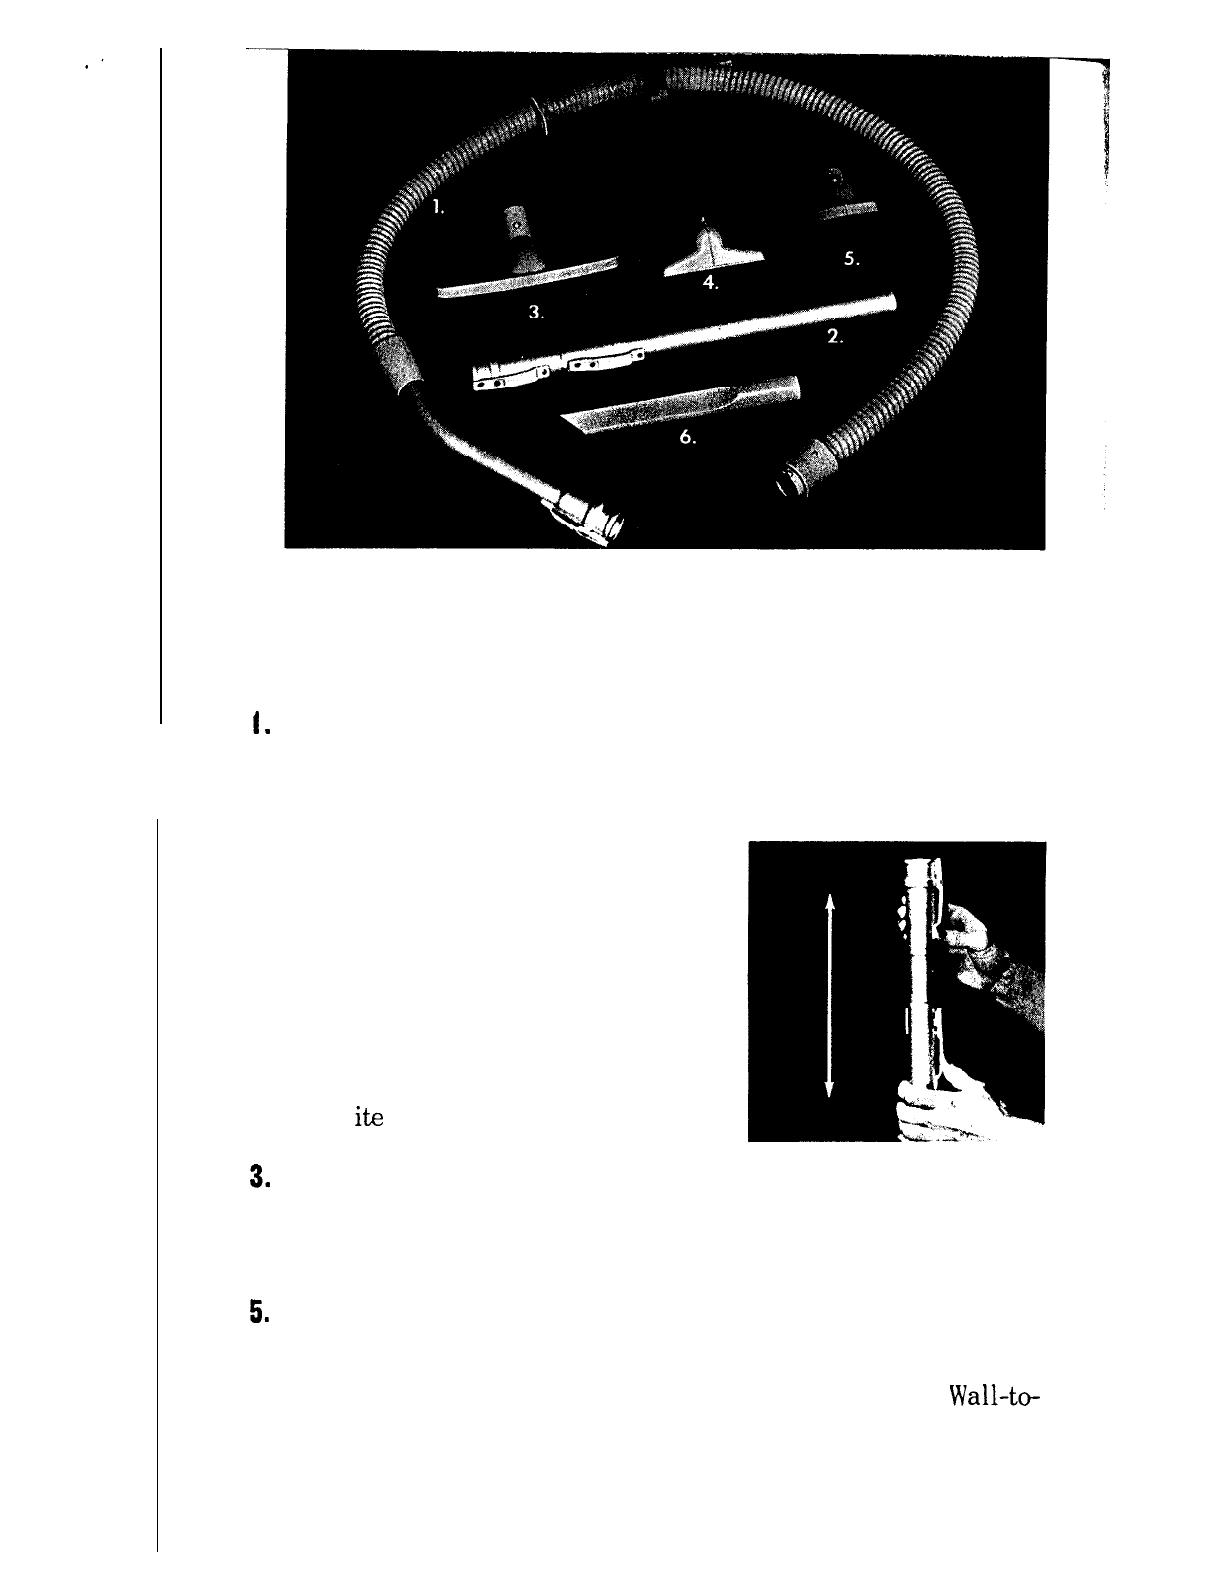
THE CLEANING TOOLS
(See Page 4 for setting Suction Control Dial when using tools.)
The cleaning tools have many uses. Some are listed below:
1.
TUFFLEX HOSE Double vinyl reinforced with nylon mesh for
long, trouble-free life. The light flexible hose has a vinyl tab,
so it can be hung on the cleaner or on a hook in a closet.
2.
TELESCOPING WAND When you
require
extra length for cleaning
bare floors or hard-to-reach places,
attach the telescoping extension
wand.
To lengthen the wand, push in on the
plastic latch and extend wand until
it locks in place. To shorten, use
oppos
itc
procedure.
3.
FLOOR BRUSH
For Hard Surface Floors and Carpeted Stairs.
4. UPHOLSTERY NOZZLE For Upholstered Furniture, Draperies,
Tapestries, Mattresses, Clothing, Automobile Interiors, Stairs.
5.
DUSTING BRUSH For Carved Furniture, Table Tops, Books,
Lamps, Light Fixtures, Venetian Blinds, Registers, Baseboards.
6. CREVICE TOOL For Upholstered Furniture, Edges of
Wall-to-
Wall Carpeting, Radiators, Dresser Drawers.
5
TO CONNECT HOSE TO CLEANER
Insert hose connector in opening below dial. Turn hose connector
in either direction until it locks in place.
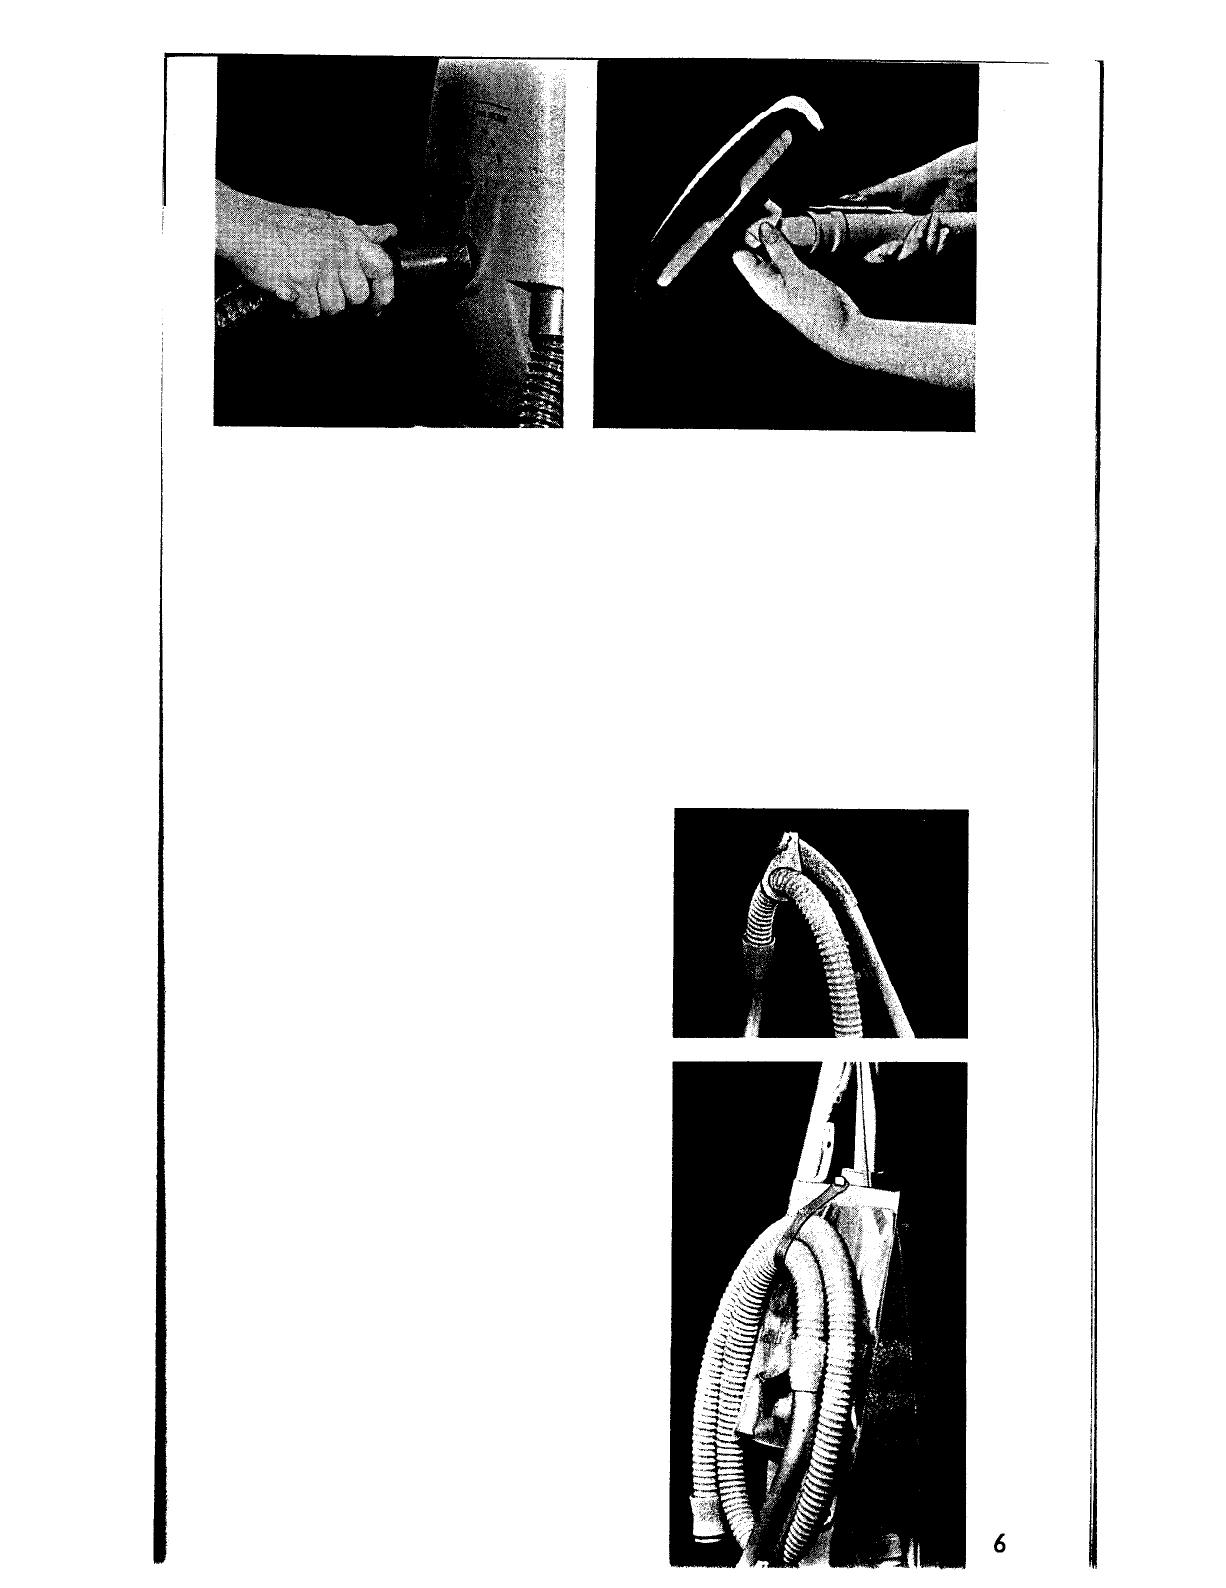
TO CONNECT TOOLS
To connect the cleaning tools to either the telescoping wand or
hose, press down on the plastic latch and fit the attachment into
place making sure the button on the attachment is locked in
place. To release, press down on plastic spring latch and remove.
TO STORE TOOLS
The vinyl tool kit has been designed
so the tools can be packed inside
and the hose attached, by strap, on
outside. The kit has two slots
located near the top for ease in
hanging on the cover latch of the
cleaner or on a hook in the closet.
While moving furniture, hose can be
conveniently hung on handle.
TO CLEAN TOOLS
To clean the hose, wipe off dirt with
a cloth, dampened with a liquid
detergent. Use a damp cloth to re-
move the detergent. Cleaning tools
can be washed in warm water with a
detergent. Rinse and let dry before
using.
HELPFUL HINTS
EASY TO CARRY
Use the convenient carrying handle for
carrying your Hoover cleaner. (See Fig.
1)
When lifting the cleaner from one surface
to another, lift it as shown in Fig. 2.
DON’T PICK UP TACKS
Hard, sharp objects should not be picked
up by the cleaner. They may damage the
hose and the throw-away bag.
TAKE CARE OF CORD
Wind it loosely, on cover latch and knob
on Suction Control Dial, to avoid strain,
Snap clip-on plug onto cord. To remove
cord, turn cover latch. (See inset.) Don’t
run cleaner over the cord- it may damage
the insulation.
THE BAG INDICATOR
The bag indicator, “CHECK BAG”,
located on the front of the c 1 e a ne r,
makes it convenient for you to know
when the disposable bag s ho u 1 d be
changed. The indicator will disappear
when the motor is turned on and the
Dial-
A-Matic
is used for cleaning carpets. If
the “CHECK BAG” indicator appears
when the cleaner is being used on car-
pets, the cleaner is not operating satis-
factorily. You should:
1. Replace bag. (See Page 9.) In some
cases the bag may not be filled to
capacity; but, d
u
e to variation in
size and type of dirt particles, the
bag has ceased to filter satisfactorily.
2. Check secondary filter. (See Page 8.)
3. Check nozzle hose. (See Page 8.)
Note: The “CHECK BAG” indicator may
be visible when cleaning tools are used.
This does not necessarily mean that the
cleaner is not operating satisfactorily.
This can be checked by turning the dial
to CARPET SUCTION p o s it i on and
checking the indicator. If it disappears,
the bag does not need to be replaced.
7
THE THROW-AWAY BAG
To assure that your Hoover cleaner
operates at peak performance it is
imperative that you use only gen-
uine Hoover Throw-Away Filter
Bags
made by The Hoover
Company. Genuine Hoover Bags
can be identified by the
Hoover Medallion. These
bags are made from a
@
(-jOJ@
special
material
which
is
scientifically formulated to
filter out dust while allowing air
to flow through freely.
THE SECONDARY FILTER
The secondary filter protects the
motor from dirt. Before installing a
new bag,
check the filter. Dirt
spilled in the bag housing will
accumulate on the filter and may
restrict motor performance. To clean
filter, remove wire holder and lift
out filter. Tap against a hard sur-
face,
or rinse thoroughly with
warm water and dry. Replace in bag
housing and secure with holder.
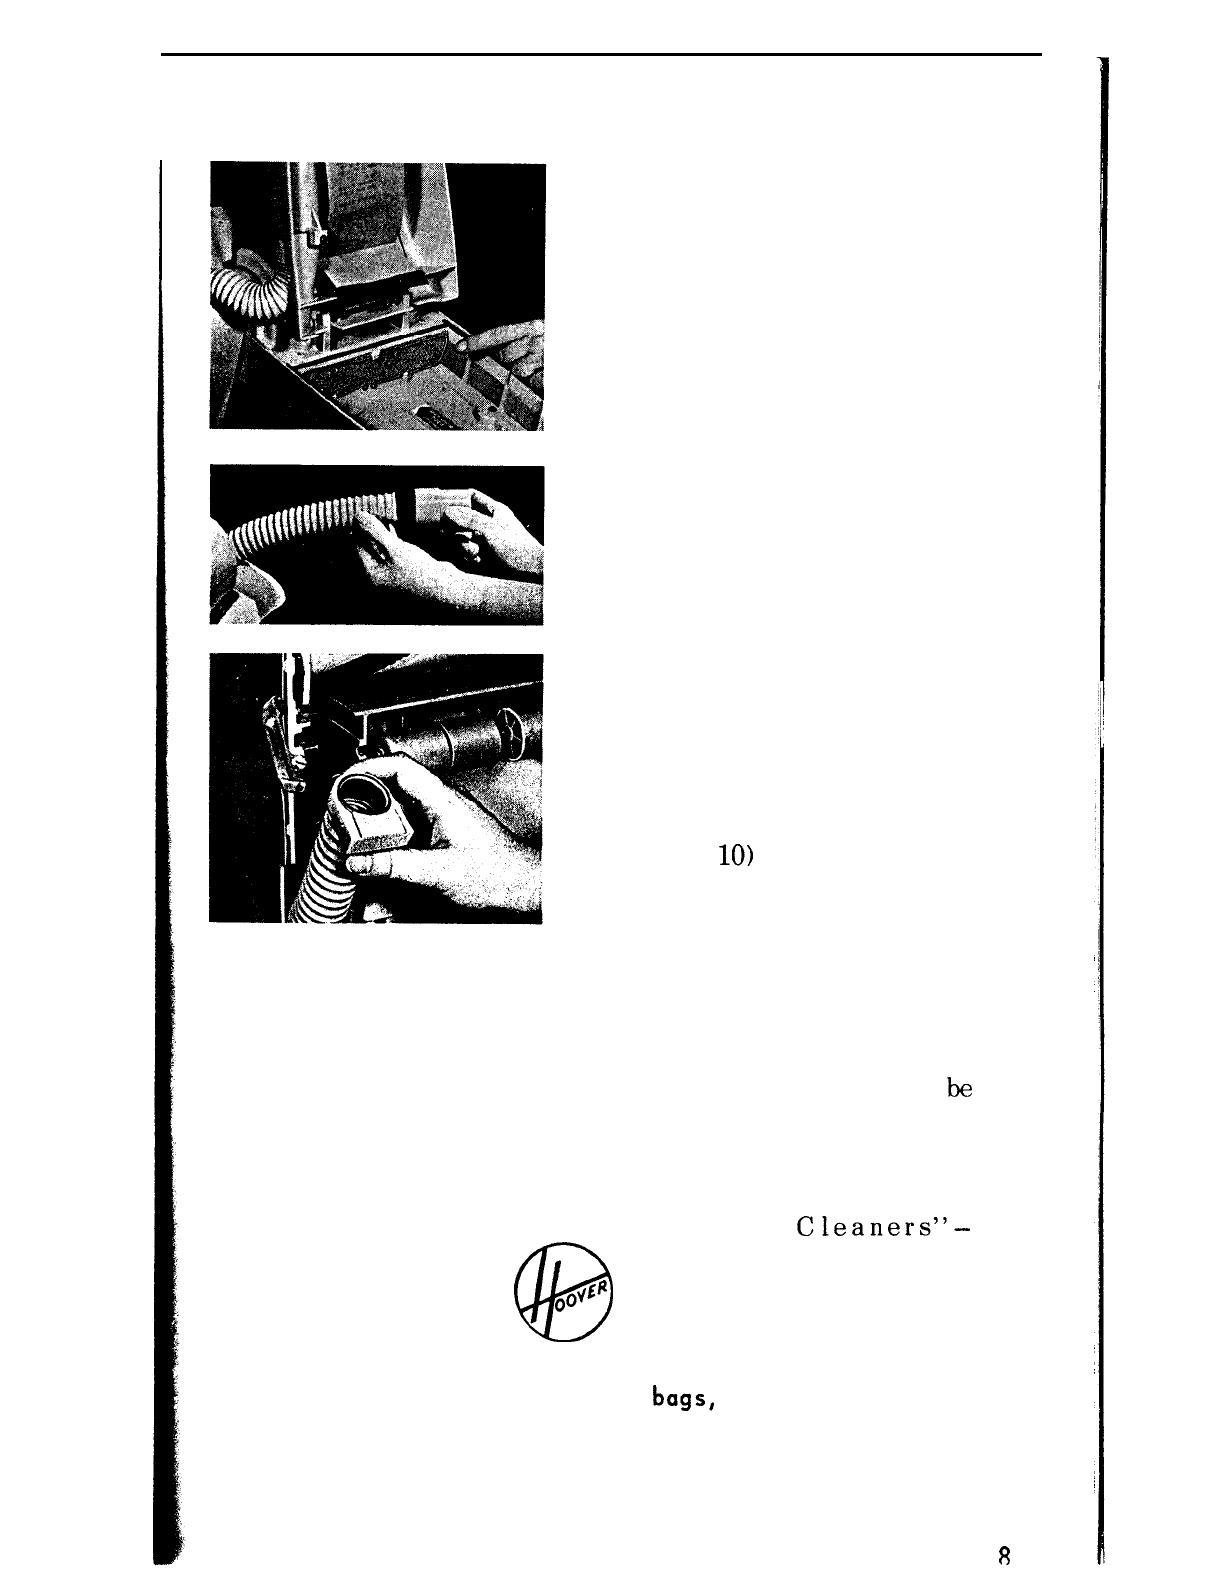
THE NOZZLE HOSE
The nozzle hose on the cleaner
carries the dirt from the nozzle to
the throw-away bag. If the hose
becomes obstructed, remove it and
clear it. Pull the hose end from the
bottom of the bag housing and
unscrew the hose end by turning in
a clockwise direction. Turn clean-
er over, remove the bottom plate
(see Page
10)
and pull hose from
cleaner. Clean hose and reinsert
it in the cleaner.
WHERE TO BUY BAGS
Throw-away bags may
be
purchased at your local
Authorized Hoover Dealer
(listed in Yellow Pages of
Telephone Directory under
“Vacuum
Cleaners”-
Hoover) or f r o m Hoover
Factory S e r v i c e
Stations
listed on service page of
this book.
When ordering throw-away
bags,
be sure to mention
the model of your cleaner.
8
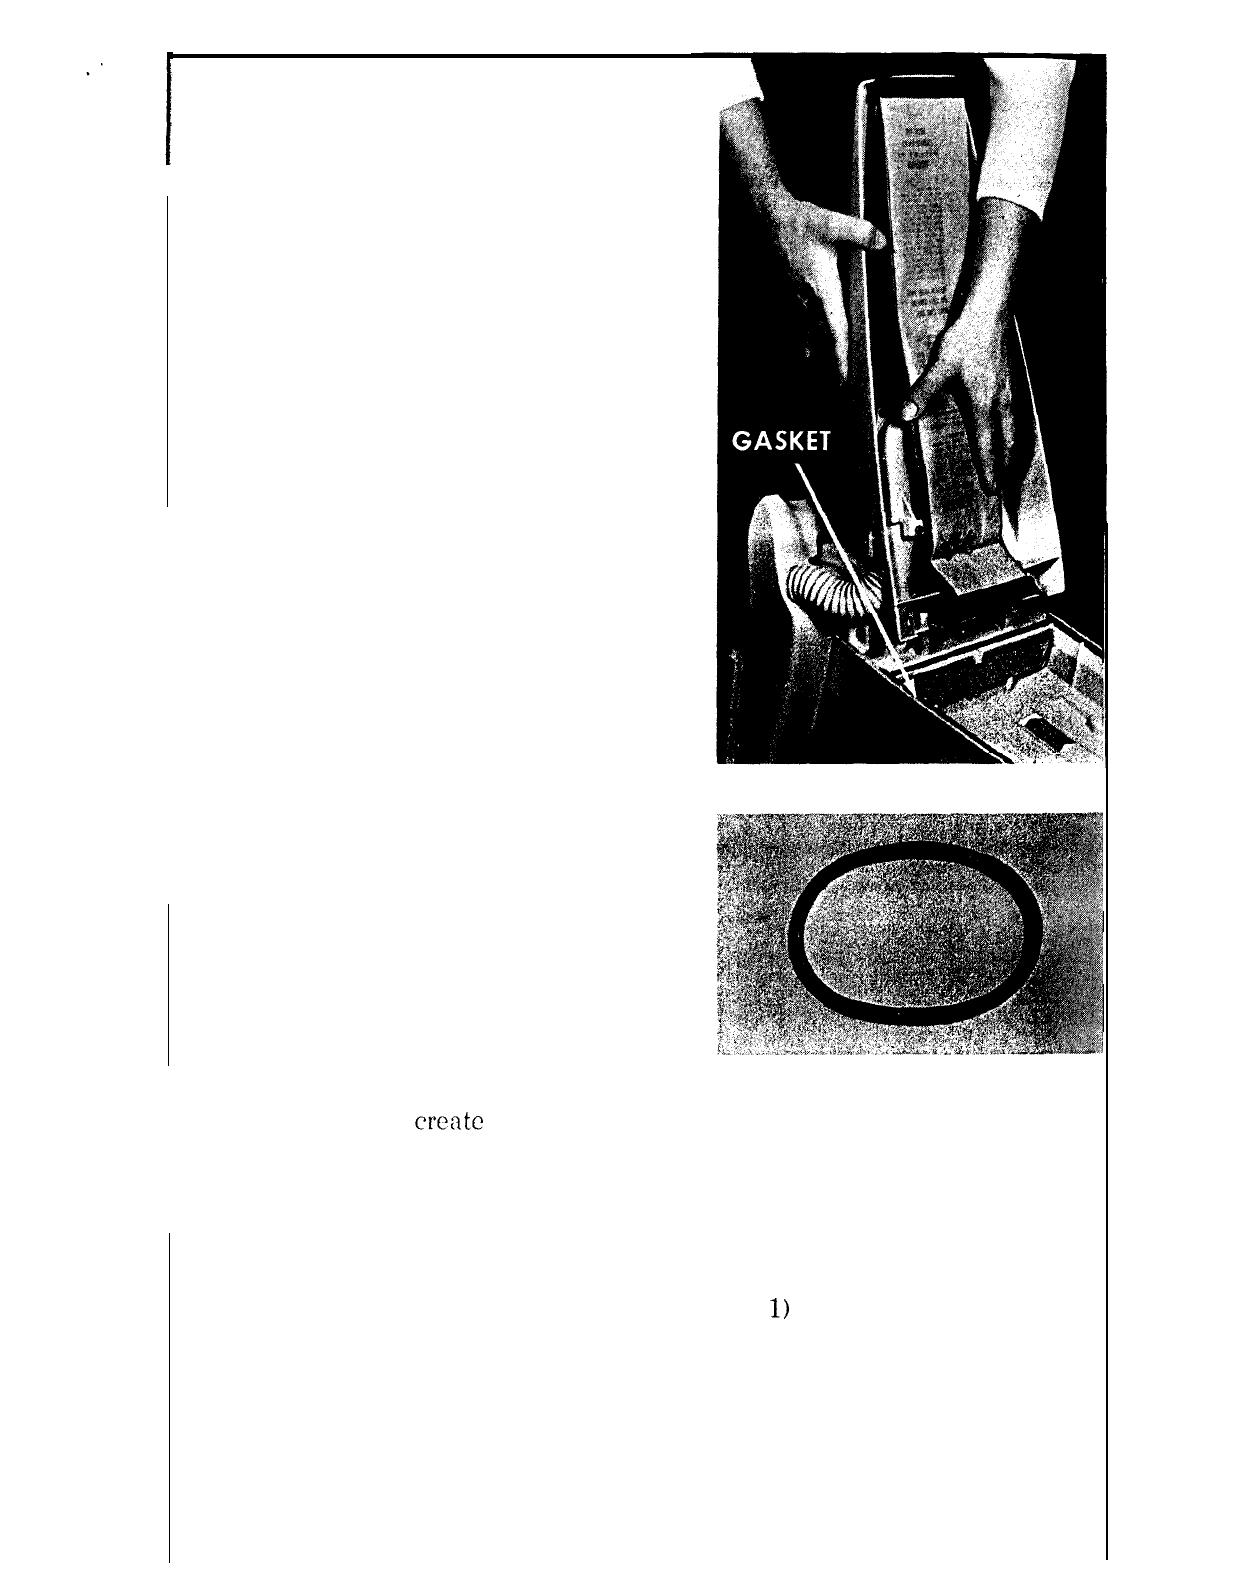
TO REPLACE THROW-
AWAY BAGS
Tip cleaner over, resting handle
on the floor. Open bag cover of
cleaner by turning latch in either
direction. Lift bag cover. Hold
throw-away bag by cardboard cover,
twist outward, and remove. Discard
used bag.
To attach new throw-away bag,
hold bag
with cardboard collar
down and with arrows pointing
toward front of cleaner. Push hole
in
cardboard firmly over tube,
twisting until bag is secure. Be
sure that throw-away bag is not
extending outside of cover and
that cover is in proper position
on the gasket before latching.
THE BELT
The belt of your Hoover cleaner
controls the speed of the agitator
and is important for the efficient
operation of your cleaner. Because
of this, when buying a new belt,
you should always insist on a gen-
uine Hoover belt. Some other belts
on the market, not manufactured
under Hoover design and quality controls, do not operate the agitator
correctly and create undue stress which will damage your Hoover
cleaner.
WHEN TO REPLACE BELT
Remove bottom plate from cleaner (see Fig.
1)
and check from time
to time to be sure the belt is in good condition. If it is stretched or
cut, it should be replaced.
9
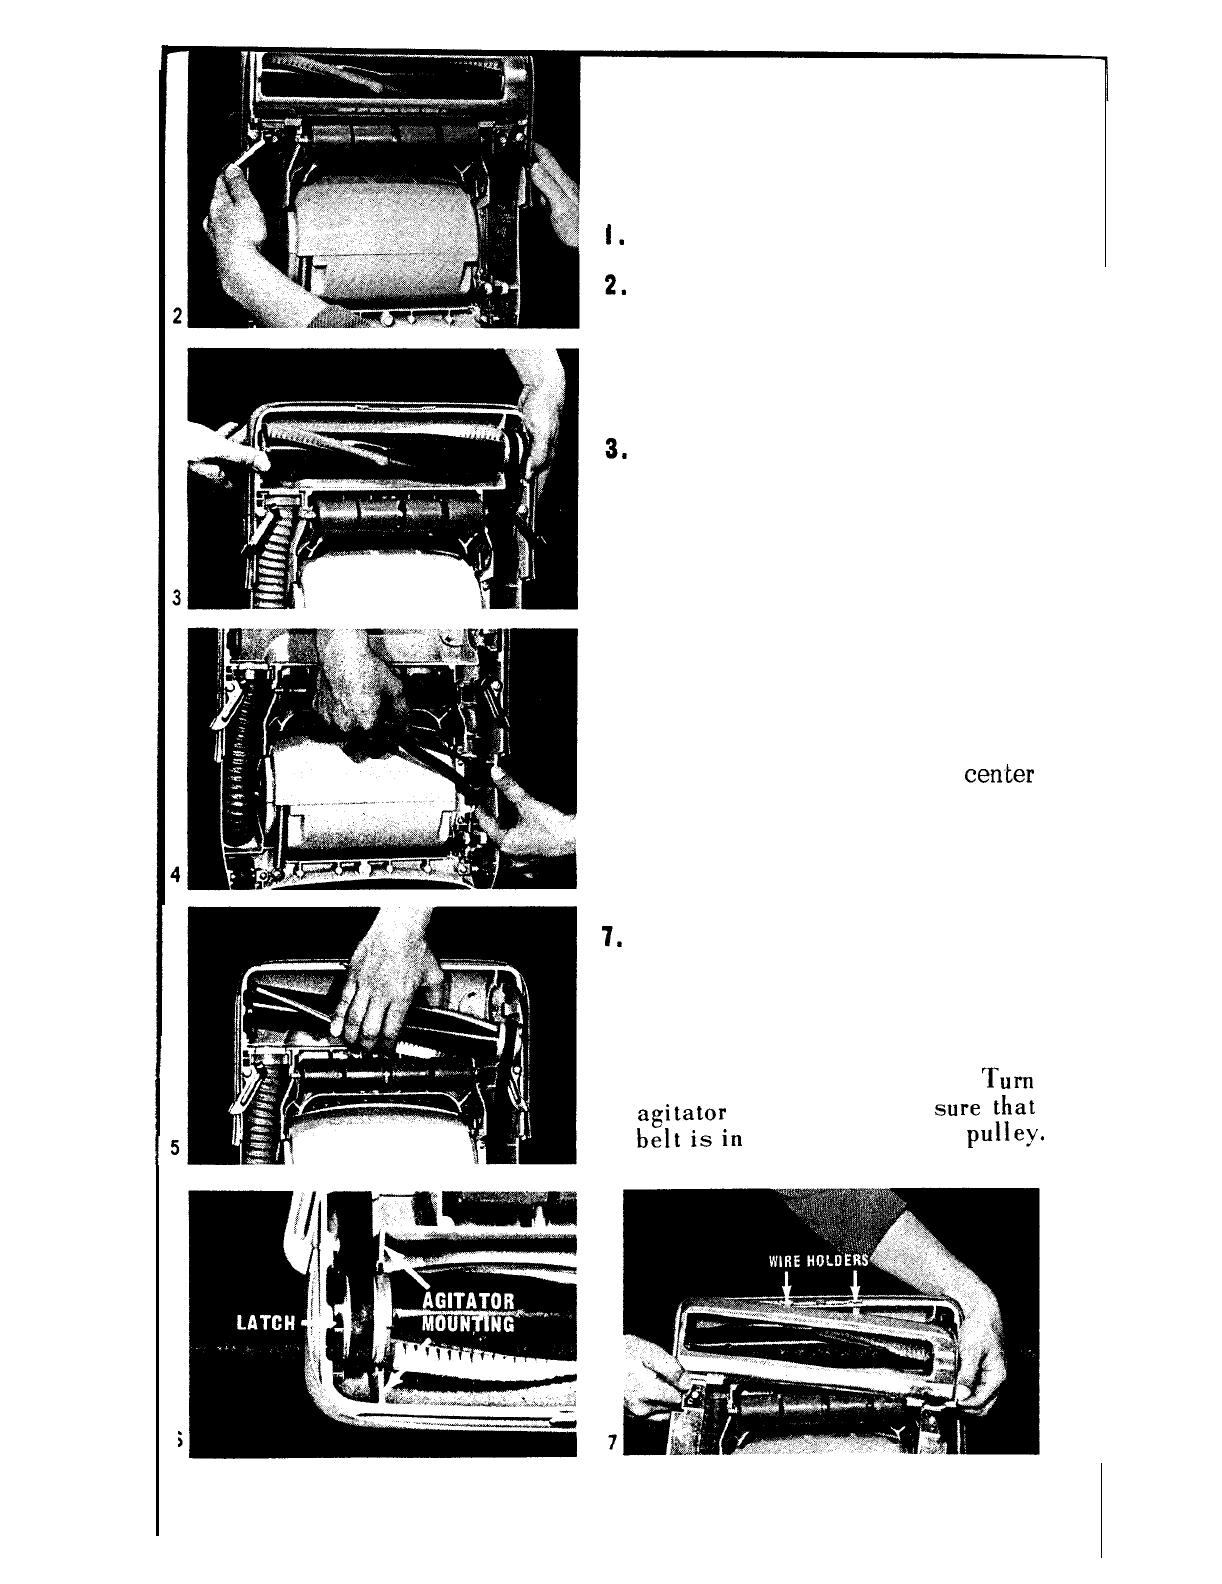
HOW TO REPLACE
THE BELT
1.
Remove cord from electrical outlet.
2.
Turn cleaner over. Remove metal
plate on bottom of cleaner by
pushing latches toward the out-
side of cleaner. Lift plate to re-
lease it from wire holders.
3,
Push latches, that hold agitator,
in and toward center of cleaner
until they are free. Lift out
agitator and remove old belt.
4. Place new belt over motor pulley,
with smooth side next to pulley,
then over agitator.
5. Replace agitator and latch it in
position.
6. Make sure that belt is in
cen,ter
of pulley and free of agitator
mountings and latch. Turn agitator
by hand to be sure that belt is in
proper position in pulley groove.
7.
Replace bottom plate. Place metal
knobs, on front of plate, in wire
holders, Check to see that. latches
are pushed back and will not be
covered by plate. Place plate in
position and latch securely.
Turn
agitator
by hand to be
sure
that
belt
is
in proper position on
puIIej’*
10
3
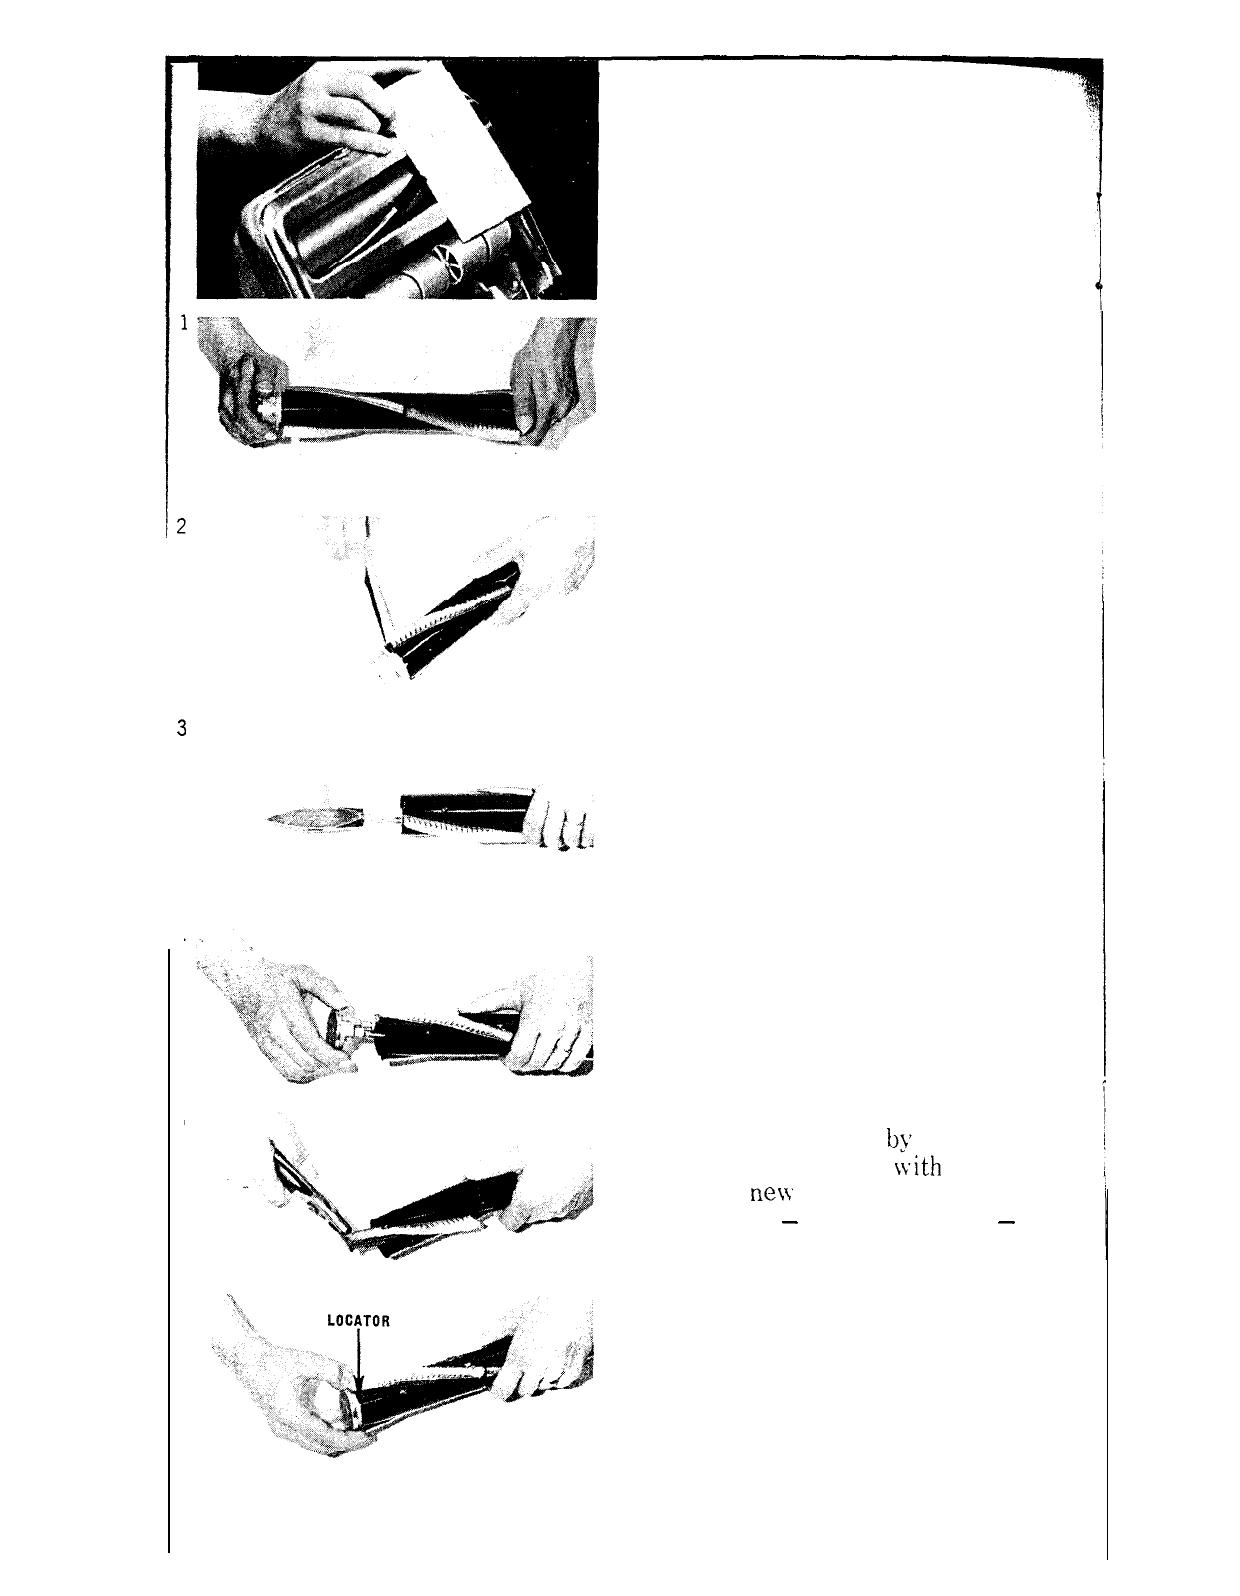
THE BRUSHES
When brushes are worn and bris-
tles do not touch the edge of a
card held across the nozzle,
they should be replaced. Always
replace both brushes at the same
time to maintain cleaning
efficiency.
TO REPLACE THE
BRUSHES
Remove bottom plate, belt, and
agitator, following directions
given on Page 10.
1. Turn end plates of agitator
in opposite directions until
one plate comes off.
2. Then pry out end section as
shown in illustration.
3. After end section is removed,
tap the shaft gently with a
hammer.
4. Pull other plate and shaft
from agitator.
5. Remove brushes
b,:
pulling
them from agitator
\vIth
pliers.
Slide
new
brushes into the
channels
-
small ends first
-
pushing them in as far as
possible.
6. Replace end plate and shaft
lining up locator on shaft
with slot on agitator. Re-
place other end section and
end plate and tighten.
11

SERVICING YOUR HOOVER APPLIANCE
Service and genuine Hoover replacement parts may be obtained from Hoover
Factory Se
r
v i c e Stations or consult the Ye I I ow Pages of your Telephone
Directory under VACUUM CLEANERS- HOOVER
For Service in Warranty Period follow instructions set forth in Guarantee.
When ordering new parts make sure that you always mention the model number.
of the product.
Lubrication--The motor is equipped with one ball bearing and one sleeve
bearing. These bearings contain sufficient lubrication for the life of the motor,
The addition of lubricant to the sleeve bearing could cause damage. THERE-
FORE, DO NOT ADD LUBRICANT TO EITHER MOTOR BEARING.
The agitator is equipped with two ball bearings that should be lubricated
periodically. This should be done by The Hoover Factory Service Station, as
listed in this booklet, or the Authorized Hoover Warranty Service Dealer, as
listed in the yellow pages of your telephone directory under the heading
VACUUM CLEANERS- HOOVER
HOOVER FACTORY SERVICE STATIONS
CALIFORNIA, NEVADA
The Hoover Company
270 Coral Circle
El Segundo, Cal. 90245
2411 W. Third Street
Los Angeles, Cal. 90057
3501 California Street
San Francisco, Cal. 94118
COLORADO, ARIZONA,
WYOMING,
NEW MEXICO, UTAH
The Hoover Company
2800-2810 W. Eighth Ave.
Denver, Colo. 80204
FLORIDA
The Hoover Company
1150 N. E. 125th Street
Miami, Fla. 33161
GEORGIA,
NORTH CAROLINA,
SOUTH CAROLINA,
TENNESSEE
The Hoover Company
1706 N.
E.
Expressway-
Access Road
Atlanta, Ga. 30329
HAWAII
The Hoover Company
llikai
-
Yacht Harbor Wing
299 Hobron Lane
Honolulu, Hawaii 96815
ILLINOIS, IOWA
The Hoover Company
5353 N. Lincoln Avenue
Chicago, III. 60625
1951 North 15th Avenue
Melrose
Park,
III.
60160
INDIANA
The Hoover Company
2060 East 52nd Street
Indianapolis, Ind. 46205
LOUISIANA, ALABAMA,
ARKANSAS, MISSISSIPPI
The Hcover Company
3120 Cleary Avenue
Metairie, La. 70002
(New Orleans)
MARYLAND, DELAWARE,
DISTRICT OF COLUMBIA,
VIRGINIA
The Hoover Company
1730 Joppa Road
Baltimore, Md. 21234
The Hoover Company
2211 Lewis Ave.
Rockville, Md. 20851
MASSACHUSETTS, MAINE,
NEW HAMPSHIRE,
RHODE ISLAND. VERMONT
The Hoover Company
Three Tech Circle
Natick, Mass. 01760 (Boston)
MICHIGAN
The Hoover Company
13735 Puritan Avenue
Detroi:, Mich. 48227
OHIO, KENTUCKY
The Hoover Company
730 McKinley Ave., N. W.
Canton, Ohio 44702
7749 Reinhold Drive
Cincinnati, Ohio 45237
16400 Miles Avenue
Cleveland, Ohio 44128
MINNESOTA, WISCONSIN
The Hoover Company
6801 Wayzata Boulevard
St. Louis Park, Minn. 55426
6615 West Layton Avenue
Greenfield, Wisconsin 53220
(Milwaukee)
PENNSYLVANIA,
WEST VIRGINIA
The Hoover Company
TWO Parkway Center
875 Greentree Road
Pittsburgh, Pa. 15220
130 S. State Road
Upper Darby, Pa. 19082
MISSOURI, OKLAHOMA,
KANSAS
TEXAS
The Hoover Company
7021 John W. Carpenter
The Hoover Company
6205 Prospect Avenue
Kansas City, MO. 64130
9034 Natural Bridge Road
Bel-R:dSe,
Missouri 63121
(St. Louis)
NEBRASKA,
NORTH DAKOTA,
SOUTH DAKOTA, IOWA
The Hoover Company
8220
“J”
Street
Omaha, Nebraska 68127
NEW JERSEY
;te2;00ver
Company
Watchung, N. J. 07882
NEW YORK, CONNECTICUT
The Hoover Company
1976 Grand Avenue
Baldwin, N. Y. 11510
5000 Kings Highway
Brooklyn, New York 11234
370 Seventh Avenue
New York, N. Y. 10001
810 Sheridan Drive
Tonawanda, New York 14750
Freeway
Dallas, Texas 75247
6655 Hillcroft Ave.
Houston, Texas 77036
WASHINGTON, OREGON,
IDAHO, MONTANA,
ALASKA
The Hoover Company
13555 Aurora Ave., North
Seattle, Wash. 98133
10255 Southwest Parkway
Portland, Oregon 97225
12
I
DIAL-A-MATIC
PORTABLE
FLOOR-A-MATIC RUG
HANDIVAC
SHAMPOt
CLEANERS
CLEANERS
&FLOORCONDlTlONER CLEANER
POLlSHEf
-,
i
SPIN-DRYING WASHERS
AUTOMATfCWASHERS&DRYERS
Your Hoover appliance is guaranteed for normal household use
against original defects in material and workmanship for a period
of one year from date of purchase. This guarantee covers labor
and parts required to place this appliance in correct operating
condition. If the product is mailed in for service under the guar-
antee,
transportation will be paid one way but this guarantee does
not cover pick up, delivery, or house calls.
No responsibility is assumed if the appliance is not used accord-
ing to the instruction book and at the voltage marked on the
appliance. Also, any damage resulting from the use of other than
genuine Hoover parts voids this guarantee.
Guarantee service can be obtained only at Hoover Factory
Service Centers (listed on Service Sheet included) or Hoover
Authorized Warranty Service Dealers. (Consult the yellow pages
of your telephone directory under “Vacuum Cleaners
-
Hoover
App I
iances”).
If there are any questions concerning this warranty or the avail-
ability of Warranty Service Outlets, write to the attention of the
Service Manager, The Hoover Company, 101 East Maple Street,
North Canton, Ohio 44720.
THEHOOVERCOMPANY
INDEX
PAGE
ATTACH HANDLE
.................................
2
BAG .............................................
8-9
BAG INDICATOR
..................................
7
BELT
...........................................
9-10
BRUSHES
.........................................
11
CLEANER NOZZLE HOSE
..........................
8
CLEANING CARPETS AND RUGS
...................
3
CLEANING TOOLS
..............................
4,
5-
6
HANDLE ADJUSTMENTS
...........................
2
HELPFUL HINTS
..................................
7-8
SECONDARY FILTER
..............................
8
SERVICE
.........................................
12
SUCTION CONTROL DIAL
..........................
3-4
12-68
LITHO
U S A
161829
’
/