Page is loading ...

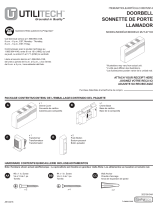
LED Lighted
Pushbutton with
Courtesy Light
© 2007 HeathCo LLC 598-1189-01
• The pushbutton is set from the factory
for use with mechanical chimes, but
can be used with either mechanical or
electronic chimes.
• Follow these instructions to install your
pushbutton and set it to work with your
particular chime.
Adjustable LED Reflector
The reflector has a 75 degree rotation to
allow the light to be directed as needed.
To adjust the reflector, slide reflector
positioning tab to desired location.
Reflector Positioning Tab
Clear Lens
Pushbutton

2 598-1189-01
1. Attach the two wires from your chime
and transformer to the screw terminals
on the back of your pushbutton (see
Figure 1). Press pushbutton to test
function.
2. If your chime functions correctly and
plays the entire tune, skip to step 7. If
your chime does not function correctly,
proceed with step 3.
Figure 1 - Attach Chime Wires to
Pushbutton (Back of Pushbutton Shown)
UP
JUMPER POSITION
SEE OWNER’S MANUAL
FOR DETAILS
MECHANICAL CHIME
ELECTRONIC CHIME
Wires from Chime and
Transformer
Screw
Terminals
Orientation
Marking
Mounting Holes
Installation
IMPORTANT: DO NOT install additional
diode(s) to pushbutton. Additional diode(s)
will cause chime to malfunction.

3598-1189-01
CAUTION: Do NOT connect push-
button to mechanical chime if pushbut-
ton jumper is set for electronic chime
use. Doing so may result in permanent
damage to your chime.
FRONT
TRANS
REAR
DO NOT OIL
Tone Bar
Figure 2 - Inside Typical Mechanical Chime
Plunger
Determine Chime Type
3. Locate your chime and remove the
cover. If you see tone bars and plungers
you have a mechanical chime (see
Figure 2). If not, you have an electronic
chime.
4. If you have a mechanical chime, go to
the
Troubleshooting section, page 5. If
you have an electronic chime proceed
to step 5 on page 4.

4 598-1189-01
Figure 3 - Determining Correct Jumper
Position (Back of Pushbutton)
UP
JUMPER POSITION
SEE OWNER’S MANUAL
FOR DETAILS
MECHANICAL CHIME
ELECTRONIC CHIME
Jumper On Two Right Pins
for Electronic Chime
UP
JUMPER POSITION
SEE OWNER’S MANUAL
FOR DETAILS
MECHANICAL CHIME
ELECTRONIC CHIME
Jumper On Two Left Pins
for Mechanical Chime
5. If you have an electronic chime,
move the jumper on the back of your
pushbutton from the two left pins to
the two right pins (see Figure 3). Press
pushbutton to test again.
6.
If your chime still does not operate
correctly, see Troubleshooting, page 5.
7. Once your pushbutton and chime
are wired and functioning correctly,
mount the pushbutton to the wall
using the screws provided. Note: The
pushbutton must be mounted with the
lens facing downward.

5598-1189-01
HeathCo LLC reserves the right to discontinue
and to change specifications at any time with-
out notice without incurring any obligation to
incorporate new features in previously sold
products.
Troubleshooting
If bell or chime does not operate:
• For Electronic Chimes: If tune does
not play completely, reverse wires
connected to the pushbutton.
• Disconnect wires from button and touch
together. If bell or chime operates,
replace with new button.
• Check transformer, bell, or chime.
Technical Service
Please call 1-800-858-8501 (English
speaking only) for assistance before
returning product to store.
If you experience a problem, follow this
guide. You may also want to visit our
Web site at: www.hzsupport.com. If the
problem persists, call* for assistance at 1-
800-858-8501, 7:30 AM to 4:30 PM CST
(M-F). You may also write* to:
HeathCo LLC
P.O. Box 90004,
Bowling Green, KY 42102-9004
ATTN: Technical Service
* If contacting Technical Service, please
have the following information available:
Model Number, Date of Purchase, and
Place of Purchase.
No Service Parts Available for this
Product

6 598-1189-01
ONE YEAR LIMITED WARRANTY
This is a “Limited Warranty” which gives you specific
legal rights. You may also have other rights which
vary from state to state or province to province.
For a period of one year from the date of purchase,
any malfunction caused by factory defective
parts or workmanship will be corrected at no
charge to you.
Not Covered - Repair service, adjustment and
calibration due to misuse, abuse or negligence,
light bulbs, batteries, and other expendable items
are not covered by this warranty. Unauthorized
service or modification of the product or of any
furnished component will void this warranty
in its entirety. This warranty does not include
reimbursement for inconvenience, installation,
setup time, loss of use, unauthorized service,
or return shipping charges.
This warranty covers only HeathCo LLC as-
sembled products and is not extended to other
equipment and components that a customer
uses in conjunction with our products.
THIS WARRANTY IS EXPRESSLY IN LIEU
OF ALL OTHER WARRANTIES, EXPRESS
OR IMPLIED, INCLUDING ANY WARRANTY,
REPRESENTATION OR CONDITION OF MER-
CHANT ABILITY OR THAT THE PRODUCTS
ARE FIT FOR ANY PARTICULAR PURPOSE
OR USE, AND SPECIFICALLY IN LIEU OF
ALL SPECIAL, INDIRECT, INCIDENTAL, OR
CONSEQUENTIAL DAMAGES.
REPAIR OR REPLACEMENT SHALL BE THE
SOLE REMEDY OF THE CUSTOMER AND
THERE SHALL BE NO LIABILITY ON THE PART
OF HEATHCO LLC FOR ANY SPECIAL, INDI-
RECT, INCIDENTAL, OR CONSEQUENTIAL
DAMAGES, INCLUDING BUT NOT LIMITED
TO ANY LOSS OF BUSINESS OR PROFITS,
WHETHER OR NOT FORESEEABLE. Some
states or provinces do not allow the exclusion or
limitation of incidental or consequential damages,
so the above limitation or exclusion may not apply
to you. Please keep your dated sales receipt, it
is required for all warranty requests.
/