
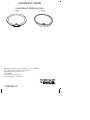
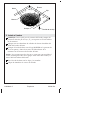
Installation Guide
Under-Mount Bathroom Sink
M product numbers are for Mexico (i.e. K-12345M)
Los números de productos seguidos de
M corresponden a México (Ej.
K-12345M)
Français, page “Français-1”
Español, página “Español-1”
K-2361 K-2741
1145059-2-C

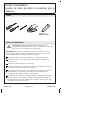
Tools
Before You Begin
CAUTION: Risk of personal injury. Handle with care.
Product can break, chip or cause injury if handled carelessly.
IMPORTANT! For bathroom sinks without faucet holes, ensure
adequate clearance for faucet installation when determining the
bathroom sink placement.
Observe all local plumbing and building codes.
Inspect the drain and supply tubing. Replace if necessary.
Use the template supplied with the bathroom sink.
Provide your countertop manufacturer with your bathroom sink
model number when ordering your countertop.
If a counter-mount faucet is required, provide the faucet
information to the countertop installer to ensure the correct holes
are drilled.
Countertop manufacturer should preinstall the anchors into the
underside of the countertop. Use the anchors and fasteners
provided by the countertop manufacturer and the clamps
provided with your bathroom sink.
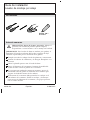
100% Silicone Sealant
1145059-2-C 2 Kohler Co.

1. Preparation
Install the water supplies and drain piping according to the
roughing-in information.
Install the countertop.
Verify cabinet clearance beneath the countertop to accommodate
the sink basin, faucet valving, and drain piping.
Clean the underside of the countertop at the bathroom sink
installation area thoroughly.
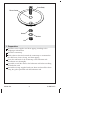
If possible, install the drain to the bathroom sink before installing
the bathroom sink.
Discard the O-ring supplied with your drain and install the drain
using the gasket provided with the bathroom sink.
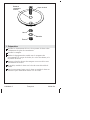
Drain Body
Nut
Washer
Gasket
Foam Gasket
Kohler Co. 3 1145059-2-C

2. Install the Lavatory
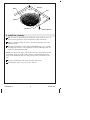
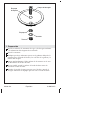
TIP: To assist in positioning the bathroom sink, mark the 12, 3, 6,
and 9 o’clock positions on the underside of the countertop.
Apply a generous bead of silicone sealant around the rim of the
bathroom sink.
Position the bathroom sink with the KOHLER logo at 12 o’clock
and align the marks on the underside of the countertop with the
notches in the bathroom sink.
NOTE: To ensure the clips will not be seen once the bathroom sink
is installed, keep the edges of the clamps positioned between the
edge of the bathroom sink and the groove in the underside of the
rim.
Secure the bathroom sink with the clips and screws.
Immediately wipe away any excess sealant.
Clip
Notch
Mark
Anchor Screw
Anchor
Groove
1145059-2-C 4 Kohler Co.
Page is loading ...
Page is loading ...
Page is loading ...
Page is loading ...
Page is loading ...
Page is loading ...
Page is loading ...

USA/Canada: 1-800-4-KOHLER
México: 001-877-680-1310
kohler.com
©2012 Kohler Co.
1145059-2-C
-
 1
1
-
 2
2
-
 3
3
-
 4
4
-
 5
5
-
 6
6
-
 7
7
-
 8
8
-
 9
9
-
 10
10
-
 11
11
-
 12
12


Ask a question and I''ll find the answer in the document
Finding information in a document is now easier with AI
in other languages
- français: Kohler K-2741-B11 Guide d'installation
- español: Kohler K-2741-B11 Guía de instalación
Related papers
-
Kohler K-2191-G-47 Installation guide
-
-
-
Kohler K-2610-SU-NA Installation guide
-
-
Kohler 103K37-SANA-CP Installation guide
-
Kohler 2890-4U-0 Installation guide
-
-
-
Other documents
-
Sterling Wescott™ Installation guide
-
Sterling 75020140-96 Installation guide
-
Sterling 442040-96 Installation guide
-
-
-
 Premium Home Creations K-2369 User manual
-
IKEA DOMSJO Installation Instructions Manual
-
Duravit 0457480000 Installation guide
