Page is loading ...

FOUR BURNER GAS GRILL
Assembly/Installation Instructions and Use & Care Guide
For questions about features, operation/performance, parts call: 1-800-229-5647 or visit www.sureheat.com
Table of Contents..............................................................................................................................2
IMPORTANT:
Save for local inspector’s use.
Installer: Leave installation instructions with the homeowner.
Homeowner: Keep installation instructions for future reference.
MODEL SF34LP

2 2
TABLE OF CONTENTS
OUTDOOR GRILL SAFETY .............................3
UNPACKING INSTRUCTIONS .........................5
ASSEMBLY REQUIREMENTS .........................5
Parts Supplied.............................................................5
ASSEMBLY INSTRUCTIONS ...........................6
INSTALLATION REQUIREMENTS ................11
Location Requirements ............................................. 11
Gas Supply Requirements ........................................ 11
Gas Connection Requirements ................................. 11
INSTALLATION INSTRUCTIONS ..................11
Make Gas Connection .............................................. 11
Check the Burners ....................................................12
OUTDOOR GRILL USE ..................................13
Using Your Outdoor Grill ...........................................13
Using Your Side Burner ............................................14
TIPS FOR OUTDOOR GRILLING ..................15
Cooking Methods ..................................................... 15
OUTDOOR GRILL CARE ...............................16
Replacing the Igniter Battery.....................................16
General Cleaning ......................................................16
TROUBLESHOOTING ....................................17
ASSISTANCE .................................................17
REPLACEMENT PARTS ................................18
WARRANTY ....................................................21

OUTDOOR GRILL SAFETY
Your safety and the safety of others are very important.
We have provided many important safety messages in this manual and on your appliance. Always read and obey all safety
messages.
This is the safety alert symbol.
This symbol alerts you to potential hazards that can kill or hurt you and others.
All safety messages will follow the safety alert symbol and either the word “DANGER” or “WARNING.”
These words mean:
You can be killed or seriously injured if you don’t immediately
follow instructions.
You can be killed or seriously injured if you don’t follow
instructions.
All safety messages will tell you what the potential hazard is, tell you how to reduce the chance of injury, and tell you
what can
happen if the instructions are not followed.
DANGER
If you smell gas:
1. Shut off gas to the appliance.
2. Extinguish any open ame.
3. Open lid.
4. If odor continues, keep away from the
appliance and immediately call your gas
supplier or your re department.
WARNING
1. Do not store or use gasoline or other
ammable liquids or vapors in the
vicinity of this or any other appliance.
2. An LP cylinder not connected for use
shall not be stored in the vicinity of this
or any other appliance.
In the State of Massachusetts, the following installation instructions apply:
Installations and repairs must be performed by a qualied or licensed contractor, plumber, or gas tter qualied or licensed ■
by the State of Massachusetts.
If using a ball valve, it shall be a T-handle type. ■
A exible gas connector, when used, must not exceed 3 feet. ■
State of California Proposition 65 Warnings:
WARNING: This product contains a chemical known to the State of California to cause cancer. ■
WARNING: This product contains a chemical known to the State of California to cause birth defects or other reproductive harm. ■
3

4
IMPORTANT: This grill is manufactured for outdoor use only. For grills that are to be used at elevations above 2000 ft (609.6 m) orice
conversion is required. See “Gas Supply Requirements” section. It is the responsibility of the installer to comply with the minimum
installation clearances specied on the model/serial rating plate. The model/serial rating plate for this model is located inside the Acess
Door.
IMPORTANT SAFETY INSTRUCTIONS
WARNING: To reduce the risk of re, electrical shock, injury
to persons, or damage when using the outdoor cooking gas
appliance, follow basic precautions, including the following:
Do not install portable or built-in outdoor cooking gas ■
appliances in or on a recreational vehicle, portable trailer,
boat or in any other moving installation.
Always maintain minimum clearances from combustible ■
construction, see “Location Requirements” section.
The outdoor cooking gas appliance shall not be located ■
under overhead unprotected combustible construction.
This outdoor cooking gas appliance shall be used only ■
outdoors and shall not be used in a building, garage, or any
other enclosed area.
Keep any electrical supply cord and fuel supply hose away ■
from any heated surfaces.
Keep outdoor cooking gas appliance area clear and free ■
from combustible materials, gasoline and other ammable
vapors and liquids.
Do not obstruct the ow of combustion and ventilation air. ■
Keep the ventilation openings of the cylinder enclosure free
and clear from debris.
Inspect the gas cylinder supply hose before each use of ■
the outdoor cooking gas appliance. If the hose shows
excessive abrasion or wear, or is cut, it MUST be replaced
before using the outdoor cooking gas appliance. Contact
your dealer and use only replacement hoses specic for
use with the outdoor cooking gas appliance.
Visually check the burner ames. They should be blue. ■
Slight yellow tipping is normal for LP gas.
Check and clean burner/venturi tube for insects and insect ■
nests. A clogged tube can lead to re under the outdoor
cooking gas appliance.
The LP gas supply cylinder to be used must be: ■
constructed and marked in accordance with the –
Specication for LP Gas Cylinders of the U.S.
Department of Transportation (DOT) or the National
Standard of Canada, CAN/CSA-B339, Cylinders,
Spheres and Tubes for Transportation of Dangerous
Goods; and Commission.
provided with a listed overlling prevention device. –
provided with a cylinder connection device compatible –
with the connection for outdoor cooking gas
appliances.
Always check connections for leaks each time you connect ■
and disconnect the LP gas supply cylinder. See “Installation
Instructions” section.
When the outdoor cooking gas appliance is not in use, the ■
gas must be turned off at the supply cylinder.
Storage of an outdoor cooking gas appliance indoors ■
is permissible only if the cylinder is disconnected and
removed from the outdoor cooking gas appliance.
Cylinders must be stored outdoors and out of the reach of ■
children and must not be stored in a building, garage, or
any other enclosed area.
The pressure regulator and hose assembly supplied ■
with the outdoor cooking gas appliance must be used. A
replacement pressure regulator and hose assembly specic
to your model is available from your outdoor cooking gas
appliance dealer.
Gas cylinder must include a collar to protect the ■
cylinder valve.
For appliances designed to use a CGA791 Connection: ■
Place a dust cap on cylinder valve outlet whenever the
cylinder is not in use. Only install the type of dust cap on
the cylinder valve outlet that is provided with a cylinder
valve. Other types of caps or plugs may result in leakage of
propane.
If the following information is not followed exactly, a re
causing death or serious injury may occur.
Do not store a spare LP gas cylinder under or near this ■
outdoor cooking gas appliance.
Never ll the cylinder beyond 80 percent full. ■
SAVE THESE INSTRUCTIONS

UNPACKING INSTRUCTIONS
ASSEMBLY REQUIREMENTS
Parts Supplied
View of Unassembled Grill Parts
Using a utility knife, cut the tape to open the top aps of the 1.
carton.
Remove the Assembly/ Installation Instructions and Use and 2.
Care Guide.
Remove the cardboard panel on the top. Remove the corner 3.
supports on the top of the inside of the carton. Remove the
foam from the two sides
Remove the cart base panel from the top and remove all the 4.
parts along the front and sides of the carton.
Remove the bread warmer, the rotisserie spit, and spare tank 5.
barrier bar
Remove the foam packaging from the top and sides of the 6.
grill head assembly.
Remove the four corner supports from the inside of the 7.
carton.
Using a utility knife, cut along the vertical dotted cut lines 8.
located on 2 sides of the carton. Lay the box sides at.
Using two or more people, remove grill head assembly from 9.
carton with the foam underneath the grill assembly.
Remove the plastic bag from the grill head.10.
Excessive Weight Hazard
Use two or more people to move and install grill.
Failure to do so can result in back or other injury.
11. Remove screws (with hang tags attached) located on either
side of the grill head.
Open hood remove and open the box which contains the grill 12.
component parts. Remove all packaging materials and
set component parts aside.
Remove wrapped avor grids from top of box. Open box and 13.
remove contents, then set aside.
Dispose of/recycle all packaging materials.14.
A. Grill hood assembly
B. Bread warming rack
C. Main burner grates
D. Flavor grids
E. Side shelf
F. Side burner shelf
G. Drawers
H. Cart door right
J. Cart left
L. Cart back
K. Cart right
M. Cart base
N. Drip pan
Not shown:
Package of small components
A
B
C
D
E
G
H
I
J
K
L
M
P
O
F
5
N
Q
R

43 - Self-Tapping screws ■
6 - Phillips pan head screws M6 x 10 ■
8 - Phillips pan head screws M6 x 40 ■
2 - Phillips sunken head screws ■
1 - Side burner knob with bezel ■
1 - “AA” battery ■
1 - Caster Swivel assembly wrench ■
3 - Towel bars ■
NOTE: Other hardware required is attached to the grill where
needed.
Tools Needed
# 2 Phillips screwdriver ■
Tape Measure ■
Adjustable wrench ■
Level ■
1/2” ■
wrench or socket
1/4” nut driver or socket ■
Non-corrosive leak detection solution ■
Assembled Grill View
Roll top grill hoodA.
Bread warming rackB.
Grilling/Cooking SurfaceC.
Side ShelfD.
Control knobs: Main E.
burners
DrawersF.
Hood handleG.
Side BurnerH.
Control Knob:Side BurnerI.
Electronic Igniter: main J.
burners and side burner
Cart DoorK.
Assembly Hardware Supplied
A
B
C
D
E
G
H
J
i
K
6
Assemble cart sides
1. Use four (4) Phillips pan head screws M6 x 40 to secure the
cart side left to the cart base.
2. Use four (4) Phillips pan head screws M6 x 40 to secure the
cart side left to the cart base.
Assemble wheels
ASSEMBLY INSTRUCTIONS
1. Use the Caster Swivel assembly wrench to screw the wheels
to the cart base. The Caster Swivels with lock should be on
the right side.
Parts Supplied
Gas pressure regulator/hose assembly set for 11” WCP LP gas ■
(attached to manifold).
Parts Needed
20 lb LP gas fuel tank ■
F

7 7
Assemble cart back
1. Tilt the grill cart assembly up. Use six (6) self-tapping scews
to secure the cart back to the cart base.
Assemble cart middle
1. Use two (2) self-tapping screws to install the cart middle to
the cart back.
2. Then use two (2) self-tapping screws to install the middle
cart to tje cart bottom.
Assemble middle bar
1. Place the middle bar between left cart and cart middle, and
then tighten the four (4) self-tapping screws to x it.
Assemble front top rail
1. Use two (2) Phillips sunken head screws to secure the front
top rail onto the cart sides.

8 8
Assemble the drawers
Lay the drawer on the oor, and use one Phillips pan head 1.
screw M6 x 10 to attach one of the handle ends to the
front of the drawer.
Slide one end of the towel bar into the installed handle 2.
end. Attach the second towel bar handle end using one
Phillips pan head screw M6 x 10 while holding the drawer
in place.
Then use six (6) self-tapping screws to x the drawer.3.
Repeat this to attach the towel bar to another drawer.4.
Assemble door to cart
Tilt the top of the door toward the grill while depressing the 1.
top door pivot pin.
Move the door slightly until the pin snaps into place in the 2.
hole at the bottom of the front face.
NOTE: The levels of the door may be adjusted using the
nuts on the pivot points.
Assemble grill head to cart assembly
With the help of a second person, lift the grill head up and 1.
set on the top of the grill cart.
Use Six (6) self-tapping screws to secure the grill head on 2.
the top of the cart sides.
Place the drawers evenly between the cart side and cart 1.
middle, then make the two sides of the drawer move
smoothly with the slot.
5.
Use one Phillips pan head screw M6 x 10 to attach one of 1.
the handle ends to the front of the door.
Slide one end of the towel bar into the installed handle end. 2.
Attach the second towel bar handle end using one Phillips
pan head screw M6 x 10 while holding the door in place.
4.
3.

9 9
B
A
Locate the side burner valve assembly out from underneath 1.
the control panel.
Using a Phillips screwdriver, remove the 2 screws from the 2.
side burner valve assembly. Set aside the screws.
Push the valve stem out through the opening in the front of 3.
the side burner shelf, lining up the threaded holes in the side
burner valve assembly with the openings on the side burner
shelf.
Position the side burner bezel (A) into place with the OFF 4.
position facing up, making sure to align the holes.
Attach the side burner bezel to side burner assembly face 5.
with screws removed in Step 2.
Press knob (B) onto valve assembly stem with OFF position 6.
facing up.
A. Igniter
A.
Large holding bracket
B. Side burner casting
C. Small holding bracket
Assemble igniter assembly
Place the electronic igniter into the igniter hole on the front 1.
left of the side burner shelf. To help ease the installation of
the wires, make certain that the igniter wire tabs are facing
away from the grill.
Secure the igniter in place.2.
Install “AA” battery, negative end (-) rst.3.
Install spring and cap assembly and tighten securely.4.
Attach loose wire to bottom of IR burner, and then to any 5.
of the open tabs in the igniter. Insert the 6 igniter wires, fed
through the grommeted hole on side of grill cart in Step
2 of the “Assemble Side Burner Shelf” section, into the
remaining 2 holes.
NOTE: The igniter is designed in such a way that it does
not matter which terminal tab is used when connecting
igniter wires.
Feed the side burner gas supply hose assembly through the 1.
hole in the side of the cart.
Loosen four bolts on the right of the grill head assembly by 2.
approximately 1/4”.
Press the side burner shelf against the grill and press 3.
downward until the shelf locks in place. Make sure the top
trim strip is hanging all the way inside of the grill before
pressing downward.
Install 1 self-tapping screw into the bottom front hole under 4.
the shelf.
Secure the four bolts on the right of the grill head assembly. 5.
A. Side burner shelf
B. Self-tapping screw
Assemble side burner assembly
A
B
C
A
A
B
A. Bezel
B. Knob
Secure the large holding bracket (A) on the side burner 1.
assembly with two (2) self-tapping screws.
Insert the side burner casting (B) into the holding bracket of 2.
the side burner assembly with two (2) self-tapping screws.
Then secure the small holding bracket (C) with two (2) self-
tapping screws.
6.
7.
8.
9.
10.
11.
12.
13.
A. Side shelf
B. Self-tapping screw
Lay the side shelf left assembly on its side. 1. NOTE: Be
careful not to scratch the sides of the shelf.
Place a piece of styrofoam from the packaging inside the 2.
roll top hood propped open slightly.
Loosen four bolts on the left of the grill head assembly by 3.
approximately 1/4”.
Press the shelf against the grill and press downward 4.
until the shelf locks in place. Make sure the top trim strip
is hanging all the way inside of the grill before pressing
downward.
Install 1 self-tapping screw into the bottom front hole under 5.
the shelf.
Secure the four bolts on the left of the grill head assembly.6.
Assemble side shelf
A
B

10 10
A
B
A. Flavor grids
B. Main cooking grates
C. Bread warming rack
A
B
C
Insert the avor grids into the cutouts with triangle ridges 3.
facing up.
Install main cooking grates on the ledges provided on the 4.
grill to create your cooking surface.
Attach rear igniter shield using 2 self-tapping screws.5.
Rest bread warming grate on 4 slots above cooking grid.6.
NOTE: The nished grill should look like the photo shown
on page 6 in the “Assembled Grill View” section.
Complete grill assembly
Place the side burner cap and grate on to the side burner 1.
tray.
Attach the drip pan holder to two holding brackets. Then 2.
slide drip pan into place.
A. Side burner grate
A
A. Drip pan holder
B. Drip pan

11 11
Location Requirements
Explosion Hazard
Do not store food tank in a garage or indoors.
Do not store grill with fuel tank in a garage
or indoors.
Failure to follow these instructions can result in
death, explosion, or re.
Fire Hazard
Do not use grill near combustible materials.
Do not store combustible materials near grill.
Doing so can result in death or re.
Select a location that provides minimum exposure to wind and
trafc paths. The location should be away from strong draft
areas.
Do not obstruct ow of combustion and ventilation air.
Clearance to combustible construction:
A minimum of 24” (61.0 cm) from grill hood sides and back must
be maintained from any combustible construction.
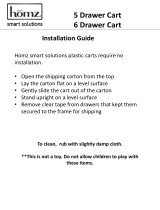
Product dimensions
Gas Supply Requirements
Observe all governing codes and ordinances.
IMPORTANT: This installation must conform with all local codes
and ordinances. In the absence of local codes, installation must
conform with American National Standards Institute, National
Fuel Gas Code ANSI Z223.1 - latest edition.
IMPORTANT: Grill must be connected to a regulated gas supply.
Gas Pressure Regulator
The gas pressure regulator supplied with this grill must be used.
The inlet (supply) pressure to the regulator should be as follows
for proper operation:
LP Gas:
Operating pressure: 11” (27.9 cm) WCP
Inlet (supply) pressure: 11” to 14” (27.9 cm to 35.5 cm) WCP
Contact local gas supplier if you are not sure about the inlet
(supply) pressure.
20 lb LP Gas Fuel Tank
This grill is equipped for use with a 20 lb LP gas fuel tank (fuel
tank not supplied). A gas pressure regulator/hose assembly is
supplied.
The 20 lb LP gas fuel tank must be mounted and secured.
1. From the rear of the cart,s et a 20 lb LP gas fuel tank into the
hole in the cart base.
2. Place the 20 lb LP gas fuel tank retention bar onto the 20 lb LP
gas fuel tank.
INSTALLATION REQUIREMENTS
Gas Connection Requirement
A
B
14”
35.6 cm
47”
119.4 cm
33”
83.8 cm
14”
35.6 cm
35.8”
91 cm
53.9”
136.9 cm
20.7”
52.6 cm
20.7”
52.6 cm

12
INSTALLATION INSTRUCTIONS
Gas Connection Requirements
Explosion Hazard
Do not store fuel tank in a garage or indoors.
Do not store grill with fuel tank in a garage or
indoors.
Failure to follow these instructions can result in
death, explosion, or re.
LP Gas:
IMPORTANT: A 20 lb LP gas fuel tank must be purchased
separately.
IMPORTANT: The gas pressure regulator/hose assembly
supplied with the grill must be used. Replacement gas
pressure regulator/hose assembly specic to your model,
is available from your outdoor grill dealer.
To Install the 20 lb LP Gas Fuel Tank:
Set tank in hole in the cart base.1.
Screw the gas pressure regulator/hose assembly on to the 2.
20 lb LP gas fuel tank as shown
Place the 20 lb LP gas fuel tank secure ring over the collar of 3.
the tank as shown.
A. Gas pressure regulator/hose assembly
NOTE: The 20 lb LP gas fuel tank orientation shown in
the illustration above must be followed to provide proper
vapor withdrawal.
Turn on the gas supply. Wait a few minutes for gas to move 4.
through the gas line.
Test all connections by brushing on an approved 5.
noncorrosive leak detection solution. Bubbles will
show a leak. Correct any leak found.
Check the Burners
The burners are tested and factory-set for most efcient
operation. However, variations in gas supply and other
conditions may make minor adjustments to air shutter or low
ame setting necessary.
It is recommended that a qualied person make burner
adjustments.
Checking the grill burner ames requires removing the grate
and avor grids.
Burner Flame Characteristics
The ames of the grill burners and side burners (on some
models) should be blue and stable with no excessive noise
or lifting (LP gas ames will have a slightly yellow tip). A yellow
ame indicates not enough air. If ame is noisy or lifts away
from the burner, there is too much air. Some yellow tips on
ames when the burner is set to HI setting are acceptable
as long as no carbon or soot deposits appear.
Check that burners are not blocked by dirt, debris, insect nests
etc. and clean as necessary.
A
B

13
OUTDOOR GRILL USE
This manual covers several different models. The grill you have purchased may have some or all of the features listed. The locations
and appearances of the features shown here may not match those of your model.
Control Panel
Main Burner Control Knob 1A.
Main Burner Control Knob 2B.
Main Burner Control Knob 3C.
Main Burner Control Knob 4D.
Igniter ButtonE.
Side Burner Control KnobF.
Using Your Outdoor Grill
Inspect the LP Gas Fuel Tank Supply Hose
Inspect the gas pressure regulator/hose assembly before each
use.
Inspect the gas pressure regulator /hose assembly for cuts, 1.
abrasions, or excessive wear.
If necessary, replace the gas pressure regulator/hose 2.
assembly before using the grill.
Contact the dealer and use only replacement hoses
specied for use with the grill.
Prepare the Gas Supply
Open the hood completely. Do not light burners with the 1.
hood closed.
Make sure control knobs are turned to “OFF”.2.
Explosion Hazard
Do not store food tank in a garage or indoors.
Do not store grill with fuel tank in a garage
or indoors.
Failure to follow these instructions can result in
death, explosion, or re.
Fire Hazard
Do not use grill near combustible materials.
Do not store combustible materials near grill.
Doing so can result in death or re.
Food Poisoning Hazard
Do not let food sit for more than one hour before or
after cooking.
Doing so can result in food poisoning or sickness.
A. Gas pressure regulator/hose assembly
A B
C
D
E
F

14 14
Turn the Gas Supply On
For outdoor grills using a 20 lb. LP gas fuel tank: Slowly open 1.
the tank valve.
NOTE: If ow limiting device activates, your grill may not light.
If your grill does not light, the ames will be low and will not
heat properly. Turn tank valve and all control knobs off and
wait 30 seconds. After shutting off the tank, very slowly open
tank valve and wait 5 seconds before lighting.
Lighting the Grill
Do not lean over the grill.1.
Push in and turn any grill burner control knob to HIGH, and 2.
immediately press the electronic igniter button.
3. You will hear the “snapping” sound of the spark igniter. When
burner is lit, release the knob. Turn knob to desired setting.
Repeat steps 2 and 3 to light the other burners.4.
IMPORTANT: If burner does not light immediately, turn the
burner knob to OFF and wait 5 minutes before relighting.
Manually Lighting the Grill
Do not lean over the grill.1.
Remove the manual lighting extension and attach a match to 2.
the split ring.
Strike the match to light it.3.
Guide the lit match between the grill grate and one of the 4.
slots in the avor grid near the burner to be lit.
5. Push in and turn the burner knob to HIGH. The burner will
light immediately. When burner is lit, turn knob to desired
setting.
6. Repeat steps 3 through 5 to light the other burners.
Remove match and replace manual lighting extension.7.
IMPORTANT:
If burner does not light immediately, turn the burner knob to OFF
and wait 5 minutes before relighting.
If any burners do not light after attempting to light them manually,
contact customer service. See the “Assistance” section.

15
Using Your Side Burner
Burn Hazard
Do not let the burner ame extend beyond the
edge of the pan.
Doing so can result in burns
Lighting the Side Burner
Open the side burner cover. Do not light burners with the 1.
cover on.
Do not lean over the grill.2.
Push in and turn the control knob to HIGH and immediately 3.
press the electronic igniter button.
4. You will hear the “snapping sound of the spark igniter. When
burner is lit, release the knob. Turn knob to desired setting.
IMPORTANT: If burner does not light immediately, turn the
burner knob to OFF and wait 5 minutes before relighting.
Manually lighting the side burner
Do not lean over the grill.1.
Remove the manual lighting extension and attach a match to 2.
the split ring.
Strike the match to light it.3.
Guide the match to the burner4.
5. Push in and turn the burner knob to HIGH. The burner will
light immediately. When the burner is lit, turn knob to desired
setting.
6. Remove match and replace manual lighting extension.
IMPORTANT:
If burner does not light immediately, turn the burner knob to
OFF and wait 5 minutes before relighting.
If any burners do not light after attempting to light them
manually, contact customer service. See the “Assistance”
section.
15

OUTDOOR GRILL CARE
Replacing the Igniter Battery
If igniters stop sparking, the battery should be replaced.
Unscrew igniter button cap counter-clockwise to remove.1.
2. Remove battery from the battery compartment.
Replace with a new alkaline “AA” size battery. Install battery 3.
with negative end (-) in rst.
Screw igniter button cap clockwise into place.4.
General Cleaning
IMPORTANT: Before cleaning, make sure all controls are off
and the grill is cool. Always follow label instructions on cleaning
products.
For routine cleaning, wash with soap and water using a soft cloth
or sponge. Rinse with clean water and dry at once with a soft,
lint-free cloth to avoid spots and streaks.
To avoid scratching the surface, do not use steel wool to clean
the grill.
To avoid damage from the weather, use a vinyl grill cover,
available from your local dealer.
STAINLESS STEEL
IMPORTANT: To avoid damage to the stainless steel surface,
do not use soap-lled scouring pads, abrasive cleaners, cooktop
polishing creme, steel wool, gritty wash cloths, paper towels or
cleaners that contain chlorine.
Food spills should be cleaned as soon as entire grill is cool. Spills
may cause permanent discoloration.
Cleaning Method:
Rub in direction of grain to avoid scratching or damaging the ■
surface.
Stainless Steel Cleaner. ■
Liquid detergent or all-purpose cleaner. ■
Rinse with clean water and dry with soft, lint-free cloth. ■
Glass cleaner to remove ngerprints. ■
PORCELAIN-COATED PARTS
To avoid chipping, do not bang porcelain covered parts with solid
objects or drop them.
Cleaning Method:
Non-abrasive plastic scrubbing pad and mildly abrasive ■
cleanser.
GRILL GRATES
IMPORTANT: Do not use a steel or ber scraper on grill grates.
Immediately after you are nished cooking, loosen food soil with
a brass bristle brush. Turn all burners to HI for 10-15 minutes with
the hood closed to burn off food soil. Turn off all burners, raise the
hood and let grates cool. Use the brass bristle brush to remove
ash from the grill grates.
When completely cool, grill racks can be removed for thorough
cleaning. Clean them with a mild detergent and warm water.
For baked-on soil, prepare a solution of 1 cup (250 mL) ammonia
to 1 gal. (3.75 L) water. Soak grates for 20 minutes, then rinse
with water and dry completely.
WARMING SHELF
Cleaning Method:
Liquid detergent or an all-purpose cleaner. ■
Rinse with clean water and dry with soft, lint-free cloth. ■
For tough spots or baked-on grease, use a commercial de ■
greaser designed for stainless steel.
EXTERIOR
IMPORTANT: Make sure gas supply is off and all control knobs
are in the OFF position. Make sure the side burner is cool.
The quality of this material resists most stains and pitting,
providing that the surface is kept clean, covered, and polished.
Apply stainless steel polish to all brushed stainless steel non- ■
cooking surfaces before rst use. Re-apply after each cleaning
to avoid permanent damage to surface.
For tough spots or baked-on grease, use a commercial ■
degreaser designed for stainless steel.
Cleaning should always be followed by rinsing with clean ■
warm water.
Wipe the surface completely dry with a soft cloth. ■
Liquid detergent or all-purpose cleaner for all powder coated ■
surfaces.
INTERIOR
Discoloration of stainless steel on these parts is to be expected,
due to intense heat from the burners. Always rub in the direction
of the grain. Cleaning should always be followed by rinsing with
clean, warm water.
Cleaning Method:
Liquid detergent or all-purpose cleaner or for small, ■
difcult-to-clean areas, use a commercial degreaser designed
for stainless steel.
A heavy-duty scrub sponge can be used with mild cleaning ■
products.
Rinse with clean water and dry completely with a soft, ■
lint-free cloth.
16

SIDE BURNER CAPS AND GRATE
Cleaning Method:
Clean with a brass bristle brush. ■
Wash grate using mild detergent, warm water and degreaser. ■
Rinse with clean water and dry with soft, lint-free cloth. ■
Stainless steel cleaner. ■
BURNERS
Cleaning Method:
Clean the exterior of the burner with a wire brush. ■
Clear any clogged burner ports with a straightened paper clip. ■
Do not use a toothpick as it may break off and clog the port.
Check and clean burner/venturi tubes. ■
DRIP PAN
IMPORTANT: The drip pan should be removed only when grill is
completely cool.
The drip pan collects grease that runs out through the grill. Clean
often to avoid grease buildup.
Cleaning Method:
Remove drip pan. Wipe excess grease with paper towels. ■
Clean with mild detergent and warm water. Rinse and dry ■
thoroughly.
KNOBS AND FLANGE AREA AROUND KNOBS
IMPORTANT: To avoid damage to the knobs and ange area, do
not use steel wool, abrasive cleaners, or oven cleaner.
To avoid damage, do not soak knobs.
Cleaning Method:
Mild detergent, a soft cloth and warm water. ■
Rinse and dry. ■
CONTROL PANEL GRAPHICS
IMPORTANT: To avoid damage to the control panel graphics, do
not use steel wool, abrasive cleaners or oven cleaner.
To avoid damage, do not spray cleaner directly onto panel.
Cleaning Method:
Clean around the burner labels gently; scrubbing may remove ■
printing.
Clean with mild detergent, soft cloth and warm water. ■
Rinse and dry. ■
Grill will not light
Is the 20 lb LP gas fuel tank valve turned off? ■
Turn the 20 lb LP gas fuel tank on.
Is the grill properly connected to the gas supply? ■
Contact a trained repair specialist or see Installation
TROUBLESHOOTING ■
Grill will not light
Is the 20 lb LP gas fuel tank valve turned off? ■
Turn the 20 lb LP gas fuel tank on.
Is the grill properly connected to the gas supply? ■
Contact a trained repair specialist or see Installation
Instructions.
Is there gas in the 20 lb LP gas fuel tank? ■
Check the gas level.
Is the igniter working? ■
Check that the igniter battery is properly installed or check to
see if the battery needs to be replaced. See the “Replacing the
Igniter Battery” section.
Check for loose wire connections to the igniter or electrodes.
Check to see if debris is blocking the electrodes.
Flame is low or erratic
Is the gas supply fully turned on? ■
Check that the 20 lb LP gas fuel tank valve is fully open..
Is the gas supply in the 20 lb LP fuel gas tank low? ■
Check the gas level.
Does only one burner appear low? ■
Check and clean the burner ports if clogged or dirty. See
“General Cleaning” section.
Is the burner ame mostly yellow or orange? ■
Grill may be in an area that is too windy. Check the burner air
inlets for obstructions.
ASSISTANCE
Before calling for assistance, please check “Troubleshooting”
section above. If you still need help, follow the instructions below.
When calling, please know the purchase date and the complete
model and serial number of your appliance. This information will
help us to better respond to your request.
If you need replacement parts:
If you have questions or need replacement parts, contact
Customer Service Hotline at 1-800-229-5647 or visit
www.sureheat.com.
Sure Heat Manufacturing
1861 West Oak Parkway
Marietta, GA 30062
16
17

18 18
REPLACEMENT PARTS
Hood Assembly
SASCD00534B
1 set
Manifold & Valve
Assembly
RCOZZ00532A
1 set
Hood Handle Assembly
SASQG00005A
1 set
Side Burner Shelf
SASCD00530B
1 set
Temperature Gauge
RCOZZ00029A
1 piece
Large Bezel
RCOAG00003A
1 piece
Bread Warming Rack
RCORC00011A
1 piece
Large Knob
RCOFE00001A
1 piece
Main Cooking Grate
RCOCC00011A
1 piece
Side Burner Valve Assembly
RCOZZ00323A
1 set
Flavor Grid
SBNMC00392A
1 piece
Side Burner Grate
RCOLC00009A
1 piece
Main Burner Tube
RCOQG00005A
1 piece
Side Burner Casting
RCOZZ00140A
1 piece
Cart base
SWLCD00535A
1 set
Side Burner Cap
RCOCC00001A
1 piece
16
18

19 19
REPLACEMENT PARTS
Side Shelf
SASCD00526B
1 set
Cart Back
SBNCD00545A
1 set
Igniter Right with 5 Poles
RCOZZ00027A
1 piece
Tank Fixing Ring
RCOZE00015A
1 piece
Regulator
RCOZZ00125A
1 set
Drawer
SASCD00541A
1 set
Drip Pan
RCOCC00004A
1 piece
Middle bar
SBNJB00213A
1 set
Cart left
SASCD00544A
1 set
Front Top Rail
SBNCD00546A
1 set
Cart Middle
SBNJB00212A
1 set
Door
SBNCD00542A
1 set
Cart right
SASCD00544B
1 set
Door handle
SASQG00030A
1 set

20 20
REPLACEMENT PARTS
Base
SBNCB00543A
1 set
Not Shown:
RCOZZ00276A Side Burner Igniter w/ wire 300mm
RCOZZ00313A Main Burner Igniter w/ wire 400mm
RCOZZ00213A Main Burner Igniter w/ wire 540mm
RCOZZ00214A Main Burner Igniter w/ wire 740mm
RCOZZ00215A Main Burner Igniter w/ wire 920mm
RCOZZ00316A “Surere”Logo
Caster Swivel With Lock
RCOZZ00218A
1 set
Caster Swivel
RCOZZ00219A
1 set
/