Page is loading ...

Balance de la Hoja
Instale un clavo en una viga o pared, dejando expuesto como una pulgada (2,5 cm).
Cuelgue la hoja horizontalmente en el clavo por el orifico central de la hoja. Si la hoja
permanece en esa posición, está balanceada. Si un lado de la hoja se mueve hacia abajo,
utilice la piedra de amolar (sin la guía) para retirar cantidades pequeñas de material del final
del extremo de ese lado de la hoja. Retire justo suficiente material del extremo para llevar la
hoja a una parada balanceada sobre el clavo.
Afilado de Otras Herramientas de Jardín
El accesorio afilador también puede usarse para afilar otras herramientas manuales de
jardín como palas, azadones, tijeras de podar que quedan en la guía. Coloque el accesorio
afilador sobre el borde biselado de la hoja de la herramienta y siguiendo el ángulo del bisel,
pase el afilador por el borde de la herramienta de jardín varias veces con la misma
velocidad y presión hasta afilarla.
Lawn Mower and Garden Tool Sharpener Model 675
Lawn Mower and Garden Tool Sharpener Operation
Operación del Afilador para Cortadoras de Césped y
Herramientas de Jardín
Utilisation de l’affûteuse pour tondeuse à gazon et outils
de jardinage.
Lawn Mower and Garden Tool Sharpener Installation
Instalación del Afilador para Cortadoras de Césped y
Herramientas de Jardín
Installation de l’aiguisoir des lames de tondeuse et outils
de jardinage
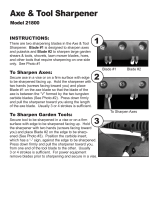
1. Unscrew the housing cap from the tool. Replace collet nut. See figure 1.
2. Insert a new or newly dressed Dremel #932 Aluminum Oxide Grinding Stone all the
way into the collet and tighten the collet nut. The bit must be inserted far enough
into the collet so that the tip does not touch the attachment. See figure 2.
3. Screw the lawn mower or garden tool sharpener attachment onto the Dremel
Rotary Tool housing. See figure 3 & 4.
Sharpen Blade
Place removed blade into a vise or clamp. Position sharpener attachment over the beveled
edge of the blade, keeping at the angle of the guide following the angle of the existing
beveled edge. Turn on rotary tool and pass over each end of the blade an equal number of
times, at the same speed and pressure to keep the blade in balance until edge is sharp.
Afilador Modelo 675 para Cortadoras de Césped y
Herramientas de Jardín – Modelo 675
Use for sharpening rotary lawn mower blades.
1: Desenrosque la tapa de cubierta del casco de la herramienta. Reinstale la tuerca
del collarín. Vea la figura 1.
2: En el collarín inserte hasta el fondo una piedra esmeril, nueva o rectificada,
Dremel No. 932 de óxido de aluminio y vuelva a ajustar la tuerca del collarín. La
mecha debe insertarse lo suficiente dentro del collarín para que la punta no haga
contacto con el accesorio. Vea la figura 2.
3: Enrosque el accesorio para afilar cortadoras de césped o herramientas de
jardínen el casco de la herramienta rotativa Dremel. Vea la figura 3 y 4.
Afilado de Hojas
Una vez que desmonte las hojas, colóquelas en una prensa. Coloque el accesorio afilador
sobre el borde biselado de la hoja, manteniendo el ángulo de la guía. Haga funcionar la
herramienta rotativa y, siguiendo el ángulo del bisel, pásela por el borde de cada extremo
de la hoja igual número de veces, con la misma velocidad y presión para mantener el
balance, hasta que el borde quede con filo.
Affûtage de la lame
Placez la lame enlevée de la tondeuse dans un étau ou une pince. Placez le dispositif
d’affûtage sur l’arête en biseau de la lame en vous assurant que le dispositif est au même
angle que celui de l’arête en biseau. Mettez l’outil rotatif en marche et déplacez le dispositif
tout au long de chaque section de la lame au même nombre de reprises, à la même vitesse
et en y appliquant la même pression, pour assurer que la lame est bien équilibrée.
Para afilar las cuchillas de cortadoras de césped rotativas.
Équilibrage de la lame
Enfoncez un clou dans une poutre ou dans un mur. Assurez-vous que le clou dépasse du
mur par au moins un pouce. Placez l’orifice central de la lame sur la tête du clou et placez la
lame en position horizontale. Si la lame est bien équilibrée, elle devrait demeurer en position
horizontale. Si un côté de la lame se déplace vers le bas, utilisez la pierre d’affûtage (sans
le guide) pour retirer de petites quantités de matériau de l’extrémité de ce côté de la lame.
Retirez seulement suffisamment de matériau de cette extrémité pour amener la lame à un
arrêt équilibré sur le clou.
Affûtage d’autres outils de jardinage
Le dispositif d’affûtage peut être utilisé pour affûter d’autres outils de jardinage
non-motorisés, par exemple toute pelle, pioche ou cisaille à émonder pouvant s’insérer dans
le guide. Placez le dispositif d’affûtage sur l’arête en biseau de l’outil à affûter. En suivant
l’angle de l’arête en biseau, déplacez le dispositif tout au long de la lame, en y appliquant
une pression ou une vitesse uniformes, jusqu’à ce que la lame soit bien affûtée.
Aiguisoir des lames de tondeuse et d’autres outils
de jardinage. – Modèle 675
1. Dévissez le capuchon du boîtier. Remettez en place l’écrou du mandrin. (Voir Fig. 1)
2. Insérez complètement dans le mandrin une pierre d’affûtage en oxyde
d’aluminium Dremel #932 neuve ou récemment apprêtée. Resserrez le capuchon
du boîtier. La mèche doit être insérée assez profondément dans le mandrin de
façon à ce que le bout ne touche pas le dispositif. (Voir Fig. 2)
3. Vissez le dispositif d’affûtage pour tondeuse ou outils de jardinage dans le boîtier
de l’outil rotatif Dremel. (Voir Fig. 3 et 4)
À utiliser pour affûter les lames de tondeuse rotative.
Balance Blade
Drive a nail into a beam or wall. Leave about one inch of straight nail exposed. Place the
center hole of the blade over the head of the nail with the blade in a horizontal position. If the
blade is balanced, it should remain in a horizontal position. If one side of the blade moves
downward, use the grinding stone (without the guide) to remove small amounts of material
from the very end of that side of the blade. Remove just enough material from the end to
bring the blade to a balanced stop on the nail.
Sharpening other Garden Tools
The sharpener attachment may be used to sharpen other non-motorized lawn and garden
tools such as shovels, hoes and pruning shears that will fit in the guide. Position sharpener
attachment over beveled edge of tool to be sharpened. Following the angle of the existing
beveled edge with the angle of the guide, pass over the edge of the garden tool at an even
speed and pressure until it's sharp.
2610010410 02/10
GARDEN TOOL
SHARPENER
WARNING
!
Consult your lawn mower owner’s manual for blade maintenance, blade
removal, and reinstallation instructions. Cracks in blade body or
improper blade removal and reinstallation may lead to serious injury.
WARNING
!
Inspect the blade for cracks or missing sections.
Replace blade if found cracked or damaged. Cracked or damaged blades
can break apart under operation.
WARNING
!
Wear eye protection, gloves, and a dust mask.
The operation of any power tool can result in foreign objects being thrown
into the eyes which can result in eye damage. Lawn mower blades have
sharp edges which can lacerate hands. Grinding operations generate
particles which can be inhaled.
WARNING
!
Use only Dremel #932 sharpening stone with this attachment. Other
stones may not fit attachment or be properly sized or speed rated.
WARNING
!
To reduce the risk of injury, user must read and understand the tool
instruction manual and this instruction sheet.
WARNING
!
Stone grabbing on the blade corner can kick back and cause loss
of control.
ADVERTENCIA
!
Para reducir el riesgo de lesiones, el usuario debe leer y
compreder el manual de instrucciones de la herramienta y esta
hoja de instrucciones.
ADVERTENCIA
!
Consulte el manual del usuario de la cortadora de césped para las
instrucciones sobre el mantenimiento, desmontaje y reinstalación
de la cuchilla. Las rajaduras en la cuchilla, el desmontaje o
la reinstalación inadecuadas pueden causar lesiones
personales serias.
ADVERTENCIA
!
Inspeccione si las hojas tienen rajaduras o partes faltantes.
De ser así, reemplácelas porque se pueden romper cuando
estén operando.
ADVERTENCIA
!
Use protección ocular, guantes y máscara antipolvo.
La operación de cualquier herramienta eléctrica puede lanzar objetos a
los ojos causándoles lesiones. Las hojas de las máquinas cortadoras
de césped son filosas y pueden lacerar las manos. Las operaciones de
esmerilado generan partículas que se pueden inhalar.
ADVERTENCIA
!
Sólo use piedras de afilar Dremel No. 932 en este accesorio. Otras
piedras podrían no entrar bien, no ser del tamaño adecuado o ser
inadecuadas para la velocidad de la herramienta.
ADVERTENCIA
!
Agarrar la piedra con la esquina de la cuchilla puede causar
contragolpe y pérdida de control.
AVERTISSEMENT
!
Pour réduire le risque de blessures, l’utilisateur doit lire et
comprendre le guide de directives de l’outil et cette fiche
de directives.
AVERTISSEMENT
!
N’utilisez avec ce dispositif que la pierre d’affûtage Dremel
#392. Toute autre pierre pourrait ne pas convenir au dispositif
ou pourrait ne pas avoir les cotes de taille ou de vitesse
requises.
AVERTISSEMENT
!
Consultez le Guide de l’utilisateur de la tondeuse à gazon pour
les instructions de démontage, d’entretien et de réinsertion de
la lame. Les fissures dans la lame ou un démontage ou
réinsertion inappropriés de la lame peuvent entraîner des
blessures corporelles.
AVERTISSEMENT
!
Inspectez la lame pour vous assurer de l’absence de
craquelures ou de sections manquantes. Si la lame est
craquelée ou endommagée, remplacez-la. Les lames craquelées ou
endommagées peuvent se briser pendant l’usage.
AVERTISSEMENT
!
Portez une protection des yeux, des gants et un masque
anti-poussière. L’usage de tout outil mécanique peut projeter dans
les yeux des corps étrangers, ce qui pourrait causer des blessures
aux yeux. Les lames de tondeuse comportent des arêtes vives, ce
qui risque de causer des lacérations aux mains. Les travaux de
meulage produisent des particules pouvant être inhalées.
AVERTISSEMENT
!
L'agrippement par la meule du coin de la lame peut provoquer
un recul et causer une perte du contrôle.
FIG. 2
DREMEL #932
DREMEL No. 932
COLLET NUT
ÉCROU DU MANDRIN
TUERCA DEL COLLARÍN
FIG. 3
FIG. 1
HOUSING CAP
CAPUCHON DU BOÎTIER
TAPA DE CUBIERTA
Attachment for use with Dremel Rotary Tool Models 100, 200, 300, 400, 4000, 770
800, 275, 285, 395, 398 & 8200.
Accessoire pour usage avec l'outil rotatif Dremel modèle 100, 200, 300, 400, 4000, 770
800, 275, 285, 395, 398 et 8200.
Aditamento sólo para uso en Herramientas Rotativas Dremel Modelos 100, 200,
300, 400, 4000, 770, 800, 275, 285, 395, 398 y 8200.
LAWN MOWER
SHARPENER
AFFÛTEUR DE
TONDEUSE
OUTILS
DE JARDINAGE
AFILADOR DE CORTADORAS
DE CÉSPED
FIG. 4
GARDEN TOOL SHARPENER
OUTILS DE JARDINAGE
HERRAMIENTAS DE JARDÍN
HERRAMIENTAS
DE JARDÍN
8
LAWN MOWER SHARPENER
AIGUISOIR DE TONDEUSE
AFILADOR DE CORTADORA
DE CÉSPED

Your new chain saw sharpening attachment kit will fit on Dremel rotary tool
models 275, 285, 395, 398, 850 and 780. When attached to a Dremel rotary
tool, the Chain Saw Sharpening attachment will sharpen nearly all popular
sizes of chain if you follow these simple instructions.
ASSEMBLY OF CHAIN SAW SHARPENING ATTACHMENT
Because there are different sizes and types of chains used on different saws,
your new sharpener must be assembled to suit your particular chain. To do
this:
1. First determine the size and pitch of your saw chain. Refer to your chain
saw owner’s manual, your chain saw instruction manual or contact the chain
manufacturer for this information.
2. Refer to the chart below for the correct grinding stone.
3. When you have determined the correct grinding stone for your chain from
the chart, assemble attachment by screwing the guide (B) and appropriate
number of spacers (C) to the clamp (D) using the two screws (A), as shown
in figure 1.
• If using the 7/32" diameter (pink) grinding stone, assemble both spacers
between the guide and the clamp.
• If using the 3/16" diameter (orange) grinding stone, assemble with only one
spacer between the guide and the clamp.
• If using the 5/32" diameter (blue) grinding stone, no spacers are needed.
4. Securely mount the correct grinding stone in your tool with approximately
1/4" of the shank exposed between the chuck cap and the stone (Figure 2).
Use the rotary tool wrench to securely tighten the chuck cap.
5. Remove the housing cap from your rotary tool and screw on the chain saw
sharpening attachment (Figure 3).
6. Using the appropriate side of the gauge (E) (see above chart), check to see
if the guide (B) is properly positioned in respect to the grinding stone (F). The
gauge must be flush with the corner (G) of the guide while making contact with
the grinding stone (Figure 4).
If the guide is not properly positioned, use a screwdriver (the end of the gauge
has a screwdriver (H) on it) to loosen the two guide mounting screws (A)
enough so the guide can be moved (I). It has elongated holes to allow for
adjustment. Using the appropriate side of the gauge, adjust the guide so it is
properly positioned in respect to the grinding stone and tighten the screws.
SHARPENING THE CHAIN
1. Set your saw on a flat, solid surface so it will not slip while you are sharp-
ening the chain. The chain tension should be adjusted as specified in the
Chain Saw Owner’s Manual. If it is too loose, the teeth will move, resulting in
a poor sharpening job.
Sharpening will be best accomplished if done on the flat of the saw bar –
somewhere near the middle of the bar.
2. The saw should first be positioned so that you are looking at the side of the
chain bar with the motor to your right. Cutter teeth on the far side of the chain
are sharpened, from inside to outside, or away from you, as shown in Figure
5. The guide (B) should be laid flat on the tooth with the 30º index line (L) par-
allel with the chain. This index line should be aligned by eye with the chain.
Two or three light strokes are usually enough unless the cutters have been
damaged. Sharpen all cutters equal. Start with the cutter with the most visual
damage (i.e. nicks or gouges) and sharpen all cutters back equally. Do not
remove excessive material as this only shortens the life of the chain.
Note: Sharpen cutter teeth (J) only, not the depth gauge (K).
3. When all of the teeth on the top of the bar have been sharpened, advance
the chain using a glove or a rag to protect your hand, by pulling the chain
toward the end of the bar. Repeat until all the teeth on the far side of the chain
have been sharpened.
4. Turn the saw around so that you are looking at the side of the chain bar with
the motor to your left. Sharpen the cutter teeth on the far side of the chain,
from inside to outside, or away from you, as shown in Figure 6. The guide
should be laid flat on the tooth with the 30º index line parallel with the chain.
Repeat the process above to sharpen all of the cutter teeth on the far side of
the chain.
5. After your chain has been sharpened a number of times, you may find that
it does not cut as fast as you feel it should. Each cutter on your chain has a
depth gauge (K) just ahead of the cutting edge (J) that determines how big a
bite it can take. To check for proper depth of the cut, lay a metal straight edge
across the tops of the cutting edges, as shown in Figure 7, and check the
dimension indicated. This dimension should be approximately equal to the
thickness of the gauge furnished with your chain saw sharpening kit. If it is
not, file or grind the chain depth gauge until the clearance is approximately
equal to the thickness of the sharpening kit gauge. Be careful to maintain its
shape. Do not remove more material than necessary or you will overload your
saw. Also, be careful to keep this depth gauge setting uniform on all cutter
teeth or you will not be able to make a straight cut.
CODE NO. PART NO. DESCRIPTION
1 1453 Sharpening Attachment, Complete
2 990869 Gauge & 2 Spacers
3 453 5/32" Grinding Wheel, Blue
4 454 3/16" Grinding Wheel, Orange
5 455 7/32" Grinding Wheel, Pink
Fig. 2
1/4"
Fig. 1
D
C
B
A
Fig. 4
Side 1
HOUSING CAP
CAPUCHON DU BOÎTIER
TAPA DE LA CARCASA
E
B
H
A
A
I
F
G
Fig. 3
VIEW: looking down at the tip of the tool with guide
mounting screws to the left.
VUE vers la pointe de l’outil avec les vis de montage
du guide à gauche
VISTA: Mirando hacia abajo, hacia la punta de la her-
ramienta, con los tornillos de montaje de la guía ubi-
cados a la izquierda.
Fig. 5
30º
30º
Fig. 6
Fig. 7
ORDERING INFORMATION - refer to figure 8.
Fig. 8
CHECK THIS DIMENSION
CONTRÔLEZ CETTE COTE
COMPRUEBE ESTA DIMENSIÓN
30º
30º
Chain Saw Sharpening Attachment Kit
Owner’s Manual - Model 1453
Read and understand these instructions and the chain saw manual for complete details for sharpening and use of the chain saw. Failure to follow all
instructions and warnings may lead to injury.
WARNING
!
Disconnect electrical plug or
spark plug lead from the power
source. Accidental start up could cause serious per-
sonal injury.
Wear eye protection and dust
mask. Grinding action will cause
dust and sparks.
Teeth of chain must be sharpened
equally and evenly. Uneven teeth
can cause the saw to kickback and excessive wear to
the bar.
CHAIN SAW SHARPENING WARNINGS
WARNING
!
WARNING
!
WARNING
!
Disconnect electrical plug or
spark plug lead from the power
source. Accidental start up could cause serious per-
sonal injury.
Débranchez la prise ou le fil
de bougie. Tout démarrage
intempestif risque de causer des blessures corporelles
graves.
Desconecte de la fuente de ali-
mentación el enchufe eléctrico
o el hilo de conexión de la bujía. Un arranque acci-
dental podría causar lesiones personales graves.
WARNING
!
WRITE FOR CURRENT PRICES - NO C.O.D.'S
UNITED STATES
Dremel Service Center
4915 Twenty-First Street
Racine, WI 53406
Dremel Service Center
4631 E. Sunny Dunes
Palm Springs, CA 92264
OUTSIDE OF
CONTINENTAL UNITED STATES
See your local distributor or write
to: Dremel,
4915 Twenty-First Street,
Racine, WI 53406
2
3
4
5
1
Grinding Grinding Grinding
Chain Wheel Size Wheel Wheel Guide
Size / Pitch (Diameter) Color Catalog No. Gauge
1/4" PITCH 5/32" Blue 453 Side 1
3/8" PITCH 7/32" Pink 455 Side 1
3/8" PITCH LOW PROFILE (LP) 5/32" Blue 453 Side 1
.325" PITCH 3/16" Orange 454 Side 1
2610913947 5/01 PRINTED IN U.S.A.
SAW MOTOR
MOTEUR DE LA
TRONÇONNEUSE
MOTOR DE LA
SIERRA
J
K
K
J
J
K
SAW MOTOR
MOTEUR DE LA
TRONÇONNEUSE
MOTOR DE LA
SIERRA
B
L
B
L
ADVERTENCIA
!
AVERTISSEMENT
!
/