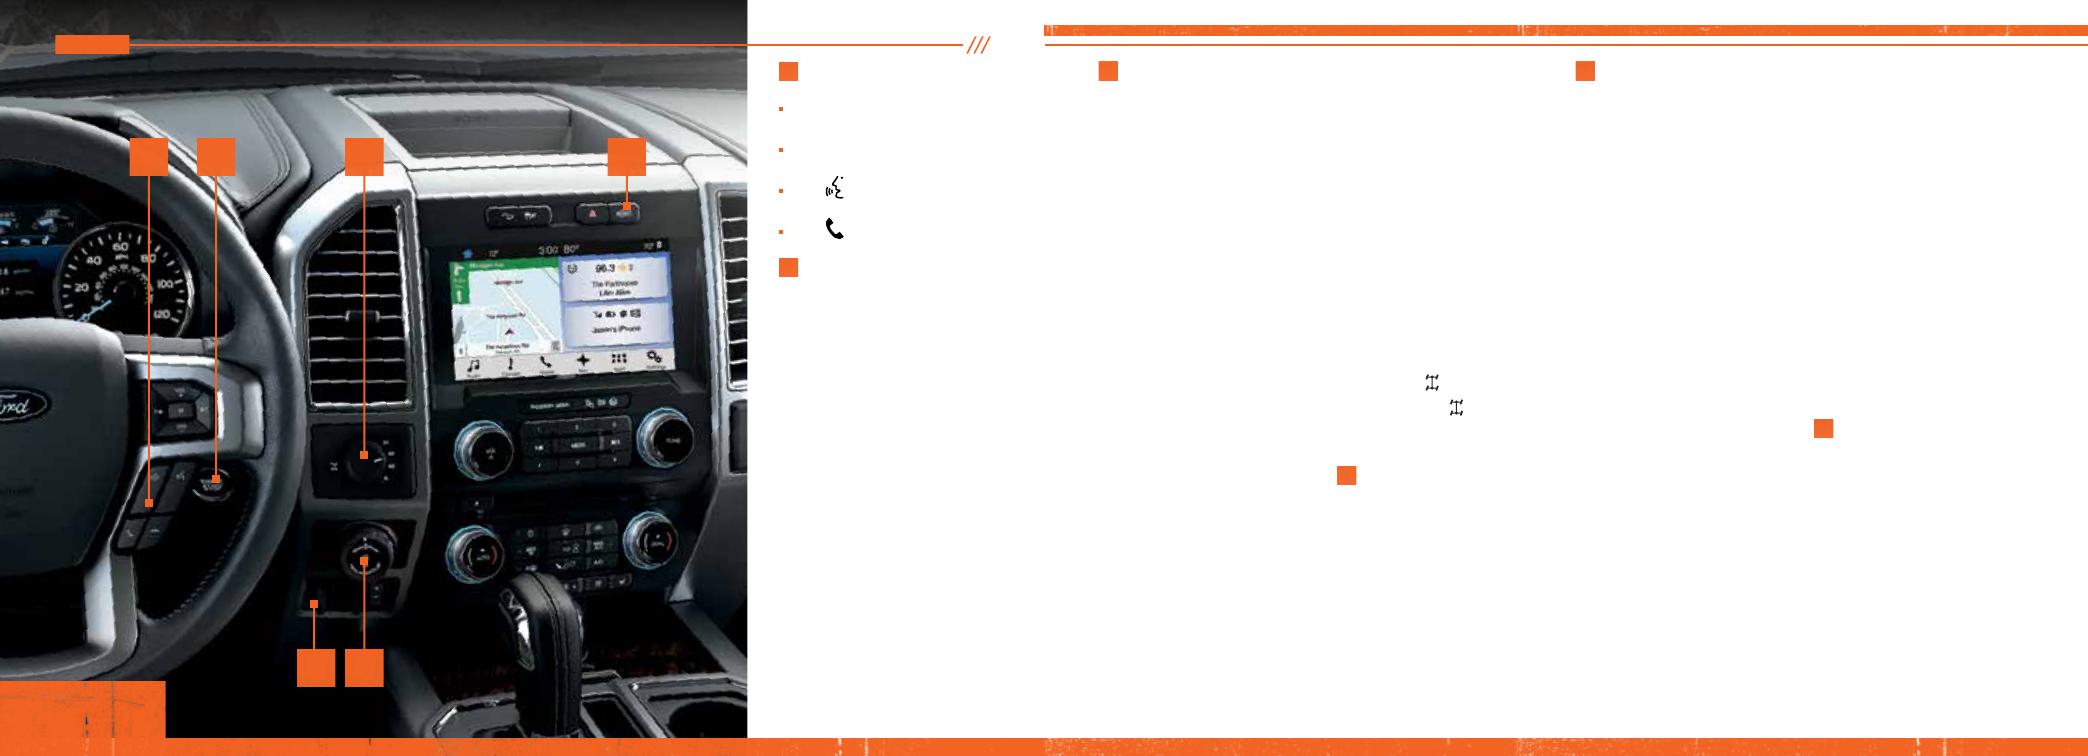
Ford 2018 F-150 Reference guide

Category
Mobile phones
Type
Reference guide

Ford 2018 F-150: Conquer any terrain with its powerful engine options, advanced 4-wheel drive system, and innovative features like the electronic locking differential for enhanced traction. Experience seamless connectivity with SYNC 3, featuring voice commands, navigation, and smartphone integration. Stay informed and entertained with the information display, showcasing customizable views and essential vehicle data. Enhance your driving experience with adjustable pedals, power-folding mirrors, and a power tilt-telescope steering column.

Ford 2018 F-150: Conquer any terrain with its powerful engine options, advanced 4-wheel drive system, and innovative features like the electronic locking differential for enhanced traction. Experience seamless connectivity with SYNC 3, featuring voice commands, navigation, and smartphone integration. Stay informed and entertained with the information display, showcasing customizable views and essential vehicle data. Enhance your driving experience with adjustable pedals, power-folding mirrors, and a power tilt-telescope steering column.

4 - 5
WARNING
Driving while distracted can result in loss of vehicle control, crash and injury. We strongly recommend
that you use extreme caution when using any device that may take your focus off the road. Your primary
responsibility is the safe operation of your vehicle. We recommend against the use of any hand-held
device while driving and encourage the use of voice-operated systems when possible. Make sure you are
aware of all applicable local laws that may affect the use of electronic devices while driving.
May 2017
First Printing
Quick Reference Guide
F-150
Litho in U.S.A.
JL3J 19G217 AA
LEARN MORE ABOUT YOUR NEW VEHICLE
Scan the country-appropriate QR code with your smartphone (make
sure you have a scanner app installed) and you can access even
more information about your vehicle.
ford.ca
owner.ford.com
This Quick Reference Guide is not intended to replace your vehicle Owner’s Manual which contains more
detailed information concerning the features of your vehicle, as well as important safety warnings
designed to help reduce the risk of injury to you and your passengers. Please read your entire Owner’s
Manual carefully as you begin learning about your new vehicle and refer to the appropriate chapters when
questions arise. All information contained in this Quick Reference Guide was accurate at the time of
duplication. We reserve the right to change features, operation and/or functionality of any vehicle
specication at any time. Your Ford dealer is the best source for the most current information. For detailed
operating and safety information, please consult your Owner’s Manual.
United States
Ford Customer Relationship Center
1-800-392-3673 (FORD)
(TDD for the hearing impaired:
1-800-232-5952)
owner.ford.com
@FordService
Canada
Ford Customer Relationship Centre
1-800-565-3673 (FORD)
(TDD for the hearing impaired:
1-888-658-6805)
ford.ca
@FordServiceCA
F-150
2018
QUICK REFERENCE GUIDE
COMMONLY USED VOICE COMMANDS
Press the voice button and then say:
4 - 5
4 – 9 INSTRUMENT PANEL
10 – 11 SYNC
12 – 16 SYNC 3
17 CONVENIENCE
18 COMFORT
19 – 21 FUNCTION
22 – 23 ESSENTIAL INFORMATION
BASIC COMMANDS
Main menu
1
Go back
1
Cancel
List of commands
1
Next page
1
Previous page
1
Help
AUDIO
AM <530-1710>
FM <87.9-107.9>
USB
Bluetooth audio
Sirius <0-233>
2
<Sirius channel name>
2
APPS
List mobile apps
Find new apps
PHONE
Phone list of commands
Pair phone
Call <name>
Call
<name> <on cell/at home/
at work>
Dial <number>
Listen to message
1
CLIMATE
1
Climate list of commands
Climate set temperature
<# degrees>
NAVIGATION
1, 2
Navigation list of commands
Destination <home/
previous destination>
Find
<an address/POI/intersection>
Show route
Where am I?
SiriusXM Trafc and Travel Link
2
list of commands
Show
<trafc/weather map/
5-day forecast/fuel prices>
– Help
Some services may not be available in your area. Refer to your Owner’s Manual, visit the
website or call the toll-free number.
FOR U.S. CUSTOMERS:
Visit owner.ford.com or call 1-800-392-3673 (select Option 1 or 2 for language, then Option 3).
FOR CANADIAN CUSTOMERS:
Visit syncmyride.ca or call 1-800-565-3673 (select Option 1 or 2 for language, then Option 3).
TABLE OF CONTENTS
1
only available with SYNC 3
2
if equipped
INSTRUMENT PANEL
2
SPOT LAMPS CONTROL*
The spot lamps are on the
forward-facing side of the exterior
mirrors. With the lighting control
switch in the parking lamps
position, press the buttons located
above the lighting control switch to
activate the left-hand or right-hand
side spot lamps. Once switched
on, the spot lamps light the area
in front of and to the side of your
vehicle. Adjust the aim of the spot
lamps by moving the exterior
mirrors' positions.
Note: The spot lamps turn off
when you reach a speed of 6 mph
(10 km/h).
3
LIGHTING CONTROL
Headlamps off.
Parking lamps on.
Headlamps on.
Autolamps on.
Automatically switches the
exterior lamps on or off
based on available daylight.
Fog lamps on. Press the
control to switch the fog
lamps on or off. You can
switch the fog lamps on
when the lighting control is
in any position except off
and the high beams are
not on.
4
ELECTRIC PARKING BRAKE*
On certain models, the electric
parking brake replaces the
conventional foot brake. The
operating switch is on the
instrument panel, to the left
of the steering column.
To apply the electric parking brake,
make sure the transmission is
locked into park (P), and then
pull the
switch up. The brake
system warning lamp ashes then
lights to conrm that you applied
the brake.
To release the electric parking
brake, switch the ignition on, press
the brake pedal, and then manually
press the
switch down. The
brake system warning lamp then
turns off to conrm the parking
brake is released.
5
ADJUSTING THE PEDALS*
Move the brake and accelerator
pedals using the control. The
vertical control is to the left of
the steering column and on the
instrument panel. The horizontal
control is on the left side of the
steering column.
Press the left arrow
to move the
pedals away from you.
Press the right arrow
to move the
pedals closer to you.
Adjust the pedals only after
stopping your vehicle and placing it
in park (P).
6
INFORMATION DISPLAY
CONTROLS*
Monitor and control important
vehicle information and features
through the information display.
Press the up or down arrows
to scroll through and highlight the
options within a menu.
Press the right arrow to enter
into a sub-menu.
Press the left arrow to exit
a menu.
Press OK to choose and conrm a
setting or message.
You can even customize your views
using MyView.
Refer to the Information Displays
chapter in your Owner’s Manual for
more details.
7
ADAPTIVE CRUISE CONTROL*
Automatically adjust your speed to
maintain a set distance between
your vehicle and the vehicle in front
of you in the same lane. Set the
gap distance between your vehicle
and the vehicle in front of you by
pressing the
and controls on
the steering wheel.
If your vehicle follows a vehicle
to a complete stop and remains
stopped for less than three seconds,
your vehicle accelerates from a
stationary position to continue to
follow the vehicle.
If the vehicle you are following
comes to a complete stop and
remains stopped for more than
three seconds, press RES+ or the
accelerator pedal to continue follow
the vehicle.
Note: Driving aids do not replace
the need to watch when the
vehicle is moving and brake where
necessary. Refer to the Cruise
Control chapter in your Owner’s
Manual for more details.
8
POWER TILT-TELESCOPE
STEERING COLUMN*
Use the control on the side of
the steering column to adjust
the position.
To tilt: Press the top or bottom of
the control.
To telescope: Press the front or
rear of the control.
1
POWERSCOPE
®
POWER TELESCOPING,
POWER-FOLDING, POWER
EXTERIOR MIRRORS*
To telescope both mirrors at the
same time, make sure you switch
your vehicle on (with the ignition
in accessory mode or the engine
running) and then:
1. Press and release the power
fold button
.
2. Press the adjustment control to
position the mirrors.
Press the left arrow to
extend the mirrors out. Press
the right arrow
to retract the
mirrors in.
Press the up or down arrow
to fold the mirrors
toward the window glass.
Press the up or down arrow
to fold the mirrors out.
Note: Moving the mirrors 10 or
more times within one minute, or
repeated folding and unfolding
of the mirrors while holding the
control down during full travel,
may disable the system to protect
the motors from overheating. Wait
approximately three minutes with
the vehicle running, and up to
10 minutes with the vehicle off,
for the system to reset and for
function to return to normal.
1 3 5 62
87
4 - 54 - 5
*if equipped*if equipped
4
INSTRUMENT PANEL
11
FOUR-WHEEL
DRIVE CONTROL*
The electronic shift 4WD system
allows you to choose between
the following:
2H (4x2) sends power to the rear
wheels only and should be used for
street and highway driving. Provides
optimal smoothness and fuel
economy at high speeds.
4A (4x4 AUTO)* provides
electronic control four-wheel drive
with power delivered to the front
and rear wheels, as required,
for increased traction. This is
appropriate for all on-road driving
conditions, including dry road
surfaces, but is especially useful on
wet pavement, snow, dirt or gravel.
4H (4x4 HIGH) Provides
electronically locked four-wheel
drive power to both the front and
rear wheels for use while driving
in snow or on icy roads or off-
road situations. This mode is not
intended for use on dry pavement.
4L (4x4 LOW) uses extra gearing to
provide maximum power to all four
wheels at reduced speeds. Intended
only for off-road applications such
as deep sand, steep grades or
pulling heavy objects. 4L (4x4 LOW)
does not engage while the vehicle is
moving above 3 mph (5 km/h); this
is normal and should be no reason
for concern.
Refer to Shifting to or from 4L
(4x4 LOW) in the Four-Wheel Drive
chapter in your Owner’s Manual
for details.
ELECTRONIC LOCKING DIFFERENTIAL*
The electronic locking differential
is a device housed in the rear axle
that allows both rear wheels to turn
at the same speed. The electronic
locking differential can provide
additional traction should your
vehicle become stuck.
Note: Do not use this feature on dry
pavement or hard-surfaced roads.
To use:
4X4: Pull the 4WD control knob
toward you.
4X2: Turn the
control to ON.
The indicator light
continuously
displays in the instrument cluster
when the ELD is active.
12
PRO TRAILER
BACKUP ASSIST*
The Pro Trailer Backup Assist
control knob helps assist you in
backing up your trailer. Turn the
knob in the direction you want the
trailer to go and the system will
take over the steering to get
it there.
This system will not work until you
set it up. See the Pro Trailer Backup
Assist Quick Start Guide in your
Owner's Manual information
for the complete set up and
operation details.
13
INTEGRATED TRAILER
BRAKE CONTROLLER
The fully integrated trailer brake
controller assists in smooth and
effective trailer braking by powering
the trailer’s electric or electric-over
hydraulic brakes with a proportional
output based on the towing vehicle’s
brake pressure.
The Gain setting is used to set the
trailer brake controller for specic
towing conditions and should be
changed as towing conditions
change. Changes to towing
conditions include trailer load,
vehicle load, road conditions
and weather.
Use the Gain + and adjustment
buttons to increase or decrease the
braking feature’s power output to
the trailer in 0.5 increments.
Adjust the Gain by:
1. Pressing the + or buttons
to increase or decrease the
setting to the desired starting
point. For example, a Gain
setting of 6.0 is a good starting
point for heavier loads.
2. Test the adjusted Gain
setting again after you
make adjustments.
When testing:
A. In a trafc-free environment,
tow the trailer on a dry,
level surface at a speed of
20-25 mph (30-40 km/h)
and squeeze the manual
control lever completely.
B. If the trailer wheels lock
up (the tires will squeal),
reduce the Gain setting. If
the trailer wheels turn freely,
increase the Gain setting.
C. The proper Gain setting will
be at the point just below
trailer wheel lock-up.
Note: If towing a heavier trailer,
trailer wheel lock-up may not be
attainable even with the maximum
Gain setting of 10.
14
360 DEGREE CAMERA*
See page 19 for details.
9
AUDIO AND MEDIA
CONTROLS
Press VOL+ or VOL– to increase
or decrease your volume level.
Press M repeatedly to access all
possible media sources.
Press to access
voice recognition*.
Press to answer calls.
10
KEYLESS STARTING*
An indicator light comes on when
the ignition is on and when the
engine starts.
If you leave your vehicle idling for
an extended period of time, the
engine and ignition automatically
turn off.
Before the engine shuts down, a
message appears in the information
display allowing the driver time to
override the shutoff feature.
Note: Your intelligent access
transmitter must be inside your
vehicle to switch the ignition on
and start the engine.
11
12
10 149
4 - 56 - 7
*if equipped*if equipped
13
INSTRUMENT PANEL
16
ADVANCETRAC
®
WITH
ROLL STABILITY CONTROL™
(RSC
®
) STABILITY
ENHANCEMENT SYSTEM
The AdvanceTrac stability system
helps you to keep control of your
vehicle when on a slippery surface.
The electronic stability control
portion of the system helps avoid
skids and lateral slides. Roll stability
control helps avoid a vehicle
rollover. The traction control system
helps avoid drive wheel spin and
loss of traction. You can switch the
system off manually
.
Refer to the Stability Control
chapter in your Owner’s Manual for
more details.
TRAILER SWAY CONTROL*
The feature applies your vehicle
brakes at individual wheels and, if
necessary, reduces engine power.
If the trailer begins to sway, the
stability control light ashes
.
The rst thing to do is slow your
vehicle down, then pull safely to
the side of the road and check for
proper tongue load and trailer
load distribution.
For more information, please refer
to the Towing chapter in your
Owner’s Manual.
17
DRIVE CONTROL
The Selectable Drive Mode System
optimize steering, handling and
powertrain response. Changing the
drive mode automatically changes
the functionality of the electronically
power-assisted steering system,
the electronic stability control and
traction control, the electronic
throttle control and the driveline
settings. The system automatically
tailors your vehicle conguration
for each mode you select on the
column shifter or console shifter.
Note: Mode changes are not
available when the vehicle ignition
is off or when in reverse (R).
Available modes may include:
Normal – For everyday driving.
Tow Haul – For improved
transmission operation when towing
a trailer or a heavy load.
Snow/Wet – For use during
inclement weather conditions
EcoSelect – Offers the best
possible fuel economy with
tradeoffs in vehicle performance
and comfort.
Sport – Use for spirted
and aggressive off road
driving situations.
Note: Your vehicle may only be
equipped with some of the drive
modes listed above.
For move information on Drive
Control, please refer to the
Driving Aids chapter in your
Owner's Manual.
18
HAZARD WARNING
FLASHER CONTROL
19
AUTO-START-STOP*
On certain models, the system
helps reduce fuel consumption
by automatically shutting off and
restarting the engine while at
a stop. The engine will restart
automatically when you release
the brake pedal.
To switch this feature off, press the
Auto-Start-Stop button
on the
center console. The button lights.
Note: The system automatically
turns off when you switch on tow or
4x4 mode.
See the Unique Driving
Characteristics chapter in your
Owner's Manual for more details.
20
110 VOLT - 400 WATT
CAPACITY AC POWER OUTLET
You can use the power outlet when
your vehicle is running to power
many electric devices, including but
not limited to:
Electric hand drills.
Rechargeable power tools.
Video games.
Laptops.
Television screens.
Other power points and outlets are
in the center console.
See the Auxiliary Power Points
chapter in your Owner's Manual
for details.
Note: Do not use any extension
cord with the 110 volt AC power
outlet since it will defeat the safety
protection design.
15
HILL DESCENT CONTROL
The feature helps you set and
maintain vehicle speed while
descending steep grades on
various surface conditions. This
feature can maintain vehicle
speeds on downhill grades
between 2 mph (3 km/h)
and 20 mph (32 km/h).
At speeds between 20 mph
(32 km/h) and 40 mph (64 km/h),
the system remains armed, but
descent speed cannot be set
or maintained.
At speeds above 40 mph (64
km/h), the system will turn off
and you need to switch the system
back on to use.
To switch this feature on and
set the descent speed, do
the following:
1. Press and release the hill
descent button
located on
the instrument panel. A light in
the control turns on and a
tone sounds.
2. To increase descent speed,
press the accelerator pedal until
you reach the desired speed. To
decrease descent speed, press
the brake pedal until you reach
the desired speed.
For more detailed information,
please refer to your
Owner’s Manual.
15 16 18 19
20
4 - 58 - 9
*if equipped*if equipped
17
10 - 11
SYNC
®
*
GETTING STARTED WITH YOUR SYNC SYSTEM
PHONE MENU
Through your phone menu, you can access your call history, phone book,
text messages, phone settings and system settings.
Press the phone button to enter the phone menu. Then you can scroll
through the menu and select the feature you want to view.
SYNC MOBILE APPS
The system enables voice and steering wheel control of SYNC AppLink-
enabled smartphone apps. When an app is running through AppLink, you
can control the main features of the app through voice commands and
steering wheel controls.
Note: You must pair and connect your smartphone to SYNC to
access AppLink.
USING SYNC TO ACCESS DIGITAL MEDIA
Using the system, you can access media from your iPod, Bluetooth device,
and most USB drives. SYNC also supports audio formats, such as MP3,
WMA, WAV and ACC.
MEDIA SOURCES
Press the AUX button to view your sources. Use the directional arrows
and OK button to select your source. You can also use the steering wheel
audio controls.
*if equipped
SYNC is an in-vehicle communications system that works with your
Bluetooth enabled phone and portable media player.
SUPPORT
SYNC support is available from your Ford regional website:
www.syncmyride.com (United States)
www.syncmyride.ca (Canada)
DRIVING RESTRICTIONS
For your safety, certain features are speed-dependent and restricted
when your vehicle is traveling over 3 mph (5 km/h).
PAIRING YOUR PHONE WITH SYNC
Note: If you have SYNC 3*, see the pairing instructions on page 12.
Wirelessly pairing your phone with SYNC allows you to make and receive
hands-free calls.
TO PAIR YOUR PHONE FOR THE FIRST TIME
1. Make sure to switch on your phone’s Bluetooth feature before starting
the search. See your device’s manual if necessary.
2. Press the Settings button.
3. Select Bluetooth from the menu.
4. Press the OK button.
5. Select the option to add. This starts the pairing process.
6. When a message to begin pairing appears in the audio display, search
for SYNC on your device.
7. When prompted on your phone’s display, conrm that the PIN
provided by SYNC matches the PIN displayed on your phone. Your
phone is now paired and the display indicates that the pairing was
successful. If you are prompted to enter a PIN on your device, enter
the PIN displayed on the screen. The display indicates when the
pairing is successful.
Depending on your phone’s capability and your market, the system may
prompt you with questions, such as setting the current phone as the
primary phone and downloading your phone book.
PHONE CONTROLS
You can use the phone buttons on your steering wheel to answer, reject
or end a call.
HELPFUL HINTS
When using voice commands, make sure the interior of your vehicle
is as quiet as possible. Wind noise from open windows and
road vibrations may prevent the system from correctly recognizing
spoken commands.
Before giving a voice command, wait for the system announcement to
nish, followed by a single tone. Any command spoken before this
does not register with the system.
Speak naturally, without long pauses between words.
You can interrupt the system at any time while it is speaking by
pressing the voice button. You can cancel a voice session by pressing
and holding the voice button.
12 - 13
SYNC
®
3
*
A REVOLUTIONARY WAY TO CONNECT
WITH YOUR TRUCK
USING SYNC 3
The SYNC 3 system allows you to interact with a variety of features
using the touchscreen and voice commands. By integrating with your
Bluetooth enabled phone, the touchscreen provides easy interaction
with audio, multimedia, climate control, navigation, and your
phone's SYNC 3 compatible apps.
PAIRING YOUR PHONE WITH SYNC 3
Pair your Bluetooth enabled phone with the system
before using the functions in hands-free mode.
Switch on Bluetooth on your device to begin pairing.
See your phone’s manual if necessary.
1. Select Add Phone.
2. Follow the on-screen instructions.
3. A prompt alerts you to search for the system on
your phone.
4. Select your vehicle’s make and model as it
displays on your phone.
5. Conrm that the six-digit number appearing on
your phone matches the six-digit number on
the touchscreen.
6. The touchscreen indicates when the pairing
is successful.
7. Your phone may prompt you to give the system
permission to access information. To check your
phone’s compatibility, see your phone’s manual or
visit the website.
*if equipped
PHONE
After pairing your phone, you can access more phone-dependent features:
Your phone connects you with other features:
Recent call lists.
Contacts: Sort alphabetically and choose a specic letter to begin
viewing your entries.
Phone settings: Pair another phone, and set ring tones and alerts.
Text messages.
Do not disturb: Send all calls to your voice mail, and all ring tones
and alerts are set to silent mode.
Note: Use the voice commands to make calls. Say, Call James at
home or “Dial 555-1212”. You can use the touchscreen to place calls
as well. Refer to the SYNC 3 information in your Owner’s Manual for
complete details.
SMARTPHONE CONNECTIVITY
SYNC 3 allows you to use Apple CarPlay and Android Auto to access
your phone over a USB connection.
When you use Apple CarPlay or Android Auto, you can:
Make calls.
Send and receive messages.
Listen to music.
Use your phone’s voice assistant.
For more information, refer to the SYNC 3 chapter in your
Owner’s Manual for details.
NAVIGATION*
Select one of two ways to nd your destination:
Destination mode lets you key in a specic address or use a variety of
search methods to locate where you want to go.
Map mode shows advanced viewing of 2-D city maps, 3-D landmarks
and 3-D city models (when available).
See the SYNC 3 information in your Owner’s Manual for details.
SET A DESTINATION
Press Destination on your touchscreen and then press Search. Enter a
street address, intersection, city or a Point Of Interest (POI).
You can also use voice commands. Say, “Find a POI” and then select a
category, such as hotels or restaurants.
After you choose your destination, press Start. The system uses a variety
of screens and visible prompts to guide you to your destination.
The navigation map shows your estimated time of arrival, remaining travel
time or the distance to your destination.
NAVIGATION MENU
During active navigation, touch the bottom of the screen to view the menu,
and then select Screen View.
Full Map.
Highway Exit Info displays on the right side of the touchscreen. View
POI icons (restaurants, ATMs, etc.) as they pertain to each exit. You can
select a POI as a waypoint, if you wish.
Turn List shows all of the available turns on your current route.
14 - 15
SYNC
®
3
*
CLIMATE
Access climate control features, including the temperature, airow
direction, fan speed and other climate features for you and your
front passenger.
SET YOUR TEMPERATURE
Touch the Climate icon on the touchscreen.
Use voice commands to change your settings, like “Climate set
temperature 72 degrees” and SYNC 3 makes that adjustment.
You can also use the or buttons on the touchscreen.
APPS
The system supports the use of certain types of apps through USB or
Bluetooth enabled devices.
Each app gives you different on-screen options depending on the app’s
content. To nd new apps, use the voice command, "Find new apps".
For more information, refer to the SYNC 3 information in your Owner’s
Manual. For support, visit the website or call the toll-free number. See the
inside front cover of this guide for details.
SYNC CONNECT
With a SYNC® Connect-equipped vehicle, you can use FordPass® to track
your vehicle’s location and remotely access vehicle features such as start,
lock and unlock, and vehicle status including fuel level and approximate
mileage. It can also provide a Wi-Fi hotspot, if equipped and enabled.
You can also schedule specic times to remotely start your vehicle so
it is ready to hit the road as soon as you are.
SYNC Connect is an optional feature on select 2017 MY vehicles.
FordPass® is available through a free download via the Apple App
Store® or Google Play™. Message and data rates may apply. Services
may be limited by mobile phone network coverage area. Please visit
www.myfordpass.com for more information.
*if equipped
16 - 17
SYNC
®
3
*
AUDIO
No matter how you store your music, SYNC makes it yours to enjoy
when you are behind the wheel. Press the Audio icon on the touchscreen
and select.
Sources. Choose from AM, FM, SiriusXM*, CD, USB, Bluetooth Stereo
or Apps.
SET YOUR RADIO PRESETS
Tune to the station and then press and hold one of the preset buttons.
The audio mutes briey while the system saves the station, and then the
audio returns.
Two preset banks are available for AM and three banks for FM. To access
additional presets, tap the preset button. The indicator on the preset
button shows which bank of presets you are currently viewing.
BRING IN YOUR OWN MUSIC
Use SYNC to play all of your favorite music from phones, ash drives and
other devices.
Plug your device into a USB port, select Sources and then choose USB.
You can even create random playlists using the Shuffle function.
USB AND POWER POINT LOCATIONS
Depending on your vehicle, you may nd USB and power point outlets in
and around the center console, in the instrument panel and on the back of
the center console for rear-seat passengers. See the Storage Compartment
chapter in your Owner's Manual for more details.
MEMORY FUNCTION*
The feature automatically recalls
the position of the driver seat,
power mirrors, steering column
and adjustable pedals*. Use the
memory controls on the door panel
to program and then recall memory
positions. To program, switch the
ignition on.
1. Move the memory features to the desired positions.
2. Press and hold button 1 until you hear a tone.
3. Use this same procedure to set the second and third positions
using buttons 2 and 3, respectively.
Press a control to recall the set positions. You can also program
your memory seats to your transmitter. That way, when you
unlock your door with the transmitter, your memory features
automatically move into your saved positions.
See the Seats chapter in your Owner's Manual for
more details.
ADJUSTABLE HEAD RESTRAINTS
Adjust the seatback to an upright driving position before
adjusting the head restraint. Adjust the head restraint so that
the top of it is level with the top of your head and as far forward
as possible. Make sure that you remain comfortable. To raise,
pull up on the head restraint. To lower, press the head restraint
down while pressing and holding the guide sleeve button.
You may also be able to tilt the head restraint forward or
backward for additional comfort. Pivot the head restraint forward
to the desired location. After the head restraint reaches the
forward-most tilt position, pivot it forward again to return it to
its standard position.
Note: After tilting the head restraint, do not attempt to force the
head restraint backward.
MULTI-CONTOUR FRONT SEATS WITH ACTIVE MOTION*
Using the button mounted on the outside of the front seats, or
through the touchscreen, you and a front-seat passenger can
adjust the massage and support settings. You can also control
the intensity of the massage, increase or decrease the lumbar
bolster and cushion support, and adjust the height of the bolster.
To program, switch the ignition on.
Refer to Multi-Contour Front Seats with Active Motion section in
the Seats chapter in your Owner's Manual for more details.
CONVENIENCE
*if equipped
18 - 19
COMFORT FUNCTION
CLIMATE CONTROLLED FRONT SEATS*
To operate the heated feature, press repeatedly to cycle through the
various settings and off.
To operate the ventilated feature, press
repeatedly to cycle through
the various settings and off. The cooled seats will function only when the
engine is running.
Note: More lights indicate higher settings.
REAR HEATED SEATS*
The rear-seat heat controls are on the back of the center console. To
operate the heated seats, press
repeatedly to cycle through the
various settings and off.
More indicator lights indicate warmer settings.
Note: When the ignition is in the on position, press the heated seat switch
to enable heating mode. The heated seats turn off automatically when you
switch off the engine.
OVERHEAD CONSOLE*
From right to left, the controls operate the following functions:
Driver Lighting Controls
Driver map lamp: Press to switch on and off.
All lamps on switch: Press to switch on and off.
Door open overhead dome light: Press to override the dome lamp
automatically turning on.
Moonroof Controls*
Moonroof open button: Press to open. The moonroof stops short of
the fully opened position. To open the moonroof fully, press the
button again.
Moonroof close button: Press to close.
Moonroof vent button: Press to vent.
Sunshade Controls*
Sunshade open button: Press to open.
The sunshade opens automatically with the
moonroof. You can also open the sunshade
with the moonroof closed.
Sunshade close button: Press to close.
Note: The sunshade stops short of a full-open
position for the comfort of rear passengers. To open the sunshade fully,
press the control again.
Passenger Lighting Control
Passenger map lamp: Press to switch on and off.
360 DEGREE CAMERA*
The system consists
of front, side and
rear cameras. Press
the control to toggle
through different
camera views to see:
What is directly in front of or behind
your vehicle.
Cross trafc view in front of and behind
your vehicle.
Refer to the Parking Aids chapter in your
Owner’s Manual for more information.
REAR PARKING AID*
This system can warn you if there is an object
behind the vehicle. A warning tone sounds and
increases in frequency as you get closer to the
object. It sounds a continuous warning when the
object is less than 12 inches (30 centimeters)
away. The system is not effective when the
vehicle is traveling above 3 mph (5 km/h) and
may not detect angular or moving objects.
Note: Visibility aids do not replace the need to
watch where the vehicle is moving. Refer to your
Owner’s Manual for safety information, more
details and limitations.
MYKEY
®
MyKey allows you to program certain driving
restrictions in order to promote good driving
habits. You can program speed restrictions,
limited volume levels and more, depending on
your vehicle's level of equipment. For complete
information, refer to the MyKey chapter in your
Owner’s Manual.
ACTIVE PARK ASSIST*
The system detects an available parallel
parking space and automatically steers the
vehicle into the space (hands-free) while you
control the accelerator, gearshift and brakes.
The system visually and audibly instructs you to
park your vehicle.
To use active park assist, press the button
on the center console near the gearshift lever.
To stop the parking procedure, grab the
steering wheel or press the control again. Before
using this feature and for complete information,
refer to the Parking Aids chapter in your
Owner’s Manual.
Note: The driver is always responsible for
controlling the vehicle, supervising the system
and intervening if required.
LANE KEEPING SYSTEM*
The system noties you to stay in your lane
through the steering system and the instrument
cluster when the front camera detects an
unintentional drift out of your lane is likely to
occur. The system automatically detects and
tracks the road lane markings using a camera
mounted behind the interior rear view mirror.
Press the button
on the center console
to switch the system on or off.
BLIS
®
(BLIND SPOT INFORMATION
SYSTEM) WITH TRAILER TOW AND
CROSS TRAFFIC ALERT*
BLIS aids you in detecting vehicles that
may have entered into your blind spot zone.
The cross trafc alert feature warns you of
vehicles approaching from the sides when the
transmission is in reverse (R).
BLIS and cross trafc alert will display a yellow
indicator light in your exterior mirrors. Cross trafc
alert will also sound tones and display messages
to warn you from which direction vehicles are
approaching. Refer to the Driving Aids chapter in
your Owner’s Manual for more information.
The Blind Spot Information System with Trailer
Tow is designed to aid you in detecting vehicles
that may have entered the detection area zone.
The detection area is on both sides of your
vehicle and trailer, extending rearward from the
exterior mirrors to the end of your trailer.
*if equipped *if equipped
20 - 21
FUNCTION
PRE-COLLISION ASSIST WARNING SYSTEM*
The Pre-Collision Assist system uses a radar sensor and a camera sensor
to scan the road ahead to detect stationary vehicles, vehicles moving in
the same direction as yours and upright pedestrians in your driving path.
The system is designed to provide an audible and visual alert, brake
support, and active braking in order to help the driver reduce impact
damage or avoid the crash completely. The system provides support at
speeds above approximately 3 mph (5 km/h) and support for pedestrians
at speeds up to 50 mph (80 km/h).
For specic details on using the system, adjusting the system alert
sensitivity and familiarizing yourself with the system limitations and
warnings, please refer to the Pre-Collision Assist chapter in your
Owner's Manual.
INTELLIGENT ACCESS*
You can unlock and lock the vehicle without taking the key out of
your pocket or purse when your intelligent access key is within 3 feet
(1 meter) of your vehicle.
To unlock, touch the unlock sensor on the back of the door handle for a
brief period and then pull on the door handle to unlock, being careful to
not touch the lock sensor at the same time or pull the door handle
too quickly.
To lock, touch the door handle lock sensor on the door for approximately
one second, being careful to not touch the unlock sensor on the back of
the door handle at the same time.
REMOTE TAILGATE RELEASE*
With the tailgate unlocked, you can open the power tailgate using the
remote transmitter. Press
twice within three seconds.
POWER RUNNING BOARDS*
The running boards automatically extend down and out when you open
the door. This can help you enter and exit your vehicle. When you close
the doors, the running boards return to the stowed position after a two-
second delay. To operate the power deploy feature manually, use the
information display.
Set the running boards in the deployed position (OUT) to access the roof.
The running boards return to the stowed position and enter automatic
mode when the vehicle speed exceeds 3 mph (5 km/h).
You can enable and disable the power running board feature in the
information display. See the Information Display chapter in your
Owner's Manual for details.
Note: Do not use any part of the power running boards to lift your vehicle
when jacking. Always use proper jacking points. See your Owner’s Manual
for details.
*if equipped
TAILGATE STEP*
Use the step to make entering the truck bed easier. This feature includes a
step-up into the box and a handle. These items store inside the tailgate.
TO USE
1. Lower the tailgate.
2. Push the button in the center of the tailgate moulding. The step pops
out slightly.
3. Pull the step out fully and lower it to the lowest position.
4. Pull the yellow handle stop toward you and out of the tailgate.
5. Rotate the handle up from a horizontal position to a vertical one until
you hear a sound, indicating that the handle locked into place.
TO CLOSE
1. Store the telescoping handle rst. Press button 1 to lower the
telescoping handle.
2. Push button 2 to unlock the handle. Rotate the handle down to a
horizontal position, and then slide it back into the tailgate.
3. Raise the step up and then push it into the tailgate fully to secure.
BOX SIDE STEP*
Use the step for easier access to the trunk bed.
TO USE
Push down on the button with your foot.
The step automatically extends from the
stowed position.
Push the step under the truck with your foot
until it fully latches. Do not push on the button
while attempting to stow the step.
CARGO AND TRAILER HOOKUP LAMPS*
The cargo lamps are positioned in the central high-mounted stop lamp and
to either side of the cargo box. The trailer hookup lamp is positioned on the
tailgate next to the handle. Use the control in the box or on the instrument
panel to switch the lights on and off.
Note: The box lights turn off automatically after 10 minutes, fading
gradually to off.
BOXLINK™ CLEATS*
These cleats attach to the inner box walls to help you to tie down cargo.
Lock the cleats to prevent removal and unlock them for removal.
You can take the cleats out to attach accessories and more. See your
Owner's Manual for complete details.
ESSENTIAL INFORMATION
22 - 23
LOCATION OF SPARE TIRE AND TOOLS
Your vehicle comes with a spare tire under the vehicle, just forward of the
rear bumper. Use it for emergency use only, and be sure to replace it as
soon as possible.
The jack and tools are attached behind the rear seat on the
passenger side.
For complete details on how to change your tire, refer to the Wheels and
Tires chapter in your Owner’s Manual.
TOWING YOUR F-150 ON FOUR WHEELS
In an emergency, you can at-tow your vehicle on four wheels under the
following conditions:
Your vehicle is facing forward for towing in a forward direction.
You place the transmission in neutral (N).
You do not exceed a maximum speed of 35 mph (56 km/h).
You do not travel beyond a maximum distance of 50 miles
(80 kilometers).
Note: For other towing features including neutral tow and recreational
towing, see your Owner’s Manual for details.
REFUELING
Open the fuel ller door, insert the nozzle and start fueling. Wait at least
10 seconds after pumping the fuel before removing the fuel ller nozzle.
This allows the residual fuel to drain into the tank.
To refuel using a portable fuel container, use the fuel funnel. The fuel
funnel is attached under the rear seat on the passenger side, near the
spare tire tool bag.
Slowly insert the funnel into the system and ll the tank with fuel from the
container. When done, clean the funnel or properly dispose of it. You can
purchase extra funnels from your authorized dealer.
Note: Do not use aftermarket funnels as they do not work with the system
and may cause damage.
FUEL TANK CAPACITY AND FUEL TYPE
You fuel tank capacity depends on your cab style. For Regular Cab
and SuperCab your fuel tank capacity is 23 gallons (87.1 liters).
For a SuperCrew Cab, your fuel tank capacity is 26 gallons (98.4 liters).
The optional fuel tank can hold 36 gallons (136.3 liters).
For gasoline vehicles, use only UNLEADED fuel with a minimum octane
rating of 87. Do not use fuel containing more than 15% ethanol, E85 fuel,
diesel fuel, fuel-methanol, leaded fuel or any other fuel because it could
damage or impair the emission control system.
To provide improved performance, we recommend premium fuel for severe
duty usage, such as when driving off road or towing a trailer.
TIRE PRESSURE MONITORING SYSTEM
Your vehicle comes with a Tire Pressure Monitoring System (TPMS) that
displays a low tire pressure warning light
when one or more of your
tires are under-inated. If this happens, stop and check your tires as soon
as possible. Inate them to the proper pressure.
Refer to the Wheels and Tires chapter in your Owner’s Manual for
more information.
  • Page 1 1
  • Page 2 2
  • Page 3 3
  • Page 4 4
  • Page 5 5
  • Page 6 6
  • Page 7 7
  • Page 8 8
  • Page 9 9
  • Page 10 10
  • Page 11 11
  • Page 12 12

Ford 2018 F-150 Reference guide

Category
Mobile phones
Type
Reference guide

Ford 2018 F-150: Conquer any terrain with its powerful engine options, advanced 4-wheel drive system, and innovative features like the electronic locking differential for enhanced traction. Experience seamless connectivity with SYNC 3, featuring voice commands, navigation, and smartphone integration. Stay informed and entertained with the information display, showcasing customizable views and essential vehicle data. Enhance your driving experience with adjustable pedals, power-folding mirrors, and a power tilt-telescope steering column.

Ask a question and I''ll find the answer in the document

Finding information in a document is now easier with AI