www.CasablancaFanCo.com
1.888.227.2178
16
M8512-01 • 07/10/13 • © Casablanca Fan Company
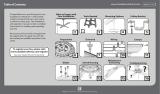
Troubleshooting
Excessive wobbling
• Tighten all of the blade and
blade iron screws until they
are snug.
• Use the provided balancing
kit and instructions to balance
the fan.
Noisy Operation
• Tighten the blade and blade
iron screws until they are snug.
• Check to see if any of the
blades are cracked. If so, replace
all of the blades.
Fan doesn’t work
• Make sure power switch is on.
• Pull the pull chain to make sure
it is on.
• Push the motor reversing switch
rmly left or right to ensure that
it is engaged.
• Check the circuit breaker to
ensure the power is turned on.
• Make sure the blades spin freely.
• Turn off power from the circuit
breaker, then loosen the canopy
and check all the connections
according to the wiring diagram
on page 10.
• Check the plug connection in
the switch housing.
Hunter fans have the power to cut your cooling costs up
to 40%.
Beat the High Cost of Cooling
The air movement created by a Hunter ceiling fan
lets you set your thermostat higher and still stay
comfortable. Every degree you raise the thermostat
saves up to 7% on energy costs. So, you can cut back on
expensive air conditioning ... and save up to 40%* on
cooling. In winter, your Hunter fan recirculates warm air
and saves up to 10%* on heating bills.
* On average at low speed settings. Your savings may
vary based on climate, building type and thermostat
setting.
Save Energy and Money While Protecting
the Environment
Congratulations! You’re saving energy and money while
protecting the environment by purchasing this ENERGY
STAR qualied Hunter ceiling fan! With this purchase, you
are doing your part to protect the environment. In 2010,
ENERGY STAR qualied ceiling fans are projected to cut
air pollution by more than 500 million pounds!
Your new ceiling fan has earned the ENERGY STAR label
because it meets high energy efciency specications
set by the Environmental Protection Agency (EPA).
ENERGY STAR labeled ceiling fans save energy because
they have more efcient fan motors and air delivery due
to more aerodynamic blade congurations. Ceiling fan
models bearing the ENERGY STAR label move air 14 -
20% more efciently than typical ceiling fan models.
For more information on ENERGY STAR visit
www.energystar.gov.
AUTHORIZED SERVICE CENTERS
For the most updated listing of Casablanca Authorized
Service Centers, visit www.CasablancaFanCo.com or
call toll free 1-888-227-2178.