Mr Handsfree CAR KIT GENIUS User manual
- Category
- Car kits
- Type
- User manual
This manual is also suitable for
Page is loading ...
Page is loading ...
Page is loading ...

2English
3
Dear mr Handsfree Genius owner,
Congratulations on your purchase of one of the most sophisticated and
easy to use car kits! This model provides you with the highest quality full-
duplex voice communication. Now you can enjoy the safest telephone
conversations in your car without any inconveniences.
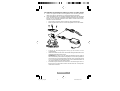
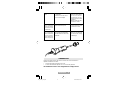
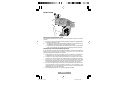
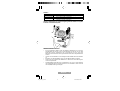
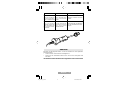
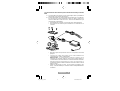
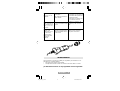
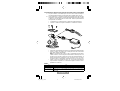
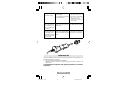
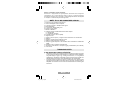
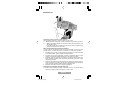
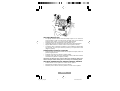
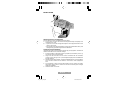
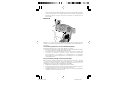
WHAT DOES MR HANDSFREE GENIUS INCLUDE?
1. Main Unit with built-in speaker.
2. TALK mode LED indicators.
3. Buttons for releasing the Main Unit from the Main unit holder.
4. Holder for Mobile phone.
5. Button to release the cramps of the Holder.
6. Main unit holder.
7. Microphone jack.
8. Power adapter for cigarette plug:
8.1. Curled cord.
8.2. Removable fuse.
9. LED indicator of Power Adapter.
10. Mounting bracket.
11. Long screws (15mm) for fastening the Mounting Unit to the dashboard of
your car.
12. Microphone.
13. Button for microphone sensitivity.
14. Clips for guiding the microphone cord.
15. Adapter for connection to car power supply and Mute cord of Car Radio (CRM).
16. Contact clips for connecting the cords.
17. Connector for connecting Mobile Phone to the Main Unit (not included).
18. Screw driver.
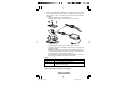
INSTALLATION
MOUNTING MR HANDSFREE GENIUS
• Select the place where you want to install the Genius main unit. The place
for the main unit has to be easily accessible for your hands, clearly visible
for the phone’s display and safe enough in case of accidents and for the
operation of Airbags. Under no circumstances should the appliance prevent
the driver from controlling or operating the car in any way.
• The mounting for the Genius main unit (this is also the phone holder) has to
be done by using a mounting bracket. The Genius main unit has to be
removed from the main unit holder. This holder is already screwed to the
universal mounting bracket.
2
M_Genius_GB_2.pmd 21.03.2005, 11:532

3
English
INSTALLATION
Mounting the Genius main unit holder
The Genius main unit can be mounted in two ways:
A. You can mount the universal mounting bracket with the supplied screws, or:
B. • Remove the universal mounting bracket from the main unit holder
by unscrewing the 6 screws.
• Screw the main unit holder to the dashboard or a bracket that is
designed for your type of car.
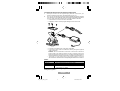
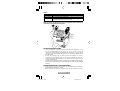
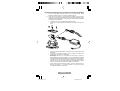
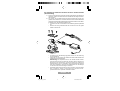
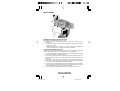
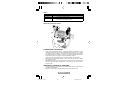
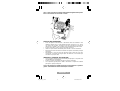
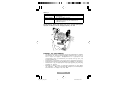
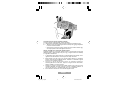
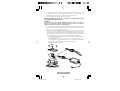
How to fix the universal mounting bracket?
In most cars, the universal mounting bracket is placed on the right side of the
gear-control console. Make sure that the mounting bracket does not block any
airbags!
1. Check for a location in your car (close to the gear-control console) where the
mounting bracket fits and where it is comfortable for use.
2. Make sure that the location in your car where you want to install your mr
Handsfree Genius is free from dust and dirt. Remove the cover of the
adhesive tape on the mounting bracket.
3. Put the upper part of the mounting bracket , with the adhesive tape, over the
edge of the console. Put the lower part of the mounting bracket , with the
angle, under the edge of the console.
4. Press both parts of the mounting bracket together until the face of the upper
part is in a horizontal position. Insert the screw in the appropriate hole.
Tighten the screw. Place the enclosed cap over the nut.
5. You have now successfully installed the universal mounting bracket.
3
2
M_Genius_GB_2.pmd 21.03.2005, 11:533

4English
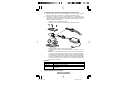
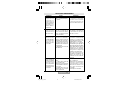
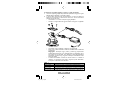
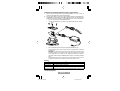
Connecting the electrical wires for power and mute function
A. When you want to use the cigarette plug with the curled cord, you
have to insert this plug in the cigarette lighter of your car.
B. You can also change the curled cord of the cigarette plug into the straight
cord. This way you can hide the cables easily and use the mute functions for
your car radio. This mute function has to comply with the standard.
• Unscrew the 4 screws on the main unit holder.
• Unplug the curled cord and plug the straight cord in the socket.
• Screw the cover plate back on the main unit holder.
• Connect the wires of the cord with the radio by using the supplied
cable connectors.
Remark: We recommend to connect the + wire to the continuous
power supply. This makes it able to use the car kit also when your
engine is turned off. To prevent your car’s battery from getting low, we
recommend taking your phone out of the car kit when you leave the car.
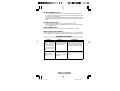
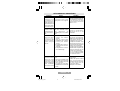
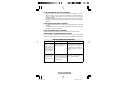
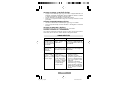
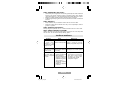
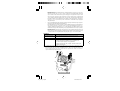
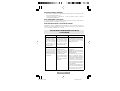
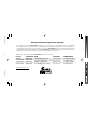
• The wires are color coded. They are listed in Table 1 and each
wire should be connected to the corresponding item listed in the column B.
Table 1.
A B
Red wire The + voltage of the car’s power supply
Black wire The negative GND connection
Brown wire Used for Car Radio muting (CRM) and is
connected to Car Radio.
Warning: Connect only to a negative ground electrical system and a +12
Volts power system.
M_Genius_GB_2.pmd 21.03.2005, 11:534

5
English
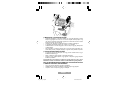
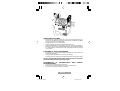
MICROPHONE CONNECTION
• For optimum performance, the microphone should be located at least 75
cm from the Genius main unit and 40-50 cm from the driver’s mouth. Make
sure that the holes of the microphone are directed towards the driver and
not towards the Genius main unit.
• Place the microphone on its location using Velcro.
• Use the supplied clips to guide the microphone cord.
• Insert the microphone plug into the socket of the Genius main unit holder.
• By default, the button on the microphone is in OUT-position (unpressed
position). Only for some telephones it is necessary to put the button in the
ON-position.
ADJUSTMENT OF THE PHONE HOLDER
• Turn the big screw in the centre of the main unit holder to the left to make
movements possible.
• Put the main unit holder in the preferred position.
• Fasten the big screw to the right to fix the main unit holder in the preferred
position.
Warning: Do not move the main unit holder without unfastening the big screw.
This will damage the fixation rubber inside!
CONNECTING A CONNECTOR TO THE GENIUS MAIN UNIT
• Take the Genius main unit of the Genius main unit holder.
• Connect the Genius connector to the Genius main unit.
• Place the Genius main unit back on the main unit holder.
M_Genius_GB_2.pmd 21.03.2005, 11:535

6English
HOW TO USE THE UNIVERSAL HOLDER?
• Release the cramps of the Genius main unit by pushing the button between
the cramps.
• Put your telephone between the cramps.
• Close the cramps in a way that they hold the telephone and it therefore
cannot fall.
• Take the telephone out of the holder without releasing the cramps by sliding
the telephone to the top side.
• To insert the telephone, you slide it from the top side between the cramps of
the Genius.
• You only have to adjust the cramps to the size of your telephone once.
CONNECTING THE PHONE TO THE CONNECTOR CABLE
• Activate the power supply to the Genius by starting the engine and connecting
the cigarette plug (if applicable).
• Connect the Genius connector to the mobile phone after the power supply
is activated.
• Charging function is activated now (if applicable).
Important:
During installation always make sure that the power cord is inserted into
the cigarette lighter and power provided before connecting your mobile
phone. The connection of your mobile phone should ALWAYS be the LAST
step of complete mr Handsfree installation.
HOW TO USE THE ANTI-THEFT SYSTEM
The Genius main unit can be released from the holder. When the two buttons
are pressed together, the main unit can be taken of the Genius main unit
holder. This way you can remove all important electronics and avoid being robbed.
IMPORTANT!
• Always read the ‘TROUBLE-SHOOTING’ chapter carefully.
• The mr Handsfree ‘Special Brand’ mobile phone connector can be
obtained by mail or directly from your local supplier.
• Due to the ‘Special Brand’ mobile phone connector which can be ordered
separately for each mobile phone model (Nokia, Ericsson etc.), your mr
Handsfree Genius is suitable for any type of mobile phone.
OPERATION OF MR HANDSFREE GENIUS
HOW TO SWITCH ON YOUR GENIUS WHILE USING THE CIGARETTE
PLUG?
• Insert your mr Handsfree power cord into the cigarette lighter of your car to
switch mr Handsfree in ON-position. Please note that for several brands of
cars the engine has to be turned on before the cigarette plug is activated.
• LED indicator lights on the cigarette plug.
• To switch off, you simply plug out your power cord from the cigarette lighter.
When the Built-in cable is used, and connected to the continuous power, the
Genius is always switched on.
6
M_Genius_GB_2.pmd 21.03.2005, 11:536

7
English
HOW TO ANSWER A CALL?
• Answer incoming calls as normal on your mobile phone. For most phones
it is possible to enable the ‘auto answer’ function. In this case the phone will
answer the call automatically.
• You can start the conversation immediately by speaking into the microphone.
• Adapt to the appropriate speaker-volume by using your mobile phone control
panel.
HOW TO PLACE A CALL?
• Dial the telephone number on your mobile phone as normal.
• You can start the conversation immediately after being connected by speaking
into the microphone.
HOW TO END A CALL?
At the end of your conversation hang up your mobile phone as normal.
HOW TO USE VOICE DIALING?
If your telephone supports the voice dialing function, you can pronounce the
name of the person you want to call after activating the voice dialing function.
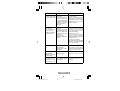
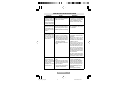
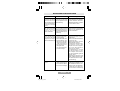
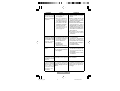
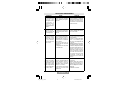
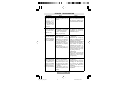
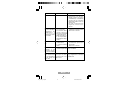
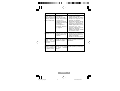
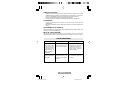
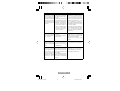
TROUBLE-SHOOTING
The device does not
charge, you don’t
hear the caller, the
caller does not hear
you, and the MUTE
function does not
work.
Sometimes a high-
frequency noise can
be heard in the car
radio.
There is a bad connec-
tion between the main
unit and the holder.
It is possible that your
car radio does not have
enough RF distortions
protection.
You should remove main unit
from the holder and connect it
again. If you made the connec-
tion correctly, you will hear a click.
Please place the mr Handsfree
Genius at least 20 cm from the
car radio.
Problem Reason Elimination
6
M_Genius_GB_2.pmd 21.03.2005, 11:537

8English
A caller does not hear
you.
Your Mobile phone is
connected to Mr
Handsfree Genius but
it does not work.
Mr Handsfree Genius
is connected to Car
Radio but does not
mute it during a call.
• The microphone is
disconnected.
• Microphone’s cord is
damaged.
Telephone or connector
contacts are dirty.
Car Radio Mute function
needs additional settings
to be activated.
Problem Reason Elimination
• Check the connection of the
microphone and the micro-
phone jack of the Mounting unit.
• Apply to a service center.
Clean the contacts of the
telephone and connector.
Check your Car Radio User’s
Guide and make necessary
settings.
Mr Handsfree does
not work. Green LED
of Cigar Adapter is off.
Mr Handsfree Genius
does not work.
It is connected to Car
Radio through
Additional Adapter.
Car Radio works.
• Cigarette lighter jack is
damaged.
• No contact between
Power Adapter and
Cigarette lighter jack.
• 1.5A fuse in the Power
Adapter is burned.
• Power Adapter is
damaged.
• No contact between
the wires.
• Car Radio wires have
smaller diameter than
necessary (with cross
section area less than
0.75mm
2
).
• 1.5A fuse in the
Additional Adapter is
burned.
• Check the contact in the con-
nection points.
• Use for connection contact
clips which correspond to the
standard of your car or another
suitable type of connection.
• Replace the fuse.
• Check if the Cigarette
lighter functions normally.
• Clean the contact of the
Cigarette lighter jack and
the Power Adapter.
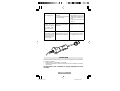
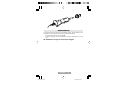
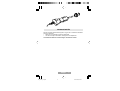
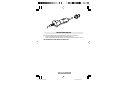
• Remove the Fuse.
Unscrew the nut from the
Power Adapter, open the
housing and take out the Fuse
(Illustration p.9.)
Insert new 1.5A fuse.
Assemble the Power Adapter.
• If items 1-3 did not help apply
to a service center.
M_Genius_GB_2.pmd 21.03.2005, 11:538

9
English
MAINTENANCE
Please check following mr Handsfree maintenance TIPS to keep your kit in top
condition:
• Do not expose the appliance to moisture.
• Always unplug the power cable when not in use.
mr Handsfree wishes you a nice and safe journey!
M_Genius_GB_2.pmd 21.03.2005, 11:539
Page is loading ...
Page is loading ...
Page is loading ...
Page is loading ...
Page is loading ...
Page is loading ...
Page is loading ...
Page is loading ...
Page is loading ...
Page is loading ...
Page is loading ...
Page is loading ...
Page is loading ...
Page is loading ...
Page is loading ...
Page is loading ...
Page is loading ...
Page is loading ...
Page is loading ...
Page is loading ...
Page is loading ...
Page is loading ...
Page is loading ...
Page is loading ...
Page is loading ...
Page is loading ...
Page is loading ...

INDICE
COME E’ COMPOSTO IL MR HANDSFREE GENIUS.............2
INSTALLAZIONE......................................................................2
FUNZIONAMENTO DEL MR HANDSFREE GENIUS................6
RISOLUZIONE DEI PROBLEMI................................................7
MANUTENZIONE......................................................................9
M_Genius_I.pmd 21.03.2005, 18:401
Page is loading ...
Page is loading ...
Page is loading ...
Page is loading ...
Page is loading ...
Page is loading ...
Page is loading ...
Page is loading ...
Page is loading ...
Page is loading ...
Page is loading ...
Page is loading ...
Page is loading ...
Page is loading ...
Page is loading ...
Page is loading ...
Page is loading ...
Page is loading ...
Page is loading ...
Page is loading ...
Page is loading ...
Page is loading ...
Page is loading ...
Page is loading ...
Page is loading ...
Page is loading ...
Page is loading ...
Page is loading ...
Page is loading ...
Page is loading ...
Page is loading ...
Page is loading ...
Page is loading ...
Page is loading ...
Page is loading ...
Page is loading ...
Page is loading ...
Page is loading ...
Page is loading ...
Page is loading ...
Page is loading ...
Page is loading ...
Page is loading ...
Page is loading ...
Page is loading ...
Page is loading ...
Page is loading ...
Page is loading ...
Page is loading ...
Page is loading ...
Page is loading ...
Page is loading ...
Page is loading ...
Page is loading ...
Page is loading ...
Page is loading ...
Page is loading ...
Page is loading ...
Page is loading ...
Page is loading ...
Page is loading ...
Page is loading ...
Page is loading ...
Page is loading ...
Page is loading ...
Page is loading ...
Page is loading ...
Page is loading ...
Page is loading ...
Page is loading ...
Page is loading ...
Page is loading ...
Page is loading ...
Page is loading ...
Page is loading ...
Page is loading ...
Page is loading ...
Page is loading ...
Page is loading ...
Page is loading ...
-
 1
1
-
 2
2
-
 3
3
-
 4
4
-
 5
5
-
 6
6
-
 7
7
-
 8
8
-
 9
9
-
 10
10
-
 11
11
-
 12
12
-
 13
13
-
 14
14
-
 15
15
-
 16
16
-
 17
17
-
 18
18
-
 19
19
-
 20
20
-
 21
21
-
 22
22
-
 23
23
-
 24
24
-
 25
25
-
 26
26
-
 27
27
-
 28
28
-
 29
29
-
 30
30
-
 31
31
-
 32
32
-
 33
33
-
 34
34
-
 35
35
-
 36
36
-
 37
37
-
 38
38
-
 39
39
-
 40
40
-
 41
41
-
 42
42
-
 43
43
-
 44
44
-
 45
45
-
 46
46
-
 47
47
-
 48
48
-
 49
49
-
 50
50
-
 51
51
-
 52
52
-
 53
53
-
 54
54
-
 55
55
-
 56
56
-
 57
57
-
 58
58
-
 59
59
-
 60
60
-
 61
61
-
 62
62
-
 63
63
-
 64
64
-
 65
65
-
 66
66
-
 67
67
-
 68
68
-
 69
69
-
 70
70
-
 71
71
-
 72
72
-
 73
73
-
 74
74
-
 75
75
-
 76
76
-
 77
77
-
 78
78
-
 79
79
-
 80
80
-
 81
81
-
 82
82
-
 83
83
-
 84
84
-
 85
85
-
 86
86
-
 87
87
-
 88
88
-
 89
89
-
 90
90
-
 91
91
-
 92
92
-
 93
93
-
 94
94
-
 95
95
-
 96
96
-
 97
97
-
 98
98
-
 99
99
-
 100
100
-
 101
101
-
 102
102
-
 103
103
-
 104
104
-
 105
105
-
 106
106
-
 107
107
-
 108
108
-
 109
109
-
 110
110
-
 111
111
-
 112
112
-
 113
113
-
 114
114
-
 115
115
-
 116
116
-
 117
117
-
 118
118
-
 119
119


Mr Handsfree CAR KIT GENIUS User manual
- Category
- Car kits
- Type
- User manual
- This manual is also suitable for
Ask a question and I''ll find the answer in the document
Finding information in a document is now easier with AI
in other languages
- italiano: Mr Handsfree CAR KIT GENIUS Manuale utente
- français: Mr Handsfree CAR KIT GENIUS Manuel utilisateur
- español: Mr Handsfree CAR KIT GENIUS Manual de usuario
- Deutsch: Mr Handsfree CAR KIT GENIUS Benutzerhandbuch
- русский: Mr Handsfree CAR KIT GENIUS Руководство пользователя
- Nederlands: Mr Handsfree CAR KIT GENIUS Handleiding
- português: Mr Handsfree CAR KIT GENIUS Manual do usuário
- dansk: Mr Handsfree CAR KIT GENIUS Brugermanual
Related papers
-
Mr Handsfree GENIUS IPHONE Owner's manual
-
 Mr Handsfree CAR-KIT PRO Owner's manual
-
 Mr Handsfree Handsfree Kit Owner's manual
-
Mr Handsfree Blue Switch Pro User manual
-
 Mr Handsfree Bluetooth Car Kit User manual
-
 Mr Handsfree iSmart Owner's manual
-
Mr Handsfree blue compact User manual
-
 Mr Handsfree iSmart Owner's manual
-
 Mr Handsfree BLUE VISION 2 User manual
-
 Mr Handsfree Blue Solar Owner's manual


Other documents
-
Yamaha DM-105 Owner's manual
-
Sony Ericsson HCB-300 User manual
-
Auto-T 540305 Quick start guide
-
Alpine CDE-174BT Owner's manual
-
Alpine CDE-178BT Owner's manual
-
Alpine CDE-185BT Owner's manual
-
Alpine CDE-183BT Owner's manual
-
Alpine CDE-W296BT Owner's manual
-
Mr. Handsfree CEL.MRH-BC6000 User manual
-
Alpine CDE-170RM Owner's manual