Page is loading ...
Page is loading ...
Page is loading ...
Page is loading ...
Page is loading ...

6
CONTENTS
INTRODUCTION .....................................................................7
Symbols used in these instructions
................................7
Letters in brackets .......................................................... 7
Troubleshooting and repairs ..........................................7
SAFETY
..................................................................................7
Fundamental safety warnings........................................7
Designated use ..............................................................7
Instructions ....................................................................7
DESCRIPTION
.........................................................................8
Description of the appliance ..........................................8
Description of the control panel .....................................8
Description of milk container and accessories ................8
PRELIMINARY CHECKS
..........................................................8
Checking the appliance .................................................. 8
Installing the appliance .................................................8
Connecting the appliance ..............................................8
DISPOSAL
..............................................................................9
BUILTIN INSTALLATION
........................................................ 9
USING THE APPLIANCE FOR THE FIRST TIME
....................... 12
TURNING ON AND HEATING UP
...........................................12
MAKING COFFEE USING COFFEE BEANS ..............................12
CHANGING THE QUANTITY OF COFFEE IN THE CUP
.............13
Programming quantity ................................................13
ADJUSTING THE COFFEE MILL
.............................................13
MAKING ESPRESSO COFFEE WITH PREGROUNDED COFFEE
INSTEAD OF BEANS
.......................................................... 13
DELIVERING HOT WATER
.....................................................14
CHANGING THE QUANTITY OF HOT WATER
..........................14
MAKING CAPPUCCINO
........................................................14
MAKING FROTHED MILK
......................................................15
CHANGING THE QUANTITY OF MILK AND COFFEE FOR
CAPPUCCINO
.......................................................................15
MAKING LATTE MACCHIATO OR CAFFELATTE
......................15
CHANGING THE QUANTITY OF COFFEE AND MILK FOR LATTE
MACCHIATO/CAFFELATTE
.................................................... 15
CLEANING
............................................................................ 15
Cleaning the machine ..................................................15
Cleaning the grounds container ................................... 15
Cleaning the drip tray
..................................................15
Cleaning the water tank
...............................................16
Cleaning the spouts .....................................................16
Cleaning the pre-ground coee funnel ........................16
Cleaning the inside of the coee machine
...................16
Cleaning the infuser ..................................................... 16
Cleaning the milk container
......................................... 16
MENU SETTINGS
.................................................................. 17
Rinsing .........................................................................17
Setting the language ...................................................17
Energy Saving ..............................................................17
Adjust time ..................................................................18
Auto-start .................................................................... 18
Auto-o (Standby) .......................................................18
Setting the temperature ..............................................18
Setting water hardness ................................................ 18
Adjusting contrast ........................................................18
Statistics function ........................................................19
Default values .............................................................. 19
Descaling .....................................................................19
TURNING THE APPLIANCE OFF
............................................19
TECHNICAL DATA
.................................................................20
DISPLAYED MESSAGES
........................................................21
TROUBLESHOOTING
............................................................22

7
EN
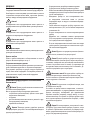
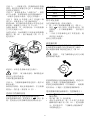
INTRODUCTION
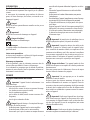
Symbols used in these instructions
Important warnings are identied by these symbols.
Failure to observe the instructions could result in electric shock,
serious injury, burns, re or damage to the appliance.
Danger!
Failure to observe the warning could result in possibly life threa-
tening injury from electric shock.
Important!
Failure to observe the warning could result in injury or damage
to the appliance.
Danger of burns!
Failure to observe the warning could result in scalds or burns.
Please note:
This symbol identies important advice or information for the
user.
Letters in brackets
The letters in brackets refer to the legend in the Description of
the Appliance on page 3.
Troubleshooting and repairs
In the event of problems, follow the information given in the
sections “Displayed messages” and “Troubleshooting”.
If this does not resolve the problem, you should consult Custo-
mer Services. For repairs, contact Customer Services only.
SAFETY
Fundamental safety warnings
Important! This is an household appliance only.
It is not intended to be used in:
• stakitchenareasinshops,ocesandotherworkingenvi-
ronments;
• farmhouses;
• byclientsinhotels,motelsandotherresidentialtypeenvi-
ronments;
• bedandbreakfasttypeenvironments.
Danger! This is an electrical appliance, it is therefore
important to respect the following safety warnings:
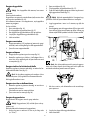
• Nevertouchtheappliancewithdamphands.
• Nevertouchtheplugwithdamphands.
• Makesurethesocketusedisfreelyaccessibleatalltimes,
enabling the appliance to be unplugged when necessary.
• Unplugdirectlyfromtheplugonly.
Never pull the power cable as you could damage it.
• To disconnect the appliance completely, place the main
switch (A23) on the side of the appliance in the 0 position.
• Iftheapplianceisfaulty,donotattempttorepair.
Turn it o using the main switch (A23), unplug from the
mains socket and contact Customer Services.
• Iftheplugorpowercableisdamaged,itmustbereplaced
by customer services only to avoid all risk.
Important! Keep all packaging (plastic bags, polysty-
rene foam) away from children.
Important! The appliance is not intended for use by
persons (including children) with reduced physical, sensory or
mental capabilities, or lack of experience and knowledge, unless
they have been given supervision or instruction concerning use
of the appliance by a person responsible for their safety. Chil-
dren must be supervised to ensure they do not play with the
appliance.
Danger of burns! This appliance produces hot water
and steam may form while it is in operation.
Avoid contact with splashes of water or hot steam. Use knobs
and handles.
Important! Do not hold on to the coee machine
when it is out of the cabinet.
Do not rest recipients containing liquids or inammable or cor-
rosive materials on top of the appliance. Place the accessories
required to make the coee (the measure for example) in the
special holder. Do not rest large objects which could obstruct
movement or unstable objects on the appliance.
Important! Do not use the appliance when extracted.
Make sure the appliance is inactive before extracting it. The only
exception is adjusting the coee mill which must be done with
the machine extracted (see section “Adjusting the coee mill”).
Please note: Use original or manufacturer recommen-
ded accessories and spare parts only.
Designated use
This appliance is designed and made to prepare coee and heat
drinks. All other use is considered improper.
This appliance is not suitable for commercial use.
The manufacturer is not liable for damage deriving from impro-
per use of the appliance.
This appliance can be installed over a built-in oven if the latter

8
is tted with a cooling fan at the rear (maximum microwave
power: 3 kW).
Instructions
Read these instructions carefully before using the appliance.
• Keeptheseinstructions.
• Failuretorespecttheseinstructionsmayresultinburnsor
damage to the appliance.
The manufacturer is not liable for damage deriving from
failure to respect these instructions.
Please note: The appliance has a cooling fan.
This comes on whenever coee, steam or hot water is delivered.
After several minutes, the fan goes o automatically.
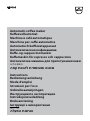
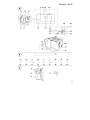
DESCRIPTION
Description of the appliance
(page 3 - A)
A1. Cup tray
A2. Service door
A3. Coee guide
A4. Waste coee container
A5. Infuser
A6. Cup tray lights
A7. On-O/stand-by button
A8. Control panel
A9. Tray
A10. Hot water and steam nozzle
A11. IEC connector
A12. Water tank
A13. Coee spout (adjustable height)
A14. Drip tray
A15. Bean container lid
A16. Bean container
A17. Grinding adjustment dial
A18. Pre-ground coee funnel door
A19. Measure
A20. Measure compartment
A21. Pre-ground coee funnel
A22. Power cable
A23. Main switch
Description of the control panel
(page 3 - B)
B1. Display: guides the user in using the appliance.
B2. button to select the coee taste
B3. button to select the type of coee (espresso, coee,
long coee)
B4. / OK button to make one cup of coee and conrm the
selected function
B5. / ▽ button to make two cups of coee and scroll
backwards through the menu to display the various modes
B6. / △ button to deliver hot water and scroll forwards
through the menu to display the various modes
B7. P / ESC button to enable or disable menu parameter setting
mode and exit from the chosen mode
B8. button to make cappuccino / frothed milk
B9. button to make latte macchiato / frothed milk
B10. button to make caelatte / frothed milk
Description of milk container and accessories
(page 3 - C)
C1. Froth regulator
C2. Milk container handle
C3. CLEAN button
C4. Milk intake tube
C5. Frothed milk spout
C6. Milk frother
C7. Hot water spout
PRELIMINARY CHECKS
Checking the appliance
After removing the packaging, make sure the product is comple-
te and undamaged and that all accessories are present.
Do not use the appliance if it is visibly damaged.
Contact Customer Services.
Installing the appliance
Important!
• Installation must be performed by a qualied professional
in compliance with legislation in force in the country of in-
stallation (see section “Built-in installation”).
• The packing elements (plastic bags, polystyrene foam, etc.)
should be kept out of reach of children.
• Never install the appliance in rooms where the temperature
may drop to 0°C or lower.
• Customise the water hardness as soon as possible following
the instructions in the “Setting water hardness” section.
Connecting the appliance
Danger! Check that the mains power supply voltage
corresponds to the value indicated on the rating plate on the
bottom of the appliance.
Connecttheappliancetoanecientlyearthedandcorrectlyin-
stalled socket with a minimum current rating of 10A only.
If the power socket does not match the plug on the appliance,

9
EN
have the socket replaced with a suitable type by a qualied pro-
fessional.
To comply with safety directives, an omnipolar switch with a mi-
nimum contact distance of 3 mm must be installed.
Do not use multiple sockets or extensions.
Important! Safety cutout devices must be included
in the mains power supply in compliance with the installation
regulations in the country concerned.
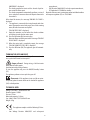
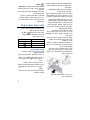
DISPOSAL
Electrical appliances must not be disposed of as
household waste.
Appliances with this symbol are covered by Euro-
pean Directive 2002/96/EC.
All unused electric and electronic appliances must
be disposed of separately from household waste by taking them
to special state authorised centres.
Disposing of the unused appliance correctly avoids damage to
the environment and a risk to health.
For more information on disposing of the unused appliance, con-
tact the local administration, the waste disposal department or
the shop where the appliance was bought.
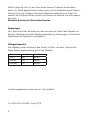
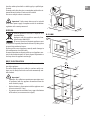
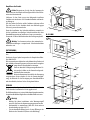
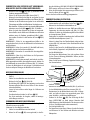
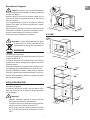
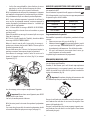
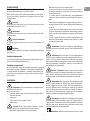
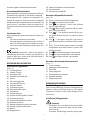
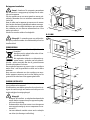
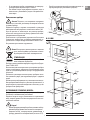
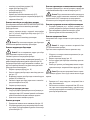
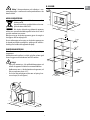
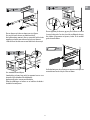
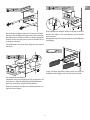
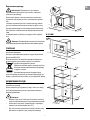
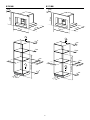
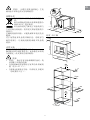
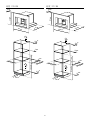
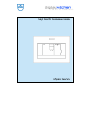
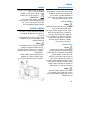
BUILTIN INSTALLATION
Verify the minimum measurements required for correct installa-
tion of the appliance.
The coee machine must be installed in a column and the co-
lumn must be rmly xed to the wall with commercially avai-
lable brackets.
Important!
• Important:allinstallationormaintenanceoperationsmust
be performed with the appliance disconnected from the
mains electricity supply.
• Kitchen furniture in direct contact with the appliance must
be heat resistant (65°C min).
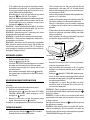
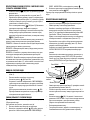
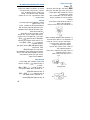
• To guarantee correct ventilation, leave a gap at the bottom
of the cabinet (see measurements in gure).
200 cm
2
45 mm
45 mm
45 mm
45 mm
361 mm
528 mm
45 mm
45 mm
45 mm
45 mm
374 + 2 mm
850 mm Min
500 mm
545 mm Min.
200 cm
2
560 + 8 mm
378 mm
594 mm
20 mm
45 mm
45 mm
45 mm
45 mm
450 + 2 mm
850 mm Min
500 mm
545 mm Min.
200 cm
2
560 + 8 mm
45 mm
45 mm
45 mm
45 mm
381 + 2 mm
850 mm Min
500 mm
545 mm Min.
200 cm
2
550 + 8 mm
45 mm
45 mm
45 mm
450 + 2 mm
850 mm Min
45 mm
45 mm
850 mm Min
200 cm
2
560 + 8 mm
x 16
x 4
x 1
x 8
412 mm
454 mm
594 mm
20 mm
412 mm
372 mm
500 mm
545 mm Min.
380 + 2 mm
560 + 8 mm
500 mm
545 mm Min.
30 mm
375 mm
544 mm
20 mm
412 mm
H 454 MM
200 cm
2
45 mm
45 mm
45 mm
45 mm
361 mm
528 mm
45 mm
45 mm
45 mm
45 mm
374 + 2 mm
850 mm Min
500 mm
545 mm Min.
200 cm
2
560 + 8 mm
378 mm
594 mm
20 mm
45 mm
45 mm
45 mm
45 mm
450 + 2 mm
850 mm Min
500 mm
545 mm Min.
200 cm
2
560 + 8 mm
45 mm
45 mm
45 mm
45 mm
381 + 2 mm
850 mm Min
500 mm
545 mm Min.
200 cm
2
550 + 8 mm
45 mm
45 mm
45 mm
450 + 2 mm
850 mm Min
45 mm
45 mm
850 mm Min
200 cm
2
560 + 8 mm
x 16
x 4
x 1
x 8
412 mm
454 mm
594 mm
20 mm
412 mm
372 mm
500 mm
545 mm Min.
380 + 2 mm
560 + 8 mm
500 mm
545 mm Min.
30 mm
375 mm
544 mm
20 mm
412 mm
200 cm
2
45 mm
45 mm
45 mm
45 mm
361 mm
528 mm
45 mm
45 mm
45 mm
45 mm
374 + 2 mm
850 mm Min
500 mm
545 mm Min.
200 cm
2
560 + 8 mm
378 mm
594 mm
20 mm
45 mm
45 mm
45 mm
45 mm
450 + 2 mm
850 mm Min
500 mm
545 mm Min.
200 cm
2
560 + 8 mm
45 mm
45 mm
45 mm
45 mm
381 + 2 mm
850 mm Min
500 mm
545 mm Min.
200 cm
2
550 + 8 mm
45 mm
45 mm
45 mm
450 + 2 mm
850 mm Min
45 mm
45 mm
850 mm Min
200 cm
2
560 + 8 mm
x 16
x 4
x 1
x 8
412 mm
454 mm
594 mm
20 mm
412 mm
372 mm
500 mm
545 mm Min.
380 + 2 mm
560 + 8 mm
500 mm
545 mm Min.
30 mm
375 mm
544 mm
20 mm
412 mm
Page is loading ...

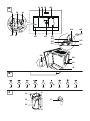
11
EN
x 4
x 16
approx.
350 mm
x 1
x 1
x 4 x 8
x 2
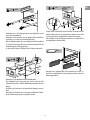
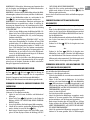
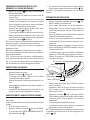
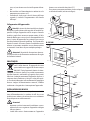
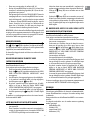
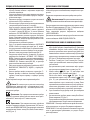
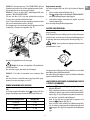
550/560 + 1 mm
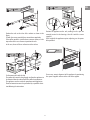
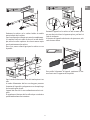
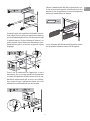
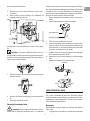
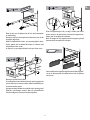
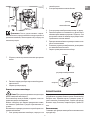
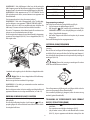
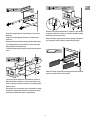
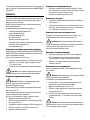
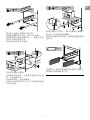
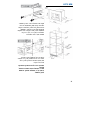
Position the rails on the sides of the cabinet as shown in the
gure.
Fix with the screws provided, then extract them completely.
If the coee machine is installed over a warmer drawer, use the
top surface of this as a reference to position the rails.
In this case, there will be no surface to rest the rails on.
x 4
x 16
approx.
350 mm
x 1
x 1
x 4 x 8
x 2
550/560 + 1 mm
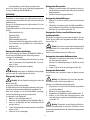
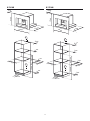
Fix the power cable with the clip.
The power cable must be long enough to allow the appliance to
be extracted from the cabinet to ll the coee bean container.
The appliance must be earthed in compliance with legislation.
Electrical connections must be performed by a qualied electri-
cian following the instructions.
x 4
x 16
approx.
350 mm
x 1
x 1
x 4 x 8
x 2
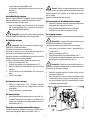
550/560 + 1 mm
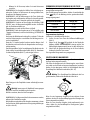
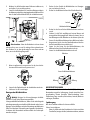
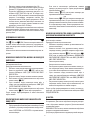
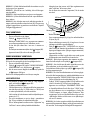
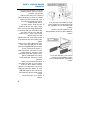
Position the appliance on the rails, making sure the pins are
correctly inserted in the housings, then x it with the screws
supplied.
If the height of the appliance requires adjusting, use the spacer
disks provided.
x 4
x 16
approx.
350 mm
x 1
x 1
x 4 x 8
x 2
550/560 + 1 mm
If necessary, correct alignment of the appliance by positioning
the spacers supplied under or at the sides of the support.

12
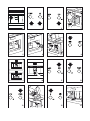
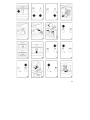
USING THE APPLIANCE FOR THE FIRST TIME
• Coeehasbeenusedtofactorytesttheapplianceanditis
therefore completely normal for there to be traces of coee
in the mill.
• Customise water hardness as soon as possible following
the instructions in the “Setting water hardness” section.
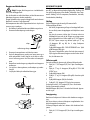
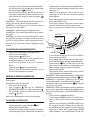
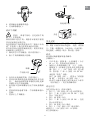
1. Connect the appliance to the mains electricity supply and
place the main switch (A23) in position I.
2. After 5 seconds, the appliance displays “FILL TANK”. Extract
the water tank (g. 4), rinse and ll with fresh water wi-
thout exceeding the MAX line. Replace and push as far as it
will go.
3. You must rst choose the language (the languages scroll
through at intervals of about 3 seconds):
When the message “PRESS OK TO SET ENGLISH” is displa-
yed, press the OK button (B4) (g. 3) for 3 seconds until
“ENGLISH SET” is displayed. If you set the wrong langua-
ge, follow the instructions in the “Setting the language”
section. If your language is not available, select one from
those displayed (the instructions refer to English).
Then follow the instructions displayed:
4. Place a cup under the hot water spout (g. 5).
(If the hot water spout is not inserted, the appliance di-
splays “INSERT WATER SPOUT”. Attach the spout as shown
in gure 6. The machine displays “HOT WATER PRESS OK”.
Press the OK button (B4), a little water comes out of the
spout.
5. After that the machine displays “TURNING OFF PLEASE
WAIT” and goes o.
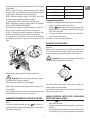
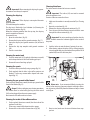
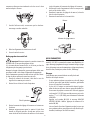
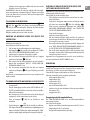
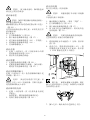
6. Extract the appliance by pulling it out using the handles
(g. 7). Open the lid and ll the container with coee be-
ans, then close the lid and push the appliance in.
The coee machine is now ready for normal use.
Important! Never introduce pre-ground coee, free-
ze dried coee, caramelised beans or anything else which could
damage the appliance.
Please note: When using the appliance for the rst
time, you need to make 4-5 cups of coee and 4-5 cappuccinos
before the appliance gives satisfactory results.
Please note: Each time you turn the coee machine on
by the main switch (A23), it performs a SELF-DIAGNOSIS cycle
and then goes o. To turn it on again, press the ON/OFF/standby
button (A7) (g. 1)
TURNING ON AND HEATING UP
Each time the appliance is turned on, it performs an automatic
preheat and rinse cycle which cannot be interrupted.
The appliance is ready for use only after completion of this
cycle.
Danger of burns! During rinsing, a little hot water
ows from the coee spouts.
To turn the appliance on, press the ON/OFF/standby button (A7)
(g. 1). The message “HEATING UP PLEASE WAIT” is displayed.
When heating is complete, the message changes to “RINSING”.
The appliance is at temperature when the message “COFFEE
STANDARD” is displayed.
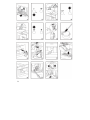
MAKING COFFEE USING COFFEE BEANS
1. The appliance is preset to make coee with a standard
taste. You can choose coee with an extra-mild, mild,
standard, strong or extra-strong taste. There is also a pre-
ground coee option. To choose the required taste, press
the button (B2) (g. 8) a number of times. The requi-
red coee taste is displayed.
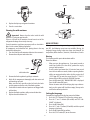
2. Place 1 cup under the spouts to make 1 coee (g. 9) or 2
cups for 2 coees (g. 9).
Lower the spouts as near as possible to the cup for a crea-
mier coee (g. 10).
3. Press the button (B3) (g. 11) to select the type of
coee (espresso, coee, long coee).
Now press the button (B4) (g. 12) if you want to
make one coee and the button (B5) (g. 13) if you
want to make 2 coees. The appliance now grinds the be-
ans and starts delivering the coee into the cup. Once the
set amount of coee has been delivered, the machine stops
delivery automatically and expels the exhausted coee
grounds into the grounds container.
4. After a few seconds, the appliance is ready for use again.
5. To turn the appliance o, press the ON/OFF/standby button
(A7) (g. 1).
(Before going o, the appliance performs an automatic rin-
se cycle. Take care to avoid scalds).
NOTE 1: If the coee is delivered a drop at a time or not at all, see
section “Adjusting the coee mill”.
NOTE 2: If the coee is delivered too fast and the cream is not
satisfactory, see section “Adjusting the coee mill”.
NOTE 3: Tips for a hotter coee:
• Proceed as described in the section “Changing and setting
menu parameters”, “rinsing” function.
• Unlesspreheated,donotuseexcessivelythickcupsasthey
will absorb too much heat.
• Preheatthecupsbyrinsingthemwithhotwater.
NOTE 4: Coee delivery can be interrupted at any moment by re-

13
EN
pressing the previously selected button which remains lit during
the operation.
NOTE 5: As soon as delivery is nished, to increase the quantity
of coee in the cup, just keep pressing the previously selected
button within 3 seconds after delivery has nished.
NOTE 6: When the appliance displays “FILL TANK”, ll the tank
with water or the appliance will not deliver coee.
(It is normal for there to be a little water left in the tank).
NOTE 7: After about 14 single (or 7 double) coees, the appliance
displays “EMPTY GROUNDS CONTAINER”.
Even if not full, the empty waste coee container message is di-
splayed 72 hours after the rst coee has been delivered.
For the 72 hours to be calculated correctly, the machine must
never be turned o with the main switch in the 0 position.
To clean, open the service door on the front of the appliance
by pulling the spout (g. 16), extract the drip tray (g. 17) and
clean.
When cleaning, always extract the drip tray completely.
Important! When extracting the drip tray, the groun-
ds container MUST always be emptied.
If this is not done, the machine may be clogged.
NOTE 8: Never extract the water tank while the machine is de-
livering coee.
If it is removed, it will not be possible to make the coee and the
appliance will display some messages (see page 21).
CHANGING THE QUANTITY OF COFFEE IN THE CUP
The appliance is set by default to make a standard quantity of
coee.
To select the quantity of coee, press the (B3) button re-
peatedly until the message corresponding to the required quan-
tity of coee is displayed:
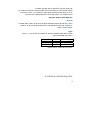
Corresponding coee quantity (ml)
ESPRESSO
≃30
COFFEE
≃110
LONG COFFEE
≃150
Programming quantity
To modify the quantity of coee delivered, proceed as follows:
1. Place a cup under the coee spouts ( g. 9).
2. Keep the (B4) button pressed until the message “PRO-
GRAM QUANTITY” is displayed and coee delivery begins.
Then release the button.
3. As soon as the coee in the cup reaches the required level,
press the same button again.
The quantity set has now been programmed.
ADJUSTING THE COFFEE MILL
The coee mill is preset in the factory and should not require
adjusting.
However, if after making the rst few coees you nd that deli-
very is either too fast or too slow (a drop at a time), this can be
corrected by adjusting the grinding adjustment dial (g. 14).
Important! The grinding adjustment dial must only
be turned when the coee mill is in operation.
For slower delivery and creamier coee, turn one click anti-
clockwise (ner pre-ground coee).
For faster delivery (not a drop at a time), turn one click clockwise
(coarser pre-ground coee).
MAKING ESPRESSO COFFEE WITH PREGROUND
COFFEE INSTEAD OF BEANS
• Press the button (B2) (g. 8) and select the pre-
ground coee function.
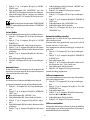
• Extractthemachinebypullingitoutwardsusingthehan-
dles (g. 7).
• Lift the central lid, place one measure of pre-ground coee
in the funnel (g. 19), push the appliance in then proceed

14
as described in the section “Making coee using coee be-
ans”.
Please note: You can make just one coee at a time by pres-
sing the
button (B4) (g. 12).
• After using the machine with pre-ground coee, to go
back to making coee using beans, disable the pre-ground
coee function by pressing the
button (B2) (g. 8)
again.
NOTE 1: Never introduce pre-ground coee when the machine is
o or it could spread through the inside of the appliance.
NOTE 2: Never add more than 1 measure, otherwise the applian-
ce will not make the coee.
NOTE 3: Use the measure provided only.
NOTE 4: Introduce only pre-ground coee for espresso coee
machines into the funnel.
NOTE 5: If more than one measure of pre-ground coee is used
and the funnel clogs, push the coee down with a knife (g. 21)
then remove and clean the infuser and machine as described in
the “Cleaning the infuser” chapter.
DELIVERING HOT WATER
• Makesurethewaterspoutisinplace(g.6).
• Position a container under the spout.
• Pressthe (B6) button (g. 20).
The message “HOT WATER” is displayed and hot water ows
out of the hot water spout into the container below.
You should not deliver hot water for more than 2 minutes at
a time.
To interrupt the ow, press the button (B6).
The appliance stops delivery once the set quantity is rea-
ched.
CHANGING THE QUANTITY OF HOT WATER
The appliance is set by default to automatically deliver 250 ml.
To modify these quantities, proceed as follows:
1. Position a container under the spout.
2. Press the button (B6) again until “HOT WATER PRO
GRAM QUANTITY” is displayed, then release the but-
ton.
3. When the hot water in the cup reaches the required level,
press the button (B6) again.
The machine is now reprogrammed with the new quantity.
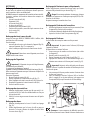
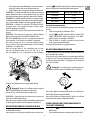
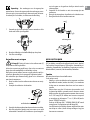
MAKING CAPPUCCINO
• Selectthetasteofthecoeeyouwanttousetomakethe
cappuccino by pressing the button (B2).
• Removethelidofthemilkcontainer.
• Fillthe containerwithabout 100 gramsofmilkforeach
cappuccino to be prepared (g. 23). Never exceed the MAX
level (corresponding to about 750 ml) marked on the con-
tainer.
You should ideally use skimmed or semi-skimmed milk at
refrigerator temperature (about 5°C).
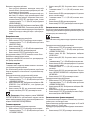
• Makesuretheintaketubeiscorrectlyinsertedintherubber
washer (g. 24) then replace the milk container lid.
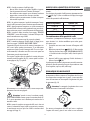
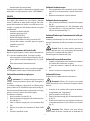
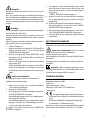
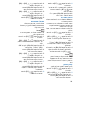
Position the froth regulator between the words cappuccino
and caelatte printed on the milk container lid.
The quantity of froth can be adjusted by moving the regula-
tor towards the word “caelatte” for a denser froth.
Moving it towards the word “cappuccino” obtains a less
dense froth.
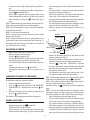
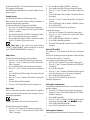
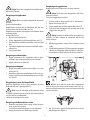
• Removethe hotwaterspout (g 6) andattach the milk
container to the nozzle (g. 25).
• Positionthemilktubeasshowning.26andthenplacea
sucientlylargecupunderthecoeeandmilkspouts.
• Press the button (B8). “CAPPUCCINO” is displayed
and after a few seconds, frothed milk ows out of the milk
spout into the cup below. (Delivery stops automatically).
• Theappliancedeliverscoee.
• Thecappuccinoisnowready.Sweetentotasteand,ifdesi-
red, sprinkle the froth with a little cocoa powder.
NOTE 1: While making cappuccino, the ow of frothed milk or
coee can be interrupted by pressing the
button (B8).
NOTE 2: If the milk in the container nishes while delivering fro-
thed milk, remove the container and add milk.
Reattach and press the
button (B8) to request a cappuccino
again.
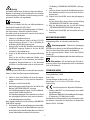
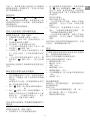
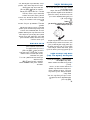
NOTE 3: To ensure the complete cleanliness and hygiene of the
milk frother, always clean the circuits in the milk container lid
after making cappuccino. “PRESS CLEAN” ashes on the display.
• Placearecipientunderthemilkspout(g.26).
• PresstheCLEANbuttononthelid(C3)andholddownforat
least 5 seconds (g. 26) to start the cleaning function.
The appliance displays the message “CLEANING UNDER
WAY” above a progress bar. You should not release the CLE-
AN button until the bar is complete indicating that cleaning
is concluded. When the CLEAN button is released, the fun-
ction stops. After cleaning, remove the milk container and
NO froth
“Less dense” froth
Froth regulator
“Denser” froth

15
EN
place in the refrigerator. The milk should not be left out of
the refrigerator for more than 15 minutes.
NOTE 4: To change the quantity of coee or frothed milk the
appliance delivers automatically into the cup, proceed as descri-
bed in the section “Changing the quantity of milk and coee for
cappuccino”.
MAKING FROTHED MILK
Select the frothed milk function by pressing either (B8) ,
(B9) or (B10) twice. The quantity of frothed milk de-
livered is equal to that of the selected drink (cappuccino, latte
macchiato or caelatte).
The quantity of frothed milk cannot be set directly.
CHANGING THE QUANTITY OF MILK AND COFFEE
FOR CAPPUCCINO
The appliance is set by default to automatically deliver standard
quantities.
To change these quantities, proceed as follows:
1. Place a cup under the coee spouts and milk spout.
2. Hold the button (B8) until the message “MILK FOR
CAPPUCCINO PROGRAM QUANTITY” is displayed.
3. Release the button. The appliance starts delivering milk.
4. Once the required quantity of milk has been delivered into
the cup, press the button (B8) again.
5. After a few seconds, the appliance starts delivering coee
into the cup and the message “COFFEE F. CAPPUCCINO
PROGRAM QUANTITY” is displayed.
6. Once the required quantity of coee has been delivered into
the cup, press the button (B8) again. Coee delivery
stops.
The machine is now reprogrammed with the new milk and cof-
fee quantities.
MAKING LATTE MACCHIATO OR CAFFELATTE
• Preparetheapplianceasdescribedtomakecappuccino.
• Beforeattachingthemilkcontainertothenozzle,position
the froth regulator between the words CAPPUCCINO and
CAFFELATTE printed on the milk container lid.
If the froth is not satisfactory, move the regulator slightly
until you obtain the required froth.
• Pressthe button (B9) to request a latte macchiato.
or
• Pressthe button (B10) to request a caelatte and af-
ter a few seconds, frothed milk ows out of the milk spout
into the cup below. (Delivery stops automatically). Milk
delivery stops and the appliance starts delivering coee.
CHANGING THE QUANTITY OF COFFEE AND MILK
FOR LATTE MACCHIATO/CAFFELATTE
The appliance is set by default to deliver standard quantities of
coee or milk.
To change these quantities, proceed as follows:
• Fillthecontainerwithmilkuptothemaximumlevelindi-
cated on the container.
• Press the button corresponding to the preparation you
want to modify, latte macchiato (B9) or caelatte
(B10) for at least 8 seconds until the appliance displays
“MILK FOR MACCHIATO PROGRAM QUANTITY” or “MILK FOR
CAFFELATTE PROGRAM QUANTITY”
Then release the button.
The appliance starts delivering milk.
• Oncetherequiredquantityofmilkhasbeendelivered,press
the button selected previously. Milk delivery stops and the
quantity is memorised.
• Afterafewseconds,theappliancedeliverscoeeintothe
cup and displays “COFFEE FOR MACCHIATO PROGRAM QUAN-
TITY” or “COFFEE FOR CAFFELATTE PROGRAM QUANTITY”.
• Oncethe requiredquantityof coee has been delivered,
press the button selected previously. Coee delivery stops
and the quantity is memorised.
The appliance is now reprogrammed with the new settings and
the message “COFFEE STANDARD” is displayed.
CLEANING
Cleaning the machine
Do not use solvents or abrasive detergents to clean the coee
machine.Asoftdampclothwillsuce.
NEVER wash any of the components of the coee machine in the
dishwasher.
The following parts of the machine must be cleaned regularly:
• coeegroundscontainer(A4),
• driptray(A14),
• watertank(A12),
• coeespouts(A13),
• pre-groundcoeefunnel(A21),
• insideofthemachine,accessibleafteropeningtheservice
door (A2),
• infuser(A5).
Cleaning the coee grounds container
When “EMPTY GROUNDS CONTAINER” is displayed, the grounds
container must be emptied and cleaned.
To clean:
• opentheservicedooronthefrontoftheappliance(g.16),
extract the drip tray (g. 17) and clean.
• Cleanthegroundscontainerthoroughly.

16
Important! When extracting the drip tray, the groun-
ds container must always be emptied.
Cleaning the drip tray
Important! If the drip tray is not emptied the water
might overow.
This could damage the machine.
The drip tray is tted with a level indicator (red) showing the
level of water it contains (g. 28).
Before the indicator protrudes from the cup tray, the drip tray
must be emptied and cleaned.
To remove the tray:
1. Open the service door (g. 16).
2. Remove the drip tray and the grounds container (g. 17).
3. Empty the drip tray and grounds container (A4) and wash
them.
4. Replace the drip tray complete with grounds container
(A4).
5. Close the service door.
Cleaning the water tank
1. Clean the water tank (A12) regularly (about once a month)
with a damp cloth and a little mild washing up liquid.
2. Remove all traces of washing up liquid.
Cleaning the spouts
1. Clean the nozzles periodically using a sponge (g. 29).
2. Check regularly that the holes in the coee spout are not
blocked. If necessary, remove coee deposits with a too-
thpick (g. 27).
Cleaning the pre-ground coee funnel
Check regularly (about once a month) that the pre-ground coee
funnel is not blocked (g. 21).
Danger! Before performing any cleaning operations,
the machine must be turned o by pressing the main switch
(A23) and unplugged from the mains power supply.
Never immerse the coee machine in water.
Cleaning the inside of the coee machine
1. Check regularly (about once a week) that the inside of the
appliance is not dirty.
If necessary, remove coee deposits with a sponge.
2. Remove the residues with a vacuum cleaner (g. 30).
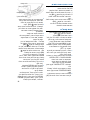
Cleaning the infuser
The infuser must be cleaned at least once a month.
Important! The infuser (A5) must not be removed
when the appliance is on.
Do not use force to remove the infuser.
1. Make sure the machine is correctly turned o (see “Turning
o”).
2. Open the service door (g. 16).
3. Remove the drip tray and grounds container (g. 17).
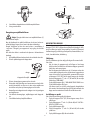
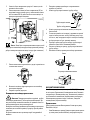
4. Press the two red release buttons inwards and at the same
time pull the infuser outwards (g. 31).
Important! Do not use washing up liquid to clean the
infuser. It would remove the lubricant applied to the inside of
the piston.
5. Soak the infuser in water for about 5 minutes, then rinse.
6. After cleaning, replace the infuser (A5) by sliding it onto the
internal support and pin at the bottom, then push the PUSH
symbol fully in until it clicks into place.
Please note: Ifyouencounterdicultyinsertingthe
infuser, before inserting it you must adapt it to the right dimen-
sion by pressing it forcefully from the bottom and top as shown
in the gure.
7. Once inserted, make sure the two red buttons have snap-
ped out.

17
EN
8. Replace the drip tray and grounds container.
9. Close the service door.
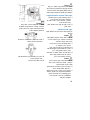
Cleaning the milk container
Important! Always clean the tubes inside the milk
container (C) when you prepare milk.
If there is still milk in the container, do not leave it out of the
refrigerator for longer than strictly necessary.
Clean the container each time you prepare milk as described in
Note 3 in the section “Making cappuccino”.
All components are dishwasher safe, placing them in the top
basket of the dishwasher.
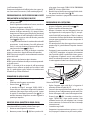
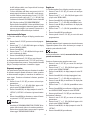
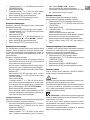
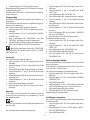
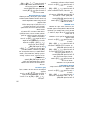
1. Turn the lid of the milk container clockwise then remove it.
2. Remove the milk spout and intake tube.
spout
milk intake tube
3. Remove the froth regulator by pulling it outwards.
4. Wash all the components thoroughly with hot water and
mild washing-up liquid.
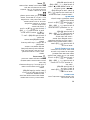
Make sure there are no milk residues left inside the holes
and the groove on the ne end of the froth regulator.
5. Check that the intake tube and spout are not clogged with
milk residues.
6. Replace the froth regulator, milk spout and intake tube.
7. Replace the milk container lid.
groove
froth regulator
hole hole
MENU SETTINGS
When you access the settings menu by pressing the P / ESC but-
ton (B7), the following menu items are available: Rinsing, Set
language, Energy Saving, Adjust time, Auto-start, Auto-o, Set
temperature, Water hardness, Statistics, Default values, Descale.
Rinsing
This function enables you to obtain hotter coee.
Proceed as follows:
• Whenyouturn the appliance on, if youwanttomake a
small cup of coee (less than 60 cc), preheat the cup by
rinsing it with hot water.
• Ifontheotherhandmorethan2/3minuteshavepassed
since the last coee was made, before requesting another
coee, you must preheat the infuser by rst pressing the P
/ ESC button (B7) to enter the menu then the ▽ and △
buttons (B5 and B6) to select the “RINSING” function.
Press the OK button (B4). “RINSING PRESS OK” is displayed.
Press the OK button (B4) again.
Deliver the water into the underlying drip tray or alterna-
tively use this water to ll (and then empty) the cup to be
used for the coee to preheat it.
Setting the language
To modify the language of the display, proceed as follows:
1. Press the P / ESC button (B7) to enter the settings menu.
2. Press the ▽ and △ buttons (B5 and B6) until “SET LAN
GUAGE” is displayed;
3. Press the OK button (B4);
4. Press the ▽ and △ buttons (B5 and B6) until the required
language is displayed;
5. Press the OK button (B4) to conrm;
6. Press the P/ ESC button (B7) to exit the menu.

18
Alternatively, hold the P / ESC button (B7) down for 10 seconds.
The languages scroll through.
Hold the OK button (B4) down for 5 seconds to conrm. The ap-
pliance goes o.
Energy Saving
Use this function to enable or disable Energy Saving.
When enabled, the function reduces energy consumption in
compliance with European regulations.
To enable or disable the function, proceed as follows:
1. Press the P / ESC button (B7) to enter the settings menu.
2. Press the ▽ and △ buttons (B5 and B6) until “ENERGY
SAVING” is displayed;
3. Press the OK button (B4). “DISABLE?” is displayed (or “ENA
BLE?” if the function has already been disabled).
4. Press the OK button (B4) to enable or disable the function
or the P / ESC button (B7) to exit the menu.
Please note: A few seconds may elapse between
“ENERGY SAVING ENABLED” mode and delivery of the rst
drink; “PREPARATION UNDERWAY” is displayed.
Adjust time
To adjust the time on the display, proceed as follows:
1. Press the P / ESC button (B7) to enter the settings menu.
2. Press the ▽ and △ buttons (B5 and B6) until “ADJUST
TIME” is displayed;
3. Press the OK button (B4). The hours ash on the display;
4. Press the ▽ and △ buttons (B5 and B6) to change the
hours;
5. Press the OK button (B4) to conrm. The minutes ash on
the display;
6. Press the ▽ and △ buttons (B5 and B6) to change the
minutes;
7. Press the OK button (B4) to conrm;
8. Press the P / ESC button (B7) to exit the settings menu.
Auto-start
You can set the auto-start time in order to have the appliance
ready at a certain time (for example in the morning) so you can
make coee immediately.
Please note:
To enable this function, the time must be set correctly.
To enable Auto-on, proceed as follows:
1. Press the P / ESC button (B7) to enter the settings menu.
2. Press the ▽ and △ buttons (B5 and B6) until “AUTO
START” is displayed;
3. Press the OK button (B4). “ENABLE?” is displayed;
4. Press the OK button (B4). The hours ash on the display;
5. Press the ▽ and △ buttons (B5 and B6) to choose the
hours;
6. Press the OK button (B4) to conrm. The minutes ash on
the display;
7. Press the ▽ and △ buttons (B5 and B6) to change the
minutes;
8. Press the OK button (B4) to conrm. “ENABLED” appears
under “AUTOSTART”.
9. Press the P/ ESC button (B7) to exit the menu.
To disable the function:
1. Press the P / ESC button (B7) to enter the settings menu.
2. Press the ▽ and △ buttons (B5 and B6) until “AUTO
START” is displayed;
3. Press the OK button (B4). “DISABLE?” is displayed;
4. Press the OK button (B4) to conrm;
5. Press the P/ ESC button (B7) to exit the menu. “DISABLED” is
displayed.
Auto-o (Standby)
The appliance is set by default to go o if not used for two
hours.
The time can be changed so that the appliance switches o after
15 or 30 minutes, or after 1, 2 or 3 hours.
To re-programme Auto-o, proceed as follows:
1. Press the P / ESC button (B7) to enter the settings menu.
2. Press the ▽ and △ buttons (B5 and B6) until “AUTOOFF”
is displayed;
3. Press the OK button (B4);
4. Press the ▽ and △ buttons (B5 and B6) until the required
time (15 or 30 minutes, or 1, 2 or 3 hours) is displayed;
5. Press the OK button (B4) to conrm;
6. Press the P/ ESC button (B7) to exit the menu.
Auto-o is programmed.
Setting the temperature
To modify the temperature of the water used to make the coee,
proceed as follows:
1. Press the P / ESC button (B7) to enter the settings menu.
2. Press the ▽ and △ buttons (B5 and B6) until “SET TEMPE
RATURE” is displayed;
3. Press the OK button (B4);
4. Press the ▽ and △ buttons (B5 and B6) until the required
temperature is displayed (l = low, llll = high);
5. Press the OK button (B4) to conrm;
6. Press the P/ ESC button (B7) to exit the menu.
Setting water hardness
The operating period can be extended if required, making desca-

19
EN
ling less frequent by programming the machine on the basis of
the real lime content in the water used.
Proceed as follows:
• Removethe“TotalHardnessTest”strip(attachedtopage2)
from its packaging then dip it fully in the water for a few
seconds.
Remove and wait about 30 seconds (until it changes colour
and forms red squares).
• Turn the appliance on by pressing the ON/OFF/standby but-
ton (A7).
• Press the P / ESC button (B7) to enter the menu and then the
▽ and △ buttons (B5 and B6) until “WATER HARDNESS” is
displayed.
• Press the OK button (B4);
• Press the ▽ and △ buttons (B5 and B6) until the number
coincides with the number of red squares on the test strip
(for example, if there are 3 red squares on the test strip, se-
lect the message “WATER HARDNESS lll” .
• Press the OK button (B4) to conrm.
The coee machine is now programmed to provide the de-
scale warning when actually necessary.
Adjusting contrast
To increase or reduce the contrast of the display, proceed as fol-
lows:
• PresstheP/ESCicon(B7)toenterthemenuandthenthe
▽ and △ (B5 e B6) icons (B5 and B6) until “CONTRAST”
is displayed.
• PresstheOKicon(B4).
• Pressthe▽ and △ (B5 e B6) icons (B5 and B6) until the
required level of contrast is displayed: (l = low; lll✍
ll = high)
• PresstheOKicon(B4)toconrm.
• PresstheP/ESCicon(B7)oncetoexitthefunctionortwice
to exit the menu.
Statistics function
This displays statistics relating to the machine.
To display, proceed as follows:
1. Press the P / ESC button (B7) to enter the settings menu.
2. Press the ▽ and △ buttons (B5 and B6) until “STATISTICS”
is displayed;
3. Press the OK button (B4);
4. By pressing the ▽ and △ buttons (B5 and B6), you can
check:
- how many coees have been made;
- how many milk drinks have been made;
- the total number of litres of water delivered.
- how many times the machine has been descaled.
5. Press the P/ ESC button (B7) twice to exit the menu.
Default values (reset)
This resets all menu settings and programmed quantities back
to the default values (with the exception of the language which
remains as set).
To reset the default values, proceed as follows:
1. Press the P /ESC button (B7) to enter the menu;
2. Press the ▽ and △ buttons (B5 and B6) until “DEFAULT
VALUES” is displayed;
3. Press the OK button (B4);
4. “CONFIRM?” is displayed;
5. Press the OK button (B4) to conrm and exit.
Descaling
Descale the machine when the message “DESCALE” ashes on
the display.
Important!
Descaler contains acids which may irritate the skin and eyes.
It is vital to respect the manufacturer’s safety warnings given on
the descaler pack and the warnings relating to the procedure to
follow in the event of contact with the skin and eyes.
Please note:
Use lactic acid bacteria based descaler, for example De’Longhi
SKU: 5513214981.
Under no circumstances should you use sulphamic or acetic ba-
sed descalers. Their use invalidates the guarantee.
Failure to descale the appliance as described above also invali-
dates the guarantee.
1. Turn the machine on.
2. Enter the settings menu by pressing the P / ESC button (B7).
Press the ▽ and △ buttons (B5 and B6) until “DESCALE” is
displayed;
3. Press the OK button (B4) and “CONFIRM?” is displayed,
press the OK button (B4) and pour the descaler.
4. Before conrming, empty the water tank completely
(A12).
Pour the descaler diluted with water (respecting the pro-
portions indicated on the descaler pack) into the water tank
and put the water tank back in the appliance.
Danger of burns!
Hot water containing acid ows out of the hot water spout.
Avoid contact with splashes of water.
5. Place an empty container with a minimum capacity of 1.5
litres under the hot water spout.
6. Conrm with the OK button (B4).
7. After conrming by pressing OK, the message “DESCALING

20
UNDERWAY” is displayed.
The descale programme starts and the descaler liquid co-
mes out of the water spout.
The descale programme automatically performs a series of
rinses and pauses to remove limescale deposits from inside
the machine.
After about 30 minutes, the message “RINSING FILL TANK” is
displayed.
8. The appliance is now ready for rinsing through with clean
water. Remove the water tank, empty, rinse under running
water, ll with clean water and replace.
“RINSING PRESS OK” is displayed.
9. Empty the container used to collect the descaler solution
and replace it under the hot water spout.
10. Press the OK button (B4) to start rinsing.
Hot water ows out of the spout and the message “RINSING
PLEASE WAIT” is displayed.
11. When the water tank is completely empty, the message
“RINSING COMPLETE PRESS OK” is displayed.
12. Press the OK button (B4). The appliance goes o automati-
cally.
TURNING THE APPLIANCE OFF
Each time the appliance is turned o, it performs an automatic
rinse cycle which cannot be interrupted.
Danger of burns! During rinsing, a little hot water
ows from the coee spouts.
Avoid contact with splashes of water.
To turn the appliance o, press the ON/OFF/standby button
(A7).
The appliance performs a rinse cycle then goes o.
Please note: If the appliance is not used for an exten-
ded period, place the main switch on the back of the appliance
(A23) in the 0 position.
TECHNICAL DATA
Voltage: 220-240 V~ 50/60 Hz max. 10A
Absorbed power: 1350W
Pressure: 15 bars
Water tank capacity: 1.8 litres
Size: LxHxD: 594x 375/378/454x412 mm
Weight: 26 kg
The appliance complies with the following EC direc-
tives:
• Low Voltage Directive 2006/95/EC and subsequent
amendments;
• EMCDirective2004/108/ECandsubsequentamendments;
• ECRegulation1275/2008forstandby
Materials and accessories coming into contact with food conform
to European regulation (EC) no. 1935/2004.

21
EN
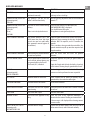
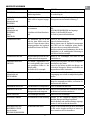
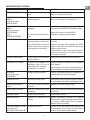
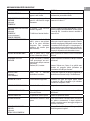
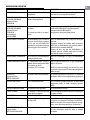
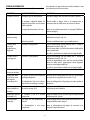
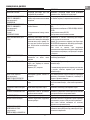
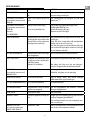
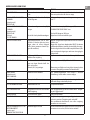
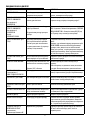
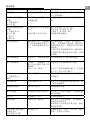
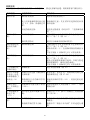
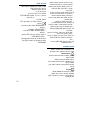
DISPLAYED MESSAGES
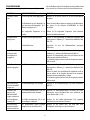
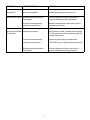
DISPLAYED MESSAGE POSSIBLE CAUSE SOLUTION
FILL TANK The water tank is empty or
positioned incorrectly.
Fill the tank with water and/or insert it correctly,
pushing it as far as it will go.
GROUND TOO FINE ADJUST MILL
(alternating with)
PRESS OK
The grinding is too ne and the
coee is delivered too slowly.
Turn the grinding adjustment dial one click clockwise
towards “7”.
GROUND TOO FINE ADJUST MILL
(alternating with)
PRESS OK
(then)
FILL TANK
The tank has been removed during
delivery.
There is air in the hydraulic circuit.
Insert the tank and press the OK button (B4).
“HOT WATER PRESS OK” is displayed.
Press the OK button (B9) again.
The appliance is once again ready for use.
EMPTY GROUNDS CONTAINER The grounds container (A4) is too
full or more than three days have
passed since you last made coee
(this guarantees correct hygiene of
the machine).
Empty the grounds container and clean, then replace.
Important: when removing the drip tray, the grounds
container MUST be emptied, even if it contains few
grounds.
If this is not done, when you make the next coees, the
grounds container may ll up more than expected and
clog the machine.
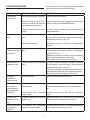
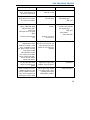
INSERT GROUNDS CONTAINER After cleaning, the grounds container
has not been replaced.
Open the service door and insert the grounds
container.
ADD PRE-GROUND COFFEE The “pre-ground coee” function has
been selected without placing any
pre-ground coee in the funnel.
The funnel (A21) is blocked.
Extract the appliance and place pre-ground coee in
the funnel.
Empty the funnel with the help of a knife as described
in the section “Cleaning the pre-ground coee funnel”.
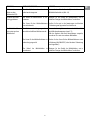
DESCALE
(alternating with)
COFFEE STANDARD
The machine must be descaled. The descaling procedure described in the “Descaling”
section needs to be performed as soon as possible.
LESS COFFEE Too much coee has been used. Select a milder taste or reduce the quantity of pre-
ground coee, then make the coee again.
FILL BEANS CONTAINER The coee beans have run out. Fill the beans container
INSERT INFUSER ASSEMBLY The infuser has not been replaced
after cleaning.
Insert the infuser as described in the section “Cleaning
the infuser”.
CLOSE DOOR The service door is open Close the service door.
GENERAL ALARM The inside of the appliance is very
dirty.
Clean the inside of the appliance thoroughly, as
described in the section “Cleaning and maintenance”.
If the message is still displayed after cleaning, contact
a service centre.
EMPTY CIRCUIT FILL CIRCUIT
alternating with
HOT WATER PRESS OK
The water circuit is empty Connect the hot water nozzle (A10) and press OK to
deliver water from it, until it ows out normally.

22
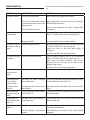
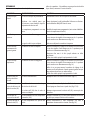
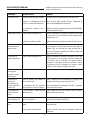
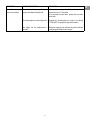
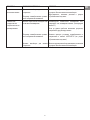
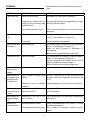
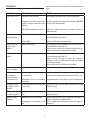
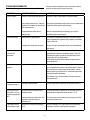
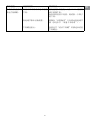
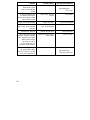
TROUBLESHOOTING
Below is a list of some of the possible malfunctions. If the pro-
blem cannot be resolved as described, contact Customer Servi-
ces.
PROBLEM POSSIBLE CAUSE SOLUTION
The coee is not hot The cups were not preheated.
The infuser has cooled down because
2/3 minutes have elapsed since the last
coee was made.
The set temperature is too low.
Warm the cups by rinsing them with hot water.
Before making coee, preheat the infuser by selecting the
RINSING function in the menu.
Change the set temperature (see section “Changing coee
temperature”).
The coee is not
creamy enough.
The coee is ground too coarsely.
Wrong type of coee
Turn the grinding adjustment dial one click anticlockwise
towards “1” while the coee mill is in operation (g. 14).
Use a type of coee for espresso coee machines.
The coee is delivered
too slowly or a drop at
a time.
The coee is ground too nely. Turn the grinding adjustment dial one click clockwise towards
“7” while the coee mill is in operation (g. 14).
Continue one click at a time until coee delivery is
satisfactory.
The eect is only visible after delivering 2 coees.
The coee is delivered
too quickly.
The coee is ground too coarsely. Turn the grinding adjustment dial one click anticlockwise
towards “1” while the coee mill is in operation (g. 14).
Avoid turning the grinding adjustment dial excessively
otherwise when you select two cups, the coee may be
delivered a drop at a time.
The eect is only visible after delivering 2 coees.
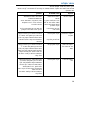
Coee does not come
out of one of the
spouts
The spouts are blocked. Clean the spouts with a toothpick (g. 27).
The coee does not
come out of the
spouts, but from
around the service
door (A2).
The holes in the spouts are clogged
with dry coee dust.
The coee guide (A3) inside the service
door is blocked.
If necessary, remove coee deposits with a toothpick, sponge
or sti bristled kitchen brush (g. 27-29).
Thoroughly clean the coee guide (A3), particularly near the
hinges.
Water comes out of
the spouts instead of
coee.
The pre-ground coee may be blocked
in the funnel (A21).
Clean the funnel (A21) with a wooden or plastic fork, clean the
inside of the machine.
The milk does not
come out of the milk
spout (C5).
The intake tube is not inserted or is
inserted incorrectly.
Insert the intake tube (C4) in the rubber washer in the milk
container lid (g. 24).
The milk is not well
frothed.
The milk container lid is dirty.
The froth regulator is not positioned
correctly.
Clean the milk container lid as described in the section
“Cleaning the milk container”.
Adjust following the instructions in the section “Making
cappuccino”.

23
EN
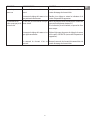
PROBLEM POSSIBLE CAUSE SOLUTION
The milk contains
bubbles or squirts out of
the milk spout.
The milk is not cold enough or is not
semi-skimmed.
The froth regulator is incorrectly
adjusted.
The milk container lid is dirty.
You should ideally use skimmed or semi-skimmed milk at
refrigerator temperature (about 5°C).
If the result is not as you wished, try changing brand of
milk.
Move the froth regulator slightly towards the word
“CAFFELATTE” (see section “Making cappuccino”).
Clean the milk container lid as described in the section
“Cleaning the milk container”.
Page is loading ...
Page is loading ...
Page is loading ...
Page is loading ...
Page is loading ...
Page is loading ...
Page is loading ...
Page is loading ...
Page is loading ...
Page is loading ...
Page is loading ...
Page is loading ...
Page is loading ...
Page is loading ...
Page is loading ...
Page is loading ...
Page is loading ...
Page is loading ...

6
TABLE DES MATIÈRES
INTRODUCTION ........................................................................ 7
Symboles utilisés dans le présent mode d’emploi .........................7
Lettres entre parenthèses..............................................................7
Dépannage et réparation ..............................................................7
SÉCURITÉ .................................................................................. 7
Consignes élémentaires de sécurité ..............................................7
Utilisation conforme .....................................................................7
Mode d’emploi ..............................................................................8
DESCRIPTION ............................................................................ 8
Description de l’appareil ...............................................................8
Description du panneau de commande .........................................8
Description du réservoir à lait et des accessoires ...........................8
VÉRIFICATIONS PRÉLIMINAIRES .............................................. 8
Vérication de l’appareil ...............................................................8
Installation de l’appareil ...............................................................8
Branchement de l’appareil ............................................................8
ÉLIMINATION ............................................................................9
INSTALLATION ENCASTRÉE
.......................................................9
PREMIÈRE MISE EN SERVICE DE L’APPAREIL
.......................... 12
MISE EN MARCHE ET PRÉCHAUFFAGE
...................................12
PRÉPARATION DU CAFÉ EN GRAINS
..................................... 12
MODIFIER LA QUANTITE DE CAFE DANS LA TASSE
................ 13
Programmation de la quantité ....................................................13
RÉGLAGE DU MOULIN À CAFÉ ............................................... 13
PRÉPARATION D’EXPRESSO AVEC DU CAFÉ PRÉMOULU
À LA PLACE DES GRAINS
......................................................14
PRODUCTION D’EAU CHAUDE
................................................. 14
MODIFICATION DE LA QUANTITÉ D’EAU CHAUDE
................... 14
PRÉPARATION DE CAPPUCCINO
.............................................. 14
PRÉPARATION DE LAIT MOUSSEUX ........................................ 15
MODIFICATION DE LA QUANTITÉ DE LAIT ET DE CAFÉ
POUR LE CAPPUCCINO
............................................................ 15
PRÉPARATION DE LATTE MACCHIATO ET DE CAFFELATTE
....... 15
MODIFICATION DE LA QUANTITÉ DE LAIT ET DE CAFÉ
POUR LE LATTE MACCHIATO/CAFFELATTE
..............................15
NETTOYAGE
.............................................................................15
Nettoyage de la machine ............................................................15
Nettoyage du tiroir à marc de café ..............................................16
Nettoyage de l’égouttoir .............................................................16
Nettoyage du réservoir d’eau ......................................................16
Nettoyage des buses
...................................................................16
Nettoyage de l’entonnoir pour café prémoulu
.............................16
Nettoyage de l’intérieur de la machine
.......................................16
Nettoyage de l’infuseur
...............................................................16
Nettoyage du réservoir à lait ......................................................17
MENU PARAMÈTRES ...............................................................17
Rinçage .......................................................................................17
Réglage de la langue ..................................................................18
Economie d’énergie .....................................................................18
Réglage de l’heure ......................................................................18
Démarrage auto ..........................................................................18
Arrêt automatique (veille) ..........................................................19
Réglage de la température ..........................................................19
Réglage de la dureté de l’eau ......................................................19
Réglage du contraste ..................................................................19
Fonction statistiques ...................................................................19
Valeurs d’usine (réinitialisation) .................................................19
Détartrage ..................................................................................19
ARRÊT DE L’APPAREIL ............................................................. 20
CARACTÉRISTIQUES TECHNIQUES
..........................................20
MESSAGES AFFICHÉS À L’ÉCRAN
............................................ 21
DÉPANNAGE
........................................................................... 22
Page is loading ...
Page is loading ...
Page is loading ...
Page is loading ...
Page is loading ...
Page is loading ...
Page is loading ...
Page is loading ...
Page is loading ...
Page is loading ...
Page is loading ...
Page is loading ...
Page is loading ...
Page is loading ...
Page is loading ...
Page is loading ...
Page is loading ...
Page is loading ...
Page is loading ...
Page is loading ...
Page is loading ...
Page is loading ...
Page is loading ...
Page is loading ...
Page is loading ...
Page is loading ...
Page is loading ...
Page is loading ...
Page is loading ...
Page is loading ...
Page is loading ...
Page is loading ...
Page is loading ...
Page is loading ...
Page is loading ...
Page is loading ...
Page is loading ...
Page is loading ...
Page is loading ...
Page is loading ...
Page is loading ...
Page is loading ...
Page is loading ...
Page is loading ...
Page is loading ...
Page is loading ...
Page is loading ...
Page is loading ...
Page is loading ...
Page is loading ...
Page is loading ...
Page is loading ...
Page is loading ...
Page is loading ...
Page is loading ...
Page is loading ...
Page is loading ...
Page is loading ...
Page is loading ...
Page is loading ...
Page is loading ...
Page is loading ...
Page is loading ...
Page is loading ...
Page is loading ...
Page is loading ...
Page is loading ...
Page is loading ...
Page is loading ...
Page is loading ...
Page is loading ...
Page is loading ...
Page is loading ...
Page is loading ...
Page is loading ...
Page is loading ...
Page is loading ...
Page is loading ...
Page is loading ...
Page is loading ...
Page is loading ...
Page is loading ...
Page is loading ...
Page is loading ...
Page is loading ...
Page is loading ...
Page is loading ...
Page is loading ...
Page is loading ...
Page is loading ...
Page is loading ...
Page is loading ...
Page is loading ...
Page is loading ...
Page is loading ...
Page is loading ...
Page is loading ...
Page is loading ...
Page is loading ...
Page is loading ...
Page is loading ...
Page is loading ...
Page is loading ...
Page is loading ...
Page is loading ...
Page is loading ...
Page is loading ...
Page is loading ...
Page is loading ...
Page is loading ...
Page is loading ...
Page is loading ...
Page is loading ...
Page is loading ...
Page is loading ...
Page is loading ...
Page is loading ...
Page is loading ...
Page is loading ...
Page is loading ...
Page is loading ...
Page is loading ...
Page is loading ...
Page is loading ...
Page is loading ...
Page is loading ...
Page is loading ...
Page is loading ...
Page is loading ...
Page is loading ...
Page is loading ...
Page is loading ...
Page is loading ...
Page is loading ...
Page is loading ...
Page is loading ...
Page is loading ...
Page is loading ...
Page is loading ...
Page is loading ...
Page is loading ...
Page is loading ...
Page is loading ...
Page is loading ...
Page is loading ...
Page is loading ...
Page is loading ...
Page is loading ...
Page is loading ...
Page is loading ...
Page is loading ...
Page is loading ...
Page is loading ...
Page is loading ...
Page is loading ...
Page is loading ...
Page is loading ...
Page is loading ...
Page is loading ...
Page is loading ...
Page is loading ...
Page is loading ...
Page is loading ...
Page is loading ...
Page is loading ...
Page is loading ...
Page is loading ...
Page is loading ...
Page is loading ...
Page is loading ...
Page is loading ...
Page is loading ...
Page is loading ...
Page is loading ...
Page is loading ...

5713220661 /03.13
95
-
 1
1
-
 2
2
-
 3
3
-
 4
4
-
 5
5
-
 6
6
-
 7
7
-
 8
8
-
 9
9
-
 10
10
-
 11
11
-
 12
12
-
 13
13
-
 14
14
-
 15
15
-
 16
16
-
 17
17
-
 18
18
-
 19
19
-
 20
20
-
 21
21
-
 22
22
-
 23
23
-
 24
24
-
 25
25
-
 26
26
-
 27
27
-
 28
28
-
 29
29
-
 30
30
-
 31
31
-
 32
32
-
 33
33
-
 34
34
-
 35
35
-
 36
36
-
 37
37
-
 38
38
-
 39
39
-
 40
40
-
 41
41
-
 42
42
-
 43
43
-
 44
44
-
 45
45
-
 46
46
-
 47
47
-
 48
48
-
 49
49
-
 50
50
-
 51
51
-
 52
52
-
 53
53
-
 54
54
-
 55
55
-
 56
56
-
 57
57
-
 58
58
-
 59
59
-
 60
60
-
 61
61
-
 62
62
-
 63
63
-
 64
64
-
 65
65
-
 66
66
-
 67
67
-
 68
68
-
 69
69
-
 70
70
-
 71
71
-
 72
72
-
 73
73
-
 74
74
-
 75
75
-
 76
76
-
 77
77
-
 78
78
-
 79
79
-
 80
80
-
 81
81
-
 82
82
-
 83
83
-
 84
84
-
 85
85
-
 86
86
-
 87
87
-
 88
88
-
 89
89
-
 90
90
-
 91
91
-
 92
92
-
 93
93
-
 94
94
-
 95
95
-
 96
96
-
 97
97
-
 98
98
-
 99
99
-
 100
100
-
 101
101
-
 102
102
-
 103
103
-
 104
104
-
 105
105
-
 106
106
-
 107
107
-
 108
108
-
 109
109
-
 110
110
-
 111
111
-
 112
112
-
 113
113
-
 114
114
-
 115
115
-
 116
116
-
 117
117
-
 118
118
-
 119
119
-
 120
120
-
 121
121
-
 122
122
-
 123
123
-
 124
124
-
 125
125
-
 126
126
-
 127
127
-
 128
128
-
 129
129
-
 130
130
-
 131
131
-
 132
132
-
 133
133
-
 134
134
-
 135
135
-
 136
136
-
 137
137
-
 138
138
-
 139
139
-
 140
140
-
 141
141
-
 142
142
-
 143
143
-
 144
144
-
 145
145
-
 146
146
-
 147
147
-
 148
148
-
 149
149
-
 150
150
-
 151
151
-
 152
152
-
 153
153
-
 154
154
-
 155
155
-
 156
156
-
 157
157
-
 158
158
-
 159
159
-
 160
160
-
 161
161
-
 162
162
-
 163
163
-
 164
164
-
 165
165
-
 166
166
-
 167
167
-
 168
168
-
 169
169
-
 170
170
-
 171
171
-
 172
172
-
 173
173
-
 174
174
-
 175
175
-
 176
176
-
 177
177
-
 178
178
-
 179
179
-
 180
180
-
 181
181
-
 182
182
-
 183
183
-
 184
184
-
 185
185
-
 186
186
-
 187
187
-
 188
188
-
 189
189
-
 190
190
-
 191
191
-
 192
192
-
 193
193
-
 194
194
-
 195
195
-
 196
196
-
 197
197
-
 198
198
-
 199
199
-
 200
200
-
 201
201
-
 202
202
-
 203
203
-
 204
204
-
 205
205
-
 206
206
-
 207
207
-
 208
208
-
 209
209
-
 210
210
-
 211
211
-
 212
212
-
 213
213
-
 214
214
-
 215
215
-
 216
216
-
 217
217
-
 218
218


V-ZUG 74A Instructions Manual
- Category
- Coffee makers
- Type
- Instructions Manual
Ask a question and I''ll find the answer in the document
Finding information in a document is now easier with AI
in other languages
Related papers
Other documents
-
Bauknecht KMT 9145 IXL User guide
-
Smeg CMS6451X User manual
-
Electrolux EBCP5452AX User manual
-
Whirlpool ACE 102 IXL User guide
-
Whirlpool ACE 102 IX User guide
-
Hotpoint-Ariston CM 9945 HA User manual
-
Hotpoint Ariston CM 9945 HA User guide
-
Smeg CMS4604 User manual
-
Bauknecht KMT 9145 PT Owner's manual
-
Smeg CMSU6451X User manual