Russell Hobbs 18036-56 Owner's manual
- Category
- Bread making machines
- Type
- Owner's manual
This manual is also suitable for
Page is loading ...
Page is loading ...

3
Read the instructions, keep them safe, pass them on if you pass the appliance on. Remove all
packaging before use.
A IMPORTANT SAFEGUARDS
Follow basic safety precautions, including:
1 This appliance can be used by children aged from 8 years and
above and persons with reduced physical, sensory or mental
capabilities or lack of experience and knowledge if they have
been supervised/instructed and understand the hazards involved.
Children shall not play with the appliance. Cleaning and user
maintenance shall not be done by children unless they are older
than 8 and supervised. Keep the appliance and cable out of reach
of children under 8 years.
2 Don’t connect the appliance via a timer or remote control system.
¬ The surfaces of the appliance will get hot.
3 If the cable is damaged, it must be replaced by the manufacturer,
its service agent, or someone similarly qualified, to avoid hazard.
H Don’t immerse the appliance in liquid.
4 Don’t use the appliance near or below combustible materials (e.g. curtains).
5 Don’t cover the appliance or put anything on top of it.
6 Unplug the appliance when not in use, before moving and before cleaning.
7 Don’t use accessories or attachments other than those we supply.
8 Don’t use the appliance for any purpose other than those described in these instructions.
9 Don’t operate the appliance if it’s damaged or malfunctions.
10 To stop the appliance, press the I button, and hold it down for 2 seconds.
household use only
U BEFORE USING FOR THE FIRST TIME
Clean the appliance, to remove manufacturing dust, etc.
C HOW IT WORKS – IN BRIEF
1 Choose a recipe.
2 Put the ingredients into the bread pan in the correct order – this is essential.
3 Put the bread pan into the appliance and close the lid.
4 Use the menu Z button to choose a program (1-12).
5 Use the crust colour ghh button to move the arrow on the top of the display to light g ,
medium h , or dark h.
6 Use the size button FGH to move the arrow on the bottom of the display to small F (500g),
medium G (750g), or large H (1kg).
7 Use the + and – buttons to set the timer (optional).
8 Press the I button to start the program.
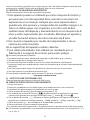
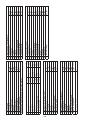
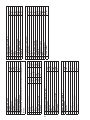
instructions
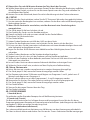
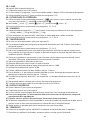
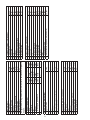
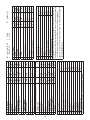
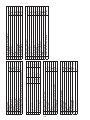
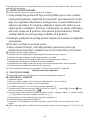
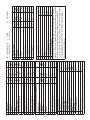
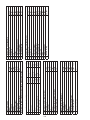
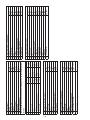
diagrams
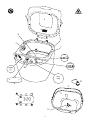
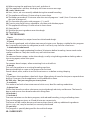
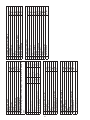
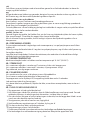
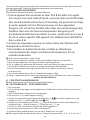
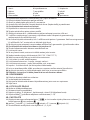
1 lid
2 handle
3 window
4 vents
5 hinges
6 drive
7 spring clip
8 light
9 timer
10 paddle
11 bread pan
12 shaft
u size
d crust colour

4
9 The display will count down, then beep when it’s finished.
, After the beep, the appliance will keep warm for an hour, on programs 1, 2, 3, 5, 8, 9, 10, and
11.
C PREPARATION
10 Sit the appliance on a stable, level, heat-resistant surface.
11 Leave a space of at least 50mm all round the appliance.
12 Open the lid.
13 Use the handle to pull the bread pan up and out of the appliance.
14 Fit the paddle to the shaft in the bottom of the bread pan.
15 The shaft and the hole in the paddle are D-shaped.
16 Set out a wire tray (for the bread), a heatproof mat (for the bread pan), and oven gloves.
18 It’s important that ingredients are measured accurately.
19 Use the same measuring spoons for all the ingredients.
20 Level the spoons with the back of a knife.
21 Don’t use a measuring jug – electronic scales are much more accurate, so weigh the water.
22 1 millilitre of water weighs 1 gram, so we’ve shown the water in the recipes as grams (g),
rather than millilitres (ml).
23 If you still want to use a measuring jug, 1 millilitre of water weighs 1 gram, you may replace
grams “g” with millilitres “ml”, but the results may not be consistent.
24 If you’re using a recipe from elsewhere, replace millilitres (ml) of water with grams (g) for
accuracy.
25 It’s important that you add the ingredients in the correct order.
26 We’ve numbered them, to make it easy.
27 First, add the liquid.
28 It’s usually water, but it might include milk and/or eggs.
29 Water/milk must be warm (20°C-25°C/68°F-77°F).
30 Both hot and cold water will inhibit the yeast.
31 Add sugar and salt, if required.
32 Add wet ingredients – honey, syrup, molasses ...
33 Add dry ingredients – flour, dried milk, herbs, spices ...
34 Finally – add the dried yeast (or baking powder/baking soda).
35 Lay it on top, and don’t get it wet, or it’ll start working too soon.
, If you’re using the timer, it’s even more important that the yeast and water are well separated.
36 Nuts, raisins, etc. are normally added during the second kneading.
C LOAD UP
36 Clean any spillage off the bread pan.
37 Lower the bread pan into the appliance.
38 You may have to turn the drive slightly to allow it to fit.
39 Close the lid.
C SWITCHING ON
40 Put the plug into the power socket.
41 The appliance will beep.
42 The display shows 1P (program 1, with medium crust), then 3:20 (the program duration).
43 Use the menu Z button to choose a program (1-12).
C CRUST COLOUR
44 Use the crust colour ghh button to move the arrow on the top of the display to light g ,
medium h , or dark h.
, light g (display = L ), medium h (display = P ), dark h (display = H )
45 This function only works with programs 1, 2, 3, and 5.

5
C SIZE
46 Use the size button FGH to move the arrow on the bottom of the display to small F (500g),
medium G (750g), or large H (1kg).
47 These sizes are approximate – think of them as small, medium, and large.
48 This function only works with programs 1, 2, 3, 5, and 8.
C THE TIMER
49 If you’re not using the timer, jump to point 63.
50 Use the timer to set the finishing time up to 13 hours ahead (including recipe time).
51 This function only works with programs 1, 2, 3, and 5.
52 Don’t use the timer with a recipe containing fresh milk, yoghurt, cheese, eggs, fruit, onions,
or anything that might go off if left for a few hours in a warm moist environment.
53 Leaving the ingredients together for an extended period will inevitably cause some
interaction, especially on a hot or humid day
54 Don’t use moist ingredients like fruit.
55 Add any nuts or raisins after the flour
56 Decide when you want your bread to be ready, e.g. 1800.
57 Check the time now, e.g. 0700.
58 Calculate the difference between the two times, e.g. 11 hours.
59 Use the + and - buttons to change the time shown on the display from the program time to
the time you’ve just calculated (e.g. 11 hours).
60 Each press will decrease - or increase + the time displayed by 10 minutes
61 You can’t reduce the time to less than the program time.
62 The maximum time which can be shown on the display is 13 hours.
C START THE APPLIANCE
63 Press the I button to start the program.
64 The appliance will beep.
65 The display will count down, then beep when it’s finished.
66 If you’re using program 3, kneading won’t start for 30 minutes, while the ingredients are
warmed.
67 Have a look at the dough (through the window) after 30 minutes of kneading.
68 If you see any unincorporated ingredients round the walls of the bread pan, open the lid,
scrape them into the dough with a spatula, then close the lid.
69 Scrape only the walls, to avoid the paddle.
C FINISHED?
70 To stop the appliance, press the I button, and hold it down for 2 seconds.
71 For best results, remove the bread as soon as it is finished.
72 If you don’t stop it, the appliance will keep the bread warm for an hour.
73 It will then beep 10 times, and switch off.
74 Unplug the appliance.
, Steam and hot air will escape when you lift the lid.
75 Wear oven gloves.
76 Open the lid.
77 Use the handle to pull the bread pan up and out of the appliance.
78 Turn the bread pan upside down and shake it to release the bread.
79 You may have to run a heatproof plastic or wooden spatula round the inside of the bread pan.
80 Put the bread on the wire tray to cool for 20-30 minutes before cutting.
81 Put the bread pan on the heatproof mat.
82 Check that the paddle is still in the bread pan.
83 If the paddle is in the bread, dig it out of the bread with a plastic or wooden spatula.

6
84 Before reusing the appliance, let it cool, and clean it.
85 If the appliance is too hot, the display will show an error message.
C nuts, raisins, etc
86 Nuts, raisins, etc. are normally added during the second kneading.
87 The appliance will beep 15 times when it wants them.
88 The beeps come about 22 minutes after the start of programs 1 and 5, but 47 minutes after
the start of program 3.
89 This function only works with programs 1, 3, and 5.
90 If you’re using fresh fruit or vegetables, dry them with kitchen paper.
91 The appliance will beep 15 times when it wants them:
92 Open the lid.
93 Sprinkle the new ingredients over the dough.
94 Close the lid.
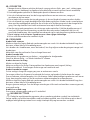
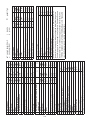
C THE PROGRAMS
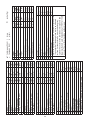
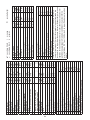
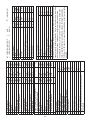
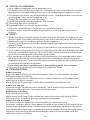
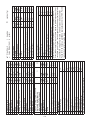
1 basic
For basic white bread, or recipes based on white bread dough.
2 French
For French-type bread, with a lighter texture and crispier crust. Recipes suitable for this program
don’t normally use butter (or margarine) or milk. It will only stay fresh for a few hours.
3 wholewheat/wholemeal
The heavier flour needs preheating for about 30 minutes before kneading. Loaves tends to be
smaller and denser. They don’t work very well with the timer.
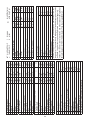
4 cake
For cake and batter recipes, rather than dough, usually using baking powder or baking soda as
the raising agent, rather than yeast.
5 sweet
For sweeter bread recipes, often containing fruit or dried fruit.
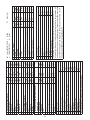
6 dough
This uses the appliance as a mixing/kneading machine.
Remove the dough as soon as the program has finished.
Punch it back, cover, and let it rest for ten minutes or so before cutting/shaping.
7 jam
This preheats the ingredients, then boils them. Allow plenty of room for the jam to expand when
boiling. If jam gets into the appliance, it will be difficult to clean.
, Take care – hot jam can give you a nasty burn.
8 sandwich
This makes a loaf with a loose texture and a thin crust, ideal for making sandwiches.
9 gluten-free
Gluten-free bread uses other substances to give the dough elasticity and bounce. The bread is
denser and coarser than bread made with strong flour.
10 fastbake I
11 fastbake II
These are variations on the basic program, with reduced kneading, rising, and baking times.
They cut the program times to 55 and 80 minutes respectively
The loaves will be smaller, denser, and coarser than normal, and any additional ingredients
(raisins, nuts, etc.) may be mashed, or unevenly distributed
12 speciality
This program is specially designed for the malt loaf recipe.
C INGREDIENTS

7
flour
The type of flour used is important. You can’t use “ordinary” plain flour for making bread. Buy
flour with “strong” or “bread” in its title. The commonest is normally marketed as strong white
flour. These “strong” or “bread” flours contain more gluten than ordinary baking flour. Gluten is
the protein that gives the bread its structure and texture. It retains the carbon dioxide produced
by the yeast, putting the elasticity, the bounce, into the dough.
other bread flours
These include strong brown flour, strong wholemeal, and whole wheat bread making flours.
These have lower levels of gluten than strong white flour. Brown loaves tend to be smaller and
denser than white loaves. Generally, if you substitute strong white flour for half of the brown
flour in a recipe, you can make bread with a “brown bread” flavour and a “white bread” texture.
yeast
1 Yeast is a living organism. Given moisture, food, and warmth, the yeast releases carbon
dioxide, which make the dough rise.
2 We recommend using “dried active yeast”, also known as “dry active yeast”, and “instant
yeast” or “easy blend dried yeast”. These are usually sold in 7 gram sachets and don’t have to
be dissolved in water first.
3 If you don’t use all the yeast in a sachet, throw the remainder away.
4 Don’t use fresh or tinned yeast – they won’t work with your appliance.
5 Check the “best before” date on the sachet of yeast.
6 You may also see “fast action’ or “bread machine” yeast – really potent yeasts that can make
dough rise up to 50% faster. If you use these, you’ll need to experiment to get the best results.
You could start by trying them with programs 10 and 11.
liquid
1 The liquid ingredient is normally water or milk, or a mixture of these.
2 Water makes a crisp crust. Milk makes a softer crust.
3 Water/milk must be warm (20°C-25°C/68°F-77°F).
4 Some recipes call for hand-hot water (that’s 35°C-50°C/95°F-122°F), to speed up the process.
Only the fast yeasts can handle this temperature.
5 Don’t use milk with the timer.
butter/fat
These make the dough tender, enhance the flavour, and retain moisture, making the bread keep
fresh longer. Margarine or olive oil can be used instead of butter, but they are less effective.
Do not use low fat spread.
sugar
Sugar feeds the yeast, adds flavour, texture, and helps with browning the crust. Some sachets of
yeast do not need sugar to activate.
You may use honey, syrup, or molasses instead of sugar, provided you adjust the liquid
ingredient compensate.
Don’t use artificial sweeteners.
salt
Salt adds flavour, and helps control the yeast, to prevent the bread rising too much, then
collapsing.
eggs
Eggs make bread richer and more nutritious, add colour, and help with structure and texture. If
you add eggs, adjust the other liquid ingredients.
herbs and spices
These can be added at the beginning, along with the main ingredients.
Dried cinnamon, ginger, oregano, parsley, and basil add flavour and interest. Use in small
quantities (a teaspoon).

8
Fresh herbs, like garlic and chives may contain enough liquid to upset the balance of the recipe,
so adjust the liquid content.
nuts, raisins, etc
Dried fruit and nuts should be chopped finely; cheese should be grated; chocolate chips must
be chips, not lumps. Don’t add too much, or the bread may not rise.
When using fresh fruit and nuts, you may need to adjust the liquid ingredient to compensate.
C STORING BREAD
Store bread for a couple of days at room temperature, in a polythene bag with the air squeezed
out.
To freeze bread, let it cool, put it in a polythene bag, suck all the air from the bag, then seal it.
Don’t put bread in the fridge. The chemical reactions involved in bread going stale work best at
fridge temperatures.
C KITCHEN TEMPERATURE
The appliance works best in a kitchen with a temperature of 15-34°C (59-93°F).
C POWER CUTS
If a power cut lasts less than 7 minutes, the appliance will compensate.
If the power cut is more than 7 minutes, the program will fail.
Unplug, empty, and clean the appliance.
C ERROR MESSAGES
If the appliance is too hot, the display will show an error message.
This will be an odd set of letters and/or numbers.
To stop the appliance, press the I button, and hold it down for 2 seconds.
Let the appliance cool, and try again.
If this doesn’t work, then the appliance isn’t overheating, it’s broken.
C CARE AND MAINTENANCE
1 Unplug the appliance and let it cool.
2 If the paddle has stuck to its shaft, fill the bread pan with warm water, to soften dough
residues and allow the paddle to be removed. Don’t leave it to soak.
3 If the inside of the paddle gets clogged with flour, soak it in warm water, then clean with a
wooden toothpick.
4 Wipe all surfaces with a clean damp cloth.
5 Hand wash the bread pan and paddle, rinse, and dry.
` You may wash these parts in a dishwasher.
6 Put the paddle, on its own, in a compartment of the cutlery basket.
7 If you use a dishwasher, the harsh environment inside the dishwasher will affect the surface
finishes.
8 The damage should be cosmetic only, and should not affect the operation of the appliance.
C RECIPES
1 Many external factors affect the taste and texture of your bread (e.g. yeast type, flour type,
sugar type, kitchen temperature, even air pressure and height above sea level).
2 The recipes supplied have been designed specially for this appliance.
3 If you want to experiment, use the recipes as a guide, taste the results, and keep notes.
4 It’s best to change only one thing at a time so you know what is responsible for the result you
get.
5 If you already have bread recipes, or find recipes in other publications, compare them with
the recipes given here, to find out which program to try first, then experiment till the results
match your desires.

9
6 Be careful with quantities when using other recipes. For the first trial, don’t fill the bread pan
above about a quarter full, certainly not as much as a third full. If you overfill the bread pan,
ingredients may burn on to the element and clog the drive.
7 It’s important that you add the ingredients in the correct order.
8 We’ve numbered them, to make it easy.
C PROBLEMS
the bread collapsed
The dough may be too moist. Reduce the recipe liquid slightly. If fruit was used, it may not have
been properly dried.
Leaving the bread in the bread pan while it cools can cause moisture released during baking to
soak back into the bread.
The flour may have been too coarsely ground. Try using finer flour.
the bread didn’t rise
Ingredients quantities were wrong – accuracy is essential.
The yeast is stale – check the “best before” date.
the core of the bread is too moist
The dough may have been too moist.
The flour may have been too heavy. This problem can occur with rye, bran and wholemeal flours.
Replace some of the heavy flour with white flour.
the bread has swollen too much
You may have used too much yeast, try reducing it slightly.
Too much sugar can cause the yeast to work too fast, and the bread to rise too much. Try
reducing the amount of sugar. If you add sweet/sugary ingredients such as dried fruit, honey or
molasses, reduce the amount of sugar to compensate.
The dough may be too moist. Reduce the recipe liquid slightly. If fruit was used, it may not have
been properly dried.
Use a coarser flour. Less yeast is needed with fine flour than with the same type of flour ground
coarsely.
the bread tastes bland
Try increasing the amount of salt by up to ¼ of a teaspoon.
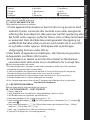
W
ENVIRONMENTAL PROTECTION
To avoid environmental and health problems due to hazardous substances in electrical and
electronic goods, appliances marked with this symbol mustn’t be disposed of with unsorted
municipal waste, but recovered, reused, or recycled.

10
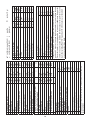
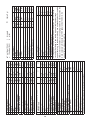
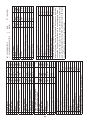
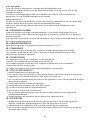
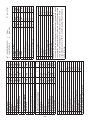
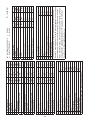
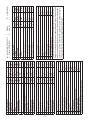
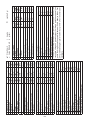
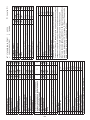
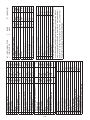
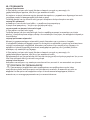
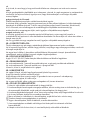
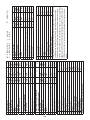
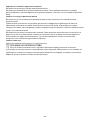
1
basic
i j k
1
lukewarm water
190g 260g 360g
2
olive oil
1 T 1 T + 1 t 2 T
3
salt
1 t 1½ t 2 t
4
sugar
1 T 1 T + 1 t 2 T
5
dried milk powder
1 T 1½ T 2 T
6
strong white bread flour
350g 500g 650g
7
dried yeast
1½ t 1¼ t 2 t
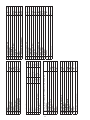
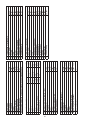
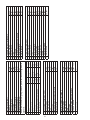
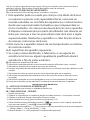
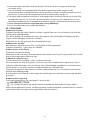
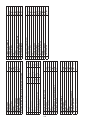
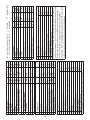
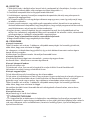
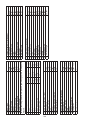
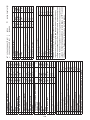
4 cake
1
lemon juice
1 t
2
egg, small (up to 53g)
2
3
vanilla extract
¼ t
4
butter, melted
50g
5
mixed dried fruit (soaked)
175g
6
plain flour
250g
7
sugar
150g
8
ground cinnamon
¼ t
9
ground nutmeg
¼ t
10
baking powder
2 t
11
brandy (optional)
3 d
If the butter isn’t melted, the recipe won’t work.
6 dough
1
lukewarm water
250g
2
olive oil
1 T
3
salt
1 t
4
sugar
2 T
5
strong white bread flour
400g
6
dried yeast
1 t
7
dried mixed herbs
1 t
Work the dough into a ball on a floured surface. Rest for
15 minutes. Roll the dough into circles on a floured
surface. Put the circles on a non-stick baking tray.
Spread the circles with a tomato based sauce and add
toppings. Bake in a pre-heated oven at 190°C for 15-20
minutes. The surface should be golden brown.
2
French
i j k
1
lukewarm water
200g 300g 400g
2
salt
1 t 1½ t 2 t
3
strong white bread flour
360g 545g 725g
4
dried yeast
1 t 1½ t 1 S
T
tablespoon (15ml)
t
teaspoon (5ml)
d
drop
g
grams
S
sachet (7g)
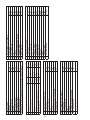
5
sweet
i j k
1
milk
200g 300g 400g
2
olive oil
1 T 1½ T 2 T
3
salt
1 t 1½ t 2 t
4
sugar
2 T 3 T 4 T
5
vanilla extract
½ t ¾ t 1 t
6
strong wholewheat flour
300g 450g 600g
7
cocoa powder
25g 40g 50g
8
dried yeast
1½ t 2 t 1 S
9
chopped hazelnuts
7 T 5 T 3 T
3
wholewheat/wholemeal
i j k
1
lukewarm water
200g 300g 400g
2
olive oil
1 T 1 T 2 T
3
salt
¾ t 1¼ t 2 t
4
sugar
2 t 1 T
1½ T
5
dried milk powder
1 T 1½ T 2 T
6
strong wholewheat flour
150g 220g 300g
7
strong white bread flour
150g 220g 300g
8
dried yeast
½ t ¾ t
1 t

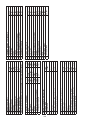
11
Mash all the ingredients together, then add to the
bread pan.
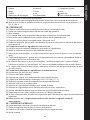
9 gluten-free
1
lukewarm water
350g
2
olive oil
1½ T
3
salt
½ t
4
sugar
1 T
8
sandwich
i j k
1
milk
250g 300g 400g
2
olive oil
1 T 1½ T 2 T
3
salt
1 t 1½ t 2 t
4
sugar
1½ T 2 T 3 T
5
strong white bread flour
370g 450g 600g
6
dried yeast
1½ t 2 t 1 S
7 jam
1
strawberries
500g
2
lemon juice
2 T
3
sugar
100g
4
vanilla extract
¼ t
5
ground cinnamon
¼ t
6
liqueur (optional)
3 d
6
dried milk powder
2 T
7
dried yeast
1 S
12 speciality
1
lukewarm water
270g
2
olive oil
1 T
3
salt
1 t
4
dried milk powder
1 T
5
plain flour
450g
6
dried yeast
1½ t
7
sultanas
200g
8
honey
1 T
9
malt extract
2 T
10
black treacle
1½ T
6
dried milk powder
1 T + 1 t
7
dried yeast
2 t
11 fastbake II
1
lukewarm water
400g
2
olive oil
2 T
3
salt
2 t
4
sugar
2 T
5
strong white bread flour
630g
5
gluten free bread mix
400g
6
dried yeast
1 t
10 fastbake I
1
lukewarm water
300g
2
olive oil
1 T + 1 t
3
salt
1½ t
4
sugar
1 T + 1 t
5
strong white bread flour
470g
Page is loading ...
Page is loading ...
Page is loading ...
Page is loading ...
Page is loading ...
Page is loading ...
Page is loading ...
Page is loading ...
Page is loading ...
Page is loading ...
Page is loading ...
Page is loading ...
Page is loading ...
Page is loading ...
Page is loading ...
Page is loading ...
Page is loading ...
Page is loading ...
Page is loading ...
Page is loading ...
Page is loading ...
Page is loading ...
Page is loading ...
Page is loading ...
Page is loading ...
Page is loading ...
Page is loading ...
Page is loading ...
Page is loading ...
Page is loading ...
Page is loading ...
Page is loading ...
Page is loading ...
Page is loading ...
Page is loading ...
Page is loading ...
Page is loading ...
Page is loading ...
Page is loading ...
Page is loading ...
Page is loading ...
Page is loading ...
Page is loading ...
Page is loading ...
Page is loading ...
Page is loading ...
Page is loading ...
Page is loading ...
Page is loading ...
Page is loading ...
Page is loading ...
Page is loading ...
Page is loading ...
Page is loading ...
Page is loading ...
Page is loading ...
Page is loading ...
Page is loading ...
Page is loading ...
Page is loading ...
Page is loading ...
Page is loading ...
Page is loading ...
Page is loading ...
Page is loading ...
Page is loading ...
Page is loading ...
Page is loading ...
Page is loading ...
Page is loading ...
Page is loading ...
Page is loading ...
Page is loading ...
Page is loading ...
Page is loading ...
Page is loading ...
Page is loading ...
Page is loading ...
Page is loading ...
Page is loading ...
Page is loading ...
Page is loading ...
Page is loading ...
Page is loading ...
Page is loading ...
Page is loading ...
Page is loading ...
Page is loading ...
Page is loading ...
Page is loading ...
Page is loading ...
Page is loading ...
Page is loading ...
Page is loading ...
Page is loading ...
Page is loading ...
Page is loading ...
Page is loading ...
Page is loading ...
Page is loading ...
Page is loading ...
Page is loading ...
Page is loading ...
Page is loading ...
Page is loading ...
Page is loading ...
Page is loading ...
Page is loading ...
Page is loading ...
Page is loading ...
Page is loading ...
Page is loading ...
Page is loading ...
Page is loading ...
Page is loading ...
Page is loading ...
Page is loading ...
Page is loading ...
Page is loading ...
Page is loading ...
Page is loading ...
Page is loading ...
Page is loading ...
Page is loading ...
Page is loading ...
Page is loading ...
Page is loading ...
Page is loading ...
Page is loading ...
Page is loading ...
Page is loading ...
Page is loading ...
Page is loading ...
Page is loading ...
Page is loading ...
Page is loading ...
Page is loading ...
Page is loading ...
Page is loading ...
Page is loading ...
Page is loading ...
Page is loading ...
Page is loading ...
Page is loading ...
Page is loading ...
Page is loading ...
Page is loading ...
Page is loading ...
Page is loading ...
Page is loading ...
Page is loading ...
Page is loading ...
Page is loading ...
Page is loading ...
Page is loading ...
Page is loading ...
Page is loading ...
Page is loading ...
Page is loading ...
Page is loading ...
Page is loading ...
Page is loading ...
Page is loading ...
Page is loading ...
Page is loading ...
Page is loading ...
Page is loading ...
Page is loading ...
Page is loading ...
Page is loading ...
Page is loading ...
Page is loading ...
Page is loading ...
Page is loading ...
Page is loading ...
Page is loading ...
Page is loading ...
Page is loading ...
Page is loading ...
Page is loading ...
Page is loading ...
Page is loading ...
Page is loading ...
Page is loading ...
Page is loading ...
Page is loading ...
Page is loading ...
Page is loading ...
Page is loading ...
Page is loading ...
Page is loading ...
Page is loading ...
Page is loading ...
Page is loading ...
Page is loading ...
Page is loading ...
Page is loading ...
Page is loading ...
Page is loading ...
Page is loading ...
Page is loading ...
-
 1
1
-
 2
2
-
 3
3
-
 4
4
-
 5
5
-
 6
6
-
 7
7
-
 8
8
-
 9
9
-
 10
10
-
 11
11
-
 12
12
-
 13
13
-
 14
14
-
 15
15
-
 16
16
-
 17
17
-
 18
18
-
 19
19
-
 20
20
-
 21
21
-
 22
22
-
 23
23
-
 24
24
-
 25
25
-
 26
26
-
 27
27
-
 28
28
-
 29
29
-
 30
30
-
 31
31
-
 32
32
-
 33
33
-
 34
34
-
 35
35
-
 36
36
-
 37
37
-
 38
38
-
 39
39
-
 40
40
-
 41
41
-
 42
42
-
 43
43
-
 44
44
-
 45
45
-
 46
46
-
 47
47
-
 48
48
-
 49
49
-
 50
50
-
 51
51
-
 52
52
-
 53
53
-
 54
54
-
 55
55
-
 56
56
-
 57
57
-
 58
58
-
 59
59
-
 60
60
-
 61
61
-
 62
62
-
 63
63
-
 64
64
-
 65
65
-
 66
66
-
 67
67
-
 68
68
-
 69
69
-
 70
70
-
 71
71
-
 72
72
-
 73
73
-
 74
74
-
 75
75
-
 76
76
-
 77
77
-
 78
78
-
 79
79
-
 80
80
-
 81
81
-
 82
82
-
 83
83
-
 84
84
-
 85
85
-
 86
86
-
 87
87
-
 88
88
-
 89
89
-
 90
90
-
 91
91
-
 92
92
-
 93
93
-
 94
94
-
 95
95
-
 96
96
-
 97
97
-
 98
98
-
 99
99
-
 100
100
-
 101
101
-
 102
102
-
 103
103
-
 104
104
-
 105
105
-
 106
106
-
 107
107
-
 108
108
-
 109
109
-
 110
110
-
 111
111
-
 112
112
-
 113
113
-
 114
114
-
 115
115
-
 116
116
-
 117
117
-
 118
118
-
 119
119
-
 120
120
-
 121
121
-
 122
122
-
 123
123
-
 124
124
-
 125
125
-
 126
126
-
 127
127
-
 128
128
-
 129
129
-
 130
130
-
 131
131
-
 132
132
-
 133
133
-
 134
134
-
 135
135
-
 136
136
-
 137
137
-
 138
138
-
 139
139
-
 140
140
-
 141
141
-
 142
142
-
 143
143
-
 144
144
-
 145
145
-
 146
146
-
 147
147
-
 148
148
-
 149
149
-
 150
150
-
 151
151
-
 152
152
-
 153
153
-
 154
154
-
 155
155
-
 156
156
-
 157
157
-
 158
158
-
 159
159
-
 160
160
-
 161
161
-
 162
162
-
 163
163
-
 164
164
-
 165
165
-
 166
166
-
 167
167
-
 168
168
-
 169
169
-
 170
170
-
 171
171
-
 172
172
-
 173
173
-
 174
174
-
 175
175
-
 176
176
-
 177
177
-
 178
178
-
 179
179
-
 180
180
-
 181
181
-
 182
182
-
 183
183
-
 184
184
-
 185
185
-
 186
186
-
 187
187
-
 188
188
-
 189
189
-
 190
190
-
 191
191
-
 192
192
-
 193
193
-
 194
194
-
 195
195
-
 196
196
-
 197
197
-
 198
198
-
 199
199
-
 200
200
-
 201
201
-
 202
202
-
 203
203
-
 204
204
-
 205
205
-
 206
206
-
 207
207
-
 208
208
-
 209
209
-
 210
210
-
 211
211
-
 212
212


Russell Hobbs 18036-56 Owner's manual
- Category
- Bread making machines
- Type
- Owner's manual
- This manual is also suitable for
Ask a question and I''ll find the answer in the document
Finding information in a document is now easier with AI
in other languages
- italiano: Russell Hobbs 18036-56 Manuale del proprietario
- français: Russell Hobbs 18036-56 Le manuel du propriétaire
- español: Russell Hobbs 18036-56 El manual del propietario
- Deutsch: Russell Hobbs 18036-56 Bedienungsanleitung
- русский: Russell Hobbs 18036-56 Инструкция по применению
- Nederlands: Russell Hobbs 18036-56 de handleiding
- português: Russell Hobbs 18036-56 Manual do proprietário
- slovenčina: Russell Hobbs 18036-56 Návod na obsluhu
- dansk: Russell Hobbs 18036-56 Brugervejledning
- polski: Russell Hobbs 18036-56 Instrukcja obsługi
- čeština: Russell Hobbs 18036-56 Návod k obsluze
- Türkçe: Russell Hobbs 18036-56 El kitabı
- svenska: Russell Hobbs 18036-56 Bruksanvisning
- suomi: Russell Hobbs 18036-56 Omistajan opas
- română: Russell Hobbs 18036-56 Manualul proprietarului
