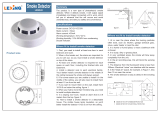
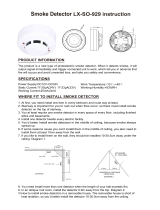
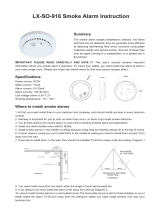
Kidde PI9010 is a sealed photoelectric/ionization smoke alarm with a "HUSH" control to temporarily silence nuisance alarms. Ideal for bedrooms, hallways, and living areas, it features a 10-year battery life and a low-battery indicator. The PI9010 can also be interconnected with other Kidde smoke and carbon monoxide alarms for added safety.
Kidde PI9010 is a sealed photoelectric/ionization smoke alarm with a "HUSH" control to temporarily silence nuisance alarms. Ideal for bedrooms, hallways, and living areas, it features a 10-year battery life and a low-battery indicator. The PI9010 can also be interconnected with other Kidde smoke and carbon monoxide alarms for added safety.


-
 1
1
-
 2
2
-
 3
3
-
 4
4
-
 5
5
-
 6
6
-
 7
7
-
 8
8
-
 9
9
-
 10
10
-
 11
11
-
 12
12
-
 13
13
-
 14
14
-
 15
15


Kidde PI9010 is a sealed photoelectric/ionization smoke alarm with a "HUSH" control to temporarily silence nuisance alarms. Ideal for bedrooms, hallways, and living areas, it features a 10-year battery life and a low-battery indicator. The PI9010 can also be interconnected with other Kidde smoke and carbon monoxide alarms for added safety.
Ask a question and I''ll find the answer in the document
Finding information in a document is now easier with AI
Related papers
Other documents
-
Firex i4618 Series User manual
-
 Lexing LX108A Operating instructions
-
 PSA Products LIFESAVER LIFPE10 User manual
-
 Lexing LX928-D Operating instructions
-
 Lexing LX928-N Operating instructions
-
 Lexing LX-SO-929 Operating instructions
-
 Fyrnetics PE9 User manual
-
 Lexing LX-SO-918 Operating instructions
-
 Reach Barrier 3139 Installation guide
-
Mercury MSD1 User manual


