Page is loading ...

Owner's instruction manuaI

The Sony HP-319 is a versatile stereo music system compactly
housed in a stylish cabinet. A BSR automatic changer, with such
advanced features as anti-skate and an oil-damped cueing lever,
is mounted on the HP-319, and a sensitive receiver and powerful
amplifier provide the finest in radio and phonograph reproduction.
Convenience of operation was especially considered, as is evi-
denced by the well laid-out facilities, with easy-to-operate buttons
and slide-type controls.
Your choice of entertainment media is supplemented by the built-
In Cassette-corder that permits you to enjoy pre-recorded or home-
recorded selections on tape cassettes.
Four-channel reproduction capabilities are easily added to the
HP-319 by using an optional Sony SQ adaptor and speakers.
To obtain the maximum enjoyment and performance from your
HP-319 please read these instructions carefully. Keep this manual
handy for future reference.
TABLE OF CONTENTS
PREPARING FOR USE . . . . . . . . . . 1
Unpacking. . . . . . . . 1
DOs and DON'Ts. . . . . . . . . . . 1
System Connections. . . . . . . . . 2
Antennas, Speakers, Tape recorder, SQ connection,
Ground connection, Power connections, Headphones,
Microphones
OPERATING INSTRUCTIONS .
Location and Function of Controls.
FM and AM Reception .
Turntable Operation .
Preparation, Automatic operation, Manual operation
Cassette-corder Operation .
Preliminary notes, Recording, Playback,
Rewind and fast forward, Erasing tape
Operation with an External Tape Recorder. . 9
Recording, Tape/source monitoring, Playback
Suggestions on Tape Recording. . . . . . . . . 9
Tape duplication, Making two recordings
simultaneously
CARE OF YOUR HP-319 . . .10
Cleaning the Cabinet . .10
Cleaning Heads. . . . . .10
Stylus Replacement. . .10
Special Adjustments. . .10
Trouble Checks. . . . . . . 11
REPACKING FOR SHIPMENT. .11
SPECIFICATIONS .12
PREPARING FOR USE
UNPACKING
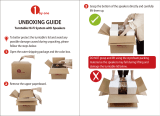
All Sony equipment comes to you carefully packed in cartons
designed to withstand the rigors of shipment. Do not throwaway
this carton and the associated packing material; they will come in
handy if you ever have to transport or ship the HP-319 (refer to the
diagram on page 11).
Inspect your HP-319 immediately for signs of damage incurred
in transit. If damage has occurred, consult your local Sony dealer
for further instructions. Once again, save all packing material to
help substantiate your damage claim.
After you have unpacked the HP-319, you must prepare the turn-
table for operation. First, turn the transit screws on the turntable
fully clockwise. The turntable will then float freely on its suspen-
sion springs.
Install the dust cover, and the cassette racks as shown.
Transit screws
DOs AND DON'Ts
cover the turntable when it is not in use.
allow at least 4 inches clearance behind the HP-319, so
that the cover can be opened.
replace the stylus when wcrn.
eject the cassette when it is not in use.
open the cabinet. No user-serviceable parts are inside.
Refer servicing to qualified service personnel.
place the HP-319 in direct sunlight, or near radiators, hot-
air ducts, or any other heat source. Also don't place it in
any area subject to freezing temperatures or excessive
moisture.
DON'T place the HP-319 on any soft surface which may block the
bottom ventilation holes.
DON'T leave records on the turntable when it is not in use.
DON'T subject the turntable to shock during operation. Avoid
placing the unit near doors that are frequently slammed.
DON'T connect the HP-319 to other than the proper power source
(120 V ac, 60 Hz).
DON'T make connections with the power on.
DO
DO
5
DO
5
DO
6
DON'T
7
DON'T
8
After you have found a suitable location for your HP-319, you can
begin making the basic connections described in the following
paragraphs. Refer to the overall system connection diagram on
the next page while making these connections.

I\--
I
I
I
I
I
I
i
I
I
I
I
I
I
~
~
wire
Speakers
A
-lJ'
SYSTEM CONNECTIONS
Outdoor fm antenna
Fm ribbon antenna
Outdoor a-m antenna
~----------------~
Ground wire
to a good earth ground
S
\--
~
peakers
to line outputs
to line inputs
Tape recorder
-.
2

Antennas
Good quality fm reception depends upon several factors, foremost
of which are adequate signal strength, minimum interference and
the sensitivity of the receiver. In distant suburbs or inside build-
ings, the signal strength is usually poor. Also high steel structures,
mountainous terrain, etc. cause audible" multipath" distortion that
is the equivalent of television ghosts. Multipath is particularly ob-
jectionable during stereophonic reception and reduces channel
separation.
In good reception areas, the ac power cord antenna or the sup-
plied ribbon antenna will work effectively. However, in the sub-
urbs or high interference locations it may be necessary to use a
good outdoor antenna, or even a rotatable directional antenna.
Installing an outdoor antenna
o
Install the antenna away frorn-busv highways to reduce the ef-
fects of car ignition noise.
e
While listening to an fm program, point the antenna in the direc-
tion that yields the best sound.
e
Keep the antenna lead-in wire as short as possible.
In some cases, multipath reception on two or more stations may
require that the antenna is pointed in different directions.
An
ef-
fective and relatively inexpensive solution to this problem is the
use of a remotely controlled rotating antenna.
An antenna which has high frontal sensitivity
rejects the reflected signals.
AM ANTENNA terminal
AC OUTLET
FM ANTENNA terminals
ISS switch
TAPE inputs-------..-l
'-----------------Ac power cord
GROUND terminal-------I
'--'--------------------SPEAKER connectors
REC OUTputs-----------'
3

Connecting the fm antenna lead: The HP-319 power cord has an
fm line antenna which can be connected to the FM ANTENNA ter-
minal. If the ac power cord antenna does not perform well, remove
the power cord antenna lug from the FM ANTENNA terminal and
connect the ribbon antenna (supplied), or an outdoor fm antenna
using 300-ohm twin-lead to the FM ANTENNA terminals.
In some cases the unshielded 300-ohm twin-lead may act as an
omnidirectional antenna, picking up noise or unwanted signals
which cause interference. You should then use shielded 300-ohm
twin-lead.
Shielded 300-ohm twin-lead
FM ribbon antenna or unshielded
300-ohm twin- lead
FM AM GROUND
300Q
AM GROUND
Conductors
Connecting the a-m antenna lead: The built-in ferrite bar antenna
will provide good a-m reception under most conditions. If recep-
tion is weak, connect a length of wire, 20-50 feet long, to the AM
ANTENNA terminal and extend it out of doors, keeping the greater
portion horizontal.
Speakers
Location: Proper speaker placement
IS
very important for optimum
stereo reproduction.
e Place the speakers on a shelf or on the floor against a wall.
elf you must position the speakers off the floor, do not place them
higher than eye level.
e Heavy draperies and rugs minimize the multiple reflections of
high frequency sound which reduce the stereo effect.
e Proper distance between the right and left speakers is directly
related to the distance from the speakers to the listening areas. In
most cases, excellent results are obtained if the speakers are sep-
arated by an amount slightly more than the distance from the lis-
tening area to each speaker.
Experiment with different speaker placements and listening loca-
tions until you find the setup that pleases you.
The SS-310 speakers (supplied) can be mounted either in a verti-
calor horizontal position to match the room decor. The Sony
name plate can be turned to match either mounting.
4
"
Connection: Connect the SS-310 speakers to the SPEAKER con-
nectors marked A or B. Connect the right and left speakers to the
Rand L connectors respectively. Other matched high-quality 8-
ohm speakers can also be used.
The HP-319 can drive two speaker systems simultaneously or
independently. The second pair of speakers should be connected
to the remaining SPEAKER connectors. Each speaker system can
be turned on or off with the SPEAKER buttons on the front panel.
Tape Recorder
The HP-319 can be used with an external recorder for recording
and playing back. Refer to "OPERATION WITH AN EXTERNAL
TAPE RECORDER" on page 9.
SO Connection
To set up the four-channel SQ system, connect the Sony SQ adap-
tor (optional) to the HP-319 TAPE inputs and REC OUTputs. The
adaptor has provision for connecting a tape recorder when desired.
Ground Connection
To reduce hum it may be helpful to connect the GROUND terminal
to a convenient earth ground, such as a mounting screw of an ac
outlet cover plate, a cold water pipe or directly to the earth.
Power Connections
The power source for the HP-319 must be 120 V ac, 60 Hz.
Before plugging in the line cord, make sure the HP-319 POWER
switch is set to OFF/AUTO OFF. Then plug the HP-319 line cord
into the electrical outlet.
An UNSWITCHED outlet on the rear panel provides a convenient
source of up to 300 watts for another component. The front panel
POWER switch does not control the ac power to this outlet. The
power consumption of the equipment plugged into this outlet must
not exceed 300 watts.
Headphones
Insert any headphone of 8 ohms or more into the HEADPHONE
jack. For private listening, the speaker sound may be cut off by
releasing the SPEAKER buttons. Be sure to firmly insert the head-
phone plug into the jack to ensure hearing both channels.
Microphones
Insert the low-impedance microphones into the MICrophone jacks.
When using the microphones, the MONITOR and Function buttons
(FM, AM, PHONO, CASSETTE, TAPE) have no effect upon the re-
cording.

OPERATING INSTRUCTIONS
LOCATION AND FUNCTION OF CONTROLS
Before attempting to operate your HP-319, take a few minutes to
learn the location and function of the controls and other parts men-
tioned in the operating instructions.
o
POWER switch
Turns the power on or off.
In the OFF/AUTO OFF position, the HP-319 turns on or off accord-
ing to the on-off condition of the turntable Operation lever.
f)
VOLUME control
e
BALANCE control
Slide the lever upwards (LEFT) to decrease the right side sound
volume, downwards (RIGHT) to decrease the left side sound volume.
To establish stereo balance=, depress the MODE button to MONO
and adjust the lever for equal output from both speakers.
*
The feeling of direction and depth that stereophonic sound pro-
duces is greatly diminished if the levels of both channels are not
balanced. Balance variations with different program sources are
due to differences in recording levels. Stereo balance is also in-
fluenced by the acoustics of the room. Carpets, furniture place-
ment, and room size and shape have a definite effect upon sound
quality and balance.
o
TONE controls [BASS] [TREBLE]
These adjust the tone quality of the reproduced sound to your pre-
ference. Slide the levers upwards to increase the bass or treble
tone, downwards to decrease. A flat response is obtained at the
center position detent.
o
HEADPHONE jack
Accepts stereo headphones.
ISS switch
PLAY bar
Cassette holder
Cassette lever
MICrophone jacks
Tape counter
and RESET button
RECord lamp
RECord button
o
SPEAKER buttons
Depress the A SPEAKER button to use the speakers connected to
the A SPEAKER connectors; B button for the speakers on the B
connectors. To use both speaker systems simultaneously, depress
both SPEAKER buttons. For headphone listening, keep the SPEAK-
ER button(s) released to cut off the speaker sound.
o
LOUDNESS button
At low listening levels, depress this button for better sound. The
LOUDNESS button compensates for the decreased response to bass
and treble frequencies of the human ear at low listening levels.
As the listening level is increased, the amount of compensation is
progressively reduced.
e
MODE button
For normal listening, keep this button released (STEREO). This but- •
ton has no effect upon a-m reception. The MONO position is used
for monophonic recording from stereo programs.
o
MONITOR button
TAPE (depressed) ... for listening to the tape recorder connected
to the TAPE inputs. When an SQ adaptor is
connected, keep this button depressed.
SOURCE (released) .. for all other program sources keep the but-
ton released and depress the Function but-
ton of your desired source.
4D>
FUNCTION buttons
CASSETTE .. for playing back the built-in Cassette-corder.
PHONO . . for listening to records.
FM for listening to fm programs.
AM for listening to a-m programs.
NOTE: Don't depress more than one FUNCTION button at a time,
otherwise the desired program source may not be reproduced.
Gl
STEREO lamp
Lights up when a stereo fm broadcast is tuned in and the MODE
button is released (STEREO).
o
TUNING knob
e
Dial scale
Dial scale
STEREO lamp
TUNING knob
MODE button
MONITOR button
BALANCE control SPEAKER buttons
POWER switch
5

Connecting the fm antenna lead: The HP-319 power cord has an
fm line antenna which can be connected to the FM ANTENNA ter-
minal. If the ac power cord antenna does not perform well, remove
the power cord antenna lug from the FM ANTENNA terminal and
connect the ribbon antenna (supplied), or an outdoor fm antenna
using 300-ohm twin-lead to the FM ANTENNA terminals.
In some cases the unshielded 300-ohm twin-lead may act as an
omnidirectional antenna, picking up noise or unwanted signals
which cause interference. You should then use shielded 300-ohm
twin-lead.
FM
ribbon antenna or unshielded
300-ohm
twin-
lead
FM AM GROUND
300Q
Shielded 300-ohm twin-lead
'.
Connection: Connect the SS-310 speakers to the SPEAKER con-
nectors marked A or B. Connect the right and left speakers to the
Rand L connectors respectively. Other matched high-quality
8-
ohm speakers can also be used.
The HP-319 can drive two speaker systems simultaneously or
independently. The second pair of speakers should be connected
to the remaining SPEAKER connectors. Each speaker system can
be turned on or off with the SPEAKER buttons on the front panel.
Tape Recorder
The HP-319 can be used with an external recorder for recording
and playing back. Refer to "OPERATION WITH AN EXTERNAL
TAPE RECORDER" on page 9.
sa
Connection
To set up the four-channel
sa
system, connect the Sony SO adap-
tor (optional) to the HP-319 TAPE inputs and REC OUTputs. The
adaptor has provision for connecting a tape recorder when desired.
AM
GROUND
Connecting the a-m antenna lead: The built-in ferrite bar antenna
will provide good a-m reception under most conditions. If recep-
tion is weak, connect a length of wire, 20-50 feet long, to the AM
ANTENNA terminal and extend it out of doors, keeping the greater
portion horizontal.
Speakers
Location: Proper speaker placement
IS
very important for optimum
stereo reproduction.
• Place the speakers on a shelf or on the floor against a wall.
.If
you must position the speakers off the floor, do not place them
higher than
eye
level.
• Heavy draperies and rugs minimize the multiple reflections of
high frequency sound which reduce the stereo effect.
• Proper distance between the right and left speakers is directly
related to the distance from the speakers to the listening areas. In
most cases, excellent results are obtained if the speakers are sep-
arated by an amount slightly more than the distance from the lis-
tening area to each speaker.
Experiment with different speaker placements and listening loca-
tions until you find the setup that pleases you.
The SS-310 speakers (supplied) can be mounted either in a verti-
calor horizontal position to ma:ch the room decor. The Sony
name plate can be turned to match either mounting.
4
Ground Connection
To reduce hum it may be helpful to connect the GROUND terminal
to a convenient earth ground, such as a mounting screw of an ac
outlet cover plate, a cold water pipe or directly to the earth.
Power Connections
The power source for the HP-319 must be 120 V ac, 60 Hz.
Before plugging in the line cord, make sure the HP-319 POWER
switch is set to OFF/AUTO OFF. Then plug the HP-319 line cord
into the electrical outlet.
An UNSWITCHED outlet on the rear panel provides a convenient
source of up to 300 watts for another component. The front panel
POWER switch does not control the ac power to this outlet. The
power consumption of the equipment plugged into this outlet must
not exceed 300 watts.
Headphones
Insert any headphone of 8 ohms or more into the HEADPHONE
jack. For private listening, the speaker sound may be cut off by
releasing the SPEAKER buttons. Be sure to firmly insert the head-
phone plug into the jack to ensure hearing both channels.
Microphones
Insert the low-impedance microphones into the MICrophone jacks.
When using the microphones, the MONITOR and Function buttons
(FM, AM, PHONO, CASSETTE, TAPE) have no effect upon the re-
cording.

4D
ISS switch (Interference Suppression Switch) on the rear panel
Cuts out the beat noise (whistle-like sound) which may occur while
recording a-m program from the HP-319 receiver onto the built-in
Cassette-corder; move the switch to either" 1 " or "2 ", depending
on which position reduces the beat noise.
~ PLAY bar
Depress this bar to playa cassette.
~ Cassette holder
4fj
Cassette lever
~~ .. slide and lock this lever to the left for fast forward tape
motion.
EJECT .
PUSH' depress this lever to stop the tape motion and eject the
cassette.
~ .. slide and lock this lever to the right to rewind the tape.
CR)
MICrophone jacks
4Ii>
Tape counter and RESET button
t!!l
RECord lamp
fl)
RECord button
Depress this button to record; the associated RECord lamp will
light.
Transit screw
Turntable
Spindle
Overarm
Spindle holder
Transit screw
6
"
FM AND AM RECEPTION
o
Turn the POWER switch ON. The dial scale will light.
e
Depress the SPEAKER button "A" or "B ", depending upon the
speaker arrangement. For headphone listening, release the
SPEAKER button(s) to cut off any undesired speaker sound.
e
Keep the MODE button released (STEREO).
e
Keep the MONITOR button released (SOURCE).
o
For fm reception, depress the
FM
button.
For a-m reception, depress the AM button. The MODE button has
no effect upon a-m reception.
o
Tune in the desired station with the TUNING knob.
NOTE: When an fm program is stereophonic, the STEREO lamp
will light. When the stereo signal shifts to monophonic, the lamp
goes out indicating that the receiver has automatically switched
to monophonic reception. When an fm stereo signal is too weak
or noisy for enjoyable stereo listening, the STEREO lamp will flick-
er. In this event, depress the MODE button (MONO).
e
Adjust the sound level, stereo balance and tone quality with the
VOLUME, BALANCE and TONE controls. When listening at low
sound levels, the LOUDNESS button may be depressed for im-
proved tone.
In poor reception areas, connect an external antenna according
to the instructions on pages 3 and 4.
"",",~~_Anti-skating compensator
A~--Stylus-force indicator
CUEing lever
Record-size selector
Tonearm
Arm rest
Operation lever
Cartridge
Speed selector

TURNTABLE OPERATION
The HP-319 turntable can be used for either automatic or manual
playing. Preparation for either mode is the same. Before playing
records, be sure to remove any dust from the stylus with a soft
brush (stylus brush, artist's paint brush) and clean the disc with a
record cleaner.
Preparation
o
Release the Overarm by depressing it at its axis and moving it
toward the center. Then lift and turn it to the right.
f)
Leave the POWER switch set to either ON or OFF/AUTO OFF.
When you leave the turntable or think you might fall asleep during
play, move the POWER switch to OFF/AUTO OFF. The set auto-
matically turns off when play ends.
e
Depress the SPEAKER button "A" or "8", depending upon
speaker connection.
o
Keep the MODE button released (STEREO).
o Keep the MONITOR button released (SOURCE) and depress the
PHONO button.
o
Remove the stylus guard.
Automatic Operation
Up to five records of the same size and speed can be played auto-
matically as follows:
o Insert the long spindle (supplied) into the center hole of the turn-
table by rotating it until the side projection is engaged in the lock-
ing slot.
Ledge lever
NOTE: Make sure the spindle ledge lever
IS
not depressed when
you install the long spindle. Otherwise, the tonearm will descend
before the first record, and the stylus will be damaged.
For automatic play of 45-rpm records, place the BSR automatic
45-rpm adaptor PS-899 (optional) on the long spindle.
'.
f)
Set the Speed selector and Record-size selector to match the
records.
e
Stack up to five records on the spindle. While holding the rec-
ord stack with your left hand, move the Overarm to the center
with your right hand. The Overarm will drop onto the records and
hold them steady.
o Move the Operation lever to AUTO and hold It there momen-
tarily until the turntable starts. Then, gently let it return to START.
(In this case, the CUEing lever should be set to ~ .)
o
Adjust the sound level, stereo balance, and tone quality to your
taste. If desired, depress the LOUDNESS button.
o To reject a record during play, move the Operation lever to
AUTO and let it return to START. The next record will start play-
ing.
8
After playing all of the records stacked on the spindle, the tone-
arm will return to its rest and the unit will turn off automatically.
7

To manually interrupt or stop the unit during play, flick the CUEing
lever to
T .
To stop the unit, manually move the tonearm above
the arm rest and return the CUEing lever to ~. Then, move the
Operation lever to STOP and the unit will turn off.
A single record can be played automatically by leaving the Over-
arm in a raised position at the right and moving the Operation lever
to AUTO. Then gently let it return to START. (In this case, the
CUEing lever should be set to ~ .) The stylus will automatically set
down on the record and the record will play repeatedly. For auto-
matic shut-off, gently return the Overarm to the center after the
stylus sets down. At the end of the record, the tonearm will return
to the arm rest and the turntable will shut off.
Manual Operation
To operate the turntable manually, proceed as follows:
o
Lift the Overarm and move it to the right. Remove the long
spindle by lifting and twisting. Then, insert the short spindle (sup-
plied) into the center.
NOTE: To play 45-rpm records, put the manual 45-rpm adaptor
(supplied) on the short spindle.
f)
Place a record on the turntable.
e
Set the Speed selector and Record-size selector to match the
record.
o
Move the Overarm fully to the backside of the turntable.
NOTE: To repeat the record, leave the Overarm at the right.
o
To start the turntable, move the Operation lever from STOP to
START.
o
Flick the CUEing lever to
.!:.
Move the tonearm above the
lead-in groove of the record or to any desired point. Then, return
the CUEing lever to .~ .
o
Adjust the sound level, stereo balance and tone quality.
o
At the end of the record, the tonearm will return to the arm rest
and the unit will shut off automatically.
8
CASSETTE-CORDER OPERATION
Preliminary Notes
To utilize the Cassette-corder portion of your HP-319 insert either
a previously recorded cassette for playback, or a blank cassette to
make your own recording from radio programs, records or micro-
phones. The cassette is inserted by merely pushing it into the slot
on the front panel, making sure that:
• The tape side is away from you.
• The desired side is up.
• There is no slack in the tape.
• The tape is wound on the right hand side.
• The tape counter is set to "000 ",
If there is slack in the tape remove it by inserting a pencil in the
hub and winding it until the slack is eliminated .
•
If the tape is not fully wound on the right side, rewind it completely
(see "Rewind and Fast Forward" on the next page), and the tape
will be automatically ejected. Re-insert the cassette and reset the
counter.
Recording
o
Turn the POWER switch to ON.
f)
Depress the SPEAKER button to "A" or "B".
e
Keep the MODE button released (STEREO).
o
To record an frnja-m or disc program, depress the FUNCTION
button of the desired program source. To listen to the program
being recorded, keep the MONITOR button released (SOURCE).
For tape duplication (connected to the TAPE inputs), refer to" Dupli-
cation from an external tape recorder" just under the illustration
on the next page.
o
Insert a cassette in the cassette holder noting the previously-
mentioned precautions.
o
While holding down the RECord button, push the PLAY bar.
During recording, the asscciated RECord lamp lights.
NOTE: While recording an a-m program, if a beat noise (whistle-
like sound) occurs, move the ISS switch to "1" or "2" depending
on which position best reduces the beat noise.
o
At the end of the tape, the cassette is automatically ejected. To
manually stop the tape during recording, depress the Cassette lever
and the inserted cassette will be ejected.
NOTE: No recording level adjustment is required due to the built-
in automatic recording-level control.
To record with a microphone, insert the Sony One Point Stereo
Microphone or two high-quality low-impedance microphones into
the MICrophone jacks. In this case, the position of the MONITOR
and FUNCTION buttons have no effect upon the recording. Hold
the microphone approximately 10 inches away from your mouth
and talk into the microphone.
If the microphone is too near the loudspeakers, a howling effect
(acoustic feedback) may occur. In this event move or point the
microphone away from the loudspeaker until the howling stops, or
decrease the sound volume with the VOLUME control.
..

Playback
8
Turn the POWER switch to ON.
f)
Set the SPEAKER button to "A" or "B" depending upon ich
speakers are used.
e
Keep the MODE button released (STEREO).
e
Keep the MONITOR button released (SOURCE) and depress the
CASSETTE button.
o
Insert a recorded cassette into the Cassette holder noting the
previously-mentioned precautions.
o Push the PLAY bar.
f)
At the end of the tape, the cassette is automatically ejected. To
stop the tape during play, depress the Cassette lever.
Rewind and Fast Forward
These functions are used in both playback and recording to enable
you to quickly position the tape for a replay or a restart in record-
ing, or to select a desired portion of the tape in conjunction with
the use of the counter.
For Fast Forward, push the PLAY bar and slide and lock the Cas-
sette lever to the left (•••• ). For Rewind slide it to the right (~).
At the end of the tape the cassette is automatically ejected. To stop
either the rewind or fast forward action, return the Cassette lever
to the center.
Erasing Tape
When the recorder is set to the record mode, the erase head oper-
ates automatically to erase previous recordings. You can also erase
the tape without adding new recordings as follows:
o Remove the microphones from the MICrophone jacks.
8
Depress the CASSETTE button.
e
Insert the cassette into the Cassette holder noting the previously-
mentioned precautions.
e
While pressing the RECord button, push the PLAY bar. The
tape will then be erased and eject automatically at the end.
OPERATION WITH AN EXTERNAL TAPE RECORDER
Connect the line outputs of a tape recorder to the HP-319 TAPE
inputs for tape playback, and the line inputs of a tape recorder to
the HP-319 REC OUTputs for tape recording.
Recording
o
Turn the POWER switch to ON.
8
Keep the MODE button released (STEREO).
e
Keep the MONITOR button released (SOURCE) and depress the
FUNCTION button of the desired program source.
o Start recording. Adjust the recording level at the recorder. The
SPEAKER buttons, VOLUME, BALANCE, BASS and TREBLE con-
trols, and LOUDNESS button of the HP-319 have no effect on the
recording signal.
NOTE: If a monaural tape recorder is used, connect it to either the
left or right REC OUTput and keep the MODE button depressed
(MONO).
-Tape/source Monitoring
When recording on a 3-head tape recorder, instantaneous tape!
source monitoring is possible by using the MONITOR button of the
HP-319 and the tape recorder; the source signal can be monitored
by keeping the HP-319 MONITOR button released (SOURCE), and
the recorded signal can be monitored by setting the HP-319 MONI-
TOR button and the tape recorder to TAPE.
Playback
o Turn the POWER switch to ON.
8
Keep the MODE button released (STEREO).
e
Keep the MONITOR button depressed (TAPE).
o Set the recorder controls for playback.
o Adjust the sound volume, stereo balance and tone quality to
your preference. If desired, depress the LOUDNESS button.
SUGGESTIONS ON TAPE RECORDING
Tape Duplication
You can copy a tape program from the built-in Cassette-corder onto
an external tape recorder, or from an external tape recorder onto
the built-in Cassette-corder.
Duplication from the built-in Cassette-corder
o Connect an external tape recorder to the REC OUTputs of the
HP-319.
8
Depress the CASSETTE button.
e
Set the Cassette-corder controls for playback, and the external
tape recorder controls for recording.
Built-in Cassette-corder
Connection with an external tape recorder
External tape recorder
to line inputs
~-
'-----< --
Ih=:i"'<;'-r----iF-:..,."..--l1
--
~.,..
to line outputs
lE:-=====~=i?
Duplication from an external tape recorder
o Connect an external tape recorder to the TAPE inputs of the
HP-319.
8
Depress the CASSETTE button.
e
Set the external tape recorder controls for playback, and the
Cassette-corder controls for recording.
NOTE: When the CASSETTE button is depressed, don't set both the
Cassette-corder and external tape recorder controls for recording.
Otherwise, oscillation may occur.
Making Two Recordings Simultaneously
You can make two recordings simultaneously by using the built-in
Cassette-corder and an external tape recorder.
o Connect an external tape recorder to the REC OUTputs of the
HP-319.
8
Depress the Function button of the desired program source
(except the CASSETTE button). To listen to the recording signal,
keep the HP-319 MONITOR button released (SOURCE).
e
Set the Cassette-corder and the tape recorder controls for re-
cording.
NOTE: If there is appreciable bias-current leakage from the exter-
nal tape recorders, beat noise will mar the recording. If this hap-
pens, make just one recording and duplicate it as described before.
9

CARE OF YOUR HP-319
CLEANING THE CABINET
Clean the cabinet with a soft polishing cloth. Never use solvents,
acetone or benzine, as they may mar the finish.
CLEANING HEADS
The accumulation of dust and oxide on the heads will cause noise
and the loss of high frequency response, so keep the heads clean
to assure best performance.
While holding down the Cassette-holder lid, gently wipe the heads,
capstan and pinch roller using the head cleaning tip or a cotton
swab moistened with denatured alcohol. Use a long probe or Q-tip
for easier access.
Pinch Roller Record/Playback Head
Capstan Erase head
STYLUS REPLACEMENT
Stylus model ND-127P is available at your Sony dealer. Handle
the stylus carefully as it is precision made and delicate. Install the
replacement stylus as follows:
o
Lift the tonearm, grasp the stylus assembly between the tips of
the thumb and forefinger, and pull down gently to remove.
e
Insert a new stylus assembly in the cartridge as shown in the
picture.
10
'.
SPECIAL ADJUSTMENTS
The unit has been accurately preadjusted for correct stylus force,
anti-skating compensation, tonearm drop-point, and cueing height.
Should readjustment be necessary, turn off the power and proceed
as follows:
Stylus-force Adjustment
The stylus force is factory preset at 4 grams with the stylus force
adjustment knob (A). The stylus-force indicator (8) points to the
center position when the stylus force is set at 4 grams. You can
adjust the stylus force by turning the adjustment knob (A). Turn
the knob clockwise to reduce the stylus force; the stylus-force in-
dicator will move to the (-) side. To increase the stylus force, turn
the knob counterclockwise;
the
indicator will move to the
(+)
side.
Anti-skating Compensation
This control should always be set for the same or next lower value
as the stylus force. For example, if the stylus force is 4 grams, set
the Anti-skating compensator (E) to 4, or if the stylus force
IS
3
grams, set the Anti-skating compensator to 2. This control is oper-
ated by rotating the knob so that the correct number is adjacent
to the indicator on the left hand. Settings are provided for 2,4 or
6
grams.
NOTE: Variation of the settings described above may be necessary
depending on the tracking. If the tonearm tends to skate outward
after adjustment, lower the setting; if it skates inward, increase the
setting.
Tonearm Drop-point Adjustment
The correct position for stylus set-down
IS 1/8
inch in from the re-
cord edge. Position adjustment should be made on a12-inch record
with the Drop-point adjustment screw (0). When properly adjusted
the stylus set-down will be correct for 7-inch and 10-inch records
as well.
Cueing-height Adjustment
The cueing height is correct when the stylus clears the top of five
records on the turntable by
1/8
inch. Raise the tonearm by turning
the Cueing-height adjustment screw (C) counterclcckwise, and
lower the tonearm by turning it clockwise. After this adjustment
is made, check that the tonearm clears the under side of a record
stack atop the spindle. Also, make sure that the tonearm rests on
the arm rest.

TROUBLE CHECKS
If trouble with the HP-319 arises, make the following simple checks
to determine if the trouble is in the HP-319 or external to it. Quite
often hi-fi equipment fails to work properly because of incorrectly-
made system connections. If the trouble persists after you have
made these checks, consult your Sony dealer for further instruc-
tions.
No sound and dial lamp not lit.
Check the power cord connection and wall outlet.
No sound but dial lamp lit.
Check speaker connections. Depress proper SPEAKER buttonts).
Select proper MONITOR and Function buttons.
No sound from one channel.
Check connection to each speaker.
Adjust BALANCE control.
When using headphones, be sure to fully insert the headphone
plug.
No sound when cassette is inserted.
Set MONITOR button to SOURCE and depress the CASSETTE
button.
Stereo lamp not lit when receiving stereo programs.
The fm stereo signals are too weak. Use an outdoor fm an-
tenna. Refer to "Antenna" on page 3.
Be sure to keep the MODE button released (STEREO).
Stereo lamp flickers.
Indicates that fm stereo signals are too weak or shows multi-
path reception. Adjust the antenna. Refer to "Antenna" on
page 3.
Depress the MODE button (MONO).
Poor reception.
Tune accurately.
Adjust antenna. (See page 3.)
Stereo broadcast is noisy and distorted.
Adjust antenna. (See page 3.)
Severe hum or noise.
Use shielded connection cables. Avoid long horizontal runs.
Keep cables away from transformers or motors, and at least
10 feet from TV sets or fluorescent lights.
Reverse ac plug in the receptacle.
Ground the HP-319. (See page 4.)
Ignition noise.
Tune accurately.
Do not install the outdoor antenna facing heavy traffic.
Rustling sound.
Make connections securely.
Wipe the plugs and jacks with a clcth lightly dampened with
methanol.
Beat interference.
Move the ISS switch to "1" or "2".
REPACKING FOR SHIPMENT
The original HP-319 carton and packing material should be saved
for future use in shipping the HP-319 for repair work or to another
location. However, to secure maximum protection, the HP-319
must be repacked in this material precisely as before. The proper
repacking procedure is as shown in the illustration.
Notes:
• Before securing the transit screws, reinsert all spacers under the
turntable platter and frame. Then, tighten the transit screws by
turning counterclockwise.
.Install the stylus guard. Clip the tonearm to the arm rest and
secure it by an adhesive tape.
.Secure the Overarm by depressing the Overarm axis and move
it toward the right. Secure the Overarm and tonearm with a cord
or tape .
• To
protect the Cassette-corder mechanism reinsert the spacer in
the Cassette holder slot.
• Remove the dust cever.
11

Fm stereo a-m superheterodyne tuner,
SEPP OTL, Complementary power
amplifier
1 FET+22 transistors for reception,
8 transistors for auxiliary circuits,
6 integrated circuits, 20 diodes
Power requirements 120 V ac. 60 Hz
Power consumption 60 W
AC outlet Unswitched 300 W (maximum)
Overall dimensions Approx. 23112"(w)
X
10"(h)
X
1611116"(d)
Weight (without speakers)
Approx. 35 Ib 18 oz (net)
Approx. 38 Ib 21 oz (in shipping carton)
Amplifier Section
,Continuous RMS output power
Total 24 W (THD 5%,8£1)
Total 40
W,
EIA (THD 5%,8£1)
40 Hz - 40 kHz at 1
W
output
Sensitivity Impedance
440 mV 50 kn
continuous RMS power
SPECIFICATIONS
General
Circuit system
Sem icond uctors
Fm
tuner Section
Tuning range
Antenna terminals
Sensitivity
SIN ratio
Harmonic distortion
Stereo separation
A-m tuner Section
Tuning range
Antenna
Sensitivity
SIN ratio
Harmonic distortion
Music output power
Frequency response
Inputs
Outputs
Tone controls
12
f+----
19
31s-----+!
19%"
'.
Loudness control
+6 dB at 100 Hz, +4 dB at 10 kHz
(att. -30 dB)
Player Section
Turntable
BSR C-141R auto/manual changer
11 inch dia. platter
3 speeds (33, 45, 78 rpm)
VX-23P
Conical 0.7 mil diamond
4 g ± 0.5 g (4 g recommended)
Cartridge
Stylus
Stylus force
Cassette-corder Section
Tape speed 1 7/S ips
(fl.8
crn/s)
Frequency response 40 Hz -10kHz
Wow and flutter Less than 0.3% wrms
Input MIC input
low impedance
Speaker System (SS-310)
System 2-way (61/2" woofer, 2" tweeter)
Impedance 8£1
Dimensions Approx. 915116"(w)x15 7/s"(h)x8 7/16"(d)
Weight Approx. 26 Ib 6 oz (net)
(pair in shipping carton)
Supplied Accessories
Long spindle (for automatic operation)
Short spindle (for manual operation)
Manual 45-rpm adaptor
Fm ribbon antenna
(1)
(1)
(1)
(1)
87.5-108MHz
300 ohm balanced,
Equipped with ac line antenna
2.2!'-V, SIN =30 dB
65 dB
Mono 0.5% at 400 Hz
Stereo 1.0% at 400 Hz
30 dB
530 -1,605 kHz
Built-in ferrite-bar antenna,
External antenna terminal
48 dB/m, built-in antenna
20 !'-V, external antenna
50 dB
0.8% at 400 Hz
TAPE
Measured with
stated above.
Output voltage Impedance
REC OUT 250 mV 10 kn
HEADPHONE Accepts headphones of 8
ohms or more.
SPEAKER 8 ohms.
BASS ±10 dB at 100 Hz
TREBLE ±10 dB at 10 kHz
Optional Accessories
Stylus ND-127P
Automatic 45-rpm adaptor BSR PS-899
One Point Stereo Microphone F-99B and ECM-99
Design and specifications subject to change without notice.
/