Avery Dennison 9860 Printer Quick Reference Manual
- Category
- Print & Scan
- Type
- Quick Reference Manual
This manual is also suitable for
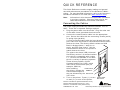
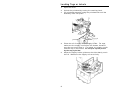
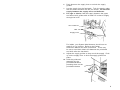
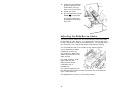
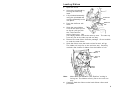
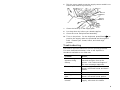
Avery Dennison 9860 Printer is a high-performance printer designed for industrial and commercial applications. It offers fast and reliable printing with a range of features that make it ideal for a variety of tasks. With its ability to handle different types of supplies, including tags and labels, and its adjustable wide/narrow knobs for various supply widths, this printer provides versatility and efficiency. The printer also features easy ribbon loading and a user-friendly interface for convenient operation.
Avery Dennison 9860 Printer is a high-performance printer designed for industrial and commercial applications. It offers fast and reliable printing with a range of features that make it ideal for a variety of tasks. With its ability to handle different types of supplies, including tags and labels, and its adjustable wide/narrow knobs for various supply widths, this printer provides versatility and efficiency. The printer also features easy ribbon loading and a user-friendly interface for convenient operation.


-
 1
1
-
 2
2
-
 3
3
-
 4
4
-
 5
5
-
 6
6
-
 7
7
-
 8
8
-
 9
9
-
 10
10
-
 11
11
-
 12
12


Avery Dennison 9860 Printer Quick Reference Manual
- Category
- Print & Scan
- Type
- Quick Reference Manual
- This manual is also suitable for
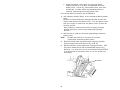
Avery Dennison 9860 Printer is a high-performance printer designed for industrial and commercial applications. It offers fast and reliable printing with a range of features that make it ideal for a variety of tasks. With its ability to handle different types of supplies, including tags and labels, and its adjustable wide/narrow knobs for various supply widths, this printer provides versatility and efficiency. The printer also features easy ribbon loading and a user-friendly interface for convenient operation.
Ask a question and I''ll find the answer in the document
Finding information in a document is now easier with AI
Related papers
-
Avery Dennison 9855 Printer Quick Reference
-
Monarch Monarch 9825 User manual
-
Avery Dennison 9855RFMP Printer Quick Reference Manual
-
Monarch 9860 Printer User manual
-
Avery 9825 Printer Quick Reference Manual
-
-
-
-
-
Avery Dennison 9417+ Quick Reference Manual
Other documents
-
Paxar Monarch 9855 RFID User manual
-
-
HP 9800 Series User manual
-
-
-
-
-
-
Hobart HT Scale Operating instructions
-
Hobart HL400-1STD Operating instructions