ENGLISH
DIGITAL WATCH WITH TOUCH SENSOR
TECHNOLOGY:
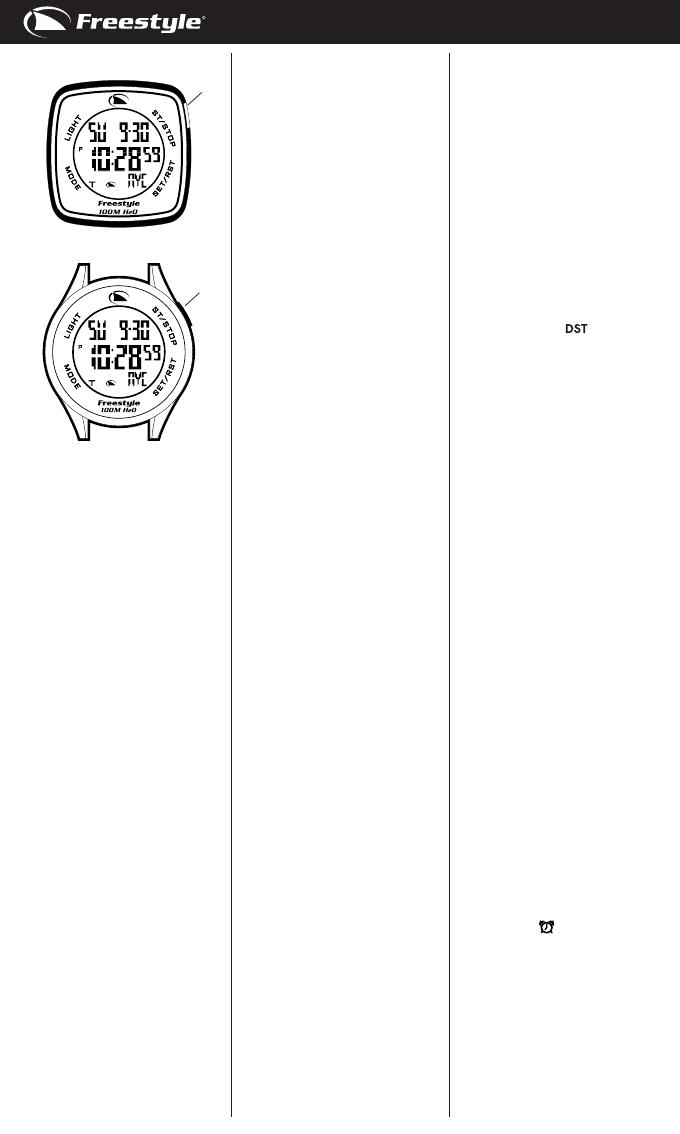
S1. Start/stop sensor
S2. Set/reset sensor
S3. Mode sensor
S4. Light sensor
S5. Touch sensor unlock button
SPECIAL FEATURE:
This Freestyle product features unique
Hydro Pushers®: these pushers can be
pressed under water to a dynamic wa-
ter pressure (not water depth) of 3 ATM.
TO LOCK AND UNLOCK THE TOUCH
SENSORS:
There are 4 touch sensors around the
lens of the watch (S1,S2,S3,and S4). To
unlock the sensors, press S5 button.
The touch sensor indicator (T) will be
displayed to indicate the touch sensors
are unlocked.
When no sensors are pressed for 10
seconds, the touch sensor lock will
automatically be activated (except in
CHRONOGRAPH mode and TIMER
mode when the chronograph or timer
is in use) and the touch sensors will
be locked.
DISPLAY MODES:
The watch has ve display modes:
NORMAL TIME, WORLD TIME (WT),
ALARM (AL), CHRONOGRAPH (CR) and
TIMER (TR).
To change from one display mode to
another, press S3 sensor once.
NOTE: In any setting mode, when there
is no sensor pressed for 30 seconds,
the watch will automatically save
the entered data and exit the setting
procedure.
TO SET THE TIME AND CALENDAR:
1. Press S3 sensor to select NORMAL
TIME mode.
2. Press and hold S2 sensor, the
message “HOLD TO SET” will be
displayed for 2 seconds and the
local city selection will blink.
Press S1 or S2 sensor to cycle
forward or backward through the
32 preset cities/ time zones to
select your home city for display in
NORMAL TIME.
3. Press S3 sensor, the Daylight
Savings Time (DST) setting will
blink. Press S1 or S2 sensor to
toggle between ON and OFF of the
DST setting. Note that setting DST
for NORMAL TIME does not auto-
matically apply to the same city in
WORLD TIME. You must apply DST
to WORLD TIME cities separately.
4. Press S3 sensor, the hour digits will
blink. Press S1 sensor to increase
or S2 sensor to decrease the value.
Holding down the sensor will speed
up the process.
5. Press S3 sensor, the minute
digits will blink. Press S1 sensor to
increase or S2 sensor to decrease
the value. Holding down the sensor
will speed up the process.
6. Press S3 sensor, the second digits
will blink. Press S1 or S2 sensor to
reset the second digits to zero.
7. Press S3 sensor, the year digits will
blink. Press S1 sensor to increase
or S2 sensor to decrease the value.
Holding down the sensor will speed
up the process.
8. Press S3 sensor, the month digits
wil blink. Press S1 sensor to in-
crease or S2 sensor to decrease the
value. Holding down the sensor will
speed up the process.
9. Press S3 sensor, the date digits will
blink. Press S1 sensor to increase
or S2 sensor to decrease the value.
Holding down the sensor will speed
up the process.
10. Press S3 sensor, the hour format
setting will blink. Press S1 or S2
sensor to toggle between 12-hour
and 24-hour format. The P.M. indi-
cator will be displayed to indicate
the time period 12:00 P.M. – 11:59
P.M. in 12-hour format.
11. Press S3 sensor, the ‘‘BEEP”
setting will blink. The ‘‘BEEP”
option will cause the watch to
beep anytime a sensor or button is
pressed. Press S1 or S2 sensor to
toggle between ON and OFF for the
beep setting.
12. Press S3 sensor, the hourly chime
(CHIME) setting will blink.
Press S1 or S2 sensor to toggle
between ON and OFF for the hourly
chime setting.
13. When nished making all the set-
tings, press and hold S3 sensor for
approximately 3 seconds to conrm.
NOTE: The day (of the week) is
automatically set in accordance with
the date. The date can be set within
the range of 1 January 2009 to 31
December 2099.
NOTE: The selected hour format will
apply to both NORMAL TIME mode and
WORLD TIME mode.
TO SELECT AND DISPLAY THE TIME
OF WORLD TIME CITY IN WORLD TIME
MODE:
1. Press S3 sensor to select WORLD
TIME mode.
2. To make the world time city selec-
tion, press S1 or S2 sensor to cycle
forward or backward through the 32
preset cities / time zones.
3. Press and hold S1 sensor for ap-
proximately 3 seconds to toggle
between DST and Standard Time.
The DST indicator
will be dis-
played when Daylight Savings Time
is displayed.
NOTE: When you have applied DST for
individual cities / time zones, the re-
spective time will be adjusted forward
by 1 hour. Please make sure you have
correctly applied DST for the selected
local city and world time cities with
reference to information available on
the Internet, or else the watch will not
be able to display the time of individual
cities / time zones properly.
TO SET THE ALARM TIME:
1. Press S3 sensor to select ALARM
mode.
2. Press and hold S2 sensor, the
message “HOLD TO SET” will
be displayed for approximately 2
seconds and the hour digits will
blink. Press S1 sensor to increase
or S2 sensor to decrease the value.
Holding down the sensor will speed
up the process.
3. Press S3 sensor, the minute digits
will blink. Press S1 sensor to in-
crease or S2 sensor to decrease the
value. Holding down the sensor will
speed up the process.
4. When nished making all the set-
tings, press and hold S3 sensor for
approximately 3 seconds to conrm.
NOTE: The alarm will automatically be
activated after being set.
TO TURN ON/OFF THE ALARM:
In ALARM mode, press S1 sensor to
toggle between ON and OFF of the
alarm. When the alarm is ON, the
alarm indicator
will appear.
WHEN AN ALARM GOES OFF:
An alarm tune will be emitted at the
designated time when the alarm is
activated. To stop the tune, press any
sensor or button.
TO USE THE CHRONOGRAPH:
1. Press S3 sensor to select CHRONO-
GRAPH mode.
2. For the measurement of elapsed
time in CHRONOGRAPH mode ,
press S1 sensor to start counting.
S5
S1
S2
THE TANGENT
THE RESPONSE
S3
S4
S5
S1
S2S3
S4


