Rifton R830 User manual

Type
User manual

This manual is also suitable for

Rifton Activity Chair
R820, R830, R840, R850, R860 & R870
Product Manual
Hi/lo Base
®
Standard Base
R820, R830, R840, R850, R860 & R870
2
© 2015 Rifton Equipment
Contents
Important information 4
Safety messages 5
Recommended use 6
User and item dimensions 6-8
Check your order 9
Basic components
Backrest and pads 9
Seatbelt 10
Arm supports 11-12
Seat depth 13
Tilt-in-space 13
Spring options 14-16
Seat quick-connect 17-18
Standard base
Adjustable legs 19
Seat height 19
Footboard 19
Hi/lo base
Seat height 20
Caster brakes and swivel lock 21
Footboard 22
3
Contents continued. . .
Accessories
Headrests 23
Whitmyer adapter plate 24
Lateral supports 25
Chest strap 26
Butter y harnesses 27
Thigh belt 28
Pelvic harness 29
Hip guides 30
Abductor 31
Adductors 31
Leg prompts and ankle straps 32
Sandals and wedges 33
Lumbar and seat support kit 34
Backrest fi ller pad 34
Tray 35
Handhold 35
Push handles 36
Footboard lift 36
Mini kit 37
Maintenance, cleaning and warranty 38
Materials and user modifi cations 39
4
IMPORTANT
Please save this product manual for future reference. Additional copies are
available at
www.rifton.com
Key for users
Use this key to determine which sections of this product manual apply to you.
Technical Users For professionals who order and set up Rifton products.
Home Users For care-givers who use Rifton products on a regular basis.
Maintenance Personnel For anyone who is responsible for service or
re-ordering of Rifton products and parts.
5
Thoroughly read and understand the information in this product manual before
attempting to use this product. If the procedures and instructions in this product manual
are not followed, serious injury or death could occur.
A qualifi ed professional must assess the appropriateness and safety of all equipment for
each user.
This product is intended for use by clients of unreliable judgment. Adult supervision is
required at all times.
To prevent falls and injuries:
Do not use this product on rough and uneven terrain, around swimming pools, or
near stairways.
Ensure the appropriate use of straps and supports at all times. Straps and supports
are provided for the safety of the user and must be carefully adjusted for comfort and
security.
Tighten all adjustment knobs before use and immediately after making any
adjustments.
To prevent pinching or crushing:
Keep clients away from under the seat of the chair.
Keep hands above the seat when the spring option is in use.
To prevent falls, strangulation, head entrapment or other injuries, always use seatbelt
or pelvic harness when the tray, chest straps, thigh belt, mini trunk support, or butter y
harness are in use.
Do not use this product for clients outside the height and weight limits speci ed in this
manual.
To prevent structural failure, which may result in serious injury or death:
Inspect this product and accessories regularly for loose or missing screws, metal
fatigue, cracks, broken welds, missing attachments, general instability or other signs
of excessive wear.
Immediately remove this product from use when any condition develops that might
make operation unsafe.
Do not use Rifton components or products for any purpose other than their intended
use.
WARNING
6
Recommended use
The Rifton Activity Chair is a Class 1 medical device. It is intended to provide comfortable
seating with adjustable support for people with disabilities in the classroom or at home.
The chair allows for growth, can be used by multiple users and is available with various
accessories that are easily removable as the client gains independence.
Small user and item dimensions
User dimensions – inches (cm) R820 Standard base R830 Hi/lo base
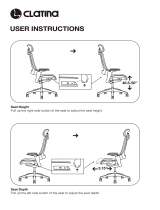
Height
with mini kit
32–48 (81-122)
28–38 (71-97)
32–48 (81-122)
28–38 (71-97)
Item dimensions – inches (cm)
R820 small
Standard base
R830 small
Hi/lo base
Frame width short legs: 21 (53) 25 (63)
long legs: 23 (58)
short legs w/ wheels: 22½ (57)
long legs w/ wheels: 23½ (60)
Seat height above fl oor short legs: 9½12½ (24-32) 10–25 (25-64)
long legs: 18½–21½ (47-55)
short legs w/ wheels: 13½16½
(34-42)
long legs w/ wheels: 18½–21½ (47-55)
Seat angle (tilt-in-space)
- degrees
15° forward, 15° back 15° forward, 25° back
Backrest angle
- degrees
5° forward, 20° back 5° forward, 20° back
Seat height above footboard
with mini kit
9–12 (23-30)
69 (15-23)
9–12 (23–30)
69 (15–23)
Seat width with hip guides
(without hip guides)
7–9 (18-23)
12 (30)
7–9 (18–23)
12 (30)
Seat depth
with mini kit
8–12 (20-30)
7–11 (18-28)
8–12 (20–30)
7–11 (18–28)
Armrest height above seat 5–7½ (13-19) 5–7½ (13–19)
Trunk support width 11½ (14-29) –11½ (14–29)
Backrest height 1–15½ (32-39) 1–1
Headrest height above seat 14½–21 (37–53) 14½–21 (37–53)
Max. working load – lbs. (kg) 75 (34) 75 (34)
Key user dimension: height
The user’s overall height is a general guide to help you select the appropriate chair.
Choose the model that allows for growth.
Important: Make sure that seat width, depth and height are adequate for each individual
user, and that the user’s weight does not exceed the maximum weight recommended.
7
Medium user and item dimensions
User dimensions – inches (cm) R840 Standard base R850 Hi/lo base
Height 40–56 (102–142) 40–56 (102–142)
Item dimensions – inches (cm)
R840 medium
Standard base
R850 medium
Hi/lo base
Frame width short legs: 23¼ (59) 27½ (70)
long legs: 24½ (62)
short legs w/ wheels: 24½ (62)
long legs w/ wheels: 25½ (65)
Seat height above fl oor short legs:12½–16½ (32–42) 12–23 (30–58)
long legs: 19–23 (48–58)
short legs w/ wheels: 16–20 (41–51)
long legs w/ wheels: 19–23 (48–58)
Seat angle (tilt-in-space)
- degrees
15° forward, 15° back 15° forward, 25° back
Backrest angle
- degrees
5° forward, 20° back 5° forward, 20° back
Seat height above footboard
with footboard lift
12–16½ (30–41)
8–12½
12–16½ (30–41)
8–12½
Seat width with hip guides
(without hip guides)
8½–11½ (22–29)
14 (36)
8½–11½ (22–29)
14 (36)
Seat depth 11–16 (28–41) 11–16 (28–41)
Armrest height above seat 7–10½ (18–27) 7–10½ (18–27)
Trunk support width 6½–12 (17–30) 6½–12 (17–30)
Backrest height 15½–19 (39–48) 15½–19 (39–48)
Headrest height above seat 17½–24½ (44–62) 17½–24½ (44–62)
Max. working load – lbs. (kg) 150 (68) 150 (68)
Key user dimension: height
The user’s overall height is a general guide to help you select the appropriate chair.
Choose the model that allows for growth.
Important: Make sure that seat width, depth and height are adequate for each individual
user, and that the user’s weight does not exceed the maximum weight recommended.
8
Large user and item dimensions
Key user dimension: height
The user’s overall height is a general guide to help you select the appropriate chair.
Choose the model that allows for growth.
Important: Make sure that seat width, depth and height are adequate for each individual
user, and that the user’s weight does not exceed the maximum weight recommended.
User dimensions – inches (cm) R860 Standard base R870 Hi/lo base
Height 50–74 (127–188) 50–74 (127–188)
Item dimensions – inches (cm)
R860 large
Standard base
R870 large
Hi/lo base
Frame width short legs: 26¼ (66) 29¾ (75)
long legs: 26¼ (66)
short legs w/ wheels: 27¾ (71)
long legs w/ wheels: 27¾ (71)
Seat height above fl oor short legs:16½–20½ (42–52) 16–24 (41–61)
long legs: 20–24 (51–61)
short legs w/ wheels: 16½–20½ (42–52)
long legs w/ wheels: 20–24 (51–61 )
Seat angle (tilt-in-space)
- degrees
15° forward, 15° back 15° forward, 25° back
Backrest angle
- degrees
5° forward, 20° back 5° forward, 20° back
.
Seat height above footboard
with footboard lift
15–20 (38–51)
11–16
15–20 (38–51)
11–16
Seat width with hip guides
(without hip guides)
11–14 (28–36)
17 (43)
11–14 (28–36)
17 (43)
Seat depth 15–20 (38–51) 15–20 (38–51)
Armrest height above seat 7–10½ (18–27) 7–10½ (18–27)
Trunk support width 9½–14 (24–36) 9½–14 (24–36)
Backrest height 19–24 (48–61) 19–24 (48–61)
Headrest height above seat 19½–29½ (50–75) 19½–29½ (50–75)
Max. working load – lbs. (kg) 250 (113) 250 (113)
9
Check your order
Your Rifton chair has been shipped according to your speci cations. It will require some
tool-free assembly. Follow these instructions to insure that your chair is put together
and used correctly. This product manual is comprehensive and may discuss features not
included in your chair.
If your shipment is incomplete or in any way damaged on arrival,
please call Customer Service, 800.571.8198.
Basic components
A Quick Reference Guide for your chair is located behind the backrest pad.
Backrest
Backrest angle and height adjust with
one-hand levers.
To adjust backrest angle, squeeze white
backrest angle lever and move backrest
forward or backward to desired angle, then
release lever (see Figure 9a).
To adjust backrest height, press backrest
height lever and raise or lower backrest to
desired position. Release lever and click
backrest into position (see Figure 9a).
Pads
Backrest and seat pads snap into
position.
Backrest pad has a Rifton tag (see Figure
9b) and is snapped onto studs (A) located
behind top and bottom edge of backrest
(see Figure 9c).
Seat pad has no tag and is snapped onto
studs (B) located under front and back
edge of seat (see Figure 9c).
Backrest pad
Seat pad
Backrest
angle lever
Backrest
height lever
Rifton tag
A
B
Figure 9a
Figure 9b
Figure 9c
Tip: Every white lever or button
indicates a point of adjustment.
10
Seatbelt
To prevent falls,
strangulation, head
entrapment or other injuries, always
use seatbelt or pelvic harness when the
tray, chest straps, thigh belt, mini trunk
support, or butterfl y harness are in use.
To attach seatbelt (see Figure 10a), use a
pen to press small white button (C) just
below one of the slots (B) at the side of
the seat. While keeping button depressed,
insert the L-shaped metal clip (A) on the
seatbelt strap into the slot with back of
L-shape towards front of seat. Press clip
rmly into slot and release button, making
sure clip locks and holds when pulled.
Repeat on other side of seat.
To remove the seatbelt, use a pen to
press small white button (C) just below
clip slot on side of seat, and pull belt up
to disengage clip. Repeat on other side
of seat.
WARNING
A
A
B
B
C
C
Figure 10a
Tip: Seatbelt can be clipped into either
set of small slots at sides of chair (B).
11
Arm supports
A pair of either armrests or forearm
prompts were purchased with the
chair.
Insert arm supports into large slots at
either side of seat.
Both types of arm supports can be removed
for side transfers.
To insert arm support and adjust its height,
press white button (A) just below arm
support slot at side of seat. Insert arm
support, move it up or down to required
height, release button and make sure it
audibly locks into place (see Figure 11a).
To remove arm support, press white button
below arm support slot at side of seat and
pull arm support up.
Armrests can be set at a wide range of
angles.
To set angle of armrest, lift white tab (B)
below outer edge of armrest (see Figure
11a) and rotate armrest to desired angle.
Release tab and make sure armrest audibly
locks into place.
B
B
A
A
Figure 11a (Armrests)
Tip: Cut-outs on armrests should be
toward back of chair.
12
Arm supports continued. . .
Forearm prompts adjust fully to facilitate
trunk and head control while sitting.
Forearm prompts are attached using a
clamp and post system (see Figure 12b).
The clamp attaches with a knob (F) to any
position on the bar, and can be attached
on the inside or outside of the bar (G) (see
Figure 12a).
The post fi ts into the clamp and provides
up/down and rotational adjustment.
Arm prompt can be attached to the post
at several angles by sliding or rotating
to achieve the best position for the user.
Loosen knob (A) to make adjustments (see
Figure 12b).
Adjust the forearm prompts to the best
position for a users comfort and function.
Slide or rotate the handgrip (see Figure
12b), by loosening, then tightening knob
(C). Adjust straps (D and E) (see Figure 12a)
and secure with hook and loop fasteners
(hooks away from the user’s arm).
Clamp
Post
Handgrip
A
A
C
C
D
D
E
E
F
F
G
G
C
C
A
A
F
F
Figure 12a ( Forearm prompts)
Figure 12b
13
Seat depth
To adjust seat depth, pull white handle
located below seat (see Figure 13a).
Move seat forward or back to desired
position and release handle. Make sure
seat audibly locks into place.
Tilt-in-space
To prevent pinching or
crushing, keep hands
and limbs away from moving parts when
adjusting chair.
Tilt-in-space allows the entire seat and
backrest to be adjusted to any angle in the
range of -15° to +1. (Angle is affected
by dynamic spring, see following pages.)
This enables the user to sit in an active or a
relaxed position.
To adjust tilt-in-space angle, place one
hand on push handle or top of backrest
and use the other hand to squeeze tilt
lever and safety lock (see Figure 13b). Push
forward or pull backward on push handle
or backrest until desired angle is reached,
then release levers to lock seat and
backrest into desired position.
Use angle indicator (see Figure 13c) on the
side of the chair for consistent positioning.
Seat handle
Safety lock
Tilt lever
Push handle
Figure 13a
Figure 13b
Figure 13c
WARNING
14
Dynamic backrest
and seat
The dynamic spring option is designed
for user-initiated movement allowing
the chair to “bounce.” The spring feature
can be locked to provide two ranges of
adjustment: forward leaning or active
mode, and reclined or relaxed mode.
The dynamic backrest is an option on
all chairs. It is controlled by the cylinder
behind the backrest. (see Figures 14a
and 14b).
The dynamic seat is an option on standard
bases only. It is controlled by the cylinder
under the seat. (See Figures 14a and 14c).
Figure 14b Dynamic backrest
Figure 14c Dynamic seat
Figure 14a
Backrest
cylinder
Seat cylinder
15
Figure 15a
Figure 15b
Dynamic backrest
The dynamic backrest (if installed) is
controlled by the dynamic cylinder
behind the backrest (see Figure 15a).
The dynamic backrest has three functions
(see Figures 15b and 15c):
1. Dynamic spring unlocked.
Turn the
white twist-lock collar clockwise to
give 10° dynamic movement. Using
the backrest angle adjustment lever
adjust the dynamic range between
-20° and +5°.
2. Spring locked – forward adjustment.
With the backrest tilted forward,
turn the white twist-lock collar
counterclockwise. Using the angle
adjustment lever adjust the backrest
angle between -10° and +
3. Spring locked – reclining adjustment.
While the spring is unlocked, push the
backrest into a reclining position. This
is easier to do with the client in the
chair. Turn the white twist-lock collar
counterclockwise. Using the angle
adjustment lever adjust the backrest
angle between -20° and -.
Tip: When locking the spring, move
the backrest forward or back to enable
the twist-lock collar to slip easily into
position.
Angle
adjustment
lever
U
n
l
o
c
k
L
o
c
k
Backrest
cylinder
Figure 15c
Backrest angle
indicator
Seat angle
indicator
16
Figure 16b
Figure 16a
Dynamic seat (standard base only)
The dynamic seat (if installed) is
controlled by the dynamic cylinder
underneath the seat (see Figure 16a).
The dynamic seat has three functions
(see Figure 16b and 16c):
1. Dynamic spring unlocked. Turn the
twist-lock collar clockwise to allow
10° of dynamic movement. Using the
tilt-in-space adjustment lever adjust the
dynamic range between -15° and +1.
2. Spring locked – forward adjustment.
With the chair tilted forward, turn the
white twist-lock collar under the seat
counterclockwise. Using the tilt-in-space
adjustment lever adjust the angle of the
seat between -5° and +1.
3. Spring locked – reclining adjustment.
While the spring is unlocked, tilt the
seat into a fully reclined position. This
is easier to do with the client in the
chair. Turn the white twist-lock collar
counterclockwise. Using the tilt-in-space
adjustment lever adjust the tilt between
-15° and +.
Seat cylinder
Tilt-in-
space
adjustment
L
o
c
k
U
n
l
o
c
k
Tip: When locking the spring, move
the backrest forward or back to enable
the twist-lock collar to slip easily into
position.
Figure 16c
Backrest angle
indicator
Seat angle
indicator
17
Seat quick-connect
The Rifton Activity Chair seat and
backrest unit can be detached from its
base and re-attached to any other Rifton
Activity Chair base of the same size.
Thus, a Rifton Activity Chair standard
base can be converted to a Hi/lo base and
vice versa, by ordering the base required.
Detaching seat and backrest:
First disconnect footboard angle adjuster,
if it has a footboard (see Figure 17a). To
do this, reach beneath seat, press tube
latch and pull footboard up and away from
seat until tubing drops out of housing (see
Figure 17a). Lock casters, if present and
remove arm supports.
Find two white levers (A and B) located
beneath the chair seat (see Figure 17b).
Place one hand under front edge of seat
and lift it up. At the same time, with the
other hand, pull lever (A) towards front of
chair. Still lifting front edge of seat, pull
second lever (B) towards front of chair to
disengage seat from crossbar (C).
Once front of seat is disengaged (see
Figure 17c), pull entire seat and backrest
towards front of chair until seat hoop (D)
disengages from metal prongs (E).
Figure 17a
Figure 17b
Figure 17c
D
D
A
A
B
B
E
E
C
C
Footboard
adjustment
tubing
Tube
latch
Housing
18
To prevent falls and
injury, ensure that the
seat is rmly attached at the front and
back before use.
If the seat is being installed on a Hi/lo base,
raise the base to its full height fi rst.
To attach, slide seat hoop (D) under prongs
(E) on base, centering backrest column
between prongs (see Figure 18a). Then
lower seat onto crossbar (C) (see Figure
18b), pushing fi rmly down on front edge
until it snaps into place.
Reconnect footboard adjustment tubing to
its housing by holding housing and tubing
in a straight line to one another. Press tube
latch, insert tubing into housing and make
sure it audibly locks into place at desired
setting (see Figure 18c).
Attaching seat and backrest
WARNING
Figure 18c
Figure 18b
Figure 18a
D
D
A
A
B
B
E
E
C
C
Footboard
adjustment
tubing
Tube
latch
Housing
Tip: Detaching seat from base and
re-attaching it to another base works
best with two people, one on either
side of chair.
19
Standard base
Adjustable legs
To prevent falls and
injury:
Adjust all legs on a chair to the same
length.
Always use four legs of a set together
on one chair; do not connect legs of
varying lengths or varying features to
the same chair.
To permit steering and
prevent injury, ensure
that the caster with the swivel lock
function is inserted into the right rear leg
of the base frame (see Figure 19b).
For more information on caster function,
see page 21.
A set of four long legs, or four short
legs, or four long legs with casters, or
four short legs with casters have already
been purchased with the standard base.
Additional sets of legs may be purchased
as an accessory.
To connect leg to chair, press snap button and
insert leg into housing. Release snap button
and make sure leg clicks into place (see Figure
19a). To disconnect leg from chair, press snap
button and pull leg out of housing.
Seat height
The selection of long or short legs, with or
without casters will impact seat height. To
adjust seat height, press snap button on each
adjustable leg, push or pull leg to desired
setting, release snap button and make sure it
audibly locks into place (see Figure 19a).
Footboard
Footboard is an accessory with standard
base. For information on footboard and its
adjustments, see page 22.
CAUTION
WARNING
Snap
button
Holes
Leg
Figure 19a
Figure 19b
20
Hi/lo base
To prevent pinching or
crushing, keep hands
and limbs away from moving parts when
adjusting chair.
Large & medium chair seat
height (R850 & R870)
To adjust seat height, use foot pedal
located at rear of chair. To raise seat,
repeatedly pump foot pedal until desired
height is achieved. To lower seat, lift the
red safety lock and foot pedal up until the
seat descends to desired height
(see Figure 20a).
Small chair seat height
(R830)
To adjust seat height, use handle behind
backrest. Squeeze and hold both triggers
while pulling up or pushing down
(see Figure 20b).
Foot pedal
Safety lock
Figure 20a
Figure 20b
Triggers
Handle
WARNING
  • Page 1 1
  • Page 2 2
  • Page 3 3
  • Page 4 4
  • Page 5 5
  • Page 6 6
  • Page 7 7
  • Page 8 8
  • Page 9 9
  • Page 10 10
  • Page 11 11
  • Page 12 12
  • Page 13 13
  • Page 14 14
  • Page 15 15
  • Page 16 16
  • Page 17 17
  • Page 18 18
  • Page 19 19
  • Page 20 20
  • Page 21 21
  • Page 22 22
  • Page 23 23
  • Page 24 24
  • Page 25 25
  • Page 26 26
  • Page 27 27
  • Page 28 28
  • Page 29 29
  • Page 30 30
  • Page 31 31
  • Page 32 32
  • Page 33 33
  • Page 34 34
  • Page 35 35
  • Page 36 36
  • Page 37 37
  • Page 38 38
  • Page 39 39
  • Page 40 40

Rifton R830 User manual

Type
User manual
This manual is also suitable for

Ask a question and I''ll find the answer in the document

Finding information in a document is now easier with AI