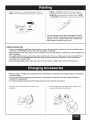
WAGNER 980 is a high-performance power roller, a precision power tool used for both interior and exterior painting. It can be used with both water (latex) and oil-based paints. It has a flow rate of 10-12 oz. per minute and a power requirement of 60 Hz current. It is capable of handling most oil and water-based paints and stains, but should not be used with lacquers, lacquer thinners, or any other solvent with a flash point below 100 ° F (38°C).
WAGNER 980 is a high-performance power roller, a precision power tool used for both interior and exterior painting. It can be used with both water (latex) and oil-based paints. It has a flow rate of 10-12 oz. per minute and a power requirement of 60 Hz current. It is capable of handling most oil and water-based paints and stains, but should not be used with lacquers, lacquer thinners, or any other solvent with a flash point below 100 ° F (38°C).


-
 1
1
-
 2
2
-
 3
3
-
 4
4
-
 5
5
-
 6
6
-
 7
7
-
 8
8
-
 9
9
-
 10
10
-
 11
11
-
 12
12
-
 13
13
-
 14
14
-
 15
15
-
 16
16


WAGNER 980 is a high-performance power roller, a precision power tool used for both interior and exterior painting. It can be used with both water (latex) and oil-based paints. It has a flow rate of 10-12 oz. per minute and a power requirement of 60 Hz current. It is capable of handling most oil and water-based paints and stains, but should not be used with lacquers, lacquer thinners, or any other solvent with a flash point below 100 ° F (38°C).
Ask a question and I''ll find the answer in the document
Finding information in a document is now easier with AI
in other languages
- français: WAGNER 980 Le manuel du propriétaire
Related papers
-
WAGNER 0525029 Installation guide
-
WAGNER Power Roller Max User manual
-
-
-
-
-
-
-
-
WAGNER 9175 User manual
Other documents
-
Unbranded 11046-76-01 User guide
-
Filament Design OL917 User manual
-
Ryobi FPR200 User guide
-
-
-
 Wagner SprayTech 1920 User manual
-
Titan EP2205 Owner's manual
-
SprayTECH EP2300SE 0294083 User manual
-
Chicago Electric 93359 User manual
-
