Page is loading ...

Manual # P80151149A - Date:2015/12/15
Assembly Instructions
UN2616ACT
Failure to comply with these instructions could
result in a fire or explosion that could cause
serious bodily injury, death or property damage.
Whether this grill was assembled by you or
someone else, you must read this entire manual
before using your grill to ensure the grill is
properly assembled, installed and maintained.
Use your grill at least 3 feet away from any
wall or surface. Use your grill at least 3 feet
away from combustible objects that can melt or
catch fire such as vinyl or wood siding, fences
and overhangs or sources of ignition including
pilot lights on water heaters and live electrical
appliances.
THIS GAS APPLIANCE IS DESIGNED FOR
OUTDOOR USE ONLY.
Never use your gas grill in a garage, porch,
shed, breezeway or any other enclosed area.
Never obstruct the flow of ventilation air
around your gas grill housing.
Never disconnect the gas regulator or any gas
fitting while your grill is lit. A lit grill can ignite
leaking gas and cause a fire or explosion which
could result in property damage, personal injury
or death.
Ÿ
Ÿ
Ÿ
Ÿ
Ÿ
Ÿ
WARNING
! !
Ÿ
Grill Information Center:
Ÿ
Ÿ
NOTE TO ASSEMBLER / INSTALLER:
Leave this manual with the consumer.
NOTE TO CONSUMER:
Keep this manual for future reference.
RECORD YOUR SERIAL #
__________________
(see silver CSA label on main body of grill)
IMPORTANT:
Ÿ
FREE HELP
FROM THE GRILL EXPERTS
Grand Hall is the expert on this product
and trained to help you with:
visit www.grandhall.com or call:
1-800-474-5587
Monday - Friday 8:00am-4:30pm PST
Assembly Questions
Grill Operation
Replacement of Damaged or Missing parts
Ÿ
Ÿ
Ÿ
UN3216ACT

2
Hardware Diagram for Model UN2616ACT & UN3216ACT
Hardware Pack For Model UN2616ACT & UN3216ACT
Pan Head Screw 1/4"x3/8"
Qty. 12
Part # S182G04061
Pan Head Screw 3/16"x3/8"
Qty. 59
Part # S182G03061
Wrench
Qty. 1
Part # P05515124L
Phillips Head Screw 3/16"x1-5/8"
Qty. 8
Part # S112G03261
Hex Head Screw 3/16"x3/8"
Qty. 8
Part # S162G03064
Pan Head Screw 3/16"x1/2"
Qty. 2
Part # S182G03081
Already installed in grill bowl
side panels
PART # PART DESCRIPTION QTY PURPOSE OF PART
P06013019B Hardware Pack 1 For use to assemble UN2616ACT & UN3216ACT
S182G04061 Pan Head Screw 1/4"x3/8" 4
S182G03061 Pan Head Screw 3/16"x3/8" 8
S182G03061 Pan Head Screw 3/16"x3/8" 4
S182G04061 Pan Head Screw 1/4"x3/8" 8
S182G03061 Pan Head Screw 3/16"x3/8" 4 Install Lower Door Brackets
S182G03061 Pan Head Screw 3/16"x3/8" 2 Install Door Guide Plate
S182G03061 Pan Head Screw 3/16"x3/8" 6 Install Cart Rear Panel
S182G03061 Pan Head Screw 3/16"x3/8" 1 LP Regulator Hose Holder
P05515124L Wrench 1 Install Casters
S182G03061 Pan Head Screw 3/16"x3/8" 6
Install Cart Partition Panel Bracket and Cart Partition Panel
(UN3216ACT Only)
S182G03061 Pan Head Screw 3/16"x3/8" 8 Install Tank Holder and Holder Assembly
S182G03061 Pan Head Screw 3/16"x3/8" 4 Install Cart Front Bracket
S182G03061 Pan Head Screw 3/16"x3/8" 8 Install Upper Door Brackets
S182G03061 Pan Head Screw 3/16"x3/8" 6 Install Left/Right Grill Bowl Trim Panel
S112G03261 Phillips Head Screw 3/16"x1-5/8" 8 Install Grill Head
S162G03064 Hex Head Screw 3/16"x3/8" 8 Install Side Shelves
S182G03061 Pan Head Screw 3/16"x3/8" 2 Install Control Box with Bracket (OB26 & OB32 Only)
S182G03081 Pan Head Screw 3/16"x1/2" 2 Install Grill Bowl Side Panel
Install Caster Seats to the Cart Side Panels
Install Cart Bottom Panel to Cart Side Panels
Already Installed in Grill Bowl Side Panel

Parts Diagram for Model UN2616ACT
3
29
28
25
1
6
8
23
21
19
16
15
14
10
12
11
2
3
18
13
5
9
7
27
26
4
20
22
24
16
17

Parts List for Model UN2616ACT
4
KEY
DESTRIPTION PART#
QTY.
1 LP Regulator Hose Holder P055360034 1
2 Grill Bowl Trim Panel, Left P007420264 1
3 Grill Bowl Trim Panel, Right P007430564 1
4 Cart Side Panel, Left P076020294 1
5 Cart Side Panel, Right P076030324 1
6 Side Shelf, Left P011060544 1
7 Side Shelf, Right P011070494 1
8 Side Shelf Trim Plate, Left P075030304 1
9 Side Shelf Trim Plate, Right P075020384 1
10 Door Bracket, Left/Upper P03313031F 1
11 Door Bracket, Right/Upper P03313032F 1
12 Door Bracket, Left/Lower P03313033F 1
13 Door Bracket, Right/Lower P03313034F 1
14 Door Assembly, Left P043050624 1
15 Door Assembly, Right P043060324 1
16 Door Hinge Y0550002 2
17 Door Magnet P05523056L 4
18 Door Guide Plate P05510137A 1
19 Caster Seat, Left Front & Right Rear P05327064H 2
20 Caster Seat, Right Front & Left Rear P05327065H 2
21 Caster, 2" without Brake P05104008A 2
22 Caster, 2" with Brake P05104009A 2
23 Cart Front Bracket P033050734 1
24 Cart Bottom Panel(LPG) P010080454 1
25 Cart Rear Panel P077021464 1
26 Tank Holder Bracket (LPG) P040090354 2
27 Tank Holder (LPG) P053590034 1
28 Tank Fastening Strap (LPG) P05314002V 1
29 Control Box Bracket P03343018C 1
Operator's Manual P80151138A 1

Parts Diagram for Model UN3216ACT
5
2
3
27
31
16
17
30
25
1
23
21
19
16
15
14
10
12
11
18
13
5
26
28
29
4
20
22
24
9
7
6
8

Parts List for Model UN3216ACT
6
KEY
DESTRIPTION PART#
QTY.
1 LP Regulator Hose Holder P055360034 1
2 Grill Bowl Trim Panel, Left P007420264 1
3 Grill Bowl Trim Panel, Right P007430564 1
4 Cart Side Panel, Left P076020294 1
5 Cart Side Panel, Right P076030324 1
6 Side Shelf, Left
P011060544
1
7 Side Shelf, Right
P011070494
1
8 Side Shelf Trim Plate, Left
P075030304
1
9 Side Shelf Trim Plate, Right P075020384 1
10 Door Bracket, Left/Upper P03313031F 1
11 Door Bracket, Right/Upper P03313032F 1
12 Door Bracket, Left/Lower P03313033F 1
13 Door Bracket, Right/Lower P03313034F 1
14 Door Assembly, Left P04305061G 1
15 Door Assembly, Right P04306031G 1
16 Door Hinge Y0550002 2
17 Door Magnet P05523056L 4
18 Door Guide Plate P05510137A 1
19 Caster Seat, Left Front & Right Rear P05327064H 2
20 Caster Seat, Right Front & Left Rear P05327065H 2
21 Caster, 2" without Brake P05104008A 2
22 Caster, 2" with Brake P05104009A 2
23 Cart Front Bracket P033060414 1
24 Cart Bottom Panel(LPG) P010080444 1
25 Cart Rear Panel P077021474 1
26 Cart Partition Panel P075120184 1
27 Cart Partition Panel Bracket P033040684 2
28 Tank Holder Bracket (LPG) P040090354 2
29 Tank Holder (LPG) P053590034 1
30 Tank Fastening Strap (LPG) P05314002V 1
31 Control Box Bracket P03343018C 1
Operator's Manual P80151138A 1

Assembly Instructions for Model UN2616ACT & UN3216ACT
1
CAUTION : Even though it is possible for one person to assemble this grill, it is better to obtain assistance from
another person when handling the large, heavy pieces.
2
7
Pan Head Screw 1/4"x3/8"
Qty. 4
Part # S182G04061
Pan Head Screw 3/16"x3/8"
Qty. 8
Part # S182G03061
Attach the Left Front(LF) and Left Rear(LR) Caster Seats on the Left Cart Side Panel using 2 Pan Head
Screws 1/4"x3/8" and 4 Pan Head Screws 3/16"x3/8" and tighten securely as shown.
Repeat the same steps on the Right Side.
Install Caster Seats
Install Cart Bottom Panel, Lower Door Brackets and Door Guide Plate
Attach Cart Bottom Panel to both Side Panels. Make sure the holes on the panels are aligned as shown. Insert
4 Pan Head Screws 3/16"x3/8". Do not fully tighten the screws until the step 3 is fully completed.
Secure the Caster Seats from the underside of the Cart Bottom Panel using 8 Pan Head Screws 1/4"x3/8".
Install the Left/Lower and Right/Lower Door Brackets onto Cart Side Panels using 4 Pan Head Screws
3/16"x3/8" and tighten securely.
Attach the Door Guide Plate to the Cart Bottom Panel using 2 Pan Head Screws 3/16"x3/8" and tighten securely.
Pan Head Screw 3/16"x3/8"
Qty. 10
Part # S182G03061
Pan Head Screw 1/4"x3/8"
Qty. 8
Part # S182G04061
Cart Side Panel, Left
Cart Side Panel, Right
Caster Seat
Door Bracket,
Left/Lower
Door Guide Plate
Cart Bottom Panel
Pan Head Screw
1/4"x3/8"
LF
LR
Pan Head Screw
3/16"x3/8"
Pan Head Screw
1/4"x3/8"
Pan Head Screw
3/16"x3/8"
Pan Head Screw
3/16"x3/8"
RF
RR
Note: The gas tank
hole should be on
the left side.
Pan Head Screw
3/16"x3/8"
Pan Head Screw
3/16"x3/8"

3
Install Cart Rear Panel and Hose Holder
8
Install the Cart Rear Panel to the Cart Side Panels using 6 Pan Head Screws 3/16"x3/8" and tighten securely as
shown.
Attach the Regulator Hose Holder onto the left side of Cart Rear Panel using 1 Pan Head Screw 3/16"x3/8" and
tighten securely as shown.
Tighten all screws on the Bottom Panel securely.
Pan Head Screw 3/16"x3/8"
Qty. 7
Part # S182G03061
Install Casters
Turn the Cart upside down and place it on the flat ground as shown.
Install 4 Casters into the threaded holes on the Caster Seats. Make sure the 2 Casters with brakes are installed
at the front. Turn the threaded stem by hand, clockwise until it stops. Tighten securely with the provided wrench.
4
Wrench
Qty. 1
Part # P05515124L
LP Regulator
Hose Holder
Cart Rear Panel
Caster with brake
Caster without brake
Caster with brake

Install Cart Partition Panel Bracket and Cart Partition Panel (For UN3216ACT only)
Install the Cart Partition Panel Brackets onto the Cart Bottom Panel using 2 Pan Head Screw 3/16"x3/8"
as shown.
Align the 2 holes on the Cart Partition Panel with the 2 holes on the Cart Partition Panel Bracket. Insert
2 Pan Head Screws 3/16"x3/8" and tighten them.
Align the 2 holes on the Cart Partition Panel with the 2 holes on the Right Side Panel. Insert 2 Pan Head
Screws 3/16"x3/8" and tighten them.
Tighten all screws securely.
5
Pan Head Screw 3/16"x3/8"
Qty. 6
Part # S182G03061
6
Install Tank Holder and Holder Assembly
Attach Tank Holder to the Tank Holder Brackets. Align the 4 holes on the Tank Holder with the 4 holes
on the Tank Holder Brackets(2 holes on each bracket). Insert 4 Pad Head Screws 3/16"x3/8" and tighten
securely.
Attach the Tank Holder Assembly to the Cart Bottom Panel and make sure the strap is facing to the front.
Align the 4 holes(2 holes on each bracket) on the bottom of the Tank Holder Brackets with the 4 holes
on the Cart Bottom Panel. Insert 4 Pan Head Screws 3/16"x3/8" and tighten securely.
Pan Head Screw 3/16"x3/8"
Qty. 8
Part # S182G03061
9
Cart Partition Panel
Cart Partition Panel Bracket
Tank Holder
Tank Holder Bracket
Strap

10
Pan Head Screw 3/16"x3/8"
Qty. 4
Part # S182G03061
Install Cart Front Bracket
Attach 2 Pan Head Screws 3/16"x3/8" to the front inside edges of both Cart Side Panels, tighten it half
way only. Install the Cart Front Bracket to the Cart Side Panels with the notchs on both ends match the
screws. Fully tighten the screws to secure the Cart Front Bracket.
7
Pan Head Screw 3/16"x3/8"
Qty. 8
Part # S182G03061
8
Install Doors and Upper Door Brackets
Install Left/Upper Door Bracket to the left side of Cart Front Bracket using 4 Pan Head Screws 3/16"x3/8" and
tighten securely. (Note: The Upper Door Bracket for the left side is marked with "L". The Upper Door Bracket for
the right side is marked with "R".)
Install the left Door. Align the hole on the upper edge of the Left Door with the nipple on the Left Upper Door
Bracket. Lift the Left Door upward for inserting the nipple and depressing the spring-loaded Door Pin on the
bottom of the door. Then, align the Door Pin with the hole on the Lower Door Bracket by sliding it to the center of
bracket. The Door Pin will click into the hole.
Repeat the same steps for the Right Door.
Nipple
Cart Front Bracket
L
R
Pan Head Screw
3/16"x3/8"
Door Bracket, Left/Upper
Spring-loaded Door Pin
Door Bracket,Left/Lower

11
9
Install Left/Right Grill Bowl Trim Panel
Install the Left Grill Bowl Trim Panel on the top of the Left Cart Side Panel using 3 Pan Head Screws
3/16"x3/8" and tighten securely as shown.
Repeat the same steps for the Right Grill Bowl Trim Panel.
Pan Head Screw 3/16"x3/8"
Qty. 6
Part # S182G03061
10
Install Grill Head
With the help of your assistants, lift the Grill Head and place it on the top of the Grill Bowl Trim Panels.
Make sure the regulator hose sits inside the hose holder as shown.
Align the holes on the Grill Bowl with the holes on the Trim Panels. Insert the 8 Phillips Head Screws
3/16"x1-5/8" and tighten securely.
Phillips Head Screw 3/16"x1-5/8"
Qty. 8
Part # S112G03261
Grill Bowl Trim Panel, Right
Grill Bowl Trim Panel, Left
Regulator Hose
Grill Head
Grill Bowl Trim Panel

12
11
Install Side Shelves
Remove pre-assembled 1 Pan Head Screw 3/16"x1/2" and 2 Countersunk Flat Head Screws
3/16"x1/4" from the Right Bowl Side Panel as shown. Keep the 1 Pan Head Screw 3/16"x1/2"
for reinstallation.
Attach the Right Side Shelf onto the Right Bowl Side Panel using 4 Hex Head Screw 3/16"x3/8"
and the removed 1 Pan Head Screw 3/16"x1/2" and tighten securely.
Repeat the same steps for the Left Side Shelf installation.
Hex Head Screw 3/16"x3/8"
Qty. 8
Part # S162G03064
Pan Head Screw 3/16"x1/2"
Qty. 2
Part # S182G03081
Already installed in grill bowl
12
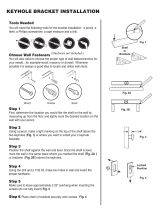
Install Transformer
Open the Doors, locate the 4 key holes on the right side of Cart Rear Panel as shown.
Attach Transformer to the Cart Rear Panel by inserting 4 stud bolts on the Transformer into the 4 key
holes on the Cart Rear Panel. Press the Transformer downwards until it rest firmly in place.(See Fig.1)
Insert Transformer-Plug into Transformer-Socket and tighten securely. (See Fig. 2)
Pull out the Transformer Cord from the hole on the left side of Cart Rear Panel.
Connect the Transformer power supply cord plug into a properly grounded 120V AC outlet.
Turn on the Grill Lights by pushing the Light Switch on the Control Panel.
Countersunk Flat Head Screw
3/16"x1/4"
Qty. 4
Part # S112G03041
2
1
Side Shelf, Left
Side Shelf, Right
Pan Head Screw
3/16"x1/2"
2
Countersunk Flat
Head Screw
3/16"x1/4"
(Take away)
Transformer
Fig. 2
Wire
Transformer-socket
Transformer-plug
AC-plug
Fig. 1
For illustration purposes, the
Grill Head is not shown.
Pull the Transformer
Cord out from the
hole.

13
Install LED Control Box(For OB26 & OB32 only)
Open the Doors, locate the LED Control Box on the right side.
The LED Control Box is assembled with a old Mounting Bracket for built-in model. Detach the Bracket
by removing the two screws.(See Fig.3)
Replace the Bracket for Cart model. Attach the new Mounting Bracket to the Control Box by using the same
screws removed and tighten securely.(See Fig. 4)
Attach 2 Pan Head Screws 3/16"x3/8" to the front inside edge of Right Cart Side Panel as shown. Tighten
the screws only half way. Install the Control Box to the Right Cart Side Panel by aligning the two keyholes
in the Mounting Bracket with two screws. Make sure the screw heads are engaged with keyhole slots,
pressing the Bracket downward until it rest in place firmly. Double check the wire outlet of the Control
Box is facing downward prior tightening the screws to secure the Control Box in place as shown.
13
Pan Head Screw 3/16"x3/8"
Qty. 2
Part # S182G03061
Fig. 3
Fig. 4
Old Mounting Bracket
New Mounting Bracket
Control Box
Control Box
Pan Head Screw
3/16"x3/8"
/